Character Rigging for Beginners (Blender Tutorial)

ฝัง
- เผยแพร่เมื่อ 19 มี.ค. 2022
- Check out Blendergrid: (Affiliated Link) ➡️ blendergrid.com/start/ryankin...
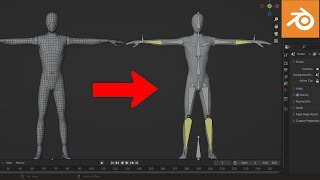
In this beginner tutorial I will show you how to rig a character in Blender. I will also show you how to setup IK rigging for the arms and legs.
● Watch the Character Modeling Tutorial: • Character Modeling for...
▶️ Recommended Blender Rigging Course: (Affiliated Links)
⚡ The Art of Effective Rigging: www.p2design-academy.com/p/th...
⚡ All P2Design Courses: www.p2design-academy.com/?aff...
● Purchase the project files and support the channel:
Gumroad: ryankingart.gumroad.com/l/dswcy
Patreon: / 64001273
Sketchfab: skfb.ly/otD7A
_________________________________________________________________________
● My Website Links:
• All links on my about page: ryankingart.wordpress.com/77-2/
• Patreon: / ryankingart
• Gumroad: ryankingart.gumroad.com/
• Artstation: www.artstation.com/ryanking
• Blender Market: blendermarket.com/creators/ry...
• Sketchfab: sketchfab.com/ryankingart
• Website: ryankingart.wordpress.com/
• Amazon Affiliate Link: amzn.to/3l1NoqH
As an Amazon Associate I earn from qualifying purchases.
#ryankingart #blendertutorial #blender


![ความรักของยักษ์เขียว (ทศกัณฐ์) - เดี่ยว ไออุ่น [OFFICIAL MUSICVIDEO 4K]](http://i.ytimg.com/vi/yCCy-QVHqK8/mqdefault.jpg)


*At Part: **5:59* In Blender Version 4.0, one of the Shortcut Keys were Changed. To Scale the Viewport Size of the B-Bone, you need to Press: *Shift+Control+Alt+S*
for some reason when i use this the bone rotates while am scaling it
I did something similar to this but different and it totally didn't work then I tried the shaping them as sticks and the command didn't work it rotated it so I'm scrapping my skeleton and starting over
thank you that i read the comment section im really going to ask you every time i try ctrl+alt+s it saves at my files thank you for this update
Works for me, but damn that's an awkward amount of keys lol
My goodness, I spent a monster amount of time pulling my thin hair, because Ctrl + Alt + S was occupied by Windows Snipping Tool.
You know, when you want to get better at Blender, you usually eat a lot of tutorials and sometimes it's getting long and annoying. When I started the video, I thought that it was going to be one of those endless video, and I was wrong. It is smooth but precise as well as friendly, you're a good professor. Thank you for your time. You won a subscriber (and a like!)
glad you like it!
Ryan King is my go-to! So great at putting these concepts together and the way he reinforces each step without feeling repetitive ::chefs kiss::
I really like that you say exactly what key(s) you are pressing and why. I really wish more tutorials would do this instead of just flying through everything.
glad you like it!
dude you are like a wizard with explaining things, you made it really clear what you were doing at all times, thanks for this
You're very welcome!
@@RyanKingArt Ye, man. So much thanks for your clarifications and fluid speech from non-english speakers as well. Music for the ears.
this is probably the most helpful tutorial i found on google out of all of them since it’s harder to find a good tutorial after youtube removed the dislike counter
Yeah, I wish TH-cam kept the Dislike counter. It was helpful. Thank you for watching!
@@RyanKingArt theres an addon to bring it back. You have 16 dislikes. good job :D
@@byganza8060 Yes I know about the addon now.
This guy explains every single step that he does even if he’s done the exact same step a thousand times in the past. I freaking LOVE how dumdum easy this channel is to follow along with 🤩
I also greatly appreciate that there were a couple of problems during the process that he showed us how to troubleshoot (for example the upper leg and knee bones). I have no idea if this was intentional to show us how to troubleshoot, or if they were genuinely on accident, but showing how to deal with these mistakes is super valuable for the learning process
glad you liked the tutorial!
Best basic tutorial for rigging that I've seen so far. Super good!
Glad you like it. Thanks for watching!
Thank you so much, this tutorial has been an absolute lifesaver! I appreciate how you go step by step in a super in depth way, and the repeating what keys you're pressing (+ the add-on that shows them) is a great touch.
Glad it helped! Thanks for watching!
● Purchase the project files and support the channel:
Gumroad: ryankingart.gumroad.com/l/dswcy
Patreon: www.patreon.com/posts/64001273
Sketchfab: skfb.ly/otD7A
hi, at 39:00 my knee point at a different direction when i tried to raise my foot using the IK
IS IT POSSIBLE TO CONVERSE WITH YOU IN PRIVATE PLEASE?
thank you so much for all of the tutorials you make. i have this process for learning blender where i watch quick 5-10 minute tutorials on a subject to get an idea of what its like, and then i watch one of your videos on the subject to refine the knowledge i learned and actually memorize the information. i wouldnt be anywhere near where i am right now without your help.
For anyone using Blender 4.0+: CTRL + Alt + S is now being assigned to that fantastic, very useful and definitely often used "Save Incremental".
Go to Armature -> Transform -> Scale BBone Size and assign the shortcut you'd like, then go back to File -> Save Incremental and R-Click -> Remove Shortcut.
Thank You! I was very confused and spent a bunch of time searching for this!
@@05pizzaman ;)
In Blender Version 4.0 the Shortcut Key was Changed. To Scale the Viewport Size of the B-Bone, you need to Press: Shift+Control+Alt+S
I couldn't find more clear and rich tutorial on TH-cam you maybe the best free blender tutorial out here or may be even the best ever I hope you post more advance tutorial so I can learn how to use blender for my work more efficiently
Glad you like it! Thanks for watching.
you have an amazing style to convey information. thank you so much for your contributions
Glad you like them!
you explain everything so well and are so helpful, ive come back to this vid a few times to rig characters and its always so helpful and easy to follow, thank you!!!!!
Thank you! This was very helpful! I especially liked the tip about reversing grabs, rotations, and scales!
Glad it was helpful!
Just Awesome. Every minute is worth watching!
glad you like it!
This is exactly the kind of tutorial I was needed! Thank you so so much for putting for free on the youtube!
Glad it was helpful! thanks for watching. 👍
Great explanation and presentation. Thank you very much for putting this out there!
Great tutorial! thank you for the amazing work!
You're very welcome!
Thank you so much for the detailed tutorials. For a beginner, this video is really helpful because you explained everything needed. 👏
Glad it was helpful! 👍 thanks for watching!
I just was waiting for this tutorial today ! Cool!
Cool! Thanks for watching!
I have not finished watching yet, but I really like how you explain things, these kinds of videos are great :) Thanks a bunch!
Thank you so much, for explaining in detail about Ik . thank you so much once again
thanks for watching!
This is awesome, Ryan. As always your approach and explaining methods are outstanding. Thanks and best regards from Denmark❤
glad it helped!
Thank you so much! You are litteraly saving my life.
Glad the tutorial was helpful.
Great tutorial ! Thanks Ryan !
you're welcome! 👍
This is such a great tutorial, I can't believe I have a posable character now! I will definitely be returning to this many times to practice rigging, you made it so easy!
I'm still at the very beginning... Your tutorials are awesome and inspiring, thank you so much!
thanks for watching
Wow very easy to understand with your explanation. Even tried some animation at the end. Thank you very much!
Thanks for watching!
Amazing tutorial! Your rate of pumping out solid content is astounding! Love what you are doing for the 3d modeling space man!
Thank you John!
This was very helpful!
Thanks a lot!
Please turn this into a series bumping up the difficulty every time.
You could a baby animal next and then for expert level maybe a dragon or alien robot.😊
Thanks for the idea!
this is awesome, great explanation
Thank you!
Thank you very much for this lesson !!!
You are welcome!
Excellent, excellent work. Clear and informative. This tutorial is bailing out my silly ‘bit off more than I can chew’ ass on an overly complex, confusing project. Thanks.
thanks for watching
the rush a feel good that comes, when you first move your arm thank you for your tutorial.
thanks for watching!
Thank you for this detailed beginner tutorial on RIgging! Hope your shifting is going on well!❤
thanks!
dude this tutorial was soo good when i was a beginer always coming back to it when im rigging a character thank you!
glad you like it!
I'm so thankful for this vid
thanks for watching!
I love you tutorial, very thanks man!!
Glad it helped!
Thanks so much you did great and covered everything thoroughly and it was easy to follow but not super slow either.
thanks for watching!
Another really helpful video, thanks! Great pacing!
glad you like it, thanks for watching!
Thank you for the tutorial! It was super helpful :)
Glad it was helpful!
really helpful and easy to follow! Thank you
Glad it was helpful!
Easy to follow and super useful! I'm transitioning to Blender after my Maya student license expired, this is a big help!
glad its helpful!
thank you! this was very helpful
Glad it was helpful!
stellar tutorial man , thank you soo much!
You're welcome!
You're a great teacher. Thanks a lot!
thanks!
Very good video, thank you!
Glad you liked it!
Dude your my favorite that's why I always hit the bill button for you. i like the way you explain things. its very clear. I really like that B-bone of your style its not looks messy. Anyway can you make more rigging tutorial about how to walk or run a character in actual world?
glad you like my videos! Thanks for the tutorial ideas.
Great tutorial. Many thanks.
You are welcome! thanks for watching.
Thanks Ryan, great tut!
thanks for watching!
Almost 100.000 Subs, i think last mounth was about 72k, great job love your extremly detailed tutorials.
thanks! Yeah for a while now I've been gaining about 6K per month.
@@RyanKingArt Thats great! i'm proud
Tons of help, thanks!
glad it helped!
Thank you very much. If there was this kind of tutorial years ago... I would have become an expert and not wasted my time learning blender.
Glad its helpful!
thank you i love you work !!!! ❣
glad you like it!
Probably the most intelligible tutorial on the subject. For begginer like my self it was very helpful... Thank you sir
thanks for watching!
Great video!!
Thanks!
im not gonna lie, my college professor was horrible at teaching blender rigging and modelling, you saved my but on the final!!!
glad it helped! thanks for watching!
This is a really helpful video! Keep it up!
Glad it was helpful!
Great tutorial. I think it's great that you keep repeating the procedure at certain points.
glad you like it!
Thank you very much!
you're welcome!
For anyone having trouble selecting ur bones in pose mode, there is a bug that happens from having the [In Front] option checked under object data properties (green guy running)>viewport display in both object and pose mode. Deselect from at least one of those modes and u should be able to reselect bones in pose mode.
Thanks for the info!
these videoes are the best. Me an My brother are trying to becae game designers and theses videoes are helping me and him to get to that dream, so thank you for these videoes :).
Very cool! Glad my videos are helpful.
very usefull tutorial, best if seen so far
thanks for watching!
You are so good ! Thank you !
thanks for watching!
@@RyanKingArt Sorry to bother you. I'm basically done with all the tutorial but when I change the view from Edit mode to POSE mode the bones move all over the place. Any clue on how can I fix this?
I figured it out ! Thanks anyway
it was great for selfstudy thanks a lot
You're welcome!
You’re so underrated. Now i know how to make an animatronic with fur that bends!
cool, thanks for watching!
The best teacher !
thanks
Thanks sir... you are great teacher....
thank you 😀
god is blessing you from above my man thanks a lot for all your hardwork everyone is really thankful for all you are doing
thank you very much! glad you like the videos. : )
Just to point out that if the bone is moving out of the mesh when applying the bone constraint called "Copy Rotation". You can use "G" key to grab and rotate the individual bone that is moving out of the mesh. G is to rotate not to move in this instance, this has to be done in the "Pose mode". But, the yellow bone such as the "Arm L" bone and the "Ankle bone L". These bones after adding the "Inverse Kinematic" bone constraint, it can only rotate on certain axis only. For example the "Arm L" cannot rotate around y axis. (Y is the depth of the camera). to adjust these "yellow bones" you need to reposition it in the edit mode itself. After satisfy with the position of the bone in the mesh, press ctrl + a to apply , then choose set at rest position in "Pose mode".
Just an issue I was faced with and it took me too long to realize what's happening; If you switch from Edit mode to pose mode or switch from pose position to rest position and your entire armature gets displaced, scaled and rotated (so it doesn't line up with the mesh anymore) all you have to do is press Alt+R/Alt+G and Alt+S.
Awesome ! you are legend !!
Haha, thank you.
wow, this guy is too good with the explainations
thanks for watching!
This was extremely helpful.
glad to hear that!
very good tutorial
glad you like it!
i need some more character's for my games too!thanks for the lessons ! :)
Thanks for watching!
@@RyanKingArt I have to actually watch the rest later so expect a super boost in views baby!lol
Thats an amazing tutorial. Thank you so much. Wonderful video. Please make a tutorial on a character with dress, hat, shoes etc with colours and rig it just like in this video. The explanation is phenomenal.
thanks for the tutorial idea 👍
I can't say I've ever learned this stuff so easily on TH-cam before. If this is what you offer for free, I can't wait to see what you offer for paid content. Thanks!
glad you like it!
After looking for tutorials for an hour, this is the only thing that was able to help me. Tank you so much for this video!
Glad it helped!
Thank you so much
You're very welcome!
Thanks man
You're welcome!
thank u bro
You're welcome!
Very cool 👍
thanks!
this video was the best
glad you like it!
I can’t believe how well this worked. I was skeptical because I was certain I’d mess up somewhere along the way that would cause my mesh to be deformed and I would have to figure out the problem and fix it, but your directions were so clear that I was able to pose my character right out of the box. Thanks so much!
glad it helped!
I was not so lucky
It took me up to 26:xx before I found something that didn't work (besides for sizing bones. In 4.1.1 there is no category, "bone constraints" and "object constraints doesn't cut it. I really like this one and the char modeling tuts. Great job.
Between your last video and this one I've used the two tutes to make a (somewhat looking) goblin and have him be able to move (and now I know the basics to rig his piggy companion) and again your tutes are the best because you don't skip over steps that you assume others should know. I've gotten to the point if i'm looking for a tutorial on something I come straight to your channel and look for it first. They've been a headache saver.
Side question, when you said to undo moving the arm and stuff you said about hitting alt g to undo grab and alt r to undo rotate, would hitting ctrl z/undo accomplish the same thing, or is this a better way than that?
Thanks for your detailed tutorials.
Could you make a tutorial about rigify plugin?
Thanks for the video idea. Maybe I can do a video on that sometime.
thank you.
You're welcome! Thanks for watching!
THANK U
You're welcome!
Thank you so much for the tutorial. Please make a tutorial on rigify feature in blender
Thanks for the tutorial request 👍
This tutorial is a lot of shortcut and description at once… great job
--edited
You won my subscribe!
Thanks for the sub!
Perfect❤❤❤
thanks!
For anyone struggling. You can re-parent bones in edit mode if necessary.
It'll save some time repositioning. It's the last menu: "Bone Properties" to "Relations".
Parenting hiarchy works like a list in reverse. (Though if you've come this far that's probably obvious.)
thanks 👍
Fantastic tutorial in general! I specifically like how you are constantly saying which keys you are hitting - I'll eventually learn them =) Question if I may on importing chars from DAZ if you know. I've done it semi successfully, just none of the textures are coming over with the model. Do you know anything about this importing? A solid tutorial on this could be quick, easy and very helpful also =)_)
Thanks Ryan! You're tutorials are so clear and easy to follow!
Glad you like them! thanks for watching!
great video i learned alot about rigging i feel i can know try this myself....i couldnt find any good rigging videos till now ! so thank you very much
Thanks for watching! Rigging actually isn't too complicated once you understand it. 👍
Apologies for the comment spam- but I followed this again with another model and after setting the pole target bone, the elbows/knees wouldn't bend. I googled it and figured out that for the IK bones to work you can't have straight bones. I ended up just moving the knee/elbow joint-circle-things in edit mode and everything was copacetic! Just thought I'd share here in case anyone else was having the same difficulty :]
Ahh ok. Thanks for the info!
I was stumped with that, thanks!
This need to be higher up, i was so sad because it was like the second tutorial that didn't worked but this fixed everything thank you so much, this comment need to be pinned 😭
I had to press control+click to select the bones when weight painting, might have changed in a newer version? Thanks for this tutorial, you're a great teacher!
Oh sorry, that's because I use the right click select, but most people use the left click select. so yeah, use Control + click.
i was looking for half an hour for this haha