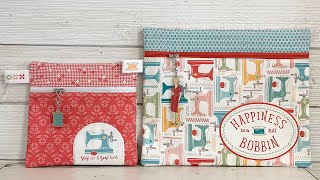
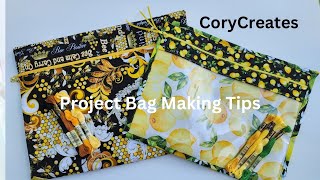
Making a Cute Project Bag

ฝัง
- เผยแพร่เมื่อ 5 ก.ย. 2024
- These project bags are so fun to make and you get to decide the style and size!
Making a Cute Project Bag
You can make your project bag any size you want, in the video I have made several that finish at 11 inches by 8
inches.... the one I make in the video finishes at 13.5 by 11.5 inches...I used 1/4 inch seam allowance ...
You can change up the zipper bands to be wider as well...
you will need:
Fabric(s)
Fusable Fleece
Thread
clear vinyl
Zipper tape and pull
Double sided tape ( I get mine from tandy leather it is 3/16 inch wide)
I used my Bernina 770 QE and both my 1D foot and my 37 D foot...
For the quilting I used stitch no. 1396
Top stitching on my zipper bands was a stitch length of 3.0
I hand stitched my binding down to finish but you can topstitch too...
I cut my binding 2.5 inches wide by width of fabric... there are not curves so you do not need to cut binding on the bias...
I get my zipper tape ( zipper by the yard) from My Handmade Space, on Etsy and I also like the zippers from Sallie
Tomato....I used a size 5 zipper for all my bag...
I hope you have fun with this... please post photos of your project bags you make and tag me so I can see the cute
things you make!
Measurements for the projet bags featured in my video...
11 by 8 inch size:
cut back, inside back, and fusable fleece 13 by 11 inches...
fuse fleece to wrong side of inside back...
sandwich back and inside back pin lightly and quilt...
trim piece to 11.5 by 8.5
cut zipper bands ,,, 1 piece 13.5 by 4 inches and 1 piece 13.5 by 2 inches
press and fold 2 inch piece in half, press and fold 4 inch piece in half then fold each long side in to meet the center fold and press....
cut vinyl 13 1/4 by 11 1/4 and tuck one long side up in to 4 inch zipper band and top stitch along lower edge...
add zipper pull to tape now
Apply double sided tape to top and bottom of zipper tape... remove paper to expose tape on the lower edge of zipper tape, ( zipper opens from left to right) and lay lower band with vinyl attached along the zipper tape and top stitch..
remove paper from top edge of zipper tape and lay folded edge of the 2 inch zipper band along upper edge of zipper tape and top stitch...
Now, keeping your zipper pull inside the project toward the m iddle, lay zipper and vinyl piece atop your quilted back and trim to match size and clip with quilters clips all around...
cut binding 2.5 iches wide by width of fabric and press and fold in half... add under clips to the top side and following directions in video to make mitered corners, stitch binding to top of project bag using 1/4 inch seam allowance.
fold binding to back and hand stitch or top stitch down...
Larger bag I made in the video:
cut back, inside back and fusable fleece 15 by 12.5
cut to size 11,1/4 by 13 3/4
ccut vinyl the same size
cut zipper bands the same as for smaller project bag
cut binding the same excet cut two strips across width of fabric...


Thank you for the nicely done project bag video! I also love you notebook cover. You have a lovely, sweet. Oice that is nice to listen to!
@@Stitcher_in_MD thank you hon…. You made my day! ❤️
I absolutely loved watching your tutorial. You're so careful to show every detail of sewing and sharing helpful tips along the way. I especially love how patient and kind you must surely be in person. This is the first video of yours that I've watched, so I'll subscribe and look forward to watching more of your tutorials. Thank you so much for sharing your expertise in sewing. ❤
Such beautiful words… thank you so much… I am humbled that God allows me to do this…❤️
❤ Awww. Yes, ma'am. ❤
I watched bags being made before and yours was very calm and thorough. You’re a good teacher and I have subscribed.❤
@@rosehixon2790 thank you so much… I appreciate you! ❤️
You have a real knack for teaching. So clear and concise
Thank you hon…❤️
Your video on project bags was excellent. Nice personality you have for tutorial! I especially appreciated your joining of sewed on binding. Many thanks.
Thank you so much for your lovely and informative video. What a great and knowledgeable seamstress you are. Thank you again.
I love your tutorial. I am inspire to make my first project bag soon.
Proud of you for knowing when to step away!
Thanks for taking the time to make this video. I found it very informative.
Thank you, you are an excellent instr, I have enjoyed watching.
I must say you are the best online instructor that I have ever watched on TH-cam. You take your time and clearly explain all the steps. THANK YOU, THANK YOU, THANK YOU!
I am 73 and fairly new to sewing small projects and I love it. Louise in New Hampshire
GOD BLESS!
Oh my gosh…. Thank you sooooo much!❤️❤️❤️
Tip: I use/align large rectangle post it notes with perfect edges inside a 1/4” along where the top of my vinyl and it glides thru the sewing machine and no fancy feet needed or slippery tissue paper. Best of all**no residue**when peeled off and reusable if stacked back on each other!
Best tutorial I have ever seen on making vynal project bags , step by step veiwing and great tips on each step ❤️ Thank you so much xx
Thank you sooooo much!❤️
I was taught to heat up your ironing surface and lay down the vinyl and no heat from an iron. It really works for me. Love your fabric.
Greetings from the UK!
I have been watching this tutorial this afternoon whilst I have been working on my cross stitch sampler and have to say this must be the best tutorial I have ever seen for a project bag. I felt as if I had you in the room with me and I was having a one to one lesson. Everything has been explained so clearly, I even learnt a new technique for the mitred corners which I must try. Thank you so much for all your time in producing a quality video.
Bless you! And thank you…❤️
You are an amazing teacher THANK YOU so much
💕Love this excellent detailed, very informative, step by step tutorial! Perfect for a visual learner, like myself! Thank you so much for sharing your talent and knowledge! 😊
❤Thank you very much for the tutorial and the work ethic. The end result is stunning. ❤
Thank you for your great tutorial on the project bag. Very clear direction. I can't wait to start mine. Thanks again. Happy stitching.
I'm about to try my first binding so I really appreciate this presentation and tutorial especially the corners. The camera work is top notch also. Thank you for sharing.
Just came across your video and you had me at “I like to stay home because I enjoy my own company”. Covid really didn’t affect me either because I don’t mind staying home. I often tell my friends….”I’m never, ever bored”. Thank you for the fun video. I’m teaching a project bag class to our quilt guild soon. We are doing a Block of the Month program and each month they bring their finished blocks to the guild meeting to get credit for finishing each month. The project bags are perfect for carrying the blocks so they don’t get dirty or misplaced. I also place a handle on my project bags so they’re easy to carry. I use double fusible bosal instead of batting and it helps the bags have a little support. Again, thank you for your video. Happy to find someone just like me!
Very glad to be in good company…❤️
May I ask where you placed the handle on your bag? I'm assuming it would be the size of a wristlet or smaller? Thank you. PS: I love being home, too.
@@KH-ko1khSo sorry I didn’t see your question until now. We put our handles at the top of the bag (back) before we assemble the bag. We found the middle of the back and placed the handle something like 2.5” on either side of the middle mark. Hope that’s helpful.
You’re so patient and calm I like your voice, so relaxing watching this.
I’ve made a few of these also and even made a black pleather one for my 30 yo son, he loved it.
Thank you so much! ❤️
Thank you enjoyed your tutorial 😊
You have such a soothing and positive voice. I could listen to you all day, I am glad I stumbled onto your TH-cam today. I love the way you do the project bag and will be trying it tomorrow. Thank you for a wonderful tutorial
Thank you honey…. ❤️❤️❤️
Thanks!
Thank you so much! ❤️❤️❤️
Your my kind of quilter! Easy going, rogue, design what I need as I need it. I love the idea of fusible fleece quilt sandwiches to practice FMQ or decorative stitches and use as a pouch at the end. A two for one in my book!
Thank you so much ! Wish we were neighbors! ❤️
Very lovely. Thanks for your time. ❤😊
Hi! When I first searched how to make a bag like this, I thought why in the world is her video so long. Thinking it was filled with a lot of preamble, I skipped over your video. Well, what a mistake that was! I love how doable you made this project. The tips and tricks you shared are invaluable. The one that struck home with me was how to do the final join in your binding. I’ve always struggled with that and the method you shared of the cross worked out great. Thank you ever so much!
Wow you made this so easy for me to understand thank you so much.. I looked at alot of videos and to tell you the truth you made this so easy.. qhen I get into my new house in a month I am going to start my own project bags maybe even try selling some.. thank you so much 😊
They sell very well! I’ll be praying for you to have great success!❤️
I’m making my sister a Project Bag for her birthday…so I’ve been researching all the tutorials, you should win an award. This bag video is amazing. Thank you for making it and know how appreciated it is received.
Thank you Sharon…❤️
Wonderful tutorial with great tips, thank you very much! 💚
Wonderful tutorial hope to see a tutorial using your orphan block. I have several extra 12 1/2 inch quilt blocks that I didn’t know what to do with a project bag is a wonderful idea
Thank you so much! ❤️
You provided the best tutorial. Thank you.
Thanks sooooooo much Cathie!❤️
Hahaha just seen your fiddlesticks n stitches “ name how stinking cute!!!!🌻🌻🌻🌻🌻🤣
Searched for MANY HOURS for just the right video, and I'm so glad I did. Have made several large project bags for myself with good results, but my next endeavor will be for my niece's adult daughters, who need zipper pouches to carry small items in their leather backpacks. Your products have a very professional appearance, the instructions are certainly thorough, and the size is adjustable. I think mine will be 6" x 9". Can't wait to see the results!
I really enjoyed your video. Your knowledge and way of explaining was perfect. Zippers by the yard sounds like a good idea.
Thank you Ida…❤️
I just wanted to say how much I appreciate your video & specially sewing the mortar corners! my goodnesses I put together my project bag everything perfect up too the point of my corners had hiccups🤣🤣 sewed right over the fold oopsy doopsy! nothing worse then wasting a hole project bc of one simple thing wasn’t correctly done , glad I didn’t use my pricy fabric for this one! Thank you for your wonderful tutorial, easy too follow soft spoken well directed and your amazing!!!! 🌻🌻🌻🌻☕️
You are so very welcome…❤️❤️❤️
These are so cute! Thank you!
Thank you for such a awesome video. But i happen to notice the eiffel towers on back ate upside down 😢
Thank You so Much for your thorough teaching.
THANK YOU! This is the most detailed video I've found on how to make a project bag like I make mine to send to my daughter who lives too far away for me to teach her myself. We must be about the same age since I started quilting about the same time as Liz Porter, so I've been sewing a very long time and actually learned three new things from your video. 1) I'd learned to join my quilt binding by overlapping the cut ends by the width of the binding, so for 2.5" binding, I'd over lap the end by that length. Liz Porter's method is SO much better! 2) I paused your video and put some double-stick tape in my Amazon cart. And 3) I want a Bernina!
I love you gramma rose!❤️
Very good video, thank you.
Enjoyed your video. I like the notebook you use for keeping track of your orders. Great idea!
saw you struggling with finishing off your binding, here's a tip to keep your project out of the way while you try to pin it to finish the sewing. Take one of those large Paper clips, don't know what they are exactly called but you can get them from office supplies, Place a pad of fabric under the clip and you won't mark your vinyl. Thanks for the video.
Great tutorial!
Great tutorial with lots of good tips. You did not mention that the back is on upside down. Oops-a-dasie.
Instead of pinning you could use wonder clips. These would not leave holes on the vinyl. Very good instructions thank you.👏
Tip: I get wrinkles out of vinyl by putting it in bathtub with hot water for a few minutes, then lay flat to dry. I hated having to use a blow dryer. If you have that wide yardage from big box store, you can roll it into tub in long sheets and drag and drape over shower curtain rod and hang dry with a towel on the floor to catch the drips on the outside of tub!
Will make bag one day. Fabulous sewing machine you have but with the quilting your doing right machine for the job. I don't do quilting it's difficult to find a good haberdashery shop.
Wonderful video!! So helpful!!! I wish I could take a class from you!
Thank you … very very much! ❤️❤️
Tip: I get wrinkles out of vinyl by putting it in bathtub with hot water for a few minutes, then lay flat to dry. I hated having to use a blow dryer or risk melting lower gauge vinyl even using fabric between and a low temp iron. If you have that wide yardage from big box store, you can roll it into tub in long sheets and drag and drape over shower curtain rod and hang dry with a towel on the floor to catch the drips on the outside of tub!
What a nice project. Lovely to watch but I was willing you to cut the Eiffel Tower fabric from the top so you got a whole tower on the fabric. Nice fabrics as well.
Thank you so much hon!❤️
Excellent information. I’ve made many of these. You had a few pointers I did not know. The video could have been shorter.
I enjoyed your video you’re very precise and explanatory. However, I would suggest that you press your fabric before you start cutting for accuracy beautiful bags. Thank you so much.😊
Great instructions but wish you would of shown the sewing of end of the binding😅
What kind of sewing machine do you use?😻
Bernina 770…❤️
Great video with so many tips. Love the floral fabric, any idea on the name and brand?
I wish I could remember but I think I got it from an online site called Helios stitches???
Do you have a tutorial for the in the hoop journal cover ? 😌
No I don’t yet….I’m sorry….
I would like to have seen you hand stitch the binding.😢
I have done it in a different video… look for my quilt binding video and you can see it…❤️
Excellent information. Was too long for me.
I hope you got better at filming. Most of the zipper was not caught on video.
I think you would be happier watching an actual studio filmed tutorial… Bernina has many on TH-cam…. Check out Bernina USA or weallsew .com