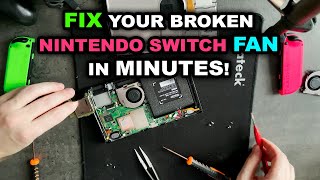
How To Repair Nintendo Switch (CPU Fan/Battery/Speakers)

ฝัง
- เผยแพร่เมื่อ 5 ก.ย. 2024
- Learn how to repair a Nintendo Switch that has a noisy CPU cooling fan, bad battery, faulty speaker, or faulty game controller slide rail. This video is an easy to follow, step by step video with many up close shots. Enjoy the video!
Nintendo Switch: amzn.to/332emnS
Tool Kit: amzn.to/35rh88b
Motion Controlled Mini Screwdriver: amzn.to/35eubcM
Straight Hemostat: amzn.to/35loObX
CPU Thermal Compound: amzn.to/35i19Jj
Nintendo Battery: amzn.to/35hP5aU
Nintendo CPU fan: amzn.to/37m31T6
Nintendo Switch speakers: amzn.to/2CYfiPN
Nintendo Slider Rails: amzn.to/2CVpQiA
Kapton Tape: amzn.to/3domVir
(Amazon Affiliate Links)
**Help me make more videos by visiting the link below. All donations, big or small, would be greatly appreciated. Thank you!
paypal.me/elect...
Bobby Tectalabyss: Thanks for your generous $5 donation!
Jeff Barr: Thanks for your generous $25 donation!
xrayjim: Thanks for your generous $25 donation!
**For GREAT deals(Usually cheaper than EBAY) on other electronics, drones, automotive tools, household items, phone accessories, locksmith tools, & much more, please visit the link below and SAVE IT AS A BOOKMARK on your computer or smartphone to Banggood for future purchases. (Your purchase supports my channel!)
Home Page: bit.ly/2COi2P0
Flash Deals: bit.ly/2HBu9oq
*Try these money saving coupon codes: affiliate6 or aff7off or f8aaf1 or 781622 or 5719ed or elec* or ask if other codes are available!
Thanks For Watching!
**If you enjoy watching my videos, then be sure to SUBSCRIBE, POST LINKS to my videos on other websites & blogs, rate "THUMBS UP", and check out my video playlists. Doing so helps to ensure that many more videos will be uploaded to my YT channel in the future. (Views are absolutely essential to ensure this channel remains in an active state)**


Couple of tips for people stumbling upon here:
Thermal compound:
- Don't spread it, it will spread perfectly when you tighten the screws. By spreading it you are only getting some off the edges that could otherwise be utilized to fill air pockets.
- It's also good practice to use a little isopropyl alcohol when cleaning off the thermal paste to get dried bits off the tiny polish marks to fill the marks with new paste that will fuse together, giving a better cooling capability although it's negligible.
Cooler installation:
- When setting down your cooler with the new thermal compound, don't move it around, line it up first try (you can use toothpicks in the screwholes for perfect alignment). Otherwise you will be creating air pockets and decreasing the cooling capability
- Don't overtighten the screws like this "handy electric screwdriver" just did. You can clearly see how the cooling pipe is very "bent" up at the exhaust end which was not the case on OEM. Get it as snug as you can while still keeping it level. The tape also is dual purpose, air direction (very minuscule difference in temps) and holding the cooler in proper position (actual purpose)
General:
- Any time you are fiddling with electronics, don't use electric tools, at least not to tighten. It can ease up the loosening bit but you can also easily strip the screws and make it super hard for yourself. If your screwdriver supports accurate torque settings, then it's OK but you probably already knew that since those are expensive.
- Never pull cables from the ribbon. NEVER! Always use a plastic tool to push from the connector! Always! The cables are very very fragile, I know from experience. You might not even see anything by eye but it's fractured inside.
- Same goes for twisting them (like in the part where the last cooler screw was removed) but that is not as dangerous if you are gentle.
In any case, thanks for the video, now I know what I will be looking at! :) Thanks for doing this!
True regarding spreading, usually I just apply a pea sized bead. As for the electric screwdriver, it didn't over tighten, it has torque control and the screws can only go in so far. As for the cooling bar and fins, they were slightly up, but once the cover is secured, it goes down flush. Once the cable has been released, there's no problem pulling on the ribbon cable. I've been doing it for at least 30 years with no problems. Thanks for watching!
You put a lot of time and effort into this very helpful and informative video! Thank you very much and looking forward to seeing the next video!!
Hopefully it pays off. I spent 3 days filming and editing. Your latest tire inflator showdown video was great!
I wasn't expecting to see you here!
Touch and hold a clip to pin it. Unpinned clips will be deleted after 1 hour.
Thank you so much for this video. I just repaired my switch that I had over a year that started overheating. Changed the fan and renewed the thermal paste. Excellent guide👍🏼
Great to hear! Be sure to check out my wide range of videos, and share my channel. Thank you!
This is exactly what I'm going to be doing today excellent video guide
I did the tutorial too for my fan and it didn’t turn back on
@@cavanski007 Open and double check all connections.
I also just changed my fan and same issue. Everything else works but new fan won't turn on. Already took apart and checked everything again.
Thank you. I'm going to be watching this video a couple more times to study it and prepare to replace my switch's disconcertingly loud fan. I'm really nervous.
Just take your time, and have a very clean work area and small cups/bowls to hold screws and other parts.
Wow just got 1 for my son for his 10th birthday. I'll know how to repair if need be. Great video as always 👍
Glad you enjoyed the video! It was made for older players, as well as parents to fix their kid's Nintendo.
My son has one too. I'm sure I'll need this one day.
@@electronicsNmore i like your channel
Your son has a lot of luck for getting one of these!! :D
Says to be careful and not touch the thermal paste... 2 mins later “ok now you wanna spread the paste with your finger”😂
At that point in the video I didn't want it on my hands, but later on it was OK.
Thank you so much for this video! My fan had been making a loud grinding noise and eventually stopped working altogether over the course of the past few months. With repair centers closed due to covid, I had to take matters into my own hands. This video was very helpful and informative, and replacing my fan went very smoothly! Thank you again!!
You're welcome! Glad it helped.
My fan does not work at all and sadly i dont have the screwdriver for the switch nails
Fan just came in and I had no trouble replacing it. Thank you. Had a bit of trouble trying to take off the board that was hiding the 3rd screw. That little latch was so tiny.
Glad the video helped! Be sure to look over my extensive video playlists below for many other videos of interest to you, and most importantly take one minute to share a link to my channel with others. Thanks!
th-cam.com/users/electronicsnmoreplaylists
There were two screws on each side of the Switch, where the joycons connect, that just *would not* budge: TOP [ X O O X O ] BOTTOM on either side. Also, the two pieces of tape covering the copper bar were destroyed when trying to remove them: for me, they were stuck so strongly to it that it wouldn't come up all in one piece like you showed in your video. I hope it works okay without replacing that tape. (I am just replacing the fan).
Update: You don't need to remove those 2 from either side if all you want to do is replace the fan and/or thermal paste. Only if you need to replace the speaker.
Sometimes the screws stick, you need to break them free using higher torque while making sure you don't strip the head. You should use a heat resistant tape. I removed the 2 just to show viewers. Thanks for watching!
Thank you so much for uploading this great video. I’ve just completed installing my new fan and it’s working great again.
So so pleased as I was using a large fan to keep my Switch cool.
I’m over the moon now...thank you
Great to hear Peter! Be sure to share my TH-cam channel with many others and look over my extensive video playlists for many other videos of interest to you. Thanks for watching
electronicsNmore I’m going to share this far and wide. If I’m honest you’ve saved me a lot of money as I was going to buy a new Switch until I came across your video
Underneath the cooper part is the Nvidia X1. Should I also do a new thermal paste directly on that chip or should I leave as it is and only do the process you did on this video?
Amazing and very informative!
Thanks for that
Subbed ✨
Great video two hardest steps I found to be undoing the screws, they were so tight a couple started to strip and removing the tape which came off in tiny little pieces. Any idea what it's actually called so I can replace it?
They act like they're seized. You need to push down hard enough and rotate. By doing that, the screwdriver tip shouldn't pop out of the head. Use the tape in the video description area. Thanks for watching!
@@electronicsNmore I see no tape in the video description area? Am I blind?
@@Schizor88 🤣 Sorry. I thought it was listed. Check now.
Excellent video. Very precise
Glad you think so!
Loved this guide! Where did you get your electronic screwdriver?
Great to hear! I have a link in the video description area. Thanks for watching!
Thank you for the video. Very helpful. I needed to replace the fan in my Switch as it was extremely loud and sounded like it could fail. This video made it very easy. However, after replacing the fan I found the one I was shipped is defective. It does not spin up at all. I tried re-seating the cable, nothing. I put the old fan back in and that spun up just fine. I have to wait for a replacement now. :(
That rarely happens. I hope you got a faulty fan.
electronicsNmore Trust me, I hope so too. The fact that the old fan still works gives me hope that the replacement was faulty.
@@electronicsNmore Got the 2nd fan and it works like a charm. :)
First one was definitely DOA but the new one is like night and day compared with the noisy one. Thanks again for the great video!
Thank you for making this video. My switch fan is being really loud and making a buzzing noise. Is there anything that I should be hyper aware of when I’m doing something in specific? If so let me know
No, just follow the video exactly. Thanks for watching!
Thanks for the video! I was able to save my Switch by replacing the fan :)
Glad I could help!
Very informative and well done. Appreciate the detail and links.
Glad it was helpful Chris!
Just ordered a kit to replace my cooling fan. Went out after a few months short of 2 years :/
Seems pretty simple to fix tho!
Will be doing the thermal paste as well.
Thanks for watching Devyn! Hope everything goes well.
Always great 👍🏻 video and super simple explanation, love you videos, there's a flaw design in a Hobart plasma cutter that will be a great video !
Glad you enjoy them! Be sure to share so they're worthwhile to make. Thank you
Nice job buddy.
Thank you!
Do I have to re apply thermal paste even if im just changing out the speaker?
No
Hello! Just wanted to say thank you for this video! I was able to replace my bad fan and save my Switch thanks to this video. Appreciate it!
You're welcome Bobby! Great to hear. Please share the video link with friends. Thanks
Mine has no noice at all plz help idk if I messed up a setting
What a.brilliant video! I am attempting to fix my cooling fan and my thermal compound paste for the very first time never done it before so the question I would ask you is can I put new thermal tape where the fan is and where the pipe is or do you recommend to stay with the old tape that came with the switch! I will be using your video as a step by step while I am fix it !👍🏻👍🏻👍🏻👍🏻
Gently remove the tape and put it back, or you can buy a small roll of heat resistant kapton tape. 1/2" to 3/4" is fine. Thanks for watching!
Just fixed my fan Kate. I used this great video to guide me and had no problems
Thanks 👍 👍 👍 very good Video! You helped me a lot!
Glad to hear that!
The fan on mines is broken and even though I’m to lazy to do this I’m still watching this video💀
How do you know your fan is broken?
@@audisiojunior21 it makes a weird loud noise when I place it a certain way
Thank you for the amazing video, my fan broke and this helped a lot :D
You're welcome! Great to hear
Looking for a good quality game card reader, you have any good leads I can buy from?
Something wrong with the speaker replacement. There's a clip that connects to the speaker. You dont need to desolder the wire. For some, it looks complicated. Haha. Anyaway, thanks for the video, it was explained well.
Yes, but I've seen some aftermarket speakers sold without the wire attached. Thanks for watching!
1:32 I don't understand how you removed these screws on both sides so easily. I cant even butch them and if I try I'd just mess up the screw and will never be able to remove them. Is there any solution? I need help please
You may need to "break" them free. Apply moderate downward pressure to the head of the screws to prevent the screwdriver from popping out of the screw and stripping it, then turn CCW.
Hi Doug. Awesome job Has always. I Liked,Shared,Added to playlists. All my best.
Thank you Bobby! Hopefully it gets noticed and takes off.
I accidentally put to much thermal compound(Artic MX-4) in the top of the radiator and when I put the metal plate on it the compound was pushed down onto everything around the radiator. When I got to the final screw there was a ribbon cable in the way so I went back to properly seat it and notice thermal compound was spread around the radiator. So I started cleaning it and got rid of most the excess compound with cotton swabs and 50% isopropyl alcohol. There is still compound in crevices that I cant get with the swabs. Can I leave it or does it got to go.
Doubt I'm gonna get an answer, but here goes. I need to replace the speakers. The Y screws came out no problem, but the philipps heads are a major pain. I got half of them with zero effort, the other half are in there so hard and they have all been stripped after my countless attempts to get them to budge. Any tips on how to remove stripped tiny screws? Its the one on top, and the ones on the controller slides on both sides. Im at my wit's end right now
I read almost every comment and reply to almost every question once, regardless of the age of the video shown on my channel. That won't happen with most other YT channels. To answer your question, when you remove those tiny screws, the tip must be well matched AND you need to push the screwdriver into the head with moderate pressure as you twist CCW to get them to "break" free. Try another mini screwdriver, make sure it matches. If you cannot remove it, the head of the screw will need to be drilled out. Thanks for watching!
@@electronicsNmore Hey, thank YOU for the tutorial. I didn't see your reply till now, cuz it's been a long, stressful and arduous day of drilling and grinding (something I've never done before mind you-- NOT a handyman by any stretch!) and I was finally able to do it. My Switch might be missing about 6 screws now, but it's solid and functional and both speakers work for the first time in about a year, so yeah, it was a good day. Only wanted to fix it finally, cuz I recently sent my left Joycon to Nintendo to fix some horrid drift that just hit me, so figured I might as well do something about it in the meantime, eh? Thanks again :)
Late comment but.. If my fan is loud, is it possibly enough to try and clean it first? Before actually replacing it. And how do I best clean the fan?
Probably has a worn out bearing.
I have a faulty speaker I really hope this video can help
Should be an easy fix. Thanks for watching!
Great video! One question, how does the fan hold up after months of use after you replaced it? I was looking at buying the same model you posted in the description.
I didn't replace mine. I took mine apart to show viewers the steps to replace.
Great video to change just fan i do t need take all rail screw out just centre ones right? My switch 3 years old fan make bad souds at times gota change it
Removing a couple extra screws is no big deal, just follow the video. Thanks
What is the brand & model of that electric screwdriver?
th-cam.com/video/ssV6i9nnzss/w-d-xo.html
For the Joy Con holder, only the middle screw one have to be removed
Now, before I try to do this, will my switch receive any data loss, I expect the SD card to be fine but what about the switch itself? Will my internal storage be affected at all?
It's just like taking apart a computer, you don't lose what's stored on hard drives/sd cards.
Thanks one of my speakers on my switch isn't as loud as the other one so I'm going to fix it
Hopefully the speaker is faulty, and not the circuit board. Definitely worth trying, it's cheap enough. Thanks for watching!
Thank you very helpful guide had to replace my fan you have a new subscriber now👍
Glad my video helped you! I have a VERY wide range of videos on my channel, so be sure to look over my video playlists and share. Thanks
@@electronicsNmore sure thing
Hi guys I'm gonna replace the fan of my switch cause it's making noises when starting a game, it's a refurbished console so maybe it is an older version, but my question is if I change the fan do I have to change the thermal paste? Or it's not necessarily at all.
Thanks for the help! New sub
Hello. If you disturb the original thermal paste, then you need to apply new. Thanks for watching!
At 12:51 what is that in where the speaker are
How do I find a fan cases
Can u do a vid on how to take and replace the slide rails from the nintendo switch for the left side since fhe right one is easy to do
It's very easy. At 5:31 you can see the left rail is loose. Flip up the black lever on the gray connector above my thumb, next to the white connector. Slide out the flat cable, and slide in the new cable on the new rail.
@@electronicsNmore thank u so much!!
What do you use when you clean the thermal compound?
Gently wipe the area using 91% isopropyl alcohol.
Where do u get the air fan
Look in the video description area for a link. Thanks
What if the actual speaker connector broke off the motherboard? Is there anyway to fix that?
Yes, you can solder it directly to that location, buy you'll need some magnification to do it properly.
Thx!!!!!!!
You're welcome!
can i please get a link to your exact replacement fan? thanks and great video btw!
Hi Matt. I placed links in the video description area. It will work, but it's not a Nintendo part.
@@electronicsNmore appreciate it! thanks for the quick reply you got a sub
Awesome video. I've heard that 3rd party fans will only run at max speed? Does this fan throttle up and down depending on the need to cool or is it always running at max? If always at max, how loud is it?
Hi. I never tested the fan at the link provided. Usually if the fan has the same number of pins, you can control the speed. Thanks for watching!
@@electronicsNmore Thanks for responding. I already ordered the fan at the link provided so I'll let you know after it's installed.
@@tobiasfunke Great. Hopefully it works well. It's hard to replace the exact same part, because Nintendo doesn't sell the parts.
@@electronicsNmore it took a bit of time to get the fan from China but it seems to be working well and with adjustable speeds depending on the temp. Thanks again for the helpful video. I would also just like to add that only the middle screw on the joycon side rails need to be removed in order to remove the back cover. I was stressed because one of the other screws was so stuck it got stripped while trying to remove it but the repair worked out anyways so it's all good.
I can't get my switch open because the screws on the sides where the joycons sit immediately gave in ): what should I do? get better screws and force them out?
How much would it cost for the supplies? I’m in the low end right now and want cheaper items, like the screw drivers. I just need those, not the kit. I’m trying to replace the fans because my Switch is over heating now.
Use the links provided, and search for "nintendo switch screwdriver". Thanks for watching
I need some help. I'm still trying to get throw the metal plate, but some scraws are giving trouble it's the top left and right. Also bottom left that are stuck.
Make sure you push the screwdriver down hard enough as you twist. Do not let the screwdriver slip out of the screw head.
I rlly feels like dropping the hundred bucks but before that I want to know if this can fix my no sound issue I can hear sound with headphones and on tv but not on handheld
Headphone jack port sounds damaged. Try swapping it out.
12:51 what’s the black thing where the speaker where
Opening for the sound to exit.
@@electronicsNmore im saying what is the piece called or fabric
Also do u always have to change the thermal compind each time you open it up?
Yes, wipe away the compound on top of the cooling bar, and apply new compound before putting the metal cover back on.
My switch overheated frequently and melted the foam tape, is there anything I can use as an alternative?
Use kapton tape.
My switch is getting really hot on its back in the right side for no reason.Any clues what’s going on?
Probably a faulty cooling fan, or it's all clogged up with dust/lint.
Tank u ever so much 👍🏻
Hello, recently my Switch cooling fan is making a grinding noise at random and I am going to open it and possibly change the fan.
Do you know were can I buy those foam stickers? Do you thinks that if it get damaged I can still use a regular tape?
I'm kind of newbie with this stuff
You can use 1/2" wide kapton tape. It's heat resistant. You can find it at the link provided in this video description area.
@@electronicsNmore thanks for the info.
I installed my new fan and battery to my switch all turns on works fine but then touch screen doesnt seem noticed finger or stylus is this blown screen or cable went in slighty wrong?
If it worked before you opened it, then you must not have put all the cables back properly.
Ok thx im guessing itz ribbon cable i removed to get to cpu fan screw
@@electronicsNmore it was cable one removed to get cpu fan all.sorted switch lile brand new also used thermal pads and artic silver mx5 paste thing feels much cooler in full load
Do you need to replace the thermal paste?
Yes
Best comment ever.😁
Constructive criticism: not a fan of the loud music, compared to your voice, you have to keep changing the volume.
I just played it back, and though the music is louder, I didn't feel any need to lower the volume. It wasn't loud enough to bother me. Unfortunately, you cannot please everyone on YT, no matter how hard you try. The majority of viewers won't have a problem with the audio level. Thanks for watching!
Yeah Im just going get someone else to do this seem way to delicate for me
Yes, it's not a job for everyone. Thanks for watching!
i wasn't able to get the tape off at 5:17 in one piece and now its all useless. any idea where i can get more?
I placed a link in the video description area. Use Kapton tape.
I'm losing it.
Replaced my speaker that was blown, tested and am satisfied.
Trying to put it back together now and I just can't get that damn sd card to lock in place. What's the trick?
You can see at 14:38 that it pops back into place if the pins are lined up properly. Make sure nothing is in the way or bent.
@@electronicsNmore I just peeled that rubber tape off it and was able to get it back in without the tape. Thank you.
You dont need to unscrew all of them on the left and right joycon rails only the middle screws on both sides... This is why your rails were flapping in the wind.
That's true, you can see that at 2:10 in the video, but to replace them, you need to disassemble further to undo the flat cable connector.
I ordered a kit to replace my fan but the tri wing screws are SUUUPER tight and ive been trying for an hour trying to unscrew them, any tips?
They should come out. You need to increase the level of torque.
@@electronicsNmore how would i do that if you dont mind me asking?
I suggest using the electric screwdriver he uses
@@marcynados unfortunately it seems that 2 of the screws are very badly stripped, I am yet to find a way to take them out
So I got a new fan and replaced the old one and it still makes the fan grinding noise, hoping I didn't get a faulty fan for my switch. I'm thinking it might be honestly.
how does it sound like?
I can't see what else it'd be so sounds faulty. I wonder if there's some kind of switch modifying megathread for reputable sellers
The tape on the fan can I buy that? My tape on the fan was very dry and bad.
Hi. You can use Kapton tape. Buy a small roll. 1/2" or 3/4" wide
electronicsNmore thank you so much😀
I replaced my fan thanks to you😀🤗
I got mine 2017 Christmas and i m going to put a new back plate cause it scached up and 10
Take your time, and take pictures as you go. Thanks for watching!
Mine Nintendo is not functioning properly I try to play it turns of saying it's overheating
Please link the screwdriver
I placed links in the video description area of this video. Thanks for watching!
Hi, followed your instructions to fix the fan. Closed everything up
Now om bootup i get error code 2162-0002
:( Beyond frustrating, it doesn't even go into the system os
Please help
Go over everything you did. You probably forgot to plug something in.
Any idea why my switch fan isn't running even after I changed the fan out for a new one? I can't find a solution
Either a faulty temp sensor or faulty board.
electronicsNmore I have this same problem. Is there a way to get a new sensor or do something to fix it?
I think ill just have nintendo themselves or a profesional do this if I end up needing to replace or repair the fan, I dont have the patients or the steady hands to do this myself.
It's definitely not a job for everyone.Thanks for watching!
I got screwed with mine literally because whoever put my Nintendo switch together at the factory tightened one screw so much that it's stripped and now it's impossible to get out and I can't change my speaker
Drill out the screw head. No big deal one less screw. Make sure no metal shavings end up on the circuit board.
Whenever I launch Fortnite, Botw, and Animal Crossing, my switch overheats. How do I fix this?
Open up the unit and make sure the air inlet and outlet for cooling is unobstructed.
just replace my fan , its still not working anyone know what could be the reason ?
I don't have any sound on my switch. Any help please
en-americas-support.nintendo.com/app/answers/detail/a_id/22505/~/no-sound-from-one-or-both-system-speakers
@@electronicsNmore Thanks for trying to help, but I've already tried that. The sound randomly comes back then goes again. I'm considering buying replacement speakers.
I should just get a new switch and data transfer everything over
Hi i have a question,Can i repair a Nintendo switch fan instead of buying one
Not worth the trouble, they're fairly cheap at the link I provided. Thanks for watching!
@@electronicsNmore I bought a new one and I think it ended up being a faulty fan because it's doing the same as the one I had before. I'm not sure what the deal is with Nintendo Switch fans.
@Stricker Clan What was the old fan doing?
The fans are crap. I just changed mine out and less than a month it started making loud noises again. Smh.
Sounds like you got a faulty fan.
👍👀
Thanks for watching Tor!
My noisy switch fan taught me to never get a console on launch day
😃
My switch has just broke and it sucks
You should never touch the motherboard with your fingers. Wear gloves. The human sweat can be acidic. But nice video, I needed this :D
The main concern is static discharge damaging sensitive components. I live in humid South Florida, so I don't have to worry about that problem. Never work on anything electrical or electronic with sweaty hands. Glad you enjoyed the video. Have a great New Year!
Did any figure out if buying the parts and tools on amazon were legit?
Unfortunately people don't have too many choices when buying parts. I don't think Nintendo will sell parts. Thanks for watching!
I bought the speaker in the link and it works.
nice power screw driver. But I dont trust modern electronics since they make them planned obsolescence. Most people will fail on the battery in taking it out and many will have extra screw in the end. LOL I find it hard to believe you use you switch more than the power screw driver. As some wealthy people say "i prefer to work another hour at work to buy what I want then waste time doing it myself and messing it up"
The Switch was borrowed. :-)
I’ve dropped mine a thousand times and wonder how it still works
They had to make them fairly drop resistant, a lot of very young people handle and drop things.
I wish you could plug in the head phones to the controller instead of the switch, I have dropped it a lot because when I’m using my switch on the tv the wire pulls the switch right of the dock and gets thrown to the floor
Omg my Nintendo won’t turn on now 😍
Same
I was just on my switch and I was thinking what in the world is that little sound guess my fan kicked in 😅
Fairly easy to replace. :-)
we see inside in nintendo labo 4 but is not real
I would do this but I’m to scared my switch will break
it's already broken, is it not? It's not that bad.
No it’s not broken I just sent it to Nintendo So maybe they will tell me what’s the problem
@@dynamite_sheeze1399 I'm confused, why did you send it in if it isn't broken?
The fan was broken just like the switch In the video that’s why I send it
Put into reverse find out how to make a switch
bruh my nintendo overheats so easily
If the fan works, then the airflow is probably restricted due to lint, dust, etc.
@@electronicsNmore any clue if there's a way to help remove it without taking apart and cleaning the fan? Not sure if compressed air would just make it worse... My switch started making a very subtle grindy/clicky sound but worried it's going to get worse