The DIFFERENCE Between Vibrance and Saturation in Photoshop - COLOR ENHANCING Photoshop Tutorial

ฝัง
- เผยแพร่เมื่อ 17 พ.ค. 2024
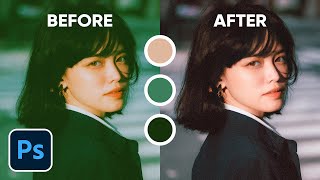
- Photoshop tutorial showing you the difference between Vibrance and Saturation.
00:00 - Introduction
00:40 - How the Hue Saturation and Adjustment Layer works
01:20 - How Saturation Works in the Vibrance Adjustment Layer
01:50 - How Vibrance Works in the Vibrance Adjustment Layer
02:23 - How Vibrance and Saturation affect saturation values
04:55 - How To Use Vibrance to color enhance your photos.
If you have any questions, please leave them below
or head over to this tutorial's page on our website:
➜ photoshoptrainingchannel.com/...
👍 Subscribe + Like + Share + Comment = More Video Tutorials!
Thank you for watching!
- - - - - - - - - - - - - - - - - - - - - - -
⚡ PTC NEWSLETTER
If you enjoyed this video be sure to subscribe to our newsletter to receive free weekly Photoshop tips and more!
➜ ✉️: ptcvids.com/subscribe
- - - - - - - - - - - - - - - - - - - - - - -
⚡PREMIUM TUTORIALS
For more in-depth Photoshop Tutorials be sure to check out our Premium tutorials.
➜ ptcvids.com/shop/
- - - - - - - - - - - - - - - - - - - - - - -
⚡ FOLLOW PTC ON
- Facebook: PhotoshopTrainingChannel
- Instagram: / jrfromptc
- LinkedIn: / photoshop-training-cha...
- Pinterest: / ptcpins
- Behance: www.behance.net/JRfromPTC
- Twitter: / jrfromptc
- - - - - - - - - - - - - - - - - - - - - - -
⚡ LINKS
- Website: photoshoptrainingchannel.com
- TH-cam Channel: / photoshoptrainingch
- Google +: google.com/+Photoshoptraining...
- This Video's TH-cam Link: • The DIFFERENCE Between...
- - - - - - - - - - - - - - - - - - - - - - -
⚡ CREDITS
- Stock Images provided by stock.adobe.com
- Photoshop video tutorials by Jesus Ramirez


Follow Up Tutorial:
How To *Make Colors POP* in Photoshop! th-cam.com/video/163KclzPM98/w-d-xo.html
does this trick work in adobe camera raw tool
I finally understand how to balance vibrance and saturation to increase saturation without damaging an image. I really appreciate how this video is very descriptive, but straight-to-the-point. It is hard to find content like this.
Great tutorial, Jesus. I've been wondering for years exactly how saturation and vibrance behave differently. I can read about it and not understand it, or I can watch your tutorial and understand it. Now I get it 100% and will change the way I do post processing, thanx to you.
I'm glad it was helpful, Ken! Thanks!
It's so fantastic when you explain what actually happens "under the hood" in Photoshop when showing those RGB channels. That helps a lot to understand what I am really doing and why with the different layers and sliders... And by the way, you explain it so everyone can understand. That's a true gift. Many people can explain Photoshop the mathematic way, and that will help 0,001 % of the users... Your way helps the rest of us ... Thanks a million.
Thank you for your comment, Stefan!
Thanks JR - perfectly explained and very helpful as always!
You're welcome!
Well done!
You are a true professional!
Thank you, Fritz!
Excellent exposition! Thanks a million JR!
You're welcome!
Thanks. Great explanation.
I will definitely be using the Vibrance adjustment layer much more often in the future. Thank you for detailing the interaction of the Vibrance and Saturation sliders in this tool. Understanding how these tools work makes them much more powerful. As always, "Another GREAT tutorial".
Thank you, Marc!
Thank You Jesus for the Vibrance and Saturation explanation much appreciated!
Those are some great tips. Thank you
Your tutorials are flawless. Thank you Jesus
Really well explained. There's a few people on Facebook, etc, that need to understand this.
I see far too many pictures that have had their saturation levels turned up to ridiculous amounts and they just look very silly...and don't even get me started on overblown HDR or overfiltered images!
Perfectly and clearly explained! Thank you Jesus!
Thanks man that was really very useful information!
Massive tip!👍👍👍 will be using this.
So well explained!
Thank you!
wOOt! This video is amazing! The way you explained everything was so clear that even I, a noob, can understand it. Thank you for this tutorial. This will definitely change my post-processing habits. Thank you!
Beautifully explained! :D
Finally found a superb video that I have been searching so long for the difference between "Vibrance" & "Saturation".
Thank you, Siddhant Sahu!
Thank you for producing such a clear video on what the difference between saturation and vibrance truly changes. I will be using the vibrance color enhancing tool more now. Keep up the great work.
Thank you, Craig!
A Wonderful Tutorial. I already understood and used Vibrance, but your explanations helped expand my understanding.
Thanks
You're welcome, Dan!
Super Helpful Tutorial. Thanks Mate.
You're welcome!
Jesus your videos are so well made. You measured the effect of the adjustments on individual color channels showing the percentage of change and used this concept in practice on a real photo. Your tips are so useful, this is why I subscribe to your channel✌🏽
Thank you!!!
Nice tutorial, right to the point.
Thank you!
Very nice, thanks 😊
Thank you so much for the tips. Very useful to me!
You're welcome, José!
perfect toturial
it's a very helpful tutorial, thx you!
Thank you, Kiril!
Another EXCELLENT HELP!! Thank you Jesús!
You're welcome!
Amazing work, mate. Wish you and people like you the best. Cheers!
Thanks, you too!
Excellent as always, Jesus. Thanks very much.
Vinny
Thank you, Vinny!
Theory plus Practical... Nailed it (y)
Thank you, Shakeel!
Great explanation! I will definitely be tweaking with a vibrance channel from here on out! Thanks!
You're welcome!
Great video, very helpful to know.
Thank you!
Excellent explanation of this important tool.
Thank you, Paul D!
Thank you for this!! :)
You're welcome!
Thanks Jesús, great video.!!
Saludos.
Very helpful, Thanks.
You're welcome, Farid!
Thank you, I used these interchangeably without noticing the difference, thanks for the tutorial.
You're welcome!
I didn't realise that the Saturation slider in the Vibrance adjustment layer behaved differently from the Saturation slider elsewhere! Always learn something new in your tutorials - even if it's on a topic I think I already know about! Thanks Jesús!
You're welcome, Images By Raphael!
nice tutorial tnx
Great advices, Jesus! Thank you!
super detailed video....
Thank you!
I often use the camera raw filter and have always struggled to understand how the saturation/vibrance sliders interact. Now I get it.. thanks!
You're welcome, Steven!
Enjoying your videos! Thanks!!
You're welcome!
Very useful, thank you
You're welcome!
great knowledge...................
Nice Tutorial I like it
Thank you!
Thanks !
This is new for me, thank you...
You're welcome!
thank you so much
Very nice tutorials I like it
Bob
Thank you, Bob MAkrides!
Great explanation. Very helpful. I noticed that someone asked about these sliders in Lightroom vs Photoshop. You stated there is a difference. What is the difference and why? Is Photoshop that much different in the way it works than Lightroom? Would that be correct in assuming that all of the sliders in Photoshop operate differently than Lightroom. Thanks again for an excellent explanation which may make me use Photoshop over Lightroom for my future editing.
Always learn something new from you, Jesus! I noticed that this type of move in the vibrancy adjustment layer it would help working in 16 bit as there was a bit of branding...
Glad you liked it Bret!
I am following you from Saudi Arabia , your channel is very helpful. ..
I have a question about changing a black t-shirt colour...
and saturated faded colours...
Great! Thank you.
You're welcome, Romulus MAP!
PERFECT!!!!!
Thank you, Thodoris!
Thanks i didn't know about saturation in vibrance correction layer
You're welcome, Nikos!
Fantastic, no bullshit intro/annoying music/anything-right down to the good stuff.
I'd love to see you do a video on how Lightroom handles those two sliders on a raw file.
Thanks, Marucla! Maybe in the future. But again, even though the names are the same, they will produce slightly different results in Lr.
Ahaha, this is my photo and my wife is on it))
Awesome! Great Photo!
The power of Adobe Stock! ;)
Thank you so very much...
You're welcome!
Nice..thank u
You're welcome, raisul!
Hello , Please i have one question about hue , why there is not all of colors(gray ,brown ,black....) into this adjustment ?
Tricky..thank sir
You're welcome, Tubeless TUBE!
I subscribed for the first video I watched.
Thank you!
Ang galing idol
Nice One
Thank you!
Every time i go to vibrance, the blending options in the right 'vibrance and sharpen' are not available. I look everywhere. Any suggestions?
Excelente, muchas gracias Jesus R.
De nada!
In addition to this, if the color settings in the working space for RGB stands on sRGB, Vibrance reduced the colors of an image that opened as an AdobeRGB, down to sRGB (without changing the work space). That allows, by reducing the saturation and increasing the vibrance, a gentle reduction into a lower color space.
👌
I find digital cameras to really lack colour saturation when I shot on Sigma SD Quattro I was blown away how rich the colours were and how good they pop out.
If you show RAW then the images will not be highly saturated (which is a good thing). You will have to do that in Lr or Ps.
notification squad!
Thank you, min Ö!
Most of the time vibrance and saturation are my first adjustments, followed perhaps by clarity.
Okay, I was still confused after this, so I made my own color strips. I made each strip from 100% saturation to 25% saturation (into the white). I made the three primaries (RGB) and the three secondaries (CMY) in this order from top to bottom M, R, Y, G, C, B. I then placed a vibrance adjustment layer over the top of them. Here's what I found:
The Saturation slider causes the colors to increase linearly into the 25% saturated (damped by white), but the colors never max out at about the 34% white mark.
The Vibrance slider never maxes out the colors either, but it does move the saturation toward the 25% saturated. It affects all the primaries and secondaries similarly. I could not discern any change at the 25% fill mark. Full saturation moves right, toward this mark, thereby increasing the deepening as you move the slider.
And get this: Using the saturation slider on a HSL adjustment layer did nothing! No changes are observed.
Now color points didn't change as you described. Red does get affected less than Green or Blue, but both green and blue are affected almost the same. These two colors don't change independently very much, and this leads me to believe that perhaps my video card (an nVidia 650ti) is responsible for this.
Then I had another idea. I turned off the vibrance layer and the HSL layer and added a Brightness/contrast layer and adjusted the contrast. The contrast increases the saturation when ramped upwards, and lowers the saturation when it is ramped to the left, making the colors less pronounced. So it seems that this vibrance layer does act differently than the contrast, but it is limited to the lower 2/3 of saturation while the contrast affects the whole line, and, like I said, the vibrance moves that saturation point into the lighter areas but never gets past the 33% spot on the colors' lines. In other words, I'm still baffled. I don't know how to use this vibrance other than move the color's saturation up to the limited 33% brightness mark.
My SPECIFIC problem is the reds. All people's skin has red in it, and very often there is just not enough. The only solution I can think of is to use the Camera Raw filter and target the reds, but you cannot do this. You can only change the tint or the temeprature, both which changes all the colors.
So, I'm stuck. I want to off the yellow and boost the red. How do I do this? All too often there is too much yellow. I want to less this, but to do this you increase the blue which changes the reds to magenta.
How does one target just the reds so that you can boost them? Also, how can you target just the yellows and neutralize them?
Does the Vibrance and saturation in Photoshop Raw works the same as it does in Photoshop?.
yes!
good day sir can you make vector vexel tutorial please
You're welcome!
Have not been that scientific about it, but I believe Lightroom/camera raw may again use a slightly different algorithm for vibrance/Saturation... am I wrong?
Yeah, they are different especially with Saturation.
Did Photoshop cs3 had this slider?
I don't remember.
jesus que tal estos totorales en español...Gracias muy bueno..
I always stick to vibrance, especially to enhance the overall look and depth of the image. Saturation the colors tend to bleed out if it makes sense, just too much for the image to look real or pleasurable to the eye.
A combo of both can be done but it takes precision.
Yup! Thanks for the comment JREEL!
Now I get it
Awesome!
ta bro
tiene traduccion al ESPAÑOL?
Mis tutoriales en Epañol estan aqui:
th-cam.com/channels/KClX_M-8WUD_iymXr2hPaQ.html
How to increase situration in vidoe
Thank you. So Saturation is not = Saturation, who could have known? What next, the Lightness in Hue/Saturation is not = the Brightness in Brightness and Contrast?
where is the picture?
Hi, thank you for the tips. The flowers are poppies, not roses 😊. Cheers
😀
So Vibrance protects the REDS while Saturation protects the BLUES.
I don't agree with you! I don't think Vibrance has anything to do with Skin tones. Vibrance protects Highlights not necessarily skin tones. If for example there is bright blue sky in highlights it gets equal treatment as does skin tones. Skin tones aren't any special. If skin tones are in Shadows (in a situation where the image is underexposed or it was backlit shot where the model is in shadows). Vibrance does not provide any protection. Skin gets saturated just like all colors
According to Adobe, it protects skin tones.
helpx.adobe.com/photoshop/using/adjusting-hue-saturation.html#adjust_color_saturation_using_vibrance
@@PhotoshopTrainingChannel Have you tested it yourself? or basing it on Adobe's word? I am basing it of my extensive testing both on test images and also real images. To test it yourself, take an underexposed image and increase vibrance, a backlit shot where the subject is in shadows is a great example. The skin will get saturated just like other colors. and then test with bright blue highlights and blue gets protected as well. The protection of skin is consequence of protecting highlights. But not its intent to specifically protect skin tones. Feel free to test it yourself.
Also, let's think about it for a second. How would a tool isolate the skin tone specifically? Protecting all of Red channel will encompass a lot of colors and that won't work. for example if it protected all of red channel, then you cannot saturate like red or yellow flowers which beats the purpose. To isolate skin specifically you will need to isolate using triple mask using Hue, Sat and Luma because skin tone in a properly exposed image has a very narrow range which will require a lot more processing to implement.
Vibrance does two things - it biases saturation to less saturated colors and also biases saturation to shadows first. If you are familiar with video editors its like using a combination of (Sat/Luma curve and Sat/Sat curve)
Roses?! Have you seen roses?
René G nope. Never.
Then why did you refer to those flowers as roses? Get out more :)
I just said never...
Very useful, thank you
You're welcome!