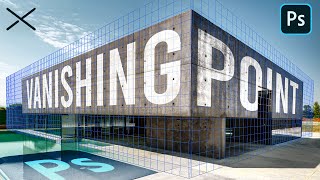
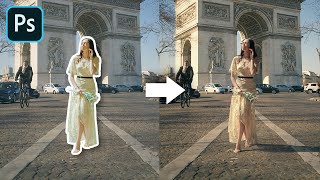
How to Add Text to Anything in Photoshop

ฝัง
- เผยแพร่เมื่อ 19 มิ.ย. 2024
- I Guarantee I Can Teach You to Master Photoshop. Learn How: phlearn.com/aaronwillteachyou
How to Add Text to Anything in Photoshop
Ditch the struggle to try and figure out perspective manually! In today's episode, we show you how to use the vanishing point filter to lay text anywhere in a realistic way.
Vanishing Point Filter
After typing the desired text, make sure to copy it onto the clipboard (Cmd+C). This way, when we go into the filter, we can paste it back in (Cmd+V).
To get to the Vanishing Point Filter dialogue, go to Filter -- Vanishing Point. Now, we can define the area that we want for our perspective. After that, the perspective is a breeze. Just drag, drop, and resize the text into the defined area.
Layer Effects
Now that we have the proper perspective, it's important to create layer effects on the text so it looks more realistic. By double clicking on the layer, we can adjust the layer styles. These will change depending on what you want your image to look like. For this episode we choose to give the text a beveled and chiseled look to blend into the stone. We also give the text an inner shadow. Make sure to have the "Use Global Light" box checked in order to keep the light source consistent.
We can adjust the color in the Layer Style Panel as well. We can sample color from the actual image to get a great match.
If things don't look correct right away, don't worry! This process is truly just a lot of playing around with the layer effects to see what looks the most natural.
Adding wear & tear
Often times, text that is placed into an image has a much higher quality resolution and may look too sharp. To create a more realistic and worn look for our text, there are a couple of steps we can take:
Gaussian Blur: Make a duplicate of the layer that holds all of the layer effects (Cmd+J), and then make a new layer and merge those two together (Cmd+E). This strips the layer effects away,. Now we can go to Filter -- Blur -- Gaussian Blur and choose a relatively subtle amount of blurring to help the text appear to be the same quality as the image.
Motion Blur: Duplicate the layer again, then go to Filter -- Blur -- Motion Blur. We can choose an angle and distance that suggests rain has caused the letters to erode. Then, we can create a black layer mask (by holding Opt + clicking on the layer mask button) and paint with white only where we want the "erosion" to show up.
Website: phlearn.com
Facebook: / phlearn
Google+: plus.google.com/u/0/116791098...


I've always wondered why Aaron is the best at giving photoshop tutorials on TH-cam!! Either it's his amazing skills or good looks... maybe both!
Thank you!!! I feel like crying for joy AND sadness that I finally found this tutorial. So many wasted moments of horribly warping text in my lonely past...
You guys are freaking awesome, I starting getting into photography 2 years ago, then started working with lightroom, then photoshop. It's a lot to take in but with your help I'm getting better, thank you.
Another fantastic tutorial. Every tutorial you've done so far has been so well presented and thorough. Your attention to detail is amazing. One of the best on TH-cam. I'm thinking about getting the Wacom intuos pro medium tablet after doing some research & watching how effortless you make it appear. It seems like all the pros use them rather than struggling with a mouse.
Excellent tip, just the thing I was looking for.
Thank you for this excellent tutorial. May there be many more like it. Well presented and just excellent advice.
Another super helpful and FUN tutorial. Thanks so much phlearn! :)
Hi Phlearn, you are a wizard, I love your workshop & teaching skills. Awesome. God Bless
Great video! Thanks for the tutorial, it really helped me create a project I was stuck on for class!
Brilliant Aaron! Thanks very much for the tips.
Excellent tutorial, I always wondered how to make perspective in photoshop, thanks Phlearn
Hi, Dear Aaron.
Thanks for your helpful tuts.
I don't know if you already know this tip or not, but for showing [Before & After] you don't have to group the layers and then turn on/off the group layer's eye ball! You just simply Alt+Click on the eyeball of the layer that you want it to be visible.
keep the good work, the world of Photoshop needs guys like you.
Great pro tutorials, very enjoyable, thx
Love all your videos! As an aspiring designer, I look to your channel to get the skills I need to build my productivity and creativity. Keep it up! Would love more videos about manipulating non living objects, such as cars or landscapes since that is my current area of interest :) Amazing tutorial!!
another amazing tutorial !
I didn't know about the vanishing point, thank you again : )
Nostalgia coming here again, 8 years ago i started doing all this, learned everything in Photoshop by you guys.
We're so glad to hear that we've been a part of your journey! Thanks for being with us for so long!
Simple but awesome. Txs. my friend Aaron.
Cheers..
David
Wonderful use of the vanishing point filter...I didn't even know it existed...opens up a lot of possibilities for me now. I just Phlearned something!!!
That was amazing and so very helpful! Thanks!
If it was anyone else's channel the tutorial would have ended at 8:50 - This is why I like Phlearn so much. Aaron really nails realism. :) Thanks Dude.
So that's what vanishing point is for! Thanks Aaron. Great job as usual.
I didn't know most of this stuff thank u for making this!!
Great Aaron!
Thanks and regards from Buenos Aires
Thank you so much, amazing tutorial
Great episode. Congrats for the work on Creative Live. Helped me a lot. Thanks Aaron
Thanks so much, I was so stuck on this, helped me add to to a book in a piece of art, so it looked like it was on the cover.
When you had shown the vanishing point tool on this tutorial.. all those times of slowly using the 3D postcard to make it look at the right angle.. thank youu! :O Will be using your techniques in this video very soon, thank you :)
This is the tutorial I have needed/wanted and been looking for on and off for months using the wrong search terms; I just happened to stumble on it today. Thanks!
***** Wow, a reply! :D
While I've got your attention then, I just wanted to say how much I appreciate Aaron's teaching style; by far my favorite online instructor. He just seems like he's genuinely having such a blast while going through the tutorials, and is great at explaining (and then demonstrating) different concepts. Thanks, and keep up the good work!
Great tutorial thank you for your help
Great tutorials. Learn a lot. Thanks.
Great tutorial, thanks!
THANKS GREAT VIDEO VERY HELPFUL
Oh Aaron my man. thanks for the tutorial!
Woah ! This is cool !! It do help thank you!!!
u guys are amazing !!!!!!!!!! thank u so much for helpin us !!
Excellent as always. Thanks.
AAron, u are a great example of a storyteller who simplifies and SUPERB educator Thanks a lot, u use short, simple words to describe the problem and your solution/ You are the best!
You're great...thanks for your videos.
Awesome tutorials! You are my photoshop guide!
Really cool video! Didn't know about the Vanishing Point Filter, thanks!
Me too, thank you Phlearn.com
So smart! So Brilliant! I was wondering how I could make it, this video was suggested by Google. This tutor is as amazing as Google. It's for work by the way. God bless you!
Maybe I am too beginner but this one went over my head. I think I had to watch it like 8 times. But I am definitely a new subscriber now. Great into!
Hola , muy didáctico el tutorial . Gracias . Saludos
Incredible. No matter how good I think I am, I still learn something new every video.
Woav... just what I needed.. been messing around with ps and illustrator to make this happend... Thanks!
Hi Aaron, I am laughing my ass of at the moment due to watching you on Creative Live Compositing 101. In the section where you are trying to match the lighting/camera angle of the pool with the cereal bowl you say one of the funniest things I have heard in a long time. I quote " I recommend taking regular dumps" LOL I am crying with laughter now having just watched it again because Aaron's face once he has actually said it is brilliant. You can see he realising what he's just said and fair play to him he doesn't laugh out load. I would not be able to control myself hahaha.
That's amazing, Thanks pal
Really amazing! I finally know how to make perspective in a short and precise way! Thanks a lot! Anyhow, I've notice that while watching on the video there is a pink lines poping out.. I think it's not the smart guide maybe it's the slice tool.. I hope you would teach us how to use the slice tool and slice selection tool ^_^
amazing, thanks!
U are amazi as usuall Aaron, i like Your work.
thank you for the lesson was very interesting and informative :)
Thank you, it means a lot:)
this is brillant thanks so much man
this is going to be great!
PHLEARN NATION!!
so that's what that filter does xD you learn something new everyday with Phlearn, even if you think you know your stuff! this will turn out very useful! thanks!
Hi Aaron, I saw you on Creative Live and let me tell you I learned a lot. Something that blew my mind was the green screen removal on fabric and hair. Could you please make a tutorial on that. Thanks a lot for sharing your knowledge. A hug from Panama.
Nice tutorial! By the way, is it possible to use more than four points with the plane tool in vanishing point?
Made it look so easy.
Awesome!
I hope it doesn't reach an eighth day without a video. I'm having withdrawal symptoms.
Thanks so much !!!!
Really interesting tutorial
THANK YOU!
Nice Job !!! THX
I love this tutorial - well done. I do however, have a problem with placing text (in perspective) onto an open book which has curved pages. Is this possible? Can I curve the plane in vanishing point to do this?
you guys are awesome and you do it like no one else,i would love if you were to make the kind of photo were a person is like holding a pen and writing in mid-air i hope you get that
Hello always a good job as usual, so look.
Great tutorial - just one snag, on the PC-laptop, when I paste the text into the screen with the perspective filter, and drag it into the box as instructed ... the perspective is WAY off, by about 5 degrees at least. I’m following your instructions to the letter, but there seems to be a bug for the PC version?
thanks Aaron,
Thanks for another great tutorial. Question how would you apply this to a rounded image? Is there a tutorial of how to do that effect?
You are near to 1m subs . Keep up the good work :)
Dear Aaron ,
Thank u so much for the workshop. Its excellent, i learnt a lot from it. Now I am very confident in making composites. Lots of love from India. Thanks again.............................................................
Amazing Tutorial!! Keep it up!!
I'm not sure if you have ever covered this in an episode before but i took a picture of a lake with some mountains on each side, And i was thinking what would be cool to add to it and i thought about a sunset or sunrise, But the problem is there isn't one on the photo itself,
Is there anyway to create a sun set/raise from scratch???
Thanks!! Keep up the great work!!!
Educational and entertaining🤣👌
Awesome video! Could you please make a tutorial about "cartoonifying" a person/a face?
Hi Aaron - top work on CreativeLive over the last 3 days btw!
Just a thought … wouldn't the "erosion simulator" effect look more authentic if the erosion appeared also under the upper (and middle) cross bars of the T, E, F (and possibly a few other places in the round letters too)?
Another great TUT keep up the great work folks!
Amazing big help. 🖖
Hey Aaron! Could you do a tutorial on how to do a portrait "Sin City" style? I loved your tutorial with the "Riddick portrait".
Your tutorials are the best! Thank you for sharing your knowledge with us!
Thanks!
Amazing
Can't believe it was so easy. Thank you so much.
Great job as always!!!
Keep phlearning us!
What happened to the video quality?
Hello, what tool did you use to remove the original words that were on the buildin?
like your lesson
Aaron,
Is there a quick way to kind of do the opposite of vanishing point? For example a photograph of a sign where you want to transform it into a perfect rectangle having 90 corners rather than the odd angles and distortion created from the perspective of the photographer.
my photoshop (im in cs6)doesnt have vanishing point though for some reason... how do i find it?
New follower here. loved this video
great 👍👍
very nice. thanks.
i have a Q: how to make text "line up at top"?
eg, use times roman, have caps and lower case word. then get all the individual letters to align along the topmost letter.
i can write the words as individual characters and then group them and "top align" them. however, this is a pain in the a**e.
is there a quicker and better method to do this in photoshop?
thanks.
Fantastic tutorial.. love ur youtube channel, first time i know about Vanishing Point feature. after having wacom tablet have u ever, ever touch your mouse again? ^_^
u r the best
You are awsome !!!!!!!!!!
Thank U
Aaron obrigado..
Awesome trick!!! Can you wrap text on an object? If I wanted to add words to a truck bed, can you make the text match the contour of the truck bed?
Wonderful tutorial Mr. Nace! By the way, do you have any tutorial on how to make a fake beard? Thank you!
i dont have vanishing point on my photoshop plz tell how to get it
Dude, you are amazing. I would hate to make you an enemy because you could take a picture of anyone and make it very, very harsh and incriminating! Really enjoy how you pick up all details like the water/aged running effect on this...never would have thought of that or done it that way. Thanks
Does that work for images as well (coat of arms for example)?
Thank's for the video
Hi Aaron could you do a video about repairing lips, kids and men and women with and without lipstick?