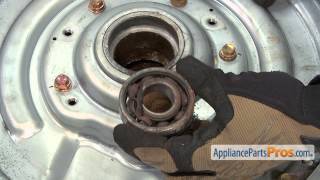
How To: LG/Kenmore Clutch Assembly AEN73131403

ฝัง
- เผยแพร่เมื่อ 7 ธ.ค. 2019
- How To Replace: LG/Kenmore Clutch Assembly AEN73131403 www.appliancepartspros.com/lg...
Symptoms: loud noises caused by corroded bearings.
Tools: Phillips screwdriver, flathead screwdriver, chisels, hammer, putty knife, 10mm socket wrench, 24mm socket wrench, penetrating oil, pipe wrench, strap with hooks, wooden block.
This LG/Kenmore made Washer Clutch Assembly replaces the following older part numbers on LG Washers: AEN73131406, 3661EA1009E, 3661EA1009F, 2657842, 3661EA1009D.
Buy the new Washer Clutch Assembly AEN73131403 here: www.appliancepartspros.com/lg...
Most orders delivered in 2 business days or less.
If you enjoyed this video, please click the like button. Subscribe to this channel for more appliance repair tutorials.
If you need any more technical advice, call us at 1-877-477-7278 or chat with us on our website www.appliancepartspros.com/. We're available 7 days a week.
Follow us on social media for more appliance advice, information, and tips.
Facebook: / appliancepartspros
Twitter: / applpartspros - แนวปฏิบัติและการใช้ชีวิต


Very clear and helpful tutorial! Thank you very much. I was able to make the repair pretty easily. The biggest challenge was the drive shaft lock nut which wouldn’t budge. I ended up heating the nut with a blow torch, which helped a lot.
This was very helpful, started with different video, but got stuck taking things apart, your guidance did the trick! Thank you!
Again, outstanding video! Just a quick tip... When I ran my washer the first time after installing the new clutch, all was well till the spin cycle. There was a rattle that sounded like a screw was bouncing around inside the rotor. I took the rotor back off and all I could find were VERY TINY pieces of metal (less than 1mm diameter) that I assume were bearing material from the old (failed) clutch or pieces from the old old clutch. Again, they were very small, so I used compressed air all around the magnets in the rotor, and I then had to pick the pieces off the magnets. Once it was clean, I put it back together and the washer runs like new now. On a side note, I tightened everything to what seemed to be right. I was surprised that there weren't any torque specs given for any of the bolts, especially considering there is a lot of plastic.
Thanks for the tip!
Tip: when removing the clutch assy, there’s an inner ring of bolts and an outer ring. The inner ring (thru 2 thicknesses of sheet metal) also need to be removed. Initially I only removed the outer ring. Basically all the 10mm bolts need to come out.
Excellent video, very well-narrated and produced to minimize time between key points. Easy to follow. Purchasing thru AppliancePartsPros was completely smooth, fast delivery. So happy to have my washer working again, especially because everything else appears to be in good condition.
If I would have read your comment first I would have saved myself quite a bit of frustration 😂
Couldn't have done it without you! THANK YOU.
Thank you the fantastic instruction. Followed step by step and washer is fixed!
Great video.
My 14" pipe wrench was too big so I got a cheap 10" at harbor freight.
I used my impact driver instead of a ratchet which is way quicker.
Thanks!
This video is the best video ever!! My top was different but it was almost the same directions. Thank you soon much!! Lifesaver!
Great video explained in terms the average person could comprehend
Thank you
This video was very helpful, however, if you have a Kenmore Elite model 31552, the process for removing the top of the washer is completely different. Don't try to shove anything in the front. You have to remove two phillips screws from the back just below where the base of the display meets the washer body. Once you remove those screws, push the entire top away from you (toward the front of the washer) and lift it up. Here's the thing - there's no hinge and the hoses for the detergent that run from the top to the wash basin are really short. You can make a temporary hinge by lifting the top almost 90 degrees on the back side (like there was a hinge from the factory like the video shows) and slide the back edge of the top under the two brackets on the body that you removed the screws from earlier. You just need a long screwdriver or piece of wood to keep it from falling back down.
On another note, if I knew the Kenmore Elite was made by LG I wouldn't have bought it. I'm sticking with GE.
Correct! I have the LG model and this video was realistic. Nothing was easy! There was no hinge on my LG model either. The video I watched for my particular model made it look simple. HaHa! My wife was literally looking at new washing machines while I tried to get the agitator plate out. The good news is that it worked.
Great how-to video. I don’t typically work on my own appliances, but thought I would give this clutch change a try. Pretty straight forward. I also had the question as to why the drum had to come out, but from working on cars i am assuming it comes out to make sure the seal on the clutch remains seated “squarely” in place while the tub is lowered, else it may get misshapen and leak. Also, on my model, the top has the four screws (two in the front are under plastic caps that just pop off), once they are removed, the whole top lifts off, no need to “slide it forward.” Make time to clean the inside of the outer tub and the outside of the inner tub, ours had lots of mold. The hardest part to remove was the rotor, but just tap a little around the spindle and keep wiggling and cussing and it will come off. I got my clutch from Appliance Pros, and all six holes for the stator were threaded. I used an impact and a 38mm socket to get the main nut off in the tub. And someone please get this instructor a couple of impacts to make his life easier!
You are welcome! Glad you were able to fix your issue! If there is anything we can help you with in the future please let us know.
Excellent video to get through a difficult task if you are not familiar with this unit.
As for the drive shaft nut the secures the wash drum to the clutch shaft, removal usually requires the aid of an impact wrench, I used a twenty some volt cordless impact wrench and 38mm socket for lg, 38mm socket can be ordered on Amazon. Harbor Freight gave me a great deal on the cordless impact wrench which I also use when I need to remove a wheel from my vehicle for brake checks, easier than a lug wrench.
To remove a seized wash platter from the drum bottom without damaging it requires some time, a lot of patience and in the end a little fineness. Once you have removed the plastic center cap and the screw that fastens the wash platter to the drum spray some penetrant such as wd40 or other brand into the threaded hole the screw was removed from. Don’t go crazy with the penetrant , lightly spray right into the screw hole section until it has filled the hole and spilled out slightly into the round area where the screw head seats, leave it sit for an hour or so and then return and repeat the process. You want just enough penetrant in the center so that it can seep into the space between the clutch shaft (the shaft the platter fits down onto) and the center opening on the platter. Once you have sprayed the penetrant and let is soak two or three times over several hours slowly work your way around the outer edge of the center platter pushing down on the edge as you work your around the platter, you will hear some light cracking as you’re doing this, the noise is a good thing. After you work your way around the platter edge several time you should be able to with a little tugging pull the platter up and out of the washer. NOW the following is worth an honorable mention. If you’re working on an lg1101cw as I was and the drum doesn’t want to spin and at times spins a little but makes a grinding sound as if something is stuck between the drum and outer drum basket, do not assume it’s a clutch issue. To install a clutch in one of these machines is time consuming and very labor intensive. If you machines symptoms are like those I described prior and you wash drum spins freely by hand, try the $13 fix first which is to replace the stator/motor sensor which is a plastic sensor that literally snaps onto the edge of the stator which is that heavy ring with the copper windings aka the motor. Many videos on TH-cam go right to replacing the clutch. My machine would not wash, overfilled with water and made the scraping grinding noise when the drum would try to spin. A new Stador sensor fixed all for $13. If you do remove that wash platter in the drum, again, do so with patience and fitness, a new platter will set you back another $160 or so which is not necessary .
Very good. Repair Clinic has the same video but it appears they are working on a new machine. Your video is much more realistic showing what to expect on an old machine.
Glad we were able to help you out. If we can help with anything else in the future please let us know.
Best video !!! Thank you
Why pull stainless tub? Is it because it is hard to align clutch in plastic and baskets at the same time??
I just installed the 2nd replacement clutch on this 10-year-old WT5101HV washing machine. The original lasted about 5 years, as did the 1st replacement. On the 2nd failure, the bearing(s) failed, and some debris got in the gap between the rotor and stator (both are on bottom of hte machine). Wasn't aware of that until after reassembly and some of the original noises still existed during a hand-spin verification of the repair. Removed the rotor and the noise was gone. Review of the rotor showed round BB-like debris (from the ball bearing) and also some loose magnet chips, with some mild contact markings on the stator as well. Did a thorough cleaning of both items (removing the debris from rotor is challenging as the debris is magnetized and it clings) and noise is eliminated. Will be doing some wash this week with fingers crossed, and a new rotor is enroute. Fortunately a rotor swap is fairly simple and fast.
Good video, thanks. I just did my Kenmore (made by LG obviously). Do not attempt this without a hefty impact driver and deep 1 1/2" / 38 mm socket to get the tub nut off. I doubt you will do it with a pipe wrench and hammer. My agitator disc came right off. The whole job might have taken me three hours but I spent all day including borrowing a 1 1/2" socket from a neighbor. I guess the seals went and took out the bearings on the drive. The rotor was rubbing on the stator because of the shot bearings.
I experienced this also, the bearing balls got in the gap between rotor and stator, causing noise upon hand-spinning to check my repair. Found debris and mild damage to the rotor that I didn't have last time I replaced the clutch.
If the shaft has broken in half, would you also have to replace the clutch assembly since the shaft is within this part? My washer plate came off with half of the shaft (broken) sticking out of it.
I'm getting a loud squeaking noise when I turn the pulsator plate could this be a bad clutch assembly?
Good video! Hate to see the chisel come out but I get it. On our 5 year old machine, the top 10mm came right off, as did the pulsator plate, but the 38mm nut did not respond to battery impact wrench on high so I had to give it some heavy hits with hammer on pipe wrench, along with PB blaster penetrating oil.
Odd thing, when I got done, I found the large, bottom (rotor cover ??) nut lying on the floor under the machine. I doubt that my hammering caused it to come all the way off. Will temporarily tighten things up while waiting for new clutch assembly and see if maybe the bottom nut was loose the whole time (or at least for several weeks). I would think that the motor would have shredded itself though without the nut in place or tight.
My LG top load washer is different the top assembly is held on with two screws to on the top and two in the back, then you have to lift the top off to get access to the top of the basket, once I had the large nut that I removed with the pipe wrench but when I went to remove the rotor in the bottom I pulled and pulled and wiggled it from side to side, I tried till I was blue in the face is there something I’m missing is there something different about this machine? Can someone help all the videos that I have seen have been the washers with the control panel in back.
woow, this video proven me wrong. I always thought that this spin because of the belt.
Nice job. You used an old machine so that made the video more realistic. One question.
If you compare 5:25 to 22:35 , do you notice the difference in terms of how far the nut went down the threaded shaft of the clutch? There seems to be at a 3 thread difference. That is the problem I ran into also and the nut came loose after a few weeks. I used a heavy duty impact gun . Do you know why the nut does not penetrate as deeply with the new clutch as with the old? Thanks.
Old question but my recent experience: there is a seal bonded onto a steel washer that is approx 1/8" thick. This might remain in the splined drive flange after the clutch is hammered out. Looking in the ID of the female splines, you'll see a faint circular line of the washer. The new washer/seal is attached on the new clutch assembly, and gives a visual of the part needing removed.
Very useful and realistic repair, thanks! This style of washer is going on 5-10 years old at this point and things will be corroded. Assuming pulsator plate seized in place, how long would you say this repair takes? 3hrs?
If you have your tools ready should be easily able to do in less than 3 hours. I have mine apart, spent time hunting down tools and have only about an hour invested so far. Waiting for new clutch assembly and putting back together should go quick and smooth.
Thanks
I used a 1-1/4" deep hole saw to cut the wash plate away, followed by a torch to remove the remaining plastic and an angle grinder for the remaining splined piece. My error in trying to remove the 'stuff' at first with an impact driver. I ended up destroying the threads of the nut, not getting the result I had hoped for. Parts are outrageously expensive but its a closed market unfortunately
I used wire and a car jack to pull my pulsator plate off vs a detroying it with a hammer and chisel. The splines on it are metal and there is no evidence of significant wear that would otherwise necessitate the replacement of this part.
There are 3 holes under the cap you can loop wire through, or you can slide the wire under the plate to the center.
before you replace that clutch assembly or call the repairman you should check to be sure that grinding noise you hear is not coming from the stator cover or nut that turns under the machine. if you tilt the empty machine back a little but not to far you can see and feel that assembly which spins under the machine. in my case the pan that is placed under washing machines to contain leaks was missing but the drain pipe was still left sticking up out of the floor and when the washer turned on the stator cover or the shaft nut hit that pipe end and made a grinding noise that i would have sworn was the clutch assembly. so much so i was willing to pay a repairman $350 to $450 to replace the clutch assembly or just buy new washers which i had been pricing at $800 to $1200. simply moving the machine over 8 inches was enough to stop the problem
Note,my part only had three of the holes threaded. The other three were not ,and
stripped the bolts as I 18:02 tried to put them in.
Hopefully 3 will work
I know, but I luckily was able to get it to fall out, upon turning it upside down & giving it a jolt!
I followed all of the steps but I cannot get the clutch assembly from dropping even though I had removed all of the hardware described in this video. My washer is an LG WT4801CW
You're going to have to strike the clutch from within the tub to get it to release and drop. The rubber boot might hav expanded, causing the clutch to get stuck.
Also, for future readers - the drive flange/disc inside the tub is splined to teh clutch. It's not simply going to drop out, it'll be corroded and mildly fused together. I had to use a sledgehammer, pounding it vertically on the shaft. I couldn't get enough force swinging a hammer, due to the handle hitting the sides of the tub.
The gear looking piece you chiseled out in order to get the bolt out…how would that normally be taken out?
You should be able to just lift it out of there.
Hi. Is the lg "clutch motor" and the lg "inverter motor" the same thing? Inverter motor has 10 year warranty, so is the clutch part of it, or excluded by the warranty? Thanks!
Motor is the stator motor. Clutch is the clutch. The warranty would not cover clutch or gearcase
Brand New 2023 LG Model # WT7400CW. After delivery from Home Depot, I washed a few t-shirts the next morning to test the machine, It seemed to work fine. But the following day, I put in another few T-shirts and during the cycle the machine produced A loud sound like two champagne glasses clicking together. "TING!" The next day, the same TING noise happens 3 - 4 times during the cycle -when it stops to "think" about the next wash cycle move - drum is stopped during this time and is settled. Could it be the clutch?? The machine otherwise does not shake or rattle...It is level and was place in the same plastic drain pan (which I cleaned) used by my last LG Washer (which lasted 12 years). Any ideas?
It is possible that you have an issue with the clutch, but if it is new and already starting to fail we would recommend reaching out to the manufacturer and see if they can get someone to come look at it for you. Does anything appear to be broken?
Some bits don't carry over to 2018 era machines, but overall it was good. I didn't need to chisel away the part he did to remove the wash plate. There are less destructive methods like screws that just fit in the holes in the base, or two channel locks. Those don't require also replacing the wash plate.
Thank you. It really all depends model number to model number.
Thanks for this video
Good video. This is exactly the issue I'm having with an LG Washer after about 7 years of use. Of course given that this part is now almost $300, and it would take me an additional three or four hours (as a novice), it makes sense to just buy a new one for about $700. It's not that I don't do some repairs, but if they get into the 3 or 4 hours range, it becomes a net loss for me, as I'm better off clocking those hours at work.
Torque specs please
Curious how come the tub needs to come out?
@Lex Man I couldn't get the nut that secures the shaft to the tub off. I let the oil sit on it for quite a while and spent 3-4 hours hammering away at the pipe wrench with a heavy forged mallet and it didn't move. Someone mentioned they had to use an impact driver and i believe it. Unfortunately I didn't have one. Anyway, i gave up and returned the parts and we went yesterday to buy a new machine :-( hope you have better luck!
@@motif1974next time just chisel the old nut off if you don't have the power to break the rust! A few $$ is better than a few hundred. Cheers.
𝙏𝙝𝙖𝙣𝙠 𝙪 𝙨𝙞𝙧
4” grinder
On the pulsator. 3 minutes
This video needs an addtional descriptor. It is how to change out the pulsator plate and clutch assembly. I bought the clutch, but like in the video, could not remove the plate. Decided to buy another machine rather than spend hours chielling it out, just to have the motor or something else go in a year.
How much does a job like this cost the appliance owner?
Cost about $200-$300 if you do yourself. If you call somewhere, $700-$800
$600-800 easily
In case you were curious what happened to Vladimir after retiring from pursuing Jack Ryan.
Sawadika Mate
12:43 just a bookmark keep scrolling
Thousands of lifetime projects with Woodglut plans.