How To: LG/Kenmore Tub Seal and Bearings 4036ER2003A, MAP61913715 & 4280EN4001B

ฝัง
- เผยแพร่เมื่อ 14 ก.ย. 2016
- How To Replace: LG/Kenmore Tub Seal and Bearings 4036ER2003A, MAP61913715 & 4280EN4001B www.appliancepartspros.com/lg-... www.appliancepartspros.com/lg-... & www.appliancepartspros.com/lg...
Symptoms: seal starts leaking causing damage to both bearings.
Tools: long and short Phillips screwdriver, flathead screwdriver, pliers, locking pliers, large pliers, socket wrench with extension, 11/16" socket head, 1/2" socket head, 10mm socket head, thread locking liquid, penetrating oil, liquid soap, punch, hammer.
Optional: container for water, rope, wooden block supports, block of wood.
This LG/Kenmore made Washer Tub Seal and Bearings replaces the following older part numbers on LG Washers: 1267488, 1267499, 4280FR4048M, 4280FR4048G, 1267497, B00AFSMLMM, 4280FR4048C.
Buy the new Washer Tub Seal and Bearings 4036ER2003A, MAP61913715 & 4280EN4001B here: www.appliancepartspros.com/lg-... www.appliancepartspros.com/lg-... & www.appliancepartspros.com/lg...
Most orders delivered in 2 business days or less.
If you enjoyed this video, please click the like button. Subscribe to this channel for more appliance repair tutorials.
If you need any more technical advice, call us at 1-877-477-7278 or chat with us on our website www.appliancepartspros.com/. We're available 7 days a week.
For more appliance advice, information, and tips, follow us on social media.
Facebook: / appliancepartspros
Twitter: / applpartspros - แนวปฏิบัติและการใช้ชีวิต


This was a very helpful video. I felt confident that I could replace the parts (and get the machine back together and working!). I replaced the bearing seal and spider (which was broken into several pieces and a lot of aluminum dust). Works great now, spins smoothly and functions normally. It saved me the trouble and expense of replacing the entire washer. Will keep this 12-year-old appliance running and out of the landfill. Interesting and satisfying project. Parts arrived in a timely fashion and were correct for the repair. Really pleased.
Took it all apart after watching This about ten times.
My shaft on drum would not brake free , I hit it over fifty times even broke the wood I was using .
Guess mine is welder together from using it for months and months after I ordered the bearings.
You made it look so easy , this is NOT the case.
same problem here... what did you do finally??
Well Thomas I went to Lowe's and got a new one, now I have new bearings seal and gasket that I cant return, guess I'll try and we'll them.
This video saved my life! Thank you!!!
You are very welcome!
Another excellent video. This is the third one I that I am going to use. They made the job easy to complete and saved me a lot of money.
0:40. BUNK! The bearings in my washer were completely corroded. It took a sledge to knock them out. Easy job it is not. But the video is great. You got a subscriber for sure here.
Although the whole video is great, the BEST and most practical advice given in this video is using the rope to lift the spring. Impressive and clearly a trick-of-the-trade! Thanks!
A trick to getting the bearings out is to use a socket that will go through the big ID but land on the inner race of the smaller ID bearing and pound out that way evenly. Then use a bigger socket for the bigger one after the small one is out. Makes light work of the bearings and they don’t damage the seat nor get stuck at some angle as with using a punch.
Great tips on removing springs and plastic hold downs.
I'd like to add for those of us who don't do it in one day (waiting for parts) use a roll of blue tape,
There are a lot of small, different kind of screws, tape them to parts you take off or cover them with tape and then mark what they are for. Also put blue tape on hoses or wires that are out of the way or in the way. Like a flag. That way you wont forget to reconnect them, (I almost did) You'll save a lot of time!
Also put bearings in freezer overnight, it'll help for a smooth transition.
last tip: Don't order from Appliancepartspro. They overcharge. They charged me $50 for ONE bearing while I can get the whole kit for$25 on Amazon. I overspent $100 for stuff that was made in China, NOT OEM! I specifically asked to use USPS and not Fedex since Fedex is slow and throws packages in the street. Guess who thow it in the street: FEDEX in 3 different packages! A week late!
Wonderful video, impeccable explained step by step, couldn't be better thanks
Place both bearings in the freezer for at least an hour to shrink them down and ease the installation. Also, use a hair dryer to heat up the metal casing the bearing fit into to make even easier.
I learned a ton using the old bearing to set the new one. Thank you. Instead of soap, I like to use silicone lubricant from WD-40 or Liquid Wrench. Just get one that says it is safe for rubber, so you know it is safe on plastic. The benefit is it will protect the bearing from corrosion (in theory) and make it easier to remove the bearing next time if there is a next time.
I think you can use STP Oil additive too. I use it when assembling engines and it's slicker than any oil.
Excellent Video, thank you so much!
It was very easy to follow the steps and great help to put it back together without having any screws left :)
Thank you again, I hope I don't, but if I do have another problem with my appliances, your page will be the first one to visit!
Thanks, video was excellent. Was able to complete the job in about 5 hrs and machine sounded like brand new.The bearing seal had pushed out on my machine and was rubbing on spider. That was the cause of the noise. Replaced all of the parts you recommended.
Glad to be able to help with the repair!
Excellent video!
Thank you!
So I have an out of balance issue and have replaced the shocks once already. I have noticed that the from the stainless drum to the "shell" has about 1/4" of runout, or out of roundness. Do you think a bad bearing could be the issue? I took the nut off and the bearing on the back looks really good. So could it be just the inner bearing?
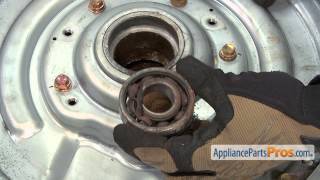
At 12:03 you can see where the bearing seats are chewed up from using a steel punch to pound out the bearings. A brass punch will cause less damage. If there is damage to the seat it should be repaired before installing the new bearings. A riffler file is handy for this.
Very nice video. I have followed it to a tee where you knock out the bearings. My issue is that the gutter seal was shredded. The inner bearing was totally destroyed, even the ball bearings were cut in half. Outer Bearing came out fine, but was defiantly shot. I no longer have that nice smooth housing to put the inner bearing into. So I don't want to order new bearings if I can't put them in. I actually have a good old fashioned hand bearing press, but should I sand it or push it in? Can you even replace that part without replacing the tub? This had been leaking pretty bad, the coils on the motor were pretty gunked up. Not sure how to clean those expcept simple green and make sure they are fully dry.
That sounds like a difficult repair! We'll be glad to help with that, though it may be difficult to go through it all here in the TH-cam comments. Get in touch with us, we offer free technical advice and diagnosis. We’re available 7 days a week at 1-877-477-7278 or you can chat us at our website: www.appliancepartspros.com/
11:49 If your bearings are as trashed as mine were, you might bust the whole thing apart getting it out, but the outer bearing ring is still embedded. Don't be fooled into thinking it's all out when it isn't. If there's a concave surface left inside there, it's the outer bearing ring (the bearing "race"). Soak it some more with penetrating oil and get out the sledgehammer. Then measure precisely with a mm ruler the diameter and depth, and try to find bearings that list those dimensions so you don't order the wrong sizes.
Great work very helpfull
Great video, but like a few others are saying, I too cannot get the shaft to come out of the bearings. Hit is as hard as I could with a hammer, after soaking it in lubricant over night. Even put the bolt for the motor back in it, and then whacked it. Result: bent the bolt but no movement in the shaft. Any other bright ideas on how to get the shaft out?
What is the model number? I've seen some LG models that aren't designed for those to come out and the entire assembly would need to be replaced.
No, congratulations, YOU did great! Outstanding visual teaching, you make it look easy. I will be ordering my parts from you soon.
my larger bearing/seal stayed on the shaft and had to be pulled off with a bearing puller and blow torch. I only wish it were as easy as this video showed. Very good video though.
10:45 The difficult part begins here.
16:40 Looks like his hand got hurt during the process.
Thank you very much vor the video, really useful.
I have the following question. Im on the 10:45 part of the video, and I have hammered really hard the back part of the axis, but nothings happens. It is really stuck!
Anyone have an advide on what can I do to get to dissamble the drum of the wash machine??
Thank you very much.
Best regards.
Good work
Could one do this with a 417-40052990 ? Kenmore/Frigidaire will only sell the entire drum for $900.
Be realistic and show how difficult it will be to get the old bearings out. You'll need a 10 pound sledgehammer and about 20 hard whacks because the bearings will be rusted in.
IT can be that difficult, but not always.
Remember this is on a new machine, also watch a few home owners replace theirs, which are all guaked up with grease and oil, maybe better to pay the Maytag man if you can afford it
xxxx
Their parts are half price on Ebay
What a waste of time. Spent hours hammering it out. Ending up cutting it. Waste of time