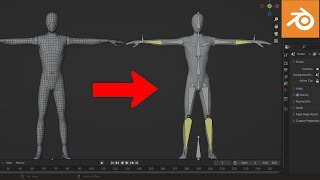
Blender Bones For Beginners - EASY

ฝัง
- เผยแพร่เมื่อ 9 ก.พ. 2025
- Learn how to use Blenders bones for mesh deformation.
More content:
🍉 Join The Patreon: / pixxo3d 🍉
🍫 Skillshare Free For A Month: skl.sh/3aROa69 🍫
____________________________________________
Social:
🔊 Join The Discord Server: / discord
📷 Instagram: / 📷
🐤 Twitter: / pixxo3d 🐤
___________________________________________
🖱️ Get Blender: www.blender.or... 🖱️
___________________________________________
#Blender #3D #CGI


In Blender 4, you need to press Ctrl+Shift to select bones. Pressing Ctrl now applIes the opposite effect of the current brush, and pressing Shift smooths the weights.
Thanks i was wondering why it did not work
U are a hero
Thanks dude, I was getting a bit mad.
huh, it was hold alt+left click for me(ver. 4.1.1)
thx
I literally said "no way; that's so dumb" (dumb how easy it is) out loud to myself after getting the mesh rigged up around 6:30. I still remember trying to learn this kinda stuff in Milkshape in the early 2000s when I was trying to make cooler animations for Counter-Strike guns and it was enough of a pain for me to give up after a few trials (got some cool animations but it just wasn't worth the effort). It's truly amazing how far the tools have come and what anyone with even a little passion and dedication can do these days!
THANK YOU this is fantastic!! I've open blender twice but been very overwhelmed by the learning curve from other videos. I need to work with some models with bones and I now feel comfortable being able to jump in and go!!
Also I love keyboard shortcuts and this was such a great mix of step by step and quick, and I love that you move through things with no bs. It's also great that you touch upon deeper concepts and I'm definitely watching more!
This is exactly what I was looking for when I searched "basic Blender bones", a bare bones basic explanation and project!
This is Really Helpful! if someone's got confused in the weight paint part when he said "Hold out Ctrl and click to other bone." it's now Shift + Ctrl
Ty bro, literaly was starting to lose my mind whether i was doing something wrong or was just stupid. You saved me few minutes of painful searching
The best tutorial on bones on how to get started! Well done!
I was kind of afraid of this subject, but now I feel more confident. Thank you very much!
oh my goodness, ive needed this for quite a while! tysm
This video was so so helpful, thank you!
7:58 hold ctrl and shift and left click to select next bone
thanks you are a life saviour these kind of tips helps really helps a lot 😘😘😘😘
Thank you for this tutorial. It has been very helpful for my commercial projects.
For some reason Blender did a really good job at Automatic Weight Painting. I didnt need to do anything. Anyways, I needed this tutorial. I tried out several other rigging tutorials and gave up. I even tried to learn Synfig to do animations with. But before i got very far, i got frustrated how buggy the program was (after using my graphics tablet to draw in the sketch layer, Synfig stopped recognizing my mouse entirely)... So i came back to Blender and tried this tutorial. This was so simple, that even i understood it!! Thanks!
Thank you very much for your *basic* video 💙
The basics are particularly important for beginners, someone who rarely works with Blender, etc.
You can also show the Blender innovations ❗🌺
There are far fewer people who understand complex tutorials.
You really don't need to apologize if you find the tutorial too easy.
A whole series of small basic tutorials (playlist) would be very nice.
Greetings to the really good performing, knowledgeable artist.
this is actually very well explained and quick, great video man thanks
Thanks for the video. as a total newbie, it was exactly what I was looking for :)
Perfect for my Bollard Wars personal project. 😂😂 Can't wait to play with this.
I"ve probably leveled up 2 years just from the circle drop part. Thank you.
You forgot to mention moving back to Select box after using the Loop Cut. I was stuck on Loop Cut and could not do the shift alt selection to make the bevel.
Also explain 'tab back out'. I notice it moves you from object mode to edit mode.
Left click does not move things in pose mode...How do I move things in pose mode?
Alt R is glossed over so quickly. Which mode to be in?
you saved my sanity in 3 minutes and 18 seconds. I will worship you until the universe dies!!!
Very good starter video. Thanks.
Thanks for the Video! I have been looking for a simple video that explains what I want to do, without all the fud to make the video longer. ❤
Perfect help for beginners, thanks a lot thank you
Nice tips!
At 7:12, holding down Control doesn't allow me to select a bone to see it's weight properties, it only lets me paint. I'm in Blender 4. Any suggestions? Thanks!
Press Ctrl+Shift to select bones. Pressing Ctrl now apples the opposite effect of the current brush, and pressing Shift smooths the weights.
@@baconerieThank you! :)
Just what I really needed! Thank you
Fast as f+++ boi! Thanks man!
Very clear and helpful!
Liar
Thanks man
Nice, nice... Select the bones in Object Mode > Data > In Front to always see them
Great rigging tutorial!
Thank you, so much.
As always, it doesn't turn out the way you did. Then maybe I'll learn. In every lesson I make mistakes that I don’t understand. But I like studying
@TripleLoony it’s because you need to enable an add-on called Rig something by pressing the edit tab and pressing preferences then searching it in the add ons.
parent the object to the armature
@@LegendAlakeizer Not in the context of this tutorial. The add-on rigify just offers some prefabricated systems such as one for a human form. Single bone is still in vanilla Blender.
Observation: if it is complicated too use the spin tool for a cylinder, use this technique too bend a cylinder
thanks you! i can do blender now
You saved my life🎉
Noob question, for 3d printing, can I model a flat hand and use rigging to make different hand poses, or is it only for animation?
Thank you!
liked and subscribed thanks a bunch
Explain how to get into weight paint mode I’ve been trying and it always comes up blank when I added on auto weight paint
1. Go to Object Mode
2. Press SHIFT and Select both Bones and Cylinder Mesh
3. Select "Weight Painting" in top left corner
4. Select one of the 5 bones. Not with CTRL as said in the vid, but with SHIFT + CTRL or ALT, if you have newer Blender version. Make sure the selected bone has a cyan outline
5. Then you can draw and substract weights as shown in the vid
thank you
7:15 ctrl-left click
Scaling out a middle bone affects everything above it on the tentacle despite the weight being focused on a single region. How can I make it flex in and out sort of like the effect of a muscle flex or a breathing chest?
How do you select the tip of the bone? How do you extrude bones?
bro, i have one addon, and i add the bones like that but when i do these like u do. The specific part becomes huge and separete from everything
what if i want to make a rope and some beads in it how to i make the beads follow up the bending with out having 100x beads meshes and have them not deform on bendin
it didn't work for my model the model didn't move with the bones do you have any idea why it would not have worked
The whole model needs to be the same part, it is not gonna work if your model is divided in different parts
YOU ARE MY BLENDER GOD, YOU SAVED MY OWN MADE MODELS FOR MY PROJECT, YOU ARE THE ONLINE JESUS
DO I FR HAVE TO REMAKE ONE OF MY 3D MODELS XD-
The faces on the model I am trying to make bones for separate from one another when I move the bone, does anyone know how to prevent this?
Thank you , this was a great entry way into weight painting!
2:20 why am I not showing the single bone option?
@@lilithwithsomeone because your version is different and it changed, just add the bone
@@adventuredragon2269 he doesnt have the addons required for it for example riggify in preferences
I'm adding a roblox rig, and when I try to hover over armeture, it just says nothing, there isn't an arrow
w pfp btw
in 4.2 some of these options just aren't there like automatic weights
I can't see the bones through the geometry, even when I select wireframe.
I thought I was losing my mind. I selected the bones first before the mesh (left shift on hold) when I parented them both and the mesh didn't move in relation to the bones.
7:50 Ctrl Click doesn't work 😢
I so wanted to like this, I so wanted to learn this. You call it a beginner's video but yet from the very first steps, I Couldn't change the points on the circle, I couldn't find that menu? I can't even extrude another bone. I had to go to another video to find out that the command was shift space bar extrude. I couldn't get past that point spent hours trying to figure it out very very disappointed! You can sit back and laugh if you like but this is the reason that I'm using Zbrush and other 3D programs without any problems. Blender absolutely sucks with its GUI interface. I've never been able to get past just trying to move around the interface!!!
Here are the instructions I wrote down, as I watched the video (in 1/2 speed mode) and pausing quite frequently throughout.
Simple Animation Steps in Blender 3.5
1) Open Blender
2) Highlight cube and press [Delete] to remove
3) Press [Shift]-A, to Add
4) Go to Mesh and then SubOption Circle, click on Circle
5) Go to lower left corner where "Add Circle" tab is located and open it
6) Give "Vertices" a value of 12
7) Go into Edit Mode and band (select) the entire circle
8) Type E (Extrude) and then Z (axis) and move the mouse up, to create a nice, long tube
9) Hover the mouse pointer over about the middle of the tube and press [Control]-R and left click, twice, to set
10) Go to Loop Cut options (tab in lower left corner, like before) and set Number of Cuts to 15 (make sure your tube is not selected (all black lines instead of yellow/orange) before the next step)
11) Press [Shift]-[Alt]-left click and highlight the perimeter of the top edge of the tube, by clicking on the topmost lines. Press F, to fill.
12) Press [Control]-B (Bevel) and bevel the topmost squares about halfway down
13) Go into Object Mode, band (select) the entire tube, then right-click, and select Shade Smooth.
It's entirely possible, if you're using a significantly lower/higher version of Blender than 3.5 (i.e. 2.95 or 4.x), some of the instructions may not work. This needs to be verified and documented.
BROKEN
There is no DRAW option in Weight Paint Mode, Only 4 brushes are There: Average, Blur, Paint, Smear.
i love rasberry pi
You sound like you're a dutchman who moved to Australian
2
1
VERY BAD EXPLENATION
why
I agree
7:09 When I do a ctrl left click, it does not select the armature, no matter what I do, it does not work