Oops, hit the wrong button. I just wanted to say that your creations are nothing less than spectacular and truly amazing. You are gifted! Ok, so you must divulge how you manage to set the piles of dimension boards down on your assembly bench, perfectly timed to the beat of the music ... scary dude ...
Great job, they look fantastic! A lot of work, but that's the way to do it if you're going to make several of the same design. Getting into the rhythm makes it go better and faster, I imagine. Probably took a while to rehang all the clamps though 😄
Hi Ryan, I like your Incra Miter Gauge ... no fear of pulling the cutting back toward you since the rotation of the blade is then pulling upward? Has the Incra made serious precision improvements to your Ridgid Tablesaw? Your presentation is always so dramatic ... it's just cool to watch and listen! You're so right about the oil bath bringing the 3d effect to life
No fear! In fact, I find it almost safer. If there’s going to be kickback, it would propel the material away from me. The INCRA certainly helps me make much larger cuts with precision vs. the little stock miter gauge that came with the saw
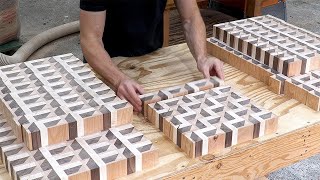
Thanks for watching. The boards themselves took about 45-50 hours to complete. The filming itself took probably 40 hours on top of that. I got 7 boards in total.
Hey man, really like the channel and try to be supportive so I hope this comes as constructive criticism! I think videos like this would be better suited for a horizontal format. I think there aren’t any positives from a TH-cam/Viewer standpoint to having a vertical video. I’ve enjoyed the shorter clips on Instagram but a full length video vertically is far less enjoyable to watch. I don’t mean to be disrespectful or discouraging if that’s how this is coming across. I am trying to be helpful from my place of ignorance. Keep up the great work!
I totally agree! When I started this build, I wasn’t planning on filming it as I had already done a video on this pattern awhile back. But I realized I was filming nearly everything for Instagram anyways that I figured I’d film the build and thought it might be too late to switch to horizontal so I just kept filming vertical. Which works well if someone happens to be watching on their phone, but not so much on an actual screen. I did experiment with zooming in on all the footage to make it fit the 16:9 horizontal ratio but it didn’t look too good so I just stuck with what I had been doing. In hind sight, if the first bit of video was in vertical and then it panned out into horizontal, that might have been a cool effect. Long story short, I sincerely do appreciate the kind and constructive feedback and I’ll be sticking to the proper video format after this. Thanks for watching!
@@ryanhawkins I had figured that was the case. Sometimes I shoot a really cool shot for a short but I don’t shoot it horizontally or can’t retake the shot and I have to make do. Can’t wait for more content


unbelievable!! it's beautiful. what a process
Oops, hit the wrong button. I just wanted to say that your creations are nothing less than spectacular and truly amazing. You are gifted! Ok, so you must divulge how you manage to set the piles of dimension boards down on your assembly bench, perfectly timed to the beat of the music ... scary dude ...
I do it within the editing software (premiere pro), simply set markers to the beat and then trim/adjust the footage to start and stop at the marker.
This man has enough clamps and wood glue TO HOLD THE WORLD TOGETHER! Just in case anything ever happens, we know who the avengers should call.
Фантастика!!!
I love your boards ;) ! Awesome work.
Thank you!
HI there so so much work but the result r stunning. weldone. great.
Thank you!
i have got to try this
Good job 👍👍👍 .
Thanks!
Great job, they look fantastic! A lot of work, but that's the way to do it if you're going to make several of the same design. Getting into the rhythm makes it go better and faster, I imagine. Probably took a while to rehang all the clamps though 😄
If I had to guess, I’ve probably got an hour or two total of just hanging clamps back up 😁
Hi Ryan, I like your Incra Miter Gauge ... no fear of pulling the cutting back toward you since the rotation of the blade is then pulling upward? Has the Incra made serious precision improvements to your Ridgid Tablesaw? Your presentation is always so dramatic ... it's just cool to watch and listen! You're so right about the oil bath bringing the 3d effect to life
No fear! In fact, I find it almost safer. If there’s going to be kickback, it would propel the material away from me. The INCRA certainly helps me make much larger cuts with precision vs. the little stock miter gauge that came with the saw
I hope to be able to make one of those one day. How many board feet of wood does one take?
For a 2”x 16”x20”, roughly 5 bd.ft of walnut, 9 of cherry and 4 of maple.
Magnífico !
Thanks!
One of the best music videos I've watched lately.
Curious: how long did the board build take and how many did you create?
Thanks for watching. The boards themselves took about 45-50 hours to complete. The filming itself took probably 40 hours on top of that. I got 7 boards in total.
I like it so much,where can i buy it?
Through my website, link in description 🙂
@@ryanhawkins Thks
I have nothing to say really, but I appreciate your content, and wish to help with the yt-algorithms.
🙏🙏
Perhaps there are some people who could afford and desire kitchen counters made in this fashion?
Be an interesting market to get into!
Hey man, really like the channel and try to be supportive so I hope this comes as constructive criticism! I think videos like this would be better suited for a horizontal format. I think there aren’t any positives from a TH-cam/Viewer standpoint to having a vertical video. I’ve enjoyed the shorter clips on Instagram but a full length video vertically is far less enjoyable to watch.
I don’t mean to be disrespectful or discouraging if that’s how this is coming across. I am trying to be helpful from my place of ignorance. Keep up the great work!
I totally agree! When I started this build, I wasn’t planning on filming it as I had already done a video on this pattern awhile back. But I realized I was filming nearly everything for Instagram anyways that I figured I’d film the build and thought it might be too late to switch to horizontal so I just kept filming vertical. Which works well if someone happens to be watching on their phone, but not so much on an actual screen. I did experiment with zooming in on all the footage to make it fit the 16:9 horizontal ratio but it didn’t look too good so I just stuck with what I had been doing. In hind sight, if the first bit of video was in vertical and then it panned out into horizontal, that might have been a cool effect. Long story short, I sincerely do appreciate the kind and constructive feedback and I’ll be sticking to the proper video format after this. Thanks for watching!
@@ryanhawkins I had figured that was the case. Sometimes I shoot a really cool shot for a short but I don’t shoot it horizontally or can’t retake the shot and I have to make do.
Can’t wait for more content
Toop Toop