Geometric Cube Pattern Cutting Board || Woodworking

ฝัง
- เผยแพร่เมื่อ 3 มิ.ย. 2024
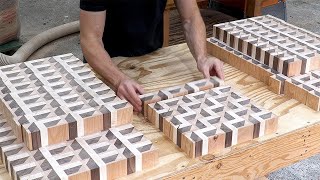
- This is my take on a geometric cube pattern that I first saw put together by MTMwood. This board is made out of 3 hardwoods: maple, cherry & walnut. The finished dimensions are 13"x22" and 1.5" thick. If you'd like to see some other things I"ve made, check the links further down.
Thanks for watching!
Ryan
▶️ Want to support this channel?
SHOP BOARDS: www.westcoastboards.ca/shop-1
PAYPAL: bit.ly/3NOhbBO
CRYPTO: bit.ly/3u6Zx4s
▶️ Follow me
Instagram: / westcoastboards
TikTok: / westcoastboards
▶️ More of my videos
3D Patterned Coffee Table
y2u.be/npjxCYLcuFs
From Barrel to Butcher Block
y2u.be/uiu0Hkd6mb0
3D Patterned Cutting Board
y2u.be/Jrh_g79Rzh0
And some links to products used in this video:
Bumblechutes Wood Conditioner: amzn.to/3uHPkMD
Freud Glue Line Rip Blade: amzn.to/3iW1gE5
Diablo 80 Tooth Fine Finish Blade: amzn.to/3AOU1Up
GRR-RIPPER 3D Push Block: amzn.to/3xVopuF
Gravity Heel Kit For GRR-RIPPER: amzn.to/3D08oHI
3M BlueTooth Hearing Protection: amzn.to/2VVVB8v
Silicone Glue Brush Rockler: amzn.to/3yZumrH
Framing Square: amzn.to/3iXIFrn
Metric Tape Measure Stanley: amzn.to/2XvzKox
Router Flattening Bit Freud: amzn.to/3CZu9qM
Pipe Clamp ¾” Bessey: amzn.to/3iV9KLL
F-Style clamps Bessey: amzn.to/3k2KhPL
Titebond III Glue: amzn.to/37OE44p
Camera Tripod: amzn.to/2XCxT1q
Sony A6400 4K Camera: amzn.to/3hRPR78
Iphone Tripod Mounting Bracket: amzn.to/3m8pptb
Belt Sander Makita 4”x24” : amzn.to/3g95WEY
Planer 13” Dewalt: amzn.to/3xVNe9N
Planer Knives: amzn.to/3g7fD6L
Men's Silicone Wedding Band: amzn.to/3Czu5gn
Custom Branding Iron: brandingirons.com/
As an Amazon affiliated member, I earn a small commission from qualifying purchases.
0:00 Intro
0:34 Milling Lumber - Miter Saw/planer/jointer/bandsaw
2:50 First Glue Up
4:00 Second Milling - Joint/plane/miter saw
5:28 Table Saw - Ripping Bevelled Strips
9:10 Second Glue Up
11:00 Third Glue Up
12:05 Table Saw - End Grain Strips
12:41 Final Pattern Assembly
13:40 Final Glue Up
16:11 Flatten & Trim Sides
17:33 Router Fingerholds & Edge Profile
18:04 Sanding
19:23 Oil
20:17 Beeswax & Rubber Feet
21:04 Finished Board - บันเทิง


Insane! Your ability to see the outcome is pure talent. Thanks for taking the time to share with us.
Pure talent as a result of consistently building your skills and demonstrating passion for the work. Your love for the craft is quite evident. What an inspiration 😊
Love the sound editing, especially at 12:07 hahaha
Outstanding. Incredible 3d effect from all angles. Excellent craftwork.
Not just outstanding craftsmanship, but stellar production and editing. I'm sensing Guy Ritchie influences with a twist of Japanese game show and 8-bit homebrew. Well done, sir. Take a bow.
Love this comment!
You’re such a great woodwork artisan bravo 🎉 👏
Your glue up stressed me out so bad 🤣🤣🤣 awesome video awesome piece
Thanks!
I've done this pattern myself. If it wasn't for all the waste I'd probably make a bunch more. Nice work.
Me to Travis! I made 6 like this and your right on the waste!
|:-
Nice nice nice bro great jobs tnx
I have nothing to say really, but I appreciate your content, and wish to help with the yt-algorithms.
Thank you my friend :)
That was pretty sick !!
You do such a great job on the cutting boards! 👍🏻🙂
You blow my mind everytime I watch one of your videos. I see the finished product in the thumbnail but the whole time throughout the video I don't understand how you'll get there until the final step, then I can't even recognize the original individual pieces to see that "ah ha" moment. God has given you an amazing talent, keep up the awesome work
So kind of you to say, thank you!
This is so beautiful! Keep up the great work
Beautiful work
Beautiful board
Absolutely amazing. 💪💪💪
Wow!! Absolutely awesome!!! I am on a quest to emulate you!!
Amazing, as usual. Thanks for sharing.
Thank you
Heel erg knap gedaan.👍
I really appreciate your editing at all the appropriate moments which show close ups of the manufacturing steps. If only I could understand how you get to all those cuts in an impossibly complex pattern. Fantastic work! Not sure if your dog knows what is going on but you sure seem to.
Thanks for the positive feedback!
Оплодисменты стоя
Отличная работа.
INSANE!!!! Description of cuts would be great!
Great job
Thanks for share
Awesome product. Maybe add some narrative. Otherwise enjoyed watching.
👍🏼
HEY My name is Ryan too !!!
pure art
Astounding!!
If you ever enter into a belt sanding competition I’m putting my money on you. Nice board!
You Sir are amazing, thank you
Thank you!
That's a very nice
Beautiful piece. You definitely have a talent. My wife and I enjoy the sounds of the work being done, however we also enjoy some narration in videos as well, and found the clamping sounds pretty shrill 😬. I'm definitely not in any position to tell you how to make a video, but just my preference would be some nice balance of wood working sounds and narration; not just one or the other. We love watching Blacktail Studios, however he never has the woodworking sounds and is only narration. Hearing you talk about your work could bring light to your personality and be a benefit. Just a thought. Again, I am in no position to tell you what to do. Best wishes and keep up the awesome work!
Such good feedback! Thank you for that. It definitely helps me figure out how to better edit my videos. I'm a big fan of Cam's channel as well. All the best to you and your wife :)
Beautiful board, I definitely do not have the patience to attempt doing this.
Hi Ryan. I really enjoy your videos. I’ve made quite a few of the MTM boards, but I think the 3D cube one is the most wasteful.
With that in mind I really think you could save yourself a few quid on glue if you only applied it to one surface. You really don’t need to do both- I’ve never had a board de-laminate, ever. Too much glue only increases the curing time, doesn’t increase strength, and most of it is squeezed out all over the place anyway.
Oh, and your video editing is brilliant.
Hi Ryan! Once again an absolutely F***king awesome and a beautiful piece of work! I totally love the editing in this video, especially the sounds that just made me giggle, whilst watching a master at work. Very different to your previous editing but so cool! Don't give up on your previous style of editing because that is also cool! Keep up the good work & thanks for uploading!
This is so great! Is there a particular wood glue you use, and/or is there something you do to increase your work time?
I generally use titebond 3, and there's no way I'd be able to use it for the time it takes to glue this up. Absolutely brilliant Q-Bert board (as I think of them as a product from the 80's!) Thanks for the edit!
Glad you liked it! One of my oldest videos, was still learning how to edit 😂 - I use Titebond 3 for all my boards
Fucking awesome work.
Gorgeous as always Ryan...
Quick question. Can you tell me where you got your oil applicator??
Thank, and keep em coming...
Thanks Dale. Applicator is from Clark's, try this link: www.amazon.ca/dp/B078SJPK7X?ref=exp_westcoastboards_dp_vv_d
Hey Ryan, love your shop and your work. I make similar boards and I can't help but ask, did you raise the grain more than once? And if so, why?
I might go a little overkill with raising the grain. I do it in between every grit after 80 grit. I'm of the belief it does make a difference in the smoothness of the finished product. But I can't say I've ran any real testing to prove it makes a difference. One thing I do believe it helps with is keeping the glue lines from popping up afterwards and being able to feel them when you run your hand across the board. I find if you continually raise the grain and knock it down, that problem doesn't happen. If I was doing edge grain projects, I'd just raise the grain once, but end grain is a different beast and I do everything I can to tame it.
Good to see you back mate, I'm going to ask the question ⁉️ Do you ship to Australia 🦘
I have shipped to Australia, I'm happy to give you a quote.
Absolutely give me a quote for three boards 👍🏾
Trabalho impressionante que exige muita paciência e concentração, o cuidado e a habilidade com que fabricou a prancha de corte fez com que fizesse uma obra de arte de valor inestimável. Parabéns pelo vídeo, continue fazendo maravilhas desse tipo e muito mais.
Wonder what the board foot waist percentage is.
👍👍👍👍👍👍👍👍👍👍
How long did this take you to make?
fascinating video and lovely board. I hated the sound though and had to watch on mute. I much prefer the commentary style.
Great feedback! Seriously. It helps me figure out how to make better videos.
Beautiful work!
... 15'46": really glue was dried just 1h later? 😳
Thanks
Thats about right
This was just a glue clean up, then it goes back into clamps again.
@@bigredruss73 I do the same thing. Saves ALOT of time later
I take the clamps off just long enough to scrape the excess, then put them back on.
Thích làm đủ thứ... Chào các bạn thân yêu
👍👍👍
I wonder how much that would cost if you put it into A Museum of modern Art, I bet some rich tosser could pay you enough to retire??? You have a real talent 👍
Thanks for watching!
nice board..a lot of work....some of your rows are off though.
There's for sure a few imperfections in this one. :)
I stopped the video at 1;57 . ALWAYS !!! put the crown side UP when you joint the board
ต่อทำเปนโต๊ะหรือเก้าฮี้มั้งสิ
ทำแต่เขียง เอามาต่อทำโต๊ะเก้าอี้มั่ง
👍🤘👍🤘👍
Completely useless video, also shown in sped up manner with no audio or explanation as to the processes.
Dude, I totally agree. I’m not happy with the editing I did on this one. Been seriously considering doing a better version where I actually explain what I’m doing. Thanks for the feedback!
@@ryanhawkins Hey mate, if you do another can you do something that no other site does... specify the initial board that you use with full dimensions. This way inexperienced people such as myself know to use say by 10 inch wide 4/4 or 8/4 boards and at what initial length to cut them. This would be so helpful!
dude the pausing, is making me think this was made for children -.-
David Copperfield of woodworking
Great work do you have a link for the feet you put on this?
Try this one: www.amazon.ca/dp/B07PX8TDJX?ref=exp_westcoastboards_dp_vv_d
@@ryanhawkins sweet thank you!! I wanted to support you with your links of things I need to buy.
Beautiful work