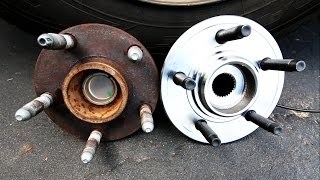
How to Replace Wheel Hub 2003-2011 Honda Element

ฝัง
- เผยแพร่เมื่อ 4 ม.ค. 2023
- Buy Now!
New Wheel Hub from 1AAuto.com 1aau.to/ic/1ASHF00173
This video shows you how to install a wheel hub on your 2003-2011 Honda Element. Not only can a worn wheel bearing or hub be annoying if it is noisy or vibrating, but it can also lead to accelerated wear in other parts, or unsafe driving conditions. Replacing your worn bearing or hub with a quality TRQ part is a safe, smart, decision.
This process should be similar on the following vehicles:
2003 Honda Element
2004 Honda Element
2005 Honda Element
2006 Honda Element
2007 Honda Element
2008 Honda Element
2009 Honda Element
2010 Honda Element
2011 Honda Element
Tools you will need:
• Flat Blade Screwdriver 1aau.to/oa4g/1AXAA00013
• Impact Screwdriver 1aau.to/obq/1AXAA00047
• Pry Bar 1aau.to/oJk/1AXAA00020
• 19mm Wrench 1aau.to/oLU/1AXAA00010
• 10mm Socket 1aau.to/oaNd/1AXAA00017
• 12mm Socket 1aau.to/oa5w/1AXAA00015
• 14mm Socket 1aau.to/oa5w/1AXAA00015
• 17mm Socket 1aau.to/oa5w/1AXAA00015
• 19mm Socket 1aau.to/o3o/1AXAA00043
• 22mm Socket 1aau.to/omj/1AXAA00266
• 36mm Socket 1aau.to/obq/1AAST00006
• Air Compressor
• Brake Caliper Hanger 1aau.to/ogQ/1AXAA00084
• Trim Tool Set 1aau.to/oVH/1AXXX00006
• Needle nose pliers 1aau.to/ox6/1AXAA00051
• Needle nose pliers 1aau.to/ox6/1AXAA00052
• 1/2 Inch Impact Gun 1aau.to/onN/1AXAA00252
• 1/2 Inch Breaker Bar 1aau.to/opX/1AXAA00078
• Ratchet 1aau.to/obgK/1AXAA00016
• Torque Wrench 1aau.to/oanq/1AXAA00044
• Anti-Seize Grease
• Brake Grease
• Brake Parts Cleaner
• Cloth Rags 1aau.to/oxq/1AXSS00035
• Gloves 1aau.to/oAV/1AXSS00048
• Safety Glasses 1aau.to/ouK/1AXAA00343
• Floor Jack 1aau.to/oQR/1AXAA00068
• Hammer 1aau.to/oLN/1AXAA00091
• Jack Stands 1aau.to/oLI/1AXAA00065
• Punch
• Sledge Hammer 1aau.to/oLN/1AXAA00091
• Wheel Chocks
• Wire Brush 1aau.to/op7/1AXAA00079
Subscribe: / @trq
⚠ DISCLAIMER:
While TRQ strives to make the information provided in this video as accurate as possible, it makes no claims, promises, or guarantees about the accuracy, completeness or applicability of the content. No information contained in this video shall create any expressed or implied warranty or guarantee of any particular result. All do-it-yourself projects entail some risk. It is the sole responsibility of the viewer to assume this risk. TRQ is not responsible or liable for any loss damage (including, but not limited to, actual, consequential, or punitive), liability, claim, or any other injury or cause related to or resulting from any information posted in this video. - ยานยนต์และพาหนะ


![[TH] Esports World Cup : Point Rush Stage](http://i.ytimg.com/vi/eLU-jnYp3Zs/mqdefault.jpg)


√ Watch the Video
√ Buy The Part at 1A Auto 1aau.to/m/Shop-TRQ-Parts
√ Do it Yourself
√ Save Money
Was the castle nut supposed to bend like that when being removed? Did you damage the part?
This dude broke a couple of parts in this video 🤦🏻
A replacement back plate / dust guard was never fitted? Seems like a big omission.
How come you didn’t show the old bearing coming out
Appreciate your videos my friend 👍,.. methodical and patient .
A hydraulic press is required . It should have been added to the list of 'Tools you Need' . Don't try this without access to one. You'll get stuck halfway thru the job. Otherwise good info.
those screws are JSP screws which are slightly different
Thank You !
Wd40 works great
so the abs sensor should be included in the kit then
Cual es el número de parte del rodamiento honda element 2008
Note to self - don't park in 3 feet of water, makes job much easier! Clearly owner of this vehicle knows nothing about cars. Only reason it is still running because it is a Honda.
LOL TRQ videos are the worst