CV Axle Seal Leak/Repair - 2004 Toyota Corolla

ฝัง
- เผยแพร่เมื่อ 16 ก.ย. 2024
- Check out my good friend Levi's channel here: / laverneas
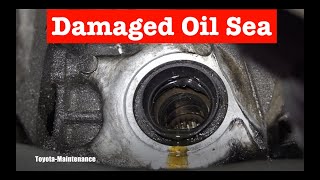
Replacing the drive axle seal on my 2004 Toyota Corolla S. Had it all apart when I put the transmission in 3 weeks ago. Didn't follow my own advice of "don't do dumb stuff". If you have it all the way apart - replace the seals even if they "look good"!
Using the amazon links below to make purchases helps keep my channel going and growing. You don't pay any extra for your purchase and Amazon pays be small percentage for sending business their way. I thank you in advance!
Affiliate Links - products I believe in and support
AIM Extreme Duty Lubricant - planetsafelubr...
Headband light bar - odelfi.com/?re...
Parts and tools needed for this job:
Tools needed for Axle Seal replacement:
Nitrile Gloves - amzn.to/2tl2rAW
Hydraulic Jack - amzn.to/2rwUyau
Jack Stands - amzn.to/2tkGDWf
Bungee Cords - amzn.to/2rwyg8S
Metric Socket Set - amzn.to/2rwHbab
Screwdriver Set - amzn.to/2stq6zd
3 Lbs Sledge Hammer - amzn.to/2rwMMgB
Pry Bar Set - amzn.to/2st6dse
Oil Drain Catch Can - amzn.to/2rNPfTw
Blue Shop Rags/Towels - amzn.to/2tlixdR
Oil Absorber - amzn.to/2sLrq3m
Grease Gun - amzn.to/2rO8g8h
The New Seal which is the whole point of this video - amzn.to/2sIC5eH
Gear Oil - (my model calls for GL-5 - amzn.to/2rNQPVs


Thanks for the shout out!! Great video.
I went through a bunch of these problems when I replaced stuff on a new-to-me corolla. Glad you documented all this for other corolla owners out there. The front engine mount on my corolla bricked and caused me to work on both axle seals and replace the engine mount. I've always used cat litter for the oil absorber, its a little cheaper. Proud of your hard work, keep posting.
Thanks man! As for cat litter, it’s basically a one time use and throw away. Some brands turn to clay and make a bigger mess. I’ve found in the long run a big bad lasts me years! I’m still using the same bag with very little degradation or loss. If you make messes like I do the oil absorber saves money in the long run. Good info.
My seals are still holding strong and have no more major mechanical issues since! Love these little cars! 🙌🏼
Sweep faster!!!! Cool video. I remember having a much easier time attaching the caliper/wheel/thingy back to the strut on my neon than what you showed. But i used a bullprick to shove into one of the holes than pushed the bolt through the other hole and boom it was rdy for me to put the other bolt in. Thanks for the video. Keep up the good work!
Great Video were proud of you . Keep up the hard work .
All you had to do was remove the tie rod. Didn't have the mess with the two strut bolts. NOW you have to get the car aligned.
jim davidson there doesnt seem to be any camber adjustment for those holes to bolt the strut in. The alignment should be exactly the same if not very close. I have taken out struts on my car multiple times and when I got the car aligned it didnt Impact anything
All you had to disconnect was the 1 bolt and 2 nuts on the lower control arm. Didn't need to disconnect the strut or caliper.
Great video!
Good video only thing I had a problem with is that you did not show us the new axle seal
It was too hard to video the actual installation and I forgot to video the unboxing of the new seal. Sorry about that. 😅
While it's hard to video the actual seal installation, demonstrating it on a workbench is easy. Explaining the importance of not hitting the trans case with metal which would damage the machined sea seat and ruin any chance of ever sealing again. The ever leaking trans is the result. A 2 inch pvc pipe with flush cut ends generally works well as a tool for me. Cut the pipe to whatever length to allow tapping with a hammer. Also, I like to place a pvc cap over the tapping end which applies pressure to the entire seal at once. The pvc pipe/ tool should be held square to the seal surface. So, before inserting the seal, align the pipe to the seal surface to visualize the pipe placement and tapping clearance. This extra step is well worth the seconds of time it takes, just sayin. Thanks for the video !
Great job! Only thing I have learned from videos is not to remove the strut bolts since it is not necessary. Only the lower 3 bolts on the ball joint/control arm. Removing 2 big strut bolts can mess up alignment unnecessarily (camber). After watching many of these videos I wish I understood how that split ring on the transmission side actually works. You pry it out which makes it release but then it snaps into place somehow when installing. I am thinking it may have something to do with the ring being forced out once installed due to centripetal force keeping the side opposite the slot outside of the axle spline diameter hence locking it. This would seem to indicate that getting it oriented with the slot on the bottom would make it remove easier for the ring would naturally fall due to gravity so it is concentric with the shaft. I have to do this job this weekend so appreciate the posting of this video. Thanks!
That’s great info thanks for sharing. 🙌🏼 I am literally learning all this as I go. I do make mistakes and take unnecessary steps sometimes. Learning from others experiences are valuable to me and my viewers so thank you.
also what helps is if the opening in the ring is facing down
Hey, very very good advice.
Same thing happened to me. Lol.
After change the seal my care shaking while shifting gear D to N , what is the reason behind this . I am from Bangladesh. Car Toyota corolla Axio 2011 Model ( CVT gearbox ).
No idea unless something didn’t get put back together correct or tight.
If the car's front-end shakes from side to side between 20 and 30 miles per hous, the CV axles might be out of balance. I had that problem with a Jeep patriot and some aftermarket (non-original) CV axles. Solution, I bought the brand-new original CV axles and installed everything with the specialized service tools. The problem was solved. With the right tools and Original Equipment Manufactured parts, the problems disappeared immediately.
@6:54, where does that spring go when you reinstall it?
The new seal will have the spring inside of it. The old seal fell apart so badly the spring popped out. Inspect your new seal and you’ll see the spring inside the lip. 👍🏼
You said " gear oil ". My toyota corolla calls for transmission fluid in the gearbox ( differential ).
I’d question that. Unless yours is an automatic transmission. Mine is a manual and it does require gear oil. If you are sure then go for it. But make sure before you do it. The wrong fluid could cause major issues/damage!
thank you.... oops yes, mine is automatic and the book calls for it. Even Toyota HQ wrote me the same thing ... I had to be sure. It once used 5 w oil but then people started changing over and so it did in the books as well.
What size socket?
Lots of sizes. Get a metric set and you’ll end up using 3-4 sizes for this job.
Tripod Brother,...tripod...;)
I just replaced new seals on mine and the passenger side is still leaking i read a thread whr someone mention that u need to add grease to the input shaft whr the seals goes
That sounds like a "Pro Tip", mine haven't leaked since replacing, I can only imagine how frustrating that must be. Did you make sure the little spring stayed on the seal when the axle shaft was installed? If that comes off it can cause a small leak like you mention. Just another thought.
@@troysgarage i did everything correctly i assume yes it still has the spring but i got the basic seals from oreilys or do i have t o get a good name brand? The one thats leaking is the passenger side seal
I’ve always had good luck with the cheaper seals. That’s just odd. The seals are cheap enough, you may just need to replace that one again. No fun but better than the smelly, sticky mess. That sucks though! 🤷🏼♂️
On my Toyota matrix, the seal should be placed flash with the outside, because it can seated deeper but then it leaks (learned the hard way to take pictures before removing old parts). It's a stupid design because you don't know how far to seat the seal.
I love this comment!!!! I just noticed that mine is leaking again (after my sons been driving it for months)! 🤨 I may have noticed it sooner if I were driving it daily! 🤷🏼♂️ But after driving it for a few days again, it needs a LOT of front end suspension work! So subscribe and ring the bell to be notified so you don’t miss that one. It’s coming soon’ish! 👍🏼
What is the name of the seal so I know which seal to buy
The seal I used is linked in the description. Second link from the bottom of the list. Good luck brother glad to hear you are thinking of tackling it yourself! 👍🏼
You couldn't just tell me the name of it
From the description of the part: “Genuine Toyota 90311-34023 Type-T Axle Shaft Oil Seal”
I wasn't aware mine's cv boot has cracked open already. Just have discovered today. I think the car was running with the cv boot like that. Will it cause damages if not replaced immediately? I found no oil leak anyway. Just the boot wet with grease.
Sooner than later. When all the grease comes out the joint becomes dry and will wear out quickly. That is the outer portion not the inner seal this video is about. But yeah you’ll want to get that replaced. 😱
you know it would be a great video if you show us how you remove stuff. You just talk and talk and talk.
I’ll subscribe to your channel, let’s see how it’s supposed to be done! I’ll be waiting. 🤷🏼♂️
Great video 👌
Thanks appreciate that! 🙌🏼