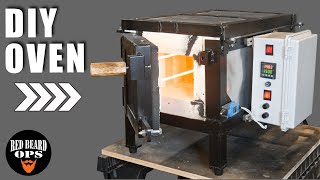
Making A Heat Treatment Oven - Finale

ฝัง
- เผยแพร่เมื่อ 25 ส.ค. 2024
- The final steps before wrapping up this build are to make the control box and wire up the components.
There will be a full build article on my website soon.
You can help support the work I do in making these videos:
Plans for sale: www.ibuildit.ca...
Support this channel on Patreon: www.patreon.co...
Did you know I have other TH-cam channels?
My main channel:
/ jpheisz
More videos on my second woodworking channel:
/ ibuildit
My home reno channel:
/ ibuildithome
Website: www.ibuildit.ca/
Facebook: / i-build-it-25804801424...
Instagram: / i_build_it.ca


![ทางเดินชีวิต - ธีเดช ทองอภิชาติ x อ.ไข่ มาลีฮวนน่า [Official MV]](http://i.ytimg.com/vi/1f3wcG16dd4/mqdefault.jpg)


The final steps before wrapping up this build is to make the control box and wire up the components.
There will be a full build article on my website soon.
You can help support the work I do in making these videos:
Plans for sale: www.ibuildit.ca/plans.html
Support this channel on Patreon: www.patreon.com/user?u=865843&ty=h
Did you know I have other TH-cam channels?
My main channel:
th-cam.com/users/jpheisz
More videos on my second woodworking channel:
th-cam.com/users/IBuildIt
My home reno channel:
th-cam.com/users/IBuildItHome
Website: www.ibuildit.ca/
Facebook: facebook.com/I-Build-It-258048014240900/
Instagram: instagram.com/i_build_it.ca/
John, we are continually in awe of your skills. That is why you make your videos.
This is a really great build! The most satisfying diy projects are not the ones that look the prettiest, but the ones that remain useful for years.
Great design .One of the best I have seen on you tube . simple low cost . Hell it beats $ 800 for Bar Z's I like your channel your honest and real . No fake personality character . Average Joe . Keep it up.
It lives . Great job .
Great series John. Wish the thermocouple was inside the control box. Can't wait to see what you do with it!
Very, very nice job John! Looks nice and tidy! If it were red it could pass as a commercial product!
John you are a Master builder!
John, you are just too awesome, man. incredible work. Congratulations.
Great Build John. Now to heat the knife steel. Thanks
Super cool project. Way better than my charcoal chimney and leaf blower method. I might have to give this a go myself.
Absolutely brilliant. Am surely looking forward to your website layout of the wiring schematic. I must build one of these. Thank you for this series!
Awesome build, John. It should serve you well.
Really nicely done. Love your ingenuity John.
Great finale John. Thanks for sharing this.
Oh BTW, it totally needs a paint job! I vote for battleship grey.
It looks absolutely perfect. Great work !
Looking forward to seeing what you make with this
Very interesting video John! I'm guessing you really got into this build because it was both something different and something you have been wanting to build for yourself for a long time! You're going to enjoy making your knives even more now!
Man, you are amazing!! Your skill surpases so, so many on youtube!!!
Thank you, that's high praise :)
Pretty good, John.
Really nice job John!
Very good series!! I saw a lot of home made oven like this demoed on youtube and they all look very hard to achieve. You made your project simple and down to the essentials so now I feel like this is doable. Thanks!!
Nice build. Better as some industrial equipment that you can buy. 👍
Nicely done John, I like that
Found this series really interesting
Didn't feel like a scrap bin project to me!
Guide to my channels:
Blue - faster, usually no talking quick projects on any subject
Red - serious woodworking content only, usually detailed builds.
Home - just home reno and improvement stuff
Black - everything else, including this kind of metal working project.
Awesome build John!! Cheers
NICE Build John.. I doubt I'll ever go to this extreme but SWEET never the less.. Gary/Hk
Amazing skills sensei !
Freaking awesome!
Fantastic result!
Awesome build! Time to open up that submarine sandwich shop and start toasting some buns!! 😜
Hey John, amazing build! It just looks perfect!
If I understood everything well, you're using your PID regulator and solid state relay as an on/of function now. If you really want to, you can make your oven much more precise by actualy using your P and I function of the PID (because a temperature regulator is a slow process, the D action isn't going to do much). A PID has the option to use your output with pulse width modulation to drive your solid state relay and keep your oven on a constant temperature instead of a high and a low point. If you want to know more about that you can always send me a message and I will gladly help you out with it because tuning those things is part of my daily job.
I really love the design!
Turned out very pro! Love it
really nice build john...paint it red with white stripes so it looks like the blackbox from an airplane
A great build. I enjoyed this series a lot, even though I'm not into working with metal (yet).
You repeated several times that you didn't try to make it look good, but there is definetely a beauty in a functional object like this that is well designed and properly made. And projects like this on your channels have contributed quite a bit in me appreciating that more and more over the past few years.
Fabulous build John! Looking forward to seeing you work on some knives coming up. How about some chisels?
great set of vids, good build. thanks John!
Nice !!!!
Love your channels.
a very decent unit. everything there Id expect from quality commercial unit.
Awesome!!!
awesome John
Well done. Wow.
That is a fun new build. I would be interested in the details on the electronics, but I like your videos and explanations, so I may be biased. :)
This is a main channel project!!
This is exactly the same setup I used to add temperature control to my electric oven range burner. The entire time I was watching, I was just comparing our temperature controllers and it definitely seems like we have the exact same kind. Yours is for hardening steel, mine is for softening your belly.
Looks awesome also
Looks great I think you should give it one can of spay paint and then it would look totally professional
This series is the kind of videos that I really love to watch. Thank you!
FYI, some of those PID controllers are actually 12vDC for the supply power. Imagine my surprise, when following the directions, and hooking it up to 120vAC. Let the smoke out pretty fast. The replacement had the same error in the manual, but it works fine on 12v.
It looks so bad ass. Like something you'd see in a mad genius's lair.
Good job.
"Stand back." A lot of funny moments in this video, and a very cool project. I know you aren't looking for this thing to win beauty contests, but I hope you'll give it a paint job. I just feel like anything that you've put effort and care into building should look good, at least to some degree.
Awesome build john!!!!
Fantastic job!
Ahhhhhhhh.. now i understood.
The sheet metal don't look so thick on the video kkkkkkk
Tks John
Pumped to see the projects that come out of this, I have greatly enjoyed your previous knife builds. The pacing for this series of videos was spot on, just enough in each episode to keep me wanting more.
Excellent! Also looks awesome. exit Shabby Chic, enter Post-apocalyptic Industrial!
Awesome build. Melt some aluminum cans for projects or casting.
"Plug it in to make sure it works... Stand back". Lol.... I call that the smoke test.
Great series on this build. As usual, I'm very impressed!
Nice work John, I really enjoyed this build....very interesting and informative. Nicely filmed and edited and I am looking forward to se it in action in the future
I look forward to using this item in the next Fallout game.
Very nice build. I've saved it to my "tool builds" list so I can find it when I'm ready to build my own. Thanks for sharing this build.
Great build. Really professional looking machine.
You've inspired me to make my own rather than buying one. They are ridiculously priced, but breaking it down the way you did looks extremely affordable
Go for it :)
any place to order those bricks from in canada?
I am pretty sure you can order those bricks from any box store or fireplace supplier
HoYin1600p Look for shops that sell kilns as that is where I found them. The big box stores here in Brandon don't carry them.
oh boy, long thin pizza build. :D
nice job
I should try it...
Votes here to see John cook pizza in that thing! And then cut the pizza with a new handmade knife. Or not, I'm happy either way to just see JP - British Steel & Boston T-Shirts.
Great job man! Thanks for the video.
Great series! I look forward to the projects that you've been putting off 😁
John great great video series. I want to purchase the same electric parts and wires as you did and build my own oven. Would you be willing to share the detailed material list for the parts? The "Dummies" version for the electrically challenged? Thanks again for the great videos.
I am really looking forward to seeing where this is going to take us.
A couple of interesting knife projects, for sure.
Just found your channel - Very good job on the oven. Having never worked with a few of the electric things mentioned what is a PID? Obviously it is sensing the thermocouple and controlling the relay, but I have never heard of a PID. I will be building one in the future as I could use it for heat treating some lathe HHS tool bits, .... etc. Thanks for a great video!
Wow. I wish I'd asked for your input on my coffee roaster project. It's on my TH-cam, but I'm pretty rambly, but the last video I posted talks about the control panel. I'm not going to be disappointed if you don't look. You're busy. I get that.
I've watched a couple of those videos, I'm subscribed to you on my red channel. Nice progress on it!
Well, if you have suggestions on safety devices for it, I'd love to hear it. I plan on using thermal breakers, and then individual resettable breakers for the elements. But that's about it. I had to learn a lot more about electricity than I thought just to get to where it is.
Will you be running it unattended? If not, I'd just trust the PID's to control the temperature.
I Build It Scrap Bin , no. And it will be used in my cement shop, so I feel pretty confident in my fire safety.
Awesome build! Can't wait for the first batch of cookies!
The not building a brake made me laugh. Give it a year :)
Finale its final
Just curious. What is your thermocouple type??
Many years ago I built a oven using Kanthal hairpin elements and 480V 3 phase with an off fire temp of 1200 deg C. I used a type K which is marginal at 1200 C but 1000 C is the sweet spot which is where we wanted to operate at anyway. It was for curing out Graphite Steel Mill Electrodes after pitch impregnation. Looks like a pretty nice build. Only thing I would do a little different is to find some ceramic tubes to cover the element wires as they come through the metal case. You don't want the case to get hot. (electrically) All in all a very good job though.
I'm about to build a heat treat oven with pretty much the same layout as yours. I was curious to know what the highest temperature you were able to achieve running on 120volts? I'm building this oven to heat treat stainless steel knives at a temp between 1900-2000 F and hoep to achieve this off of 120 as well rather than 220.
Great project there. Random question, what kind of screwdriver are you using there? Really enjoying watching this channel.
I think your run down of the electrics was suffice, no need for extra video explaining... then again I am an electrician...
I'll include a schematic in the build article, when I get that done.
upon further inspection you were drinking MGD... come on man sleemans for the win!
I like Sleemans too, but this is my current favourite. I don't drink enough of it to sway the economy one way or the other.
I believe he grounded to the aluminum plate. Proper would be to grind paint off anywhere that needs bonding and attaching a proper lug. Assuming there is not coating on the aluminum it should be fine for what he is doing (if you did a continuity test anywhere to ground I'm sure there would be because of the bolt hardware touching metal between paint layers).
ya see Guelph loves me
No metal break project? Very sad.
That is a monster thermocouple. Remember where you found it?
I enjoy all your Videos and respect your knowledge/experience - I was wondering what you thought of those diamond cut-off wheels for grinders .. they claim 1000 cuts but are like 9x-times more expensive, in your opinion do you think they are worth it? (by Lenox)
can you tell us how to become an angle grinder professional? :D
John, in the event that you decide to paint the oven, please, please, PLEASE add flames around the control box. Just sayin'. Thanks, Chuckie
Was the case still cold at 1,900F? Surely not, that would be crazy.
Just warm. It never got past warm, even while cooling down.
You mentioned that the temperature control was in Fahrenheit. But when you start showing the .PV of the PID, it is at 29. I tend to doubt your shop was at 29 F. So, is this controller actually running off of Celsius? Or does the zero and span of the PID need to be adjusted? Different thermocouples have different ranges and in any event need to be spanned correctly in the controller.
I said 29 *Celsius* when it first started and then changed the settings to Fahrenheit off camera.
Gotcha. Sorry I missed that.
Great video John. thanks for sharing. i have been wanting to make one for a long time now but never got around doing it. Im planing to make my own controller using arduino or similar as it will be pretty easy and cheap to make. It is funny to see thay call their controller a PID as that is definetly not a PID controler. I is usualy refered in control systems as a "on off controller" or sometimes it is also called " bang bang controller". it is the most simple controller to design and implement, and for those application it works great.
thanks again for sharing. got some usefull ideas from it.
It is a PID controller - proportional-integral-derivative with settings for each.
I Build It Scrap Bin oh ok makes sense. however it this situation it is not working as a pid. for a pid controller the output needs to be controllable. for example if you would have a regulator on the coil alowing to control for instance the voltage , than you would be able to control " how much the coil is on". in this case, as you are controlling it with a relay, you can only turn it on or off. the whole idea of a pid is to be very fast and adaptive to changes.
As another example lets say you whant to set a temperature of 1000. If you can only turn the coil on or off, the controller will probably whait until the temperature reaches 1000 and than switch off. than it will go on again when it goes below a set value. this is an on off controller. when using pid, depending on the gain parameters set, when the temperature reaches for example 950 and the error becomes smaller, the controller will lower the voltage on the coil so that when it reaches 1000 it will not overshoot too much and will mantain a steady state. most temperature controllers don't use pid as it is not required. themperatures in those ranges usually changes very slow and an on off controller is prefered. Hope this wasn't too confusing. Looking forward seeing this in action in a future video
Nope, it uses the relay to do the proportional heating, switching it on and off to vary the output. You might be better off forgetting the arduino idea and just pick up one of these cheap devices that do exactly what's needed for a job like this.
I Build It Scrap Bin you have said it in one of your past videos. Diy is not just to save money hahaha. I enjoy doing it myself 😀
I Build It Scrap Bin you are correct. I just did some research on these Controllers and as thay are using solid state relay thay can simulate analog output with pwm. My apologise
I just had to press the like button because the counter was at 399.
Heat treated stainless steel wing nuts quenched in (pea)nut oil -- just to give the trolls something to think about... lol
will you be making plans for this because i would love to buy them
There will be a free SketchUp model with the build article, and that should be ready this weekend.
Thats really awesome of you to do thanks so much
The next video will be a brake after this one
Should have used a diamond tipped hole saw to drill the square hole, eh?
You see John, I know this since I've been a *MASTER WOODWORKER* for over 130 yea...
...
Hi The isolations you have on the concretion to the heating element is not god the material is made of paper and can start to burn. Take some porslin material
Nonsense.