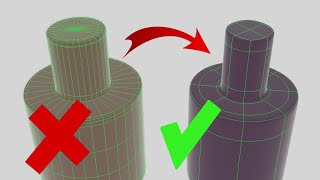
Placing Objects on Faces Using the Raycast Node

ฝัง
- เผยแพร่เมื่อ 14 ก.ค. 2024
- A handy node setup for so many reasons. In the video we focus on using it for placing rivets but it could be used for SO many things, especially when you consider that you could randomise the objects being placed.
If you want the node setup you can find it on my Patreon:
patreon.com/ArtisansofVaul
Cults3D page: cults3d.com/en/users/Artisans...
CGTrader page: www.cgtrader.com/artisans-of-...
(Affiliate links) SUPPORT THE CHANNEL BY BUYING SOME STUFF YOU WERE GOING TO GET ANYWAY ;p
Hard Ops and Boxcutter discount bundle: blendermarket.com/products/ha...
Hard Ops: blendermarket.com/products/ha...
Boxcutter: blendermarket.com/products/bo...
Just Panels Add On: blendermarket.com/products/ju...
Construction Lines: blendermarket.com/products/co... - แนวปฏิบัติและการใช้ชีวิต


![[LIVE] ใครคุยเรื่องบอล "พ่องตาย" #คุยให้เด็กมันฟัง EP.43 (13/7/67)](http://i.ytimg.com/vi/8bHYL8RuBqs/mqdefault.jpg)


Awesome stuff, got it. Thx a lot.
@@corvette724 my pleasure
Danke!
@@corvette724 My pleasure 😁👍🏻
@@ArtisansofVaul you helped me with an long lasting issue.
Finally someone who can explain Raycast and Normals so that the average human can understand them
Glad it was clear. I realised after I should have shown the normals on the display but if it's understandable then I'm happy 😁👍🏻
@@ArtisansofVaul could also turn this into a tool for your asset browser collection by using a grid in Geo Nodes and exposing some values like grid resolution and Ray direction. Just a fun Idea
Of all tutorials about geo nodes that I have seen, yours are the best without a doubt. You explain why things work the way they do and this is what i find is often missing from other videos - in my eyes this is the most important part because without knowing 'why', following a tutorial becomes an exercise in replication rather than learning. Thank you. Keep up the good work. I hope to see you get to a 100k subs and beyond.
Thanks so much. To me the why is also the most important part (and like you I often found that missing or quickly mentioned without a lot of clarity). Really glad to hear others feel the same and that these videos achieve that. Thanks so much 😁
Top notch as always.
Thanks so much
This is really helpful! Especially the grid-method. As rivets on historical vehicles sometimes come in odd, irregular patterns it is still faster and easier to move or delete single vertices or edges with this method here to replace or remove rivets according to an original. Plus: Sometimes rivets come in odd shapes like little pyramids. With the "align euler to vector" operation even those can be placed easily.
I thought you'd find it helpful 😁👍🏻
Perfect! Been thinking about how to make this happen 👍
Great to know its helping 😁
,ou talked about printing? So this is also printeable? Wow.
The objects would need to be booleaned together but definetly.
Hi, just one more question. If i duplicate the single vertex no second sphere shows up? Any ideas? Cheers, Axel
@corvette724 I believe it will need to be as part of a face/edge because it needs the normal information to control the direction it is "cast".
@@ArtisansofVaul ah, ok, thx. This helps to understand. So i'm german i have iussues of understanding cast in this context. Is it like overcast for cloudy? Thx, Axel
@corvette724 No, it's cast as in to throw. Like I would "cast" a net. In this instance, it means to project in a direction. Hopefully that makes sense 👍🏻
Thank you for another great solution! Please could you give an advice on how to make those rivets become mirrored on the another side of an object? For example, I'm placing the rivets along the curved object (space marine shoulder pad) on the one side of the object and want to use mirror modifier to transfer those onto the other, but nothing happens.
Hmm... I'm not in front my my computer to play with it but my guess would be needing to put in a realise instances node at the end of the node setup. But I haven't tested that.
Howdy again! Love the videos as usual. I do have one request for a topic soon, and that's how to remove say a hand from around a weapon and then fixing it up so that you can print just the weapon separately. I'm not sure if you've explained this before but if you haven't it would be incredibly useful!
That's a good idea for a video. I'll have to have to add that to the list. The biggest issue with that will be that sometimes things like the thumb slightly overlap onto the weapon. But that's what makes it a fun video. I'll look into it👍🏻
I just thought that you might find this video I did useful. Its not for Blender but a slicer program instead you might find useful. Check out the Planar cut chapter: th-cam.com/video/TxHtYDUR-6s/w-d-xo.html
@@ArtisansofVaul That's an interesting feature! It doesnt solve my problem though lol. I have a unit that has a bow in hand on the model, but you can take it as a secondary weapon as well, which doesnt have a model. I wanna put it on their back, so I want to model the handle and then attach it. I can do the attaching part just fine, I just can't figure out the best way to fix the handle without it looking like hot garbage.
@NorasHobbyverse Ahh... So you more want to how to make a handle for a bow? It's a slightly lazy method but if it's 28mm there is a method in this video that works ok: th-cam.com/video/I8hb9KdK9pM/w-d-xo.html
Is there any way to raycast onto multiple planes stacked vertically joined as a single object? Currently trying out the new Repeat Zone node with no luck.
You mean like the same set of object almost on multiple "shelves"? Are the planes the same distance apart from each other?
This is great! I'd love to see how this would do dimpled flush rivets. Also, just an FYI, real rivets never have an undercut.
Oh I know as they are a half round. Its purely a tip from a 3d printing and painting point of view. It makes it easier to "see" the rivet if that makes sense and helps paint to pool when you do something like a oil wash.
@@ArtisansofVaul As a scale modeller I couldn't get away with undercut rivets. I've never had any issues with washes or stains not showing rivets even printed at 0.01mm. But still, a video showing the various ways to do real rivets would be a good in my opinion. AN470 and AN426's.
I have a question, while I have followed your guide and used spheres for the rivets.
Currently, I have changed out the shape for cones. Some of the placement is a bit strange. Do I need to add or edit any of nodes in this video to get a better result?
It depends what you mean by strange... Could you explain in what way? It may be that you need to move the origin of the cone to the bottom face (this is me guessing as its the only strange thing I can think of that could happen).
@@ArtisansofVaul Currently with Allign Euler to Vector factor set to 0. The bolts all face in one direction, regardless of the face it is set against.
When set to 1, the rivets seem to rotate randomly and doesn't seem to factor in the surface it is set against at all.
I hope this helps clarify some of the problems I am having. But I am modelling a tank's turret with many varying angled panels.
Interesting. Thank you for sharing! I could not get it to work. The Rivet to Face object info node gives an error "Geometry cannot be retrieved from the the modifier object" in Blender 3.6.5.
Hmm.... I'll have a look at replicating this when Blender 4 is out as that's this week. Did any of the nodes look different?
@@ArtisansofVaul Thnx! I I think I got mixed up with Rivet to Face and Rivet. I set the Object Info node to Rivet. This cleared the error, but the Raycast node ray direction options have no effect. I can move the Rivet to Face with Set Position node options.
@YYZ342 hmm.... that's bizarre if it has no effect. As I say I will check it out in Blender 4 as its release is (I believe) tomorrow.
@@ArtisansofVaul Sounds good, thank you!
Nice tutorial.
I wish I could distribute random points on a surface with better control over the objects not touching itself. The donut tutorial makes sprinkles clipping over themselves.. distance between points do not suffice. And the raycast "hit" can't be used to reference each other points objects so they won't touch themselves..
😁 Already got you covered I think: th-cam.com/video/IaEwxrqrX4k/w-d-xo.html
The sound is a bit quiet, I'm going through and fixing a couple of videos where the audio wasn't quite right but this has what I think you're looking for.
Hi, i left you super thanks, u got it?
@corvette724 I did indeed. Thankyou so much! Really appreciated 😁
Interesting tutorial! I followed along using tiny cones instead of rivets and discovered some instances flipped up-side-down when I connected up HitNormal. But other instances of the same geometry were fine. Not sure what's happening there??
Ok, position offset scale must be > 0. : )
@@BoscoRetro Oh well done. Worked out before I could reply. Nice job! 👍
Im new to this but there seems to be an issue if you use an offset scale of zero (I was making an object of a hemisphere screw head to place on top). I had to increase above zero to get correct alignment else the direction normal spazzed out. I can only think it is like when the viewport shows two faces on top of each other that have the same location and the displays a mix of the two, and the normal is having the same issue due to being at zero of the face. Like I say I'm new so anyone that can explain better please do.
I think you are referring to the face fighting that happens when two faces are directly on top of each other. It happens as Blender tries to jump between each one to show "both" as they should in theory both be visible. It happens for sure. Though normally you just ignore it as the faces shouldn't remain on top of each other so its normally just a part of the process in creation before they are moved.