
ฝัง
- เผยแพร่เมื่อ 10 ก.พ. 2025
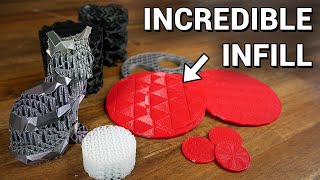
- Unlock the full potential of your 3D prints with this comprehensive guide to infill patterns! 🛠️ Whether you're new to the world of 3D printing or a seasoned expert, understanding the importance of infill can drastically improve the strength, flexibility, and finishing of your models. In this video, we dive deep into the 17 different infill patterns available in the Bambu Studio slicer, discussing their pros, cons, ideal use cases, and expert tips. From the aesthetically pleasing Octogram Spiral to the lightning-fast, well, Lightning infill, we've got you covered. Don't just print, print smart!
Check out my Amazon Store: amzn.to/4efGRDK
Check out my website: lendizzle.com/
/ lendizzleprintz
As an Amazon Associate, I earn from qualifying purchases.


We need tables! Time and filament per type.
Some are not very optimal for cubes of course. For example I use Lightning when printing busts and they are almost hollow until you get part way up the actual head, where it increases in density to support to top of the skull properly
Lightning will save you A LOT of infill material, specially on larger/taller objects as it doesn't necessarily build up from the button, but rather "springs" out from internal walls as your print approaches the top of the print, (hense, it was not visible in your test) I used it printing a mannequin head in full size.
Best for enclosed objects that does not require any additional strength.
Its basically an internal overhang/support structure, rather than an infill.
One thing really worth covering is different infills for different filament types. For instance, most infills work fine for PLA but for PETG, infill patterns that overlap themselves will cause filament buildup on the nozzle as it drags through the infill. This can lead to stringing and boogers and other defects.
Which patterns work best with petg. I have experienced what you are talking about.
@@colinmsmall I usually just use Grid but a lot of people use Gyroid also. Basically you want patterns that don't cross themselves all the time. Which seems odd with Grid but it works pretty well for me compared to Cubic or any of those. You'll always get a little collecting at times with PETG but not too much that it leads to a burnt booger on the side of your print.
@@bsimmons00 is grid strong enough for helmet infill? For like cosplay helmets and armor etc? I’m trying to find a good pattern fit this type of stuff with petg.
@@colinmsmall Oh, I'd imagine so. You can always adjust the density. I use Grid at 15% for stuff that gets pretty good abuse.
This is helpful. Could you put your results in a spreadsheet/table? Following the video is hard. It would also be helpful if you put the pattern name on screen for the whole time you're discussing it. You look away for a minute and you're lost. Thanks.
This and chapters for the video. Very good video otherwise.
Great info, Thanks. I noticed you had Generic ASA on your list, I’ve been trying to print with it but the settings on Bambu Lab never print to what I preset. I have a P1S.
Exactly!
For those who dont know, 3 walls and 20% Infill give you the best Fillament use to Strength ratio 😊
Cubic and Beehive are the top 2 infills regarding Fillament use/strength ratio
One comment that always comes up in the internets is that the default (and other) patterns criss-cross, causing the tip of the nozzle to hit and sometimes tip the part. I notice this at the layer where the change in direction happens (sound of nozzle periodically hitting) and more with PETG than PLA for example.
One hint for top and bottom pattern: You can use any object (for example text) as a modifier for an area. So you could use hilbert curve for bottom pattern, ad a text object as modifier, use this with concentric. Also I recommend a seperate modifier just for the first layer to set perimeters to 1. So you get a very nice hilbert curve bottom with text in concentric lines. Print this in black PETG, you have clearly visible text black on black. Optimal for printing displays for Disaster Areas show spaceship...
Being new to 3d printing I absolutely needed this video, I havent done any customizing to infills yet and I started a 22 hour print of a leon kennedy figure thats about a foot tall using a .2mm nozzle and i walked away, its almost done and i just noticed its completely hollow because for some reason my infill was default to lightning T_T removing this supports is going to be terrifying
Wow. Thank you for making this video. Truly helpful/useful.
So many settings, so little time. Thanks for doing this.
I mean this is very obvious from the slicer software BambuStudio. The patterns in the software show how they look like. The thing people wanna know is that which pattern is best for what scenario.
Outstanding study. This is quite useful indeed. I certainly will use these recommendations. Thank you.
aligned rectlinear. Fastest, no crossing path, strong.
I like the adaptive cubic!!! That’s my go to!
No need to stop the part before it finishes to see the infill. If you just set it to no top layers then the infill is exposed, you can do the same with no bottom or top layers or no walls.
Or you could set it to pause at layer 60 and just cancel the print then.
Thanks for the video! Very helpful :)
Got any suggestions for best stetting fro transparent infill, I wanna do a test Benchy in PetG, but I have no idea if i should just use the default setting or not, I'd like it to come out as see through as possible.
Great topic, thanks 👍
Which infill pattern would work best for a helmet?
i dont seem to have all these infill patterns on my p1s
You say the grid infill consumes more material than rectilinear but then say the print uses less material?
Chapters!!!!
A chart would have been useful. Clearly you had notes, publish those.
How high are you!!!
I'm sorry but I'm 4 minutes into the video and you're still talking about what you're going to talk about .. fhs
you should try editing your videos to cut out mistakes. It's a waste of time to hear someone make a mistake in an informational video