In norway we use 2 pieces of strapping before the siding goes on the first one is vertical top to bottom the we use a horizontal one in top then the siding fixes to that you will have a constant flow in between the first piece top to bottom always cut an angle on the bottom of the siding to create a sharp edge so as the water drips off and leave a gap don't side the siding onto the metal needs a gap and the bug screen i s very good idea we use similar hope you understand my poor explanation 😀 good luck
Don't think the grooves were necessary but wont hurt. I think the condensation from the roof was because it's metal and reacts very quickly to temperature changes and therefore creates condensation. Wood siding doesn't change temperature as rapidly and therefore doesn't create condensation like the roof, that being said if siding leaks occur the grooves will help it drain off. Great work Michelle!
Here in New Zealand, horizontal cavity battens in this type of application are carefully designed to allow ventilation. As well as “grooves”, the top edge of the batten should be sloped away from the wall towards the cladding. The grooved side would be against the cladding if only one sided, but battens are usually castellated to allow both the membrane and the cladding to drain.
For horizontal strips, anything that can be done to extend the life of the cabin is a good thing for You. Moisture is a big enemy of wood. Love your videos, thanx.😃
you truly are a godsend to all your pets . You have given them a Beautiful home , and they can live out there lives in a place full of love and kindness . Your cliff top mansion will look amazing when finished , and that view WOW .
You got a couple different ways you can skin the cat for the rain screen. -Run furring at 45 degree angle so water can drain. -Use a product like Cora vent on the back to furr our the 1x so there is a 1/16-1/8” drainage plane/air gap. Furring boards can be ran horizontal. Hope this helps I’m in the same process of my build and had similar trouble with details for running my board and batten.
@@michygoss7148 as long as you layout the attachment of the fasteners to land horizontally with the 45 degree furring I’d think it would be fine. The furring may need to be slightly wider than a 1x4 to achieve this and ensure proper fastening details of siding. This is how I did my roof furring so water could drain if it were to get under my metal roof.
@@michygoss7148 thinking about the 45 angle that may not be the best way for siding but a roof drainage plane I don’t see any problems. Doing what you did is probably the easiest way! I may end up doing mine like you did. I should be filming mine but I’m just too busy 😌
@@michygoss7148 Running the furring strips at an angle is the best solution I can see for your issue. To solve the issue of lining up the nails, you can just draw horizontal lines across the strapping on the wall before you start the siding. Is your siding verticle or horizontal? One or the other may be easier with the angled strapping.
I just wanted to say that the thing you question the most, your “thinking,” is far more solid and trustworthy than you typically believe. Sure, there may be a better product, maybe even a purpose-made one, that you’re not familiar with. There may be a technique that you’re not familiar with that might make a given job go smoother and easier. But all of this simply a matter of research and asking questions, asking for help. But your THINKING, the thought processes that lead you to question things, to wonder what the best way is, to question and re-question as you go along… THAT is always spot on. You are intelligent and perceptive and you are always asking the right questions and wondering about the right stuff. You have great intuition about how things will turn out and what things you should consider or be concerned about. And that’s an incredibly valuable and rare gift that can’t necessarily be taught. You bring so much more to these endeavors than you sometimes want to give yourself credit for. I’m not here to blow sunshine up your skirt. I have no dog in this hunt, as the saying goes. (Those would be completely separate videos. 😂) You truly are just plain awesome, and way better at all of this stuff than you often are comfortable acknowledging. So there. 🥰
Optimal is two layers of strappings, the inner vertical and the outer horizontal to allow for airflow and drainage. That goes for botht roof and walls.
@@michygoss7148yes. I work in construction.thats how it's done professionally. But our ready made strapping we buy is only 2 inches wide. So you could have cut your strapping down to much narrower. And they come in 3 thicknesses. ⅜, ½, ¾ inch
Excellent job Michelle. Always better to do something overkill than regret it later by either cutting a corner or just not using the opportunity while you can to do it, (if you have the stuff already). Grooves are a good way to go id say for sure btw. Poor old Lenny. Probably keeps looking down at his nuts thinking what could have been with Luna lol 🙈🏴🇬🇧
Miss Straps ALot! My advice, build a greenhouse over your cabin! End of water worries. Good luck sourcing the glass and stuff. I believe in You and Lenny! All the hugs for your sad pup.
I don’t know that you overthink things, it seems to me that you care deeply about doing the best job you can with the materials and experience you have. In my humble opinion this is a very positive character trait 😊
Hi again Michelle, as for overkill, I cannot ever think of a case where overkill is bad! If you have the materiel and don't mind a little more time invested, more attention to prevention is always a plus in my mind.
Copper Sulfate is good stuff to maintain the wood. Grooves where a good idea to let air in. The Meadow would be a Great place for a New Cabin at some point. Nice Job Michy on the build so far. keep at it. Love the view from there, Be Safe, Don't fall off. Keep your cell phone with you just incase something would happen.
Michelle, You sure have a million dollar view. Love your pups and the way you take care of them. I think what you did with the strapping will be fine. Enjoy every video you put out. I trucked BC for many years and never got tired of the scenery. I can tell your meadow "spot" is a favorite. Maybe another cabin?? Greetings from the Arrowhead of Minnesota.
A good tip. Ask questions about what you are going to do in the near future so you have good advice in your messages before you start. You’re doing a fantastic job. I love your presentation. Thanks so so much.
4:28 nice choice of music. Green slather. I put together one of those plastic sheds. it cost a bunch but I love the little playhouse look. Anyway, they recommended a concrete slab or if you use wood, slather on some rat and weather repellent. I just happened to have a gallon of the stuff that had been under the work bench for twenty yrs. Seriously. Well, the stars come together. I slapped the green goop on all of the exposed wood. I hope it prevents termites and weather. I have had mice. That's another story.
Michelle, The grooves are a good idea, especially in conjunction with the wood preservative. I was really excited to see that you were using saw horses, except for the time that you had your hand under the board. If you add a sacrificial strip of wood to the top/beam of the sawhorse, you can saw/cut without having to lift you board. The sacrificial strip can be toenailed or screwed at the ends so you will prevent running into them with your saw blade. Great video. Cheers! Blue Skies! Faithfully, James
JP from Indiana!: anything you can do to preserve wood relative to moisture is a good idea. The copper coating and drain grooves are great ideas to maximize the life of the pine backing strips. Maybe consider also layering the siding with a trim piece to cover the seams between each piece of siding, and that will help deflect water even more. Tedious, yes, but one more barrier to prevent water intrusion. Love your work!
I feel ya Lenny! Hang in there brother! Since you are going with a reverse B&B detail, anything you do for moisture mediation is a good idea. With the old growth pine, the copper may have been unnecessary but you had it and it was easy enough to do. You definitely want to gap your siding up off the flashing so it doesn't wick water up into the wood. Not sure if you have a final plan for your trim detail but now is definitely the time to plan to make sure it sheds. If you want it to protrude you might need to go at least 2 1/2" thick (if going to the foam without an extension). I'd bevel and drip edge the top and rabbit the sides and bottom. You're doing an amazing job! Thanks for sharing so much of yourself. :)
Hi Michelle, I've watched you since long before you started your cabin.I think you have done a great job and even my dog Ghost) looks forward to your videos.I also built a tiny off grid cabin back in the woods here in N.B. Canada in 2021.My retirement project...Your mind seems to work a fair bit like my own..keep on sharing ...
I would have Tyvek the little cabin and then strapped. Either way you are not going to get much if any moisture on the outside wall. Thank you for sharing your adventures!! Love the commitment that you and your husband have with your dogs.
Another great video, Michelle, thank you, I think I would have put strapping around the window so I’d have something to attach my trim to wonderful job. Have a great week and a lovely day.
Ya, I actually haven’t figured out what i want around the windows. I might just make trim that attaches straight to that layer - have to play around with that still.
"Hypercogitating strapination 101"? It has been my experience that overthinking wins over underthinking. I have been bitten many times by not examining all possibilities. Anyway, don't beat yourself up. You are doing great work on getting "Clifford" looking and feeling like a dream come true. And thank you for sharing with all of us. Oh, to answer you question about the grooving and painting of the strapping; No, I probably would not have done that because I don't think that far ahead. But seeing that you have done it I would certainly do it because it looks like a good idea. See you taught me something.
I think you did a great job mitchy 😊 And I definitely would have put the grooves for any moisture Release 😊 And it certainly didn't hurt preservative on it We often try to overthink things and then look at hindsight But I think you did an excellent job I think your cabin will last a very long time 😊 When will we get to see foxy roxy again miss mitchy ? Keep up the great work you're definitely doing awesome❤❤
Love your work and can’t thank you enough for giving a home to those beautiful dogs. I’m a cat person myself, but your love for all animals is truly commendable!
Two things I've learned in my time building things: 1) You can never be too careful when it comes to water and 2) there's always a better way to do something, but you have to balance longevity with cost. That flashing at the bottom will definitely help where it is, but you should run a strip of sealing tape ( something like window flashing membrane) over the top edge of the flashing. Otherwise, any water that makes it behind the siding will just run down the wall and right under the flashing. Your idea of slotting the strapping was great, but yeah, just gapping them is a LOT less work. Keep plugging along at it. It's fun to watch your progress ...
Michelle I just want to tell you I look forward to your videos every week. I love watching you figure stuff out, and thank you for sharing your adventures with us.
Good afternoon Michelle! I noticed Woodness Goodness TH-cam channel did his cabin roof with the spacing under the slats as you were describing. He’s a fellow Canadian! I’m thinking, you guys come up with all the best ideas! Love the channel ( and the dogs!)
Hello Michele, The sealing of facades is very delicate, boards arranged in the direction of height have a time limit. Despite all the water repellent products. Superimposed horizontal tile cladding is the most effective. The water runs in drops along the edge and flows onto the lower board like a roof.The lowest board should cover the joint cover. Have a nice weekend Michèle ❤️❤️❤️❤️❤️❤️❤️❤️❤️💋
No doubt, these things will make a difference in 150-200 years or so of cabin longevity. The real trick is keeping those wild critters out over the years - high and low. That can end a structure in no time. Looks great Michelle!
Hi Michelle. Love watching your videos, work and fur babies. Thinking out loud. Condensation is all around, it doesn't know there is a channel for it to travel over there, I'm going here. If you marked the center between each cannel and cut an angular channel to each side to allow water to travel down the slope. More work. An easier thought, tilt each runner on a 1/8th angle or 1/16th. Top to the right, next to the left and so on. Alternating the pitch. So water does not pool up on a flat surface witch will cause it to rot faster. Love all your fur babies. Poor Lenny has been through so much. GOD Bless you all and keep you safe.
Cleaver idea grooving your strapping , routers make that easy and fairly quick ! Sure if I was at that point I sure would have done that ! Flashing on the bottom , good idea it’s easy enough to work with ! It’s going to turn out perfect when the siding is on ! You made good progress today , task well done !!
I love the way we "creatively build things, I'm much the same :). The angle on the flashing can happen by putting your lowest siding piece pushed down to the flashing as tight as possible. The wood siding can press down on the flashing to create a bit of a slope. You're rocking those Levi's as well.🤩
I thought the same thing too, but a few people are reminding me of how water wicks and if the siding is pressed right down on the flashing, the siding will slurp it right back up. I’ll have to find a sweet spot in there somewhere !
Like I mentioned before, you need a little bench or pavilion in the meadows. That way if you had a pavilion you could hang a hammock on and enjoy that beautiful view. Thank you so much for sharing everything. 0:54
As I understand the BC climate has a lot of humidity and moisture so I understand the desire to have concerns for creating moisture drainage. However, using wood preservative may be more important. I due see the desire to make a cabin on side of a cliff for the peaceful felling I see your puppy 🐶 shows looking over the water. 😊
you know i'm never going to stop commenting about the need for a deck railing...if not for yourself, then for your dogs...only saying it because I care..and I love your channel :)
You've motivated me to buy a Woodland Mills sawmill. I'm going to build a small guest cabin on my ranch in Durango, Colorado. Good luck Lenny I hope you feel better soon! Michelle try to remember to lift with you legs, some of your neck pain could be coming from your low back. Back problems can sneak up on you quickly with repeated motions like moving wood piles. Look forward to the next video!
I don’t know if I would’ve put the grooves in the wood or even thought about that? Whatever decision you make is a good decision because it’s your own decision I love watching your videos.. I think you’re an intelligent, beautiful, woman. I hope you stay inspired to finish this project. It’s awesome.
Michelle, you've come up with a workable solution on your strapping. Word of advice when you go to put up the siding, keep about a 1/4" gap between the bottom of the siding and the metal flashing at the bottom, will help keep water that hits the deck from wicking up into the siding. You may also want to treat the bottom edge of the siding.
Always love seeing the dogs and cat at the end of the video. Always thought Clyde was older than Riley. Will be exciting to see the siding on the exterior.
Michelle, I've dealt with that strapping issue 3 times, 1st time I repurposed old lathe, 2nd time I used strips of fanfold insulation 1/4" and 3rd time I used strips of 1/2" Dow Board. All were installed vertically on the 16" centered framing using 2 1/2" galv. roofing nails measured out to miss the nailing flanges. You're in the groove idea is well worthy of reducing some condensation build up, yet the top edge of each may need a path to follow to the groove, especially since they've been leveled. All in all, the idea will work. You could also help the situation by drilling 2'' holes on the very top siding panels and screening the backside of each to deter bugs and release any heat build-up. As for those 'gutters', how would 'Clifford' look with the old school curled 1/4 moon-shaped copper style with a rolled edge that was designed to force the water away from the structure. -- Jerry
Hi Michelle, i enjoy watching your build of the remote cabin . If i can make a comment on the siding timber frames why don't you place vertical support small beams two feet apart or less and then screw the siding boards . This will make the external siding boards have clearance for the water/moisture to drain. Thank you again totally enjoy watching your videos . Good luck !! P.S. Please add some deck railing like a wire which will not close the view but give you safety support .😊
First I LOVE your Basset !!! Now as for your furring, I might have waited for that foam you ordered before putting up the furring but other than that I don't have or see any problems with what you did with furring... Now as for your ladder, I have two suggestions 1) mount the bedside with hinges and then attach a pulley to the bottom of the steps then place that to the ceiling. 2) mount a bar/tube to the loft side and then you with proper rollers on the ladder top you can roll the ladder from side to side. I hope these ideas might help if now, still thinking you are doing a GREAT job with your build !!!!
Enjoy so much watching you and the family, overthinking it maybe ok well yes but that just part of your journey. The building will be still standing in 25 years no matter how you do it so will it matter. Your doing fantastic it will all be good and you learn as you go. Thank you for sharing
Strap it like a metal roof. First run vertical 1x4’s everywhere. Then over those run your horizontal straps to fasten the siding to. Love all of your videos. Can we bring up our Golden Retrievers to play with your pups??? We are only 3099 miles away in SWFlorida. Stop by with Steve in your new Yacht. ❤
@@michygoss7148 don’t temp me! I grew up going to Lake Nipissing, North Bay, every year with neighbors, when i was about age 8 to 15. The wife was Canadian they owned a small island there. I’m hoping to visit there again soon. It’s a bucket list thing, it’s a real short list, just one, the only one i have. Fantastic childhood memories, fishing, camping, dogs, and my first love at 10.
youtube.com/@barntobeachdesignsandsawmill?si=Z5aqvHVFrz8DCrtM The above link is to my close friends channel, he has a Wood Mizer LT15. I go up there once a month and teach, help him build stuff around his house, barn, and pool. He was a Lineman for the big electric co and retired about 6-8 months ago. Purchased his wood mill and now is making great money selling lumber locally. So I’m teaching him construction. I’ll soon be putting in my order for roof strapping to install my metal panel system roofing. With Hurricane IAN hitting us last year, it’s time to Hurricane proof the top of our house.
Michelle i live in florida i built a porch 8 years ago i put thomson seal on all side and every cuts that i did with al pine wood and my porch still like it was built yesterday so protecting the wood there is nothing wrong with that specially the wood that you can not see anymore it put your mind at ease to know that it is protected have a great day
The grove idea for water drainage behind the siding I have used before when I put Cedar shake on the roof and side of a house. You are a thinker 👍👍🤠 I only used a skill saw set at 1/4 inch depth and with cuts every 2 to 3 inches apart on 1 x 2 and or 1 x 3 wood strips. The screen wrapped around the bottom and top lathe would have been an excellent idea to prevent bugs from nesting under your siding. 👍👍🤠
Michelle, like u said it's in the middle of nowhere..I built a 10 x 15 shed last summer, tyvek, strapped it then milled up cedar for board an batten turned out nice! Whatever u decide I'm sure it'll last!!
Kinda curious to hear what Foxy Roxy has to say about strapping 😉🤣🤣 Cliffy is looking great. Keep up the great work! Keep doin' you. Can't wait for the meadow series.
We have full walls of the webbing material on our cabin. The entire cabin is wrapped and then the half logs installed, so any water that gets between the half logs and the cabin it drains properly. Great stuff, more cost but half logs are not cheap to replace.
🤣🤣🤣 "Don't want to spend too much time F***ing around ". Now that one caught me by surprise!🤣🤣🤣 I was going to suggest shallow cross cutting of the strapping but you figured it Out, Good Job! Carry on!
Did you message me to contact you on telegraph? not familiar with that app. Found it but requires phone number to contact you back. Might be a scam? not sure. Let me know.
Good idea I was thinking about leaving gaps and not butting tight that is to change my roof to metal but I think I will use your idea thanks great job have a great week
Michelle, your a rare one :) You have what i call {The Heart of a Champion], what's that you ask, glad you asked :) Everyone on this planet gets knocked down sometimes in life, many actually, what is it that some are warriors and never give up, they sooner or later reach their goal? The Heart of a Champion NEVER gives up, always gets back up and enter the race. It is becoming more and more rare to find these people. Steve is one, he looks at a problem, as an opportunity and he is great at fixing things. I watched most of all your videos, and some of the challenges you guys have went through many, MANY people these days would have quit, and most everyone else would have said, don't blame them i would have quit also. YOU guys are special, i really mean that. Tell Steve we said hey.. love and prayers from SE Texas Bear :) ❤💯🙏 for ya'll and the fur babies too.
Good job,well done. A comment that you may not have needed to put the groves in....maybe but they won’t hurt and long term every little improvement can make a big difference. Shows you are thinking ahead and doing a dam fine job of it. Now let’s talk about the railing or lack of. You are ignoring the danger and need to get onto that job, Steve has commented as well. No more procrastinating safety always comes first. 😊
Well the only way to find out if it's going to work good give it a year and then take some of the siding off and look at it I think it's a pretty good idea but thank you for the video the cabins looking great and all your kids they all look happy and Clyde he's a big teddy bear I hope Steve doing good and you're doing good see you on the next one😂
The groves in the strapping is a great idea and I have asked myself that many times when doing steel roofing. I haven't seen steel roofers do that here in Ontario and I always wondered where/how would the water drain out if there was a leak somewhere. Great job.
Another way is to put spacers behind the strapping, but that requires a lot of extra material of all the same thickness. I just don’t have that down there, so that’s why I opted to make the grooves.
I believe that you are doing just fine on the strapping. there is nothing wrong with preserving wood and cutting the grooves for water drainage. you are building it to last and you shouldn't have to worry about wood rot for a long time. your cabin is going to turn out beautiful and best of all it was built with your own hands.
Its worth it, you can buy them that way already for roof tile.They have a 1/4-3/8 dado in them.The other stuff you showed is like core vent here.Dryvit which startes with foam is suppose to have a way for moisture to get out also, before its brown coated.You have 2 layers of vapor control with wrap and foam board.Yes flash before deck, not that big because you membraned fish, if I recall.Metal wainscot is always nice, if doing later just run a flashing at level and start from there.
When you use lumber covers on your materials make sure to put them right side up, they are designed to breath moisture out. You are definitely building a cool cabin keep up the good work.
Good Job Michy,,,, one thing you might do is cut 4 inch block from ur stripping n use them for vertical furring strips behind your horizontal strapping. Works the same as full vertical strips but less material. Could have been done for your metal roofing also. I did this method when i installed tile roofing on my house here in southwest US. Good luck.
Yeah, I thought of that, but I’m limited on materials down there and am really trying to just use what I’ve got. I wasn’t sure I’d have enough to do it that way.
... run some weather tape over the bottom flashing wall edge, that'll keep any moisture from getting behind it. I think the strapping should work out good. The other thing you might want to consider is when you start putting up the vertical siding, at the bottom deck end, raise it up off the deck say 3/4". Plus cut the back side at a 30deg ish angle. What this will do is give you less material for moisture wicking up the boards. The thing with building, anything, you need to think five steps ahead. Your doing aweSOME! Good Luck!


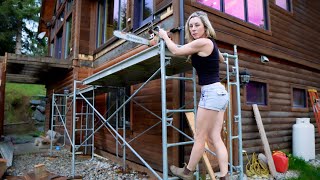


In norway we use 2 pieces of strapping before the siding goes on the first one is vertical top to bottom the we use a horizontal one in top then the siding fixes to that you will have a constant flow in between the first piece top to bottom always cut an angle on the bottom of the siding to create a sharp edge so as the water drips off and leave a gap don't side the siding onto the metal needs a gap and the bug screen i s very good idea we use similar hope you understand my poor explanation 😀 good luck
Sunday morning coffee and a lake view,thanks.👍🏝️
Don't think the grooves were necessary but wont hurt. I think the condensation from the roof was because it's metal and reacts very quickly to temperature changes and therefore creates condensation. Wood siding doesn't change temperature as rapidly and therefore doesn't create condensation like the roof, that being said if siding leaks occur the grooves will help it drain off. Great work Michelle!
Here in New Zealand, horizontal cavity battens in this type of application are carefully designed to allow ventilation. As well as “grooves”, the top edge of the batten should be sloped away from the wall towards the cladding. The grooved side would be against the cladding if only one sided, but battens are usually castellated to allow both the membrane and the cladding to drain.
Dont forget to strapping around windows and doors.
I love watching the build, but the best part of your videos is always when you come home to all your beautiful puppies...God's precious gift to us 🙏
For horizontal strips, anything that can be done to extend the life of the cabin is a good thing for You. Moisture is a big enemy of wood. Love your videos, thanx.😃
you truly are a godsend to all your pets . You have given them a Beautiful home , and they can live out there lives in a place full of love and kindness . Your cliff top mansion will look amazing when finished , and that view WOW .
You got a couple different ways you can skin the cat for the rain screen.
-Run furring at 45 degree angle so water can drain.
-Use a product like Cora vent on the back to furr our the 1x so there is a 1/16-1/8” drainage plane/air gap. Furring boards can be ran horizontal.
Hope this helps I’m in the same process of my build and had similar trouble with details for running my board and batten.
Never thought of running them on an angle - would that make the fasteners show at all different angles too?
@@michygoss7148 as long as you layout the attachment of the fasteners to land horizontally with the 45 degree furring I’d think it would be fine. The furring may need to be slightly wider than a 1x4 to achieve this and ensure proper fastening details of siding. This is how I did my roof furring so water could drain if it were to get under my metal roof.
@@michygoss7148 thinking about the 45 angle that may not be the best way for siding but a roof drainage plane I don’t see any problems. Doing what you did is probably the easiest way! I may end up doing mine like you did. I should be filming mine but I’m just too busy 😌
Came to the comments to say the same thing. Keep it simple, just place the furring strip at 45 degrees. It's done this way all the time.
@@michygoss7148 Running the furring strips at an angle is the best solution I can see for your issue.
To solve the issue of lining up the nails, you can just draw horizontal lines across the strapping on the wall before you start the siding. Is your siding verticle or horizontal? One or the other may be easier with the angled strapping.
Saying “ Screw it “ is a true pro craftsman move . More proof she’s not a rookie
Now we just need to hear “ fu#k it nail it “ to seal the deal 😀
Milling your own grooves is a great idea! Wonderful view, wonderful dog, wonderful craftsmanship! Cute carpenter! 🪚🔨🪛😄👍
You could try using pressure treated lattice behind strapping for air circulation.🌞
Strapping lass from BC
I just wanted to say that the thing you question the most, your “thinking,” is far more solid and trustworthy than you typically believe. Sure, there may be a better product, maybe even a purpose-made one, that you’re not familiar with. There may be a technique that you’re not familiar with that might make a given job go smoother and easier. But all of this simply a matter of research and asking questions, asking for help. But your THINKING, the thought processes that lead you to question things, to wonder what the best way is, to question and re-question as you go along… THAT is always spot on. You are intelligent and perceptive and you are always asking the right questions and wondering about the right stuff. You have great intuition about how things will turn out and what things you should consider or be concerned about. And that’s an incredibly valuable and rare gift that can’t necessarily be taught. You bring so much more to these endeavors than you sometimes want to give yourself credit for. I’m not here to blow sunshine up your skirt. I have no dog in this hunt, as the saying goes. (Those would be completely separate videos. 😂) You truly are just plain awesome, and way better at all of this stuff than you often are comfortable acknowledging. So there. 🥰
Awe. Thank you! That’s very kind 💝
Whatever.
Optimal is two layers of strappings, the inner vertical and the outer horizontal to allow for airflow and drainage. That goes for botht roof and walls.
I definitely won’t have enough wood for that! But good to know!!
@@michygoss7148yes. I work in construction.thats how it's done professionally. But our ready made strapping we buy is only 2 inches wide. So you could have cut your strapping down to much narrower. And they come in 3 thicknesses. ⅜, ½, ¾ inch
@@michygoss7148Home depot sells 1/8 inch trim that might work as first layer of strapping. $9.00 here in Maryland.
Excellent job Michelle. Always better to do something overkill than regret it later by either cutting a corner or just not using the opportunity while you can to do it, (if you have the stuff already). Grooves are a good way to go id say for sure btw.
Poor old Lenny. Probably keeps looking down at his nuts thinking what could have been with Luna lol 🙈🏴🇬🇧
😂
When all is said and done I think you will be glad you grooved the furring strips. Thanks pretty lady!
Miss Straps ALot! My advice, build a greenhouse over your cabin! End of water worries. Good luck sourcing the glass and stuff. I believe in You and Lenny! All the hugs for your sad pup.
I don’t know that you overthink things, it seems to me that you care deeply about doing the best job you can with the materials and experience you have. In my humble opinion this is a very positive character trait 😊
Hi again Michelle, as for overkill, I cannot ever think of a case where overkill is bad! If you have the materiel and don't mind a little more time invested, more attention to prevention is always a plus in my mind.
I have retired for 15 years and love watching do what you love. Please reconsider the railing. 🙏❤
I know you are a fearless young woman but one mistake could me your end.
Copper Sulfate is good stuff to maintain the wood. Grooves where a good idea to let air in. The Meadow would be a Great place for a New Cabin at some point. Nice Job Michy on the build so far. keep at it. Love the view from there, Be Safe, Don't fall off. Keep your cell phone with you just incase something would happen.
I can’t wait to work on the meadow.
Michelle, You sure have a million dollar view. Love your pups and the way you take care of them. I think what you did with the strapping will be fine. Enjoy every video you put out. I trucked BC for many years and never got tired of the scenery. I can tell your meadow "spot" is a favorite. Maybe another cabin?? Greetings from the Arrowhead of Minnesota.
Another cabin, yes!!!
A good tip. Ask questions about what you are going to do in the near future so you have good advice in your messages before you start. You’re doing a fantastic job. I love your presentation. Thanks so so much.
A fantastic view! Thanks! 🙂😎
4:28 nice choice of music. Green slather. I put together one of those plastic sheds. it cost a bunch but I love the little playhouse look. Anyway, they recommended a concrete slab or if you use wood, slather on some rat and weather repellent. I just happened to have a gallon of the stuff that had been under the work bench for twenty yrs. Seriously. Well, the stars come together. I slapped the green goop on all of the exposed wood. I hope it prevents termites and weather. I have had mice. That's another story.
Michelle,
The grooves are a good idea, especially in conjunction with the wood preservative.
I was really excited to see that you were using saw horses, except for the time that you had your hand under the board.
If you add a sacrificial strip of wood to the top/beam of the sawhorse, you can saw/cut without having to lift you board. The sacrificial strip can be toenailed or screwed at the ends so you will prevent running into them with your saw blade. Great video.
Cheers!
Blue Skies!
Faithfully,
James
JP from Indiana!: anything you can do to preserve wood relative to moisture is a good idea. The copper coating and drain grooves are great ideas to maximize the life of the pine backing strips.
Maybe consider also layering the siding with a trim piece to cover the seams between each piece of siding, and that will help deflect water even more.
Tedious, yes, but one more barrier to prevent water intrusion.
Love your work!
I feel ya Lenny! Hang in there brother!
Since you are going with a reverse B&B detail, anything you do for moisture mediation is a good idea. With the old growth pine, the copper may have been unnecessary but you had it and it was easy enough to do. You definitely want to gap your siding up off the flashing so it doesn't wick water up into the wood. Not sure if you have a final plan for your trim detail but now is definitely the time to plan to make sure it sheds. If you want it to protrude you might need to go at least 2 1/2" thick (if going to the foam without an extension). I'd bevel and drip edge the top and rabbit the sides and bottom. You're doing an amazing job! Thanks for sharing so much of yourself. :)
It's always nice to see how you are doing. Safely.
Hi Michelle, I've watched you since long before you started your cabin.I think you have done a great job and even my dog Ghost) looks forward to your videos.I also built a tiny off grid cabin back in the woods here in N.B. Canada in 2021.My retirement project...Your mind seems to work a fair bit like my own..keep on sharing ...
I would have Tyvek the little cabin and then strapped. Either way you are not going to get much if any moisture on the outside wall. Thank you for sharing your adventures!! Love the commitment that you and your husband have with your dogs.
Another great video, Michelle, thank you, I think I would have put strapping around the window so I’d have something to attach my trim to wonderful job. Have a great week and a lovely day.
Ya, I actually haven’t figured out what i want around the windows. I might just make trim that attaches straight to that layer - have to play around with that still.
"Hypercogitating strapination 101"? It has been my experience that overthinking wins over underthinking. I have been bitten many times by not examining all possibilities. Anyway, don't beat yourself up. You are doing great work on getting "Clifford" looking and feeling like a dream come true. And thank you for sharing with all of us. Oh, to answer you question about the grooving and painting of the strapping; No, I probably would not have done that because I don't think that far ahead. But seeing that you have done it I would certainly do it because it looks like a good idea. See you taught me something.
I think you did a great job mitchy 😊 And I definitely would have put the grooves for any moisture Release 😊 And it certainly didn't hurt preservative on it We often try to overthink things and then look at hindsight But I think you did an excellent job I think your cabin will last a very long time 😊 When will we get to see foxy roxy again miss mitchy ? Keep up the great work you're definitely doing awesome❤❤
Love your work and can’t thank you enough for giving a home to those beautiful dogs. I’m a cat person myself, but your love for all animals is truly commendable!
Two things I've learned in my time building things: 1) You can never be too careful when it comes to water and 2) there's always a better way to do something, but you have to balance longevity with cost.
That flashing at the bottom will definitely help where it is, but you should run a strip of sealing tape ( something like window flashing membrane) over the top edge of the flashing. Otherwise, any water that makes it behind the siding will just run down the wall and right under the flashing. Your idea of slotting the strapping was great, but yeah, just gapping them is a LOT less work. Keep plugging along at it. It's fun to watch your progress ...
Michelle I just want to tell you I look forward to your videos every week. I love watching you figure stuff out, and thank you for sharing your adventures with us.
Good afternoon Michelle!
I noticed Woodness Goodness TH-cam channel did his cabin roof with the spacing under the slats as you were describing.
He’s a fellow Canadian!
I’m thinking, you guys come up with all the best ideas!
Love the channel
( and the dogs!)
I have found that when I over think ,, I'm happier with the results . I like your videos . Thanx ---
It’s a balance between knowing what will drive you nuts and what you can let go of. 😊
The grooves and the treatment are always a good idea. Well done! Love seeing doggys around too.
Hello Michele, The sealing of facades is very delicate, boards arranged in the direction of height have a time limit. Despite all the water repellent products. Superimposed horizontal tile cladding is the most effective. The water runs in drops along the edge and flows onto the lower board like a roof.The lowest board should cover the joint cover. Have a nice weekend Michèle ❤️❤️❤️❤️❤️❤️❤️❤️❤️💋
That little cabin is so cool!!
No doubt, these things will make a difference in 150-200 years or so of cabin longevity. The real trick is keeping those wild critters out over the years - high and low. That can end a structure in no time. Looks great Michelle!
Hi Michelle. Love watching your videos, work and fur babies. Thinking out loud. Condensation is all around, it doesn't know there is a channel for it to travel over there, I'm going here. If you marked the center between each cannel and cut an angular channel to each side to allow water to travel down the slope. More work. An easier thought, tilt each runner on a 1/8th angle or 1/16th. Top to the right, next to the left and so on. Alternating the pitch. So water does not pool up on a flat surface witch will cause it to rot faster. Love all your fur babies. Poor Lenny has been through so much. GOD Bless you all and keep you safe.
Cleaver idea grooving your strapping , routers make that easy and fairly quick ! Sure if I was at that point I sure would have done that !
Flashing on the bottom , good idea it’s easy enough to work with !
It’s going to turn out perfect when the siding is on ! You made good progress today , task well done !!
I love the way we "creatively build things, I'm much the same :). The angle on the flashing can happen by putting your lowest siding piece pushed down to the flashing as tight as possible. The wood siding can press down on the flashing to create a bit of a slope. You're rocking those Levi's as well.🤩
I thought the same thing too, but a few people are reminding me of how water wicks and if the siding is pressed right down on the flashing, the siding will slurp it right back up. I’ll have to find a sweet spot in there somewhere !
Tack the flashing down to the deck maybe.😊
20:28 and 20:47 awwwwww Be still my heart! That was such a sweet few moments. ♥♥ Another wonderful video. Thumbs up!
Like I mentioned before, you need a little bench or pavilion in the meadows. That way if you had a pavilion you could hang a hammock on and enjoy that beautiful view. Thank you so much for sharing everything. 0:54
Great job there, Michy. You are a joy to watch and easy on the eyes, thanks so much!
Michy, quit doubting yourself. Everything you touch turns to gold! Just trust your instincts.
Your work ethics are amazing!
I think everything you do towards forethought is always beneficial.
LUNA HAS THE MOST ADORABLE FACE!! BUT THEN AGAIN,ALL YOUR FURBABIES ARE BEAUTIFUL.
She is such a sweetheart!
🥰@@michygoss7148
As I understand the BC climate has a lot of humidity and moisture so I understand the desire to have concerns for creating moisture drainage. However, using wood preservative may be more important. I due see the desire to make a cabin on side of a cliff for the peaceful felling I see your puppy 🐶 shows looking over the water. 😊
Fantastic views from your Cabin I must say well chosen location .😊
you know i'm never going to stop commenting about the need for a deck railing...if not for yourself, then for your dogs...only saying it because I care..and I love your channel :)
Killer view from the meadow. Copper nap. has quite a loud smell. 😊 Thanks for the video!
You've motivated me to buy a Woodland Mills sawmill. I'm going to build a small guest cabin on my ranch in Durango, Colorado. Good luck Lenny I hope you feel better soon! Michelle try to remember to lift with you legs, some of your neck pain could be coming from your low back. Back problems can sneak up on you quickly with repeated motions like moving wood piles. Look forward to the next video!
Adding that black angle capping along the base of the building was a very good idea. It’s another layer of protection. 🙂👍🏻
I don’t know if I would’ve put the grooves in the wood or even thought about that? Whatever decision you make is a good decision because it’s your own decision I love watching your videos.. I think you’re an intelligent, beautiful, woman. I hope you stay inspired to finish this project. It’s awesome.
Oh, we’re gettin it done!!! 🤩
appreciate you sharing your days with us.. the good and the different.... Have a wonderful week...
Michelle, you've come up with a workable solution on your strapping. Word of advice when you go to put up the siding, keep about a 1/4" gap between the bottom of the siding and the metal flashing at the bottom, will help keep water that hits the deck from wicking up into the siding. You may also want to treat the bottom edge of the siding.
Always love seeing the dogs and cat at the end of the video. Always thought Clyde was older than Riley. Will be exciting to see the siding on the exterior.
I love your animals almost as much as you do! ❤❤
Awe!! They are all pretty special!!! ❤❤
I like the use of the router to give the strapping some condensation breathability - good job.
Michelle, I've dealt with that strapping issue 3 times, 1st time I repurposed old lathe, 2nd time I used strips of fanfold insulation 1/4" and 3rd time I used strips of 1/2" Dow Board. All were installed vertically on the 16" centered framing using 2 1/2" galv. roofing nails measured out to miss the nailing flanges. You're in the groove idea is well worthy of reducing some condensation build up, yet the top edge of each may need a path to follow to the groove, especially since they've been leveled. All in all, the idea will work. You could also help the situation by drilling 2'' holes on the very top siding panels and screening the backside of each to deter bugs and release any heat build-up.
As for those 'gutters', how would 'Clifford' look with the old school curled 1/4 moon-shaped copper style with a rolled edge that was designed to force the water away from the structure. -- Jerry
Hi Michelle, i enjoy watching your build of the remote cabin . If i can make a comment on the siding timber frames why don't you place vertical support small beams two feet apart or less and then screw the siding boards . This will make the external siding boards have clearance for the water/moisture to drain. Thank you again totally enjoy watching your videos . Good luck !! P.S. Please add some deck railing like a wire which will not close the view but give you safety support .😊
First I LOVE your Basset !!! Now as for your furring, I might have waited for that foam you ordered before putting up the furring but other than that I don't have or see any problems with what you did with furring... Now as for your ladder, I have two suggestions 1) mount the bedside with hinges and then attach a pulley to the bottom of the steps then place that to the ceiling. 2) mount a bar/tube to the loft side and then you with proper rollers on the ladder top you can roll the ladder from side to side.
I hope these ideas might help if now, still thinking you are doing a GREAT job with your build !!!!
The grooves may help, but only time will tell. Excellent little cabin! Thanks much for sharing!
Seeing those dogglies all so happy and loved gives me a warm and fuzzy feeling.
Yeap you keep being my hero! I've been working on my mom's house...I hate cement! But you work with what you have...great job girl!
Enjoy so much watching you and the family, overthinking it maybe ok well yes but that just part of your journey. The building will be still standing in 25 years no matter how you do it so will it matter. Your doing fantastic it will all be good and you learn as you go. Thank you for sharing
Strap it like a metal roof. First run vertical 1x4’s everywhere. Then over those run your horizontal straps to fasten the siding to. Love all of your videos. Can we bring up our Golden Retrievers to play with your pups??? We are only 3099 miles away in SWFlorida. Stop by with Steve in your new Yacht. ❤
C’mon up!!!
@@michygoss7148 don’t temp me! I grew up going to Lake Nipissing, North Bay, every year with neighbors, when i was about age 8 to 15. The wife was Canadian they owned a small island there. I’m hoping to visit there again soon. It’s a bucket list thing, it’s a real short list, just one, the only one i have. Fantastic childhood memories, fishing, camping, dogs, and my first love at 10.
youtube.com/@barntobeachdesignsandsawmill?si=Z5aqvHVFrz8DCrtM
The above link is to my close friends channel, he has a Wood Mizer LT15. I go up there once a month and teach, help him build stuff around his house, barn, and pool.
He was a Lineman for the big electric co and retired about 6-8 months ago. Purchased his wood mill and now is making great money selling lumber locally. So I’m teaching him construction. I’ll soon be putting in my order for roof strapping to install my metal panel system roofing. With Hurricane IAN hitting us last year, it’s time to Hurricane proof the top of our house.
Michelle i live in florida i built a porch 8 years ago i put thomson seal on all side and every cuts that i did with al pine wood and my porch still like it was built yesterday so protecting the wood there is nothing wrong with that specially the wood that you can not see anymore it put your mind at ease to know that it is protected have a great day
The grove idea for water drainage behind the siding I have used before when I put Cedar shake on the roof and side of a house. You are a thinker 👍👍🤠
I only used a skill saw set at 1/4 inch depth and with cuts every 2 to 3 inches apart on 1 x 2 and or 1 x 3 wood strips.
The screen wrapped around the bottom and top lathe would have been an excellent idea to prevent bugs from nesting under your siding. 👍👍🤠
Michelle, like u said it's in the middle of nowhere..I built a 10 x 15 shed last summer, tyvek, strapped it then milled up cedar for board an batten turned out nice! Whatever u decide I'm sure it'll last!!
Haven’t watched your videos in a while. You’re making great progress. Beautiful country up there!!
You're doing a great job Mish and you're so stinkin adorable!
Kinda curious to hear what Foxy Roxy has to say about strapping 😉🤣🤣 Cliffy is looking great. Keep up the great work! Keep doin' you. Can't wait for the meadow series.
Meeee tooooo! I’ve got a fun idea for the meadow!!
We have full walls of the webbing material on our cabin. The entire cabin is wrapped and then the half logs installed, so any water that gets between the half logs and the cabin it drains properly. Great stuff, more cost but half logs are not cheap to replace.
🤣🤣🤣 "Don't want to spend too much time F***ing around ". Now that one caught me by surprise!🤣🤣🤣 I was going to suggest shallow cross cutting of the strapping but you figured it Out, Good Job! Carry on!
Did you message me to contact you on telegraph? not familiar with that app. Found it but requires phone number to contact you back. Might be a scam? not sure. Let me know.
I literally have no words ❤
Good idea I was thinking about leaving gaps and not butting tight that is to change my roof to metal but I think I will use your idea thanks great job have a great week
Michelle, your a rare one :) You have what i call {The Heart of a Champion], what's that you ask, glad you asked :)
Everyone on this planet gets knocked down sometimes in life, many actually, what is it that some are warriors and never give up, they sooner or later reach their goal? The Heart of a Champion NEVER gives up, always gets back up and enter the race. It is becoming more and more rare to find these people. Steve is one, he looks at a problem, as an opportunity and he is great at fixing things. I watched most of all your videos, and some of the challenges you guys have went through many, MANY people these days would have quit, and most everyone else would have said, don't blame them i would have quit also. YOU guys are special, i really mean that. Tell Steve we said hey.. love and prayers from SE Texas Bear :) ❤💯🙏 for ya'll and the fur babies too.
Your still the best and letting your ideas live! That is awesome! Stay in the fight!!!
Hey Mich, how about a row of tape around the top of flashing to prevent water from getting behind it? Looking good!!
Poor Lenny. He is lucky to have you guys to look after him.
You do a great job and all the stuff you do it’s OK to overthink it. I enjoy your videos. You are a very determined young woman.
Honestly I don't think you're over thinking things... You're just good about thinking ahead which is always a good thing! Great job today!
Good job,well done. A comment that you may not have needed to put the groves in....maybe but they won’t hurt and long term every little improvement can make a big difference. Shows you are thinking ahead and doing a dam fine job of it. Now let’s talk about the railing or lack of. You are ignoring the danger and need to get onto that job, Steve has commented as well. No more procrastinating safety always comes first. 😊
Good job, you are not overthinking/over-killing it. Don't forget to strap around the widows and door opening.
Oh those glacier meltwater coloured eyes get me everytime 😍
Well the only way to find out if it's going to work good give it a year and then take some of the siding off and look at it I think it's a pretty good idea but thank you for the video the cabins looking great and all your kids they all look happy and Clyde he's a big teddy bear I hope Steve doing good and you're doing good see you on the next one😂
The groves in the strapping is a great idea and I have asked myself that many times when doing steel roofing. I haven't seen steel roofers do that here in Ontario and I always wondered where/how would the water drain out if there was a leak somewhere. Great job.
Another way is to put spacers behind the strapping, but that requires a lot of extra material of all the same thickness. I just don’t have that down there, so that’s why I opted to make the grooves.
Michelle, I think it will be just fine with the grooves in the strapping. Thanks for Sharing!
I believe that you are doing just fine on the strapping. there is nothing wrong with preserving wood and cutting the grooves for water drainage. you are building it to last and you shouldn't have to worry about wood rot for a long time. your cabin is going to turn out beautiful and best of all it was built with your own hands.
Its worth it, you can buy them that way already for roof tile.They have a 1/4-3/8 dado in them.The other stuff you showed is like core vent here.Dryvit which startes with foam is suppose to have a way for moisture to get out also, before its brown coated.You have 2 layers of vapor control with wrap and foam board.Yes flash before deck, not that big because you membraned fish, if I recall.Metal wainscot is always nice, if doing later just run a flashing at level and start from there.
The flashing at the bottom of your walls is a fantastic idea and will keep mice from getting into your foam and subsequently into your cabin.
Sweet --always cool to see your new vids in the morning motivates me to get things done. Cabin looks great
Thanks for sharing can't wait to see the next one
Editing as we speak!
@@michygoss7148 😼
💚 I'm taking ideas for building a tiny home. I like the drains on the strapping. Well done (product of overthinking eh 👻)
When you use lumber covers on your materials make sure to put them right side up, they are designed to breath moisture out. You are definitely building a cool cabin keep up the good work.
Good Job Michy,,,, one thing you might do is cut 4 inch block from ur stripping n use them for vertical furring strips behind your horizontal strapping. Works the same as full vertical strips but less material. Could have been done for your metal roofing also. I did this method when i installed tile roofing on my house here in southwest US. Good luck.
Yeah, I thought of that, but I’m limited on materials down there and am really trying to just use what I’ve got. I wasn’t sure I’d have enough to do it that way.
... run some weather tape over the bottom flashing wall edge, that'll keep any moisture from getting behind it. I think the strapping should work out good. The other thing you might want to consider is when you start putting up the vertical siding, at the bottom deck end, raise it up off the deck say 3/4". Plus cut the back side at a 30deg ish angle. What this will do is give you less material for moisture wicking up the boards. The thing with building, anything, you need to think five steps ahead. Your doing aweSOME! Good Luck!