✅ DETAILED 2001-2007 Dodge Grand Caravan Strut Installation Guide ✅ 30 Minutes and You are DONE

ฝัง
- เผยแพร่เมื่อ 14 ธ.ค. 2019
- If my video helped you or saved you money, please consider donating to my channel using the Super THANKS button found just below this video. Each donation goes towards tools, project supplies, parts, and production value. Big or small, every bit helps!!! I show you how to easily remove old and worn struts and install a new strut assemblies on 2001-2007 Dodge Grand Caravans. From start to finish, it takes about 15 minutes to remove and install each strut.
Once complete, you must take your Grand Caravan and have a 4 wheel alignment performed to ensure proper steering angles and to prevent premature tire wear or failure. Normally, the alignment will include shifting the cradle as well as repositioning front end components to achieve a proper alignment and steering geometry. Remember, it is up to the mechanic to ensure all components are installed correctly and all fasteners are tightened to specifications. Inspect your work before driving the vehicle!
Torque specs:
Strut Tower Attaching Nuts 28 N·m (250 in. lbs.)
Steering Knuckle Attaching bolts 88 N·m(65 ft. lbs.) Plus 1/4 Turn.
Attaching Link Nuts 88 N·m (65 ft. lbs.)
Please 👍 like my video and subscribe to my channel.
As an Amazon Associate and eBay partner, I earn from qualifying purchases you make from my content. Clicking on my links and making a purchase provides me with a referral fee which in turn is used to pay for more projects and instructional videos.
✅ Repair parts at great prices:
👍MAHLE Valve Cover Gasket: ebay.us/uikkET
👍Denso 234-4010 Oxygen Sensor: ebay.us/9SDAhr
👍Denso 234-4216 Oxygen Sensor: ebay.us/7Of7Yj
👍Front Left Monroe Quick Strut: ebay.us/gdiwlT
👍Front Right Monroe Quick strut: ebay.us/1X5p2E
👍Power Steering Rack and Pinion: ebay.us/Wx72Ar
👍Front Sway Bar Mount Bushings: ebay.us/IUMg0N
👍Front Sway Bar End Links:ebay.us/Bpq1NL
👍Front Lower Left Control Arm: ebay.us/ns3Wxz
👍Front Lower Right Control Arm: ebay.us/20Or3t
👍Grease: ebay.us/bdgQXY
👍Grease Gun: ebay.us/h7htkA
👍Headlight Restoration Products: ebay.us/l2bGGd
🛠 Tools:
👍INNOVA 3040e+ Scan Tool: ebay.us/FWA402
👍Oxygen Sensor Socket: ebay.us/Q8MNVu
👍Cordless Drills: ebay.us/OTGSqp
👍Torx Bit Sockets: ebay.us/6z4C8b
👍Metric Wrench Sets: ebay.us/kzEOom
👍SAE Wrench Sets: ebay.us/HDNAxB
👍Metric Socket Set: ebay.us/h32EER
👍SAE Socket Set: ebay.us/dMudEO
👍Cordless Impacts: ebay.us/FwYOi9
👍Torque Wrenches: ebay.us/eAjAwo
👍Mechanic Tool Set: ebay.us/VfPqEE
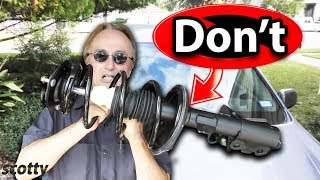
Pre-Assembled Upper Strut Mount: OE-style bearings, SAE-grade nuts & bolts, Superior rubber-to-steel bonding, Plated steel for durability, All components manufactured to meet or exceed OE performance.
The revolutionary Monroe Quick-Strut unit is the first complete, ready-to-install replacement strut assembly available! Monroe Quick-Strut units include all the components required for strut replacement in a single, fully-assembled unit. They feature pre-assembled replacement bearing plate, upper and lower spring isolators, upper spring seat, coil spring, boot kit, and a premium strut. This breakthrough design saves on installation time by eliminating having to disassemble components and compress the coil spring prior to installation. Each Quick-Strut assembly features application-engineered valving to optimize each vehicle's unique ride and handling characteristics. Available for popular passenger car, light truck and SUV applications.
This video was produced and filmed digitally at 1280x720 using the Samsung Galaxy S9 Plus. Post production editing was generated by Windows 10 Video Editor and was reduced to 1080P. Copyright © BOSSC351's Productions No part of this video may be reused, edited, or rebroadcast in any form without expressed written permission. Contact BOSSC351@aol.com for permissions. All content is generated by BOSSC351's Productions. Any infringement on any other party's intellectual rights or incidental use of another's property is strictly by mistake and will removed upon written request and proof of ownership. - ยานยนต์และพาหนะ


Great video. I was always worried about DIY strut work on my Caravan but just happened across your video and see that this is a pretty simple job. My problem is always tackling rust and trying not to break other parts on a 20 year old van in the process. It always turns a 20 minute job into a week long nightmare.
this van is obviously NOT from the rust belt :) like mine :(
It's so deceivingly easy without rust and corrosion!
#1 you could mark that bottom bolthead to the body, because it's an alignment bolt, and if you put it back just like it came out. It may save you a front end alignment charge. And I personally would never beat on a bolt that many times, instead I would spray everything down with PB blaster the day before. And thanks for being precise on the tools, because I had to buy the ones I didn't have.
Those bolts are serrated and can’t be turned, when I did mine I did what you suggested and I still had to hit it just as many times lol.
By alignment bolt you mean the 2 bolts that connect the strut to the rotor piece part (I forgot what the term is)
you can also use another jack and support/lift the strut up a bit to align and relieve the bolts in the holes and they come out easier
I usually put the nut back on just a little so you beat on the nut and not the bolt. I've messed up many threads beating
A 30 minute install, huh? God bless you for having unimpeded removal and install. Rusted nuts make for difficult removal. My install, trying to hold a 25 lb strut with one hand and line up to the strut mount bolt holes was near impossible. Both sides took me over 5 hours.
Unfortunately that is sometimes the case.
GitRdone
Thanks! I appreciate the time you took to help people like myself out buddy. Thanks again.
Thank you great teacher
Best video on here ❤
Great stuff.
Finally got around to replacing struts and stabilizer bars / sway bar links. I had to pry down on sway bar to remove and install new bars/ links. I didn't see you have to do that. I compared new to old parts. Perfect match.
What did I overlook?
Thanks.
thank you kindly sir
Yeah I was hoping for the other two videos because I'm doing the full deal on the right hand side I guess I got enough mechanical ability to figure it out
Which? I have several uploaded.
i used gabriel quick struts 169.00 for the pair you always replace both not just one of them
Struts and both a-arms were replaced as well as the rack and pinion and its mounts.
I'm struggling to get the otherside off since the sway bar bolt doesn't have that bit hole on that side
so I click on the link for the strut. I get ebay but the producgt shown does not show "monroe". it shows "moca". I scroll down and see monroe but the part item for the monroe is different than that shown on your parts list/link. I want to get it but do not want to get the wrong one. any help would be appreciated. thanks.
Only thing is, it doesn't say "Quick Strut?"
Where to get the Monroe struts from?
What if the strut is broken
I just priced struts and shocks for my 2002 caravan and, what a different in price. Local single struts are $ 166.97. and I got all 4 two struts and two shocks for $ 200.98, my van just turned 220,000, and it's been though Katrina, Mexico, long story, I've changed almost everything on the outside of the engine in the last 8 years that I've had it.. and I bought it from a shysters in
De Land, FL at a
buy here, pay here place, and within the first month I new that these guys burned me, not honoring their own warranty to just blowing me off on their shop, and having someone look at it. One of the first things I noticed, and stop me making anymore payments on it. I went to change out the donut tire, for a regular tire and rim. Because it fits up in the spot as a donut tire. And donuts suck. Both kinds, well I drop the original donut down on that cable, and low and behold, it's full of sea shells and sand. The rim on the donut, it looked like someone took a decorative fishbowl full of sea shells and dumped right in that rim. Pissed off a little. Anywho I never made the rest of the $2200 in payment's, and the van is titled in my name. I found a way to beat the shysters.....
I am in SUPER DIRE need of knowing what size that 18mm sway bar link nut is that connects to the strut...PLEASE ANYONE HELP
Good video. What do you find to be the most common front end worn out parts? I'm getting into a 05 Grand Caravan and I'm thinking since everything has 91000 miles I don't mind changing more than just the struts. Thanks.
Struts, a-arms, rack and pinion leaks, and worn out rack and pinion mounting bushings.
Very good video. What's the music at the end?
Just generic music from the video editor I use.
thank you for the video..if i do this..can i drive maybe 15 miles at 55mph to the Alignment shop..or will it be ALL OVER the ROAD..?
You likely may not even tell its off. You should be just fine.
awesome ..thank you so much...You saved me a Lot of Money...Daren
Hello Again..Would you know how often I should get a "Complete Transmission Service"...I know that's a Loaded " Question"... Its the 3.3L ..I'm putting 200
Hwy miles on it once a week..The van has a 100k on it [ fluid is clean ] ..I'm used to owning Full Size GM Trucks.. I always did a Full service every 15k..on them for 25yrs I Never had to replace a Trans...Just wanna get your Input / Opinion. Its just me in the van...no Cargo..Trailer..etc...Thanx Daren
@@780tango2 Your owners manual has recommended intervals. I would probably service it every 30,000 miles unless towing or similar severe service.
You should tell folks that there is a left and right strut.
you missed the torque specs? that's very important.
Torque specs are in the description.
nice try stevie...
You never want to use those Monroe Quick struts never ever They Ride bad and they have the incorrect spring rates as some Vans use staggered Spring rates left and right and the Monroe Springs are not staggered and you will wind up with your Van sitting an inch lower on one side or the other!!.. .
Worked great on the two vans I did.