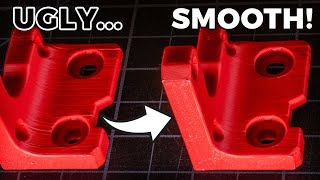
These threaded inserts aren't made for 3D prints (but work amazingly well)

ฝัง
- เผยแพร่เมื่อ 12 เม.ย. 2024
- Heat-set inserts are pretty cool, but you would be missing out if you're not trying what the woodworkers have in stock! Also, were my tests skewed previously by printing my parts too weak - and what about materials other than PLA?
Try Meshinspector and get 10% off with code MADEWITHLAYERS (valid till 30.06.2024) meshinspector.com/
Part 1 of my threaded inserts testing • Do you even need threa...
Get the inserts
CNC Kitchen heat-set inserts cnckitchen.store/ (use code tom5 for 5% off!)
Aliexpress heat-set inserts go.toms3d.org/AliInserts
Rivet nuts on Amazon go.toms3d.org/rivnuts
Zinc furniture inserts on Amazon go.toms3d.org/zincserts
Steel woodworking inserts on Amazon go.toms3d.org/steelserts
Thread repair wire inserts on Amazon go.toms3d.org/wirethreadrepair
Self-tapping inserts on Amazon go.toms3d.org/selfsert
Prongnuts on Amazon go.toms3d.org/prongsert
JLC3DP 3D Printing & CNC Machining Starts at $0.3, Sign Up Get $60 Coupons: jlc3dp.com/?from=MadewithLayers
Product links are affiliate links - I may earn a commission on qualifying purchases (at no extra cost to you)
🎥 All my video gear toms3d.org/my-gear
I use Epidemic Sound, sign up for a 30-day free trial here share.epidemicsound.com/MadeWi...
🎧 Check out the Meltzone Podcast (with CNC Kitchen)! / @themeltzone
👐 Enjoying the videos? Support my work on Patreon! / toms3dp - วิทยาศาสตร์และเทคโนโลยี


Pro tip for modeling this and many other parts. McMaster-Carr has 3D files (in multiple formats) for tens of thousands of parts. Just download what you need and add/subtract/manipulate to your hearts content. When it comes to hardware, I have found the files to be spot on.
Oh yeah, so does Traceparts, 3d contentcentral and some others, highly recommend sources
FYI, most of the places with the CAD/STEP/etc. files sometimes use multiple vendors for the same part. The files do not always match. For non-branded critical fit parts, it is best to buy the parts you intend to use and verify the models before use. I have received the "same" parts from different manufacturers in the same order before, one matched the CAD, and the others were just different enough to require a design change. This has happened to me with fasteners, inserts, bearings, gears, wheels, and more.
The McMaster-Carr heatsets do all seem to follow their published design guidelines, though they are different from the "Voron Approved", CNCKitchen, Amazon, and AliExpress heatsets...
Just be aware that using McMaster's 3D files in a printed part violates their terms of use. It specifically calls out 3D printing and prohibits it.
@@ChrisHeerschap To be fair I think the intention of that rule is more regarding the replication of the part itself rather than designing around it.
Really good tip, especially if your part follows any type of standard like DIN, ISO, etc.
the problem with the flanged inserts is that if you have access to the other side of the part, you can just use a standard embedded hex nut (maybe with a washer for extra strength). probably much simpler, since most people already have nuts and washers on hand.
Inserted nuts (hex or square) make the most sense for me: no extra hardware or tooling needed. It would be interesting to see them compared to the inserts tested here. Thank you, Thomas!
Yep, I make it all the time, simple to model, cheap, and works perfectly.
I also do it when you got access from one side even if not the rear, you can just make a slot where it fits and it's embed there inside.
@@jmsaltzman square nuts tend to be much superior to hex nuts. They have larger faces an sharper corners which prevents rotation and they tend to have a larger surface area and square holes tend to be easier to model too.
@@Kalvinjj yes sliding nuts in slots from the side is a very good way of doing it. Another way is to just leave voids in the model and when printing pause it at that point to insert the nuts, that way you don’t need anything visible from the outside.
@@conorstewart2214 you can leave two cavities on top of each other. A square or hex for the nut, and a round shallow one for a washer. That washer (could be a fender washer, those masive ones) will increase the support area a lot so there will be no chance to just pull the nut. Even better but more expensive is a washer nut (nut with integrated washer)
Thank you for the exhaustive test. You really went all out. If I could pick one little nit - I was hoping early on in the video that you would test the standard brass heat set inserts installed from the back side like the flange nuts. I know you can't always use them this way - but it would've been nice to know how much stronger they are when possible to utilize them in that installation method.
This is a huge service for the community. Love what you're doing here!
I work in rapid prototyping and we use the self-tapping inserts for our SLS-printed nylon parts. The brand we're using is called Ensat and they have special tools that are similar to thread cutting tools and make inserting them easier than with a bolt.
Also designing the threads in the part is not needed if the hole that the inserts threads into is the correct size for the insert.
You can even cut holes later on and it will still work.
You didn't test heat-set inserted from opposite side of a part(absolute majority of structural parts are designed this way, and they only have "tolerance" all-way hole for screw, so it's significantly stronger, yet should be less strong than self-tapping steel piece) as well as regular nuts are missing.
I suspect that usage pattern is going to be strong regardless of the threaded insert used, so it would be a bit boring and unnecessary to make an in-depth test video covering it.
I have only rarely seen heat set inserts used as you describe, if you are going to put the bolt all the way through anyway you might as well just use a nut on the other side. Putting the insert on the other side also doesn’t stop the insert from eventually turning.
There are a number of reasons why using a nut rather than the method you describe is better. Nuts have larger features that help to prevent them from turning when recessed into a part, with a heat set insert all you have preventing rotation is small teeth on the outside, with a nut you have large faces that can resist rotation, especially if you use square nuts. Nuts tend to have more surface area pushing on the part when tightened too, when using a heat set insert like you describe only the bottom area of the insert is pushing on the plastic when tightened, compared to the whole bottom face of nuts, again square nuts are better as they tend to have more surface area. You can use washers with nuts too to further increase the area that the force is distributed over. Inserting nuts is also easier and doesn’t require special tools like heat set inserts do and if you want nuts embedded in a part you can pause a print and add them then.
Nuts are just overall better for structural parts. Heat set inserts should only really be used for relatively low force applications, I mainly use them when I just want a reusable connection (can be screwed and unscrewed multiple times) and when nuts wouldn’t be practical, so I only use heat set inserts inserted from the front. If you need a strong connection there is pretty much always a way to use a nut rather than a heat set insert.
@@conorstewart2214 your writing is too long, but look at prime example right behind him-Vorons are designed this way and I do design parts this way and only use inserts the way he showed only in case where connection isn’t expected to be under any significant stress
@conorstewart2214 I design parts with heat inserts on the opposite side and know many others that do as well. They work well. I would also argue that since a heat set insert generally has many knurls in it, they actually offer more surface area than a nut, though probably at a max size of M3. Heat set inserts have their place imo in compact or aesthetic applications and generally make repeated assembly and disassembly easier. Anything designed with M5s I use trapped nuts.
Could also try wood screws
I always flip the Riv-nuts around the way you did with the Prong-nuts. You don't need the special tool just a slight recess for the larger diameter It'll never pull through. But you need a thick part and access to the rear for that mode of use. The disadvantage of the Prong-nut is size and complication of the interface geometry. That extends the print time by a lot. I always use Riv-nuts and heat inserts I've never been disappointed.
100% came here to say the same thing. At least for smaller rivnuts like m3, this has worked great for me for several years. I have also had success pausing prints, pushing in some rivnuts, and then resuming the print so the whole thing is embedded and invisible
@@ozonepat yeah I use 10-24 screws a lot. that seems to be a goldilocks size for my builds.
That's nice to know that self-tapping inserts work just as well as heat-set inserts, seems more convenient to put.
Not to mention far more likely to remain straight/true.
I would have used the rivnuts the same way as the prong nut as well. But torque-out on the round nutserts wouldn't be expected to be as good as the prong nuts.
In the RC airplane biz, we use the 'pronged Tee-Nuts' especially for gas or glow-fuel engine mounts.
I really like them because, short of crushing the substrate they actually strengthen the material by not allowing it to be distorted or pulled apart.
In analyzing many post-crash situations, there was never a failure of the fastener system, even when everything else was obliterated!
In most cases they are overkill and take up a little extra room, but if you have to have the strongest, I think they are hard to beat...
"these go in from behind, and as you know that can cause quite a bit of damage" rofl.
Oh boy. So when you can use a driver from behind, on reverse screws, where does that get you?
im glad im not the only one - and then 'you'll need to reach around from behind' - no way this was an accident
That's why you should always lube your parts, and check tolerances.
Great comparison! For my designs which usually are pretty small I just use M3 bolt directly into plastic and for most cases it is sufficiently strong. And surprisingly the plastic survives many assembly-disassembly iterations.
Thanks and love from Ukraine!
There are screws designed for directly threading into plastic, but they're kinda like wood screws. Last time I used them, they wrecked their own thread when I overtightened them. Machine screws are probably the way to go.
@@MMuraseofSandvich For ease of use there's nothing that really beats them, just thread in and it's done, that's why they are so popular for plastic housings and clamshells, basically all power tools use them
A better option is to design with a bit tight hole, and tap it with a tapper tool. A tapper tool makes far better threads, and the accuracy of the treads will be far superior, as opposed to just using a screw to do the tapping. If you use m14, you may use a regular 8mm flat bit, even on the backside of the screw. They last as long as the hole for the bit lasts. Just replace the screw if needed. That lasts for many hundreds, if not thousands of iterations, and you need no metal parts at all. You only need about two rotations of threads.
Slava Ukraini!
@@FrodeBergetonNilsen It is actually quite interesting which machine bolt would hold stronger. The one which goes into pre-tapped hole with a machine tap or the one which goes directly into the tight hole and tap its own thread as it goes.
The machine taps are made to give some clearance between a part and a bolt. This extra clearance might weaken the joint with a machine bolt and a plastic part.
I've found that if you can't access the back of the part to insert a nut from behind, I can often make a slot to insert one from the side of the part. You just slide it down the side hole till it's under the fixture hole. This works even better if you can get square nuts but they only seem to make them in imperial sizes
This was a really cool test! I have one idea for you if you're interested in following up on it. With those self cutting threaded inserts, put them in the freezer overnight as it will cause the metal to shrink ever so slightly. Then take them out of the freezer and immediately insert them into a 3D printed part by letting them cut their own threads. Once the part has warmed up to room temperature, the metal will slightly expand and put even more tension between the metal and plastic. Maybe it will increase the strength and maybe it won't. But it would be a neat test!
For people looking for tests of embedded nuts etc - CNC kitchen did a bunch of testing on these vs heat set inserts a while ago, and I think that's why Thomas didn't repeat that here.
Honestly the best use case for threaded inserts I've found is replacing self-tapping screws in car parts with machine screws. The air intake and cabin air filter housings on my old BMW were held on with self tappers and after many years of removing these to do maintenance they weren't working anymore... some nice pan-head stainless machine screws with washers and 10 minutes work setting the inserts with my soldering iron and it was all sorted. At least until I let a "professional" work on my car and they torqued out one of them, obviously using an electric driver, and I had to glue it back in...
What an immense amount of time went into this test. Thank you for that
Thanks for all the work Tom, very informative.
I've used wood threaded inserts for some furniture projects with 3D printed connections and they work wonderfully, super strong connection
Thanks a lot. the self tapping inserts are the winners, and do not need heat to make them work. very convenient 👌
Next you should try various methods of using nuts. You could test normal hex or square nuts as well as trying them completely embedded in a part (added during a pause when printing), pushed in through a slot in the side or used normally from the back.
You could also see how much of a difference adding washers creates. In theory it should be like the prong nut but better since you don’t have the teeth and hence holes going down through the part which probably caused weak points.
This is great information, thanks for testing this!
Great tests Tom! I hadn't heard of the self tapping inserts till now, going to try them out next time I need threaded parts.
Great information Thomas. Thanks for your work.
after 14 year of 3d printing. I've never used any of these inserts. I just embed a standard nut. The best part, hex is easy to model, and nuts are going to be cheaper per part than any of these inserts.
Sure. But they easily start spinning, if they are too small. Once you use too much torque, they all finally slip. The square ones are better, but same story there. I still use the regular nuts, due to their ease of availability, but always try to design for easy replacement or ways to fasten the screw, if they start to slip.
You need more clearance for a standard nut, and you have to pause the print in order to insert them. Sometimes that's OK, sometimes not.
@@larrybud Modeling pockets so the nuts can slide in is the way. The pocket can be a bit taller than the nut since it will get squeezed in that direction.
@@FrodeBergetonNilsen It’s a responsibility not to overtighten in general. If that’s a risk, square nuts as you mention are even better, or size up the hardware. I prefer using standard hardware than inserts in general- inserts can easily be melted in at an angle or too deeply, and the plastic melting around the insert deforms the model a bit. Melt-in inserts are just inconsistent without a press and temperature control.
@@jmsaltzman Doesn't that mean that if they can slide in, they could slide out?
Finally back to basics that you are great at 😊
@tom - awesome video, great to see this breakdown!
The T-Nuts that you tested are very commonly used for mechanical fasteners on ski boots typically Nylon, TPU, and PU materials. What I have see on their failure mode is the metal prongs which are designed to bite into the material, begin to bend, and then causing the nut to spin while being torqued.
That voron in the background of your video is gorgeous
I hope you make more videos about it, like some MODS you love and you find useful
Thanks well thought out as always.
I began using blind nuts long ago simply because i had a tonne of them on hand and didn't want to buy anything i didn't need to. I figured if they work good with wood they'd work well with plastic. I wasn't wrong.
12:20 Can we get a test on that? I always print my holes just a little smaller or larger than whatever the pre-drill size is to tap. Smaller if I want to go through the effort of drilling them to spec or larger to make sure it's never too small. Most bolts will self tap just fine into either of those holes and I feel like the result is a lot stronger than modelled threads.
Bonus points for driving the bolt in fast enough the first time that it gets to a temperature where it slightly remelts the plastic around it to form a stronger area.
Amazing testing method, GG !!!
Super helpful thanks for doing these tests :)
The screw in kind are what we've used for years at work for anything larger than m4! There are ones made for plastic available for a few cents a piece
I feel silly to admit that I didn't know tee nuts went in from the back like that..... I have only ever used some to put leveling feet on the bottom of some table legs (the feet came with tee nuts instead of threaded inserts) and ended up just using some epoxy to set them in to stay put. These make much more sense to be used on plywood or other thinner parts or at the end of a long blind hole. Learn something new every day, thanks!
Wow, impressive video
Thanks for sharing your expirence with all of us 👍 😀
You should include drywall/plasterboard fixings, the type that deform behind the hole and grip from behind. They do need a bit of room behind to be inserted far enough for the front face to be level with the part but they shoud work quite well with plastic.
Awesome and very informative video! Thanks a lot!
When you have access to the back of the hole then the heat set ones can be strengthened up and just a hex nut from the back side as well!
My very first design and functional print was a block for my son's toy chest. The cheap box had lift hinges that mounted to a MDO (paper board) block. they failed in short order. I designed and printed replacements and used T-Nuts (that is what they originally used) and just heat set them in with my soldering gun. No need to model in the "slots" for the T's. Box is still working, and no issues with those blocks. Heat Set T-Nuts for the win there.
Rivet nuts can also be pulled from other side, so this will also require access from back trough.
It would have been nice to see a test of just a standard hex nut press fit into the back as a cheaper and more available alternative to the prongnut
I thing Stefan did a few test with this setup. additionally he did those Pockets, prusa likes to use.
I do industrial maintenance. My favorites for soft metals and UHMW plastics are called Key Lock Inserts. They favor the self-tapping ones you tested in material, but you drve in a key to prevent them from threading loose. I wonder how they would test? Great Data, thanks for your work!
Great idea, awesome video. Classic Thomas work. Love it!
Very riveting video😂. A lot of useful info when printing functional parts. Love to see more videos like this for self-drilling drywall anchors (look like blades), neoprene expansion inserts, and the plastic inserts for screws 😊
Thank you, great info
The tests are awesome, but I think there's two different types of loads to consider here. My theory is with the combined heat generated from the fastening of the screw as well as the rotational force I could see this lowering the overall holding power of it during its actively loaded test phase. While if the insert just had an axial force applied after the threaded puller was installed I could potentially see them withstanding a higher pullout force. It depends on how the insert will be used I suppose. Interesting findings! I was not aware of the self tapping inserts, I'll be adding those to my arsenal for sure! Thanks Tom!
The 1/4-20 rivet-nut oriented upside-down works awsome for a tripod mount. All tripods have a 1/4-20 screw to hold cameras on top.
Great video!
very interesting video, thank you for taking the time to do the comparisons.
Tom does that for a living. It has become his job to make TH-cam content.
It makes no difference to me if someone simply wants to say thank you.
@MadeWithLayers I completely agree with you and in this case I actually don't care.
Would you agree that there is indeed a difference if it was actually specifically about the time invested?
Thanks for doing your job, Tom.
❤️ that !
As you tested prong nuts, you should have also tested zink furniture inserts (they also exist in steel version) and brass inserts inserted from the back (like prong nuts).
Also brass inserts exist with an outer lip - would be interesting to see how they perform especially when inserted from the back.
The prongnut looks like a perfect use case for adding a pause in the gcode to add the nut, then continue printing to encapsulate it. I use that trick with regular nuts, but the built in flange greatly increases surface area. Obviously, that's dependent on orientation.
I think that helicoil has a key advantage, especially woth small screw diameter - they're thinner than self tappers or heat inserts. That might be useful in some cases.
Btw, I tried quick google and found helicol-like V-coil M3 inserts for cheaper, than their self-tappong counterparts. Plus, I discovered there's also a threadlock variant.
I use the helicoil in almost all aluminum parts. however you are right and you have to get the threads exactly right with the proper helicoil tap and fancy installer tool. the cheap tools make it very hard to install repeatably.
I want to try to place an insert that a helicoil can be threaded into. I want the helicoil because it should provide reliable firction to the screw over time. Are you aware of a larger insert that matches the outside threads of a M5 helicoil? I know it sounds nutty.
Definitely going to consider trying to use prongnuts on some future projects. I've been lazy, just using regular nuts heat-set into slightly undersized holes, but they easily turn in the hole if over-torqued, which seems unlikely for the prongnuts to do.
another awesome video, thanks!
I used to model nut geometry holes, insert a nut in the print process pause and it worked best all the time :)
I find myself printing knobs/handles for various woodworking jigs and usually use embedded square nuts (slightly more resistant to over-torque tear-out vs hex)… but thanks for the reminder that I should consider modeling in some space for t-nuts since they're often a lot easier to find in 1/4-20 than square nuts.
As far as the helicoil-style inserts go, you can find off-brand ones for pretty cheap. I would probably also just print the thread in the part slightly too small (or model it exactly on size and let the 3D printer make it too small like it does) and then run through really quick with a tap beforehand to ensure perfect thread formation for the insert. That being said, that would be a fair bit more work than the solid metal self-tapping inserts, so I guess it depends on how much you're willing to pay. A bit of searching online and I was able to find 200 pcs helicoil type for $20, vs about $15 for 50 pcs of the self-tapping type. Which translates to roughly 3x the cost.
Great video! I had a suggestion for a future video. At least for me, when I am using inserts or just 3d printed threads, the parts that I am printing will be directly touching each other. I feel like this might translate some of that linear tension force into rotational force and cause the inserts to fail by rotating rather than pull out of the part. It'd be great to see how having some backing preventing the pull out of the insert affects the results of this test.
Such a cool idea to test these out. Instead of using the prong nut as intended, I’d be interested in trying to pause a print, insert it with the wide part up and resume printing to capture it. At that point, you could use a standard nut in the same way. Great video to test some different ideas and it gives me inspiration to try my own tests instead of only having theories.
I use 1/4-20 inserts for camera tripod stuff. 😊
I also have a bunch of M10 clinch nuts.
@Made with Layers You've forgotten one Type you had on Hand: Rivetnut reverse... 😁
If the connection doesn't need to come apart I just max out the thread length. If the length exudes 10 times the diameter this is rock solid.
If the connection has to come appart I prefer rivnuts from the rear or Rampa-nuts from the front.
Overall force distribution is king. Thread length or more connectionpoints distributed over a wide area of the part.
I feel like before you use those prongnuts, you should always check, if just inserting regular or square nuts into a pocket at the back of the hole might be good enough. Easy to design and works quite well in my experience.
A timely video for me as I'm about to test some industrial parts we're using in a prototype and I need to use an nut insert to hold some grub screws. Thanks for your thoroughness.
For screws larger than M3, I use "cheap Zinc" wood screws.
Instead of shaping the hole with thread I make a simple hole the size of the core of the external screw and insert them by screwing them with the soldering iron with the head replaced with a hex bit.
I've never seen them fail even though I'm a gorilla when I have a spanner in my hand.
You should also tested standart nuts inserted from the back. They are in my opinion the best way to add threads if you can reach from back
I miss one important thing in your videos and that's what I personally do: I mount the heat inserted nuts from behind whenever that's possible. This will always give the best connection as you'd have to pull the nut all the way through the material.
I like this new series.
I think the test could be improved though. You should use pulling force rather than torque. This will mean you can test different sized inserts without thread pitch impacting the results (finer pitch = less torque for the same load). It will also take away any variables caused by the material or surface finish that are creating additional friction when tighten the fastener.
This would also let you use a simple load cell so that you can plot the strain on a graph if you want.
best solution: square nuts. can use them as print-in-place. super space saving (only 2mm thick). very cheap (6 cents a piece for M3 8x8mm). can't be pulled out like the melt inserts, so is as strong as the printed material itself.
You should also talk about plastite screws, I used in them in a prototype PLA models and actual production in potted ABS current sensors. These self- threading screws have pretty good holding power while not needing inserts to start off with
Great test and comparison, if just to satisfy curiosity. However, I find little reason to choose any of the other inserts over the typical ruthex/cnc kitchen inserts. You'll end up doing more work for marginally better results. The wall thickness/infill density info was probably more pertinent than the type of insert; I typically use 4 walls and 30% infill.
Testing carbon fiber PETG and PLA would be a good test.
I have been using the self tap ones for a while now and I'm surprised at how strong those did in your tests; I use it for other stuff too, it's great for side loads. Although in prints, in tension, I find using square nuts to be stronger, almost like the pronged nuts, but it might be more prone to stripping due to the thickness of the ones I use (3mm for M5 ones).
Good video, I’ve been using heatset inserts up until now but not a fan of the installation method, might try out the self tappers as an easier alternative
You could basically any of these sinilarly to the prongnut and install from one side while pulling through the part. Especially the rivnuts and zinc furniture threads with the large shoulder. You should check those along with a standard hex nut and square nut
The furniture inserts are kinda neat to fix a part where a heat set insert has pulled out.
Tom, if you haven't gotten rid of your test bed, could you do a trial with the prong nut with the flange on the outside but embedded with top layers over them?
another amazing video :)
The key with any insert. Is to design it in such a way that you are pulling it thru the part not surface mounted.
Also the hole should be reducing in diameter along the way to avoid pulling the insert through the part.
You can write that under every insert video out there and it will not change the mindset.. nice try though :D
In an ideal world yeah, but things are rarely ideal
Then again the entire point of going with a heat set insert is just like they do with laptop cases: you don't get the rear access, you can only stick it from the top. If you have rear access may as well just bolt and nut and call it a day, a little cavity for the nut if you're feeling fancy and need it to be hidden/stay there.
@@Kalvinjj True.. but most cases allow to do it from the back - even better in 3D printing. The most just dont consider that and leave a better design behind because of this. For any other cases a force facing mounting is "as good as it gets" and propably enought.
if you really want rivnuts to hold on to soft materials, you need to back it with a washer! Also, for through holes, nothing beats a hexagonal rivnut backwards (with the flange opening in the back of the piece)
I know you probably enjoy doing things like this, but I still appreciate the massive amount of time you have spent putting all this information together. It's very helpful to not have to personally test every little thing myself to make design decisions.
Made me realise I need rivnuts instead of welding nuts on to steel section!
I have used helicoil. however I have found that the helicoil can peel out when you really tighten it. The threaded brass ones are ok. I have used thousands of tapered brass heat set inserts and have had very good luck. However I almost alway print parts 100percent infill all abs / petg/ cf petg.
The prong nut to me is very interesting. Especially as something that can be dropped in and then printed over
Would be interesting to see how thread cutting screws for plastic would compare to inserts as it is a very fast and reliable way.
06:47 Ackshually, these are made for particle board, which is very fluffy compared to wood.
07:40 Yes, those are made for wood.
Why would you measure torque instead of force? The failure mode is pull-out, not stripping. Torque is also going to be affected by coefficient of friction between the two metals, but won’t actually affect fastening strength.
Tom, your tests all pull a single fastener. More common use would be several fasteners along an edge. Could you adapt the test apparatus to pull three fasteners at a time?
Here it really would be interesting how the internal layout is affecting strength: I would imagine that just having a circular hole would be a lot weaker than having continuous lines that just "touch" the circle - imagine water streamlines around a pole, with different directions for each layer. But that would be a pain to model without direct slicer support.
I think I am going to keep those self tapping inserts handy. They don't need any additional tools to install which is my problem with heat set inserts.
I've been designing my parts for so long with drop-in nut channels, I don't want to even think about new ways to fasten at this point.
I wonder, what if you heat set these furniture nuts? They oughta have some gnarly bite into the part. Also rivnuts from behind would be interesting.
I usually use them because it looks more professional, even if I don’t need them. Just like the look.
Pronged Nuts have the potential to be stronger than that simply because they have to be strong enough to be hammered into wood. Though I'm not sure why you didn't test them as heated inserts, which would be like hammering them into the part. Also, could you help the inserts stay in place if you introduce a washer into the equation?
would be interesting if the "Zinc furniture inserts" was tested to pull them from the oposite site as the have also a flange head , or screw them with a help of iron head
The easiest way to use the helicoils that I found was to print the threads a little undersized, tap the threads, then use the helicoils. I would love to see these tests replicated with resin printed parts.
It would be interesting to see the zinc inserts heat set in. By which I mean threaded in while hot into a hole with little thread?
im curious if the self taping would havesome strength increase if you applied heat after they are in.
I think that most of those would have a massive increase if you put them in from the backside like the flanges ones. Try a heat set from the backside and will be much much stronger.
Helicoil are sold with a matching tapping die. You woulf have had better results if you had it. Also, heated inserts are hard to get perfectly perpendicular without an expensive jig