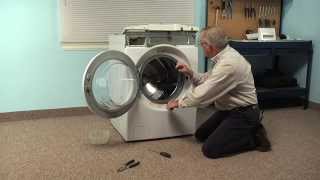
How to replace a drain pump in a Kenmore Elite front load washer

ฝัง
- เผยแพร่เมื่อ 6 ต.ค. 2024
- The water was not draining in our clothes washing machine. This is the second pump we've had to install in our Kenmore Elite front load washer. Our filter has not been clogged up. We are not sure why this is happening. Oddly enough, the part came in an "LG" box. It fit well. This job will take you about 2 hours to complete if you have never done it before... or if you are me, three hours because I replaced it before and forgot how to do it. Thanks for watching us repair our Kenmore Elite Front load washing machine! Almost forgot.. We used a Maxxeon light so we could see inside the washer. We love this headlamp and you will find us with it all the time. We've tried other brands but this one seems to hold up the best. You can find the same one here... amzn.to/2ZuouHF
This an "affiliate link" where you can purchase the same item we bought. As we understand affiliate links, if you use this link we may receive a tiny commission on the sale because we showed you the product. Sort of like that movie Office Space. It the tiny fractions of cents that add up, that nobody notices and over time we make money. As an Amazon Affiliate Associate I earn from qualifying purchases.
This Video is for entertainment purposes only.


If clearing the drain trap doesn't fix it, it might not be the pump. Take a close look at the rubber boot hose that connects it to the washer barrel. Inside it is a floating ball mechanism with a hole next to it that has potential to get clogged with lint or a sock. If the pump runs during a spin-and-drain cycle and the hose collapses while the pump is running, that's a sign the pump is working but the hose is clogged. It unclamps at both ends with a channel lock or pliers, and can be replaced, or you may be able to open just the upper end and clear it out.
Thanks for taking the time to share this info. I'll definitely pin the comment! I learn a lot from kind folks like yourself and hope others can use this comment when they are in the same situation! Kevin
Thanks 🙏 again and again my wife is very happy after watching your video I be able to replace the water pump on kenmore elite washer you are the best sir!
Your comment Odlyspices, made my day! I'm glad this helped! I just ordered another pump and it's sitting on the shelf waiting for this one to die. For me, it's been 2-3 years before they break again. We run a b&b and do about 4 loads every day except Sunday. Thanks for watching and sharing your comment! Hope you'll visit the channel for some of our other videos. Kevin
This is now my third pump install using this video as a guide, thank you genuinely for posting this. I’ve kept this POS washer going for 6 years now because of you. I still laugh with you every time the camera falls.
Papple, it happens a lot in my videos. Most of the time I edit it out. Sometimes it is funny to see it happen! Being a one man rodeo, thing happen. Right? Thank you for watching and sharing your thoughts! It motivates me to keep making videos. At times I struggle getting videos made with so much going on and when I get a comment like your, it makes my day! Thanks for watching and watching and watching! And maybe watching again! Kevin
we are having the same problem with the exact same washer. We just ordered the pump and with your video I am going to try and tackle this myself. Sure beats having it repaired or replaced by professionals. Thanks for your video.
Rooster Hollow, check out the comments on this video. Someone said they can change it out without taking off the front. Thanks for watching and sharing your thoughts!!! Kevin
I did this repair today on our Kenmore Elite and your video was very helpful. When I got my pump motor out it would work intermittently when checking in the shop. I pulled off the impeller end and the stator housing was full of sand and stagnant water and impeding the magnetic field. I flushed it all out, blew it dry and put back together with the two o rings intact. Slapped her all back together and doing a white vinegar rinse right now. Three hours and lollygagging and no parts expense. Thanks a bunch!
Rick,
Thanks for sharing your solution. The last time I replaced the pump the impeller was bent... it turn freely but not in a circle, more like an oblong... Hopefully this one will last a bit longer. Now that I put the video up, I can go back and remember how I took it apart. Thanks for taking the time to comment! K
Rick Magers did your pump make wear noise when not working properly? O not noise at all?
It stopped completely. After I removed the impeller, it still would not turn. Thanks
Kevin
Another good thing to do with the pump out is to make sure the drain hose is clear. You can do it with an air hose, a vacuum cleaner etc... A quarter stuck in the drain line will burn up a new pump in a few weeks. I learned this lesson the hard way.
You are correct Mr. Ballard. I typically check the hose for scale but never a solid blockage. Thankfully, I've not had the lesson and because of your comment I many never have that one too. Thanks for watching our video and sharing your thoughts! Kevin
Just an FYI: I watched several videos on how to fix this (because I really didn’t want to take the front off) and discovered you can access the part by safely tipping the washer back and accessing through the the bottom, so there’s not need to take the front off. Good news!
This is wonderful news. I'm almost certain I will need to replace this soon!! Thanks for watching and sharing your discovery!!! Kevin
I'm having this issue right now 😫. Will follow your technique step by step 1st thing in the morning.
Did it work? Thanks for watching our video! Kevin
Thank you so much for this video. This is my second pump on my Kenmore Elite. The pump was still draining but sounded like a rocket trying to take off lol. This time I noticed that the filter was clean but the drain hose was super clogged with sand and dirt, probably from my 11 y/o not rinsing his dirt bike riding clothes all the way. I literally had to roll the dirt out with a rolling pin and lots of hot water in order to loosen it all out. It was like mudcrete! Then to top it off, I reversed the wires on one side of the pump. Needless to say it wasn't draining. Once I saw your video I knew exactly what I did wrong (red front, black rear!! ). It wouldn't be so bad if I didn't have to take the whole front apart again. That wire ring is always a pain to put back on. I don't have a lot of space to "tip" the washer and access it from the bottom, as someone has suggested. Probably would've been quicker.
My husband did have fun watching me. I'm glad I could be this entertaining to him😂.
Aggie
Just reading about your adventure was entertaining. I would love to see a video of it on the next go round! Cause there will be one! I'm due for ring adventure again. The trick will be to find the pliers prior to starting! Thanks for sharing it started my day off with a smile! Kevin
@MillGapFarms Oh, by the way, you wanna know how I found out that there isn't enough room to tip the washer for "work from below" way? Well....I forgot to take a towel out that I placed under the black drain pipe to catch the water when I disconnected it! I realized that part as soon as everything was put together. 🤬 I told my husband, "I'm not taking this 💩apart again! Start lifting!". I think by now, I have created a standard operating checklist for this procedure in order to prevent the same stupid mistakes for next time! I felt totally defeated by my washer! I felt like I should've read "The Art of War" while humming the Gilligan's Island theme song by the time I was finished!
That was sooo funny!?!🤪😜😝🤣😂😅😆😁
hell yeah, this video help me❤! thank you -nj.
Thanks for taking a minute to share your thoughts! Your comment motivates me to continue to make videos! Thanks Kevin
Just WOW! Even though some have posted being able to access the pump from the bottom (which when the washer is on a pedestal might take two people), this video was a Godsend, TY 🎉
Glad it helped! I watch this each time I have to replace the pump. We wash a lot here on the farm and I have to say that this washer does a great job! Only challenge is that I wish the pumps lasted longer. Thanks for leaving your comment! Kevin
Thanks for the effort to make the video! Tore our 2010 Elite apart and back together in 90 minutes thanks to your video. Almost exactly the same. We also had a warped impeller... A twenty dollar part, (free shipping even), and we're back in business for another ???? few months, maybe even years!
Dave, I'm glad this helped you! Each time I have to go into the washer, I refer back to my video. So far, I think this is my second pump on this washer. It's lasted about 1.5 years so far! YEAH!!! I appreciate you taking the time to leave a comment! Kevin
Thanks for the teardown video - really helped to see the process and assist in finding a dime stuck under the impeller.
I'm glad this helped you. This was the second time I did it and this time, I found my lost socket in the bottom of the washer. I'm hoping to find more tools next time... I appreciate you taking a minute to comment! Thanks Kevin
hanks a million for this video,Using your video as a guide made this a pretty easy fix.
Debbie, thanks for watching our video. I've replaced this pump a couple times. I can't say each time it gets easier unless, I watch this before I start. Thanks for commenting!
I use Milliard’s powdered Citric Acid to clean the washing machine by adding 1/2 cup every now and then.
Benjamin, Thanks for sharing this tip with us. We use citric acid all the time in our maple syrup operation and I never thought to use it in the washing machine. Thanks for watching and sharing this great tip! Kevin
Orange and grape powdered drink mix does the same thing Sailors in the Navy use it to clean stainless steel in the scullery!😊😊😊😊
Thank you for the video. Much appreciated
Glad it was helpful! Thanks for watching our videos Token Talk and sharing your comment. It motivates me to continue making them! Kevin
Good stuff. Very helpful
Glad it was helpful. Thanks for watching and leaving your thoughts! Every comment encourages us to make more videos! Kevin
@8:00 nice catch!
It's a new camera... Thanks for watching! K
Did your drain pump make noise when was bad?
GEO M, It did make a noise. A slight humming but it would not drain. This being the second time I was going to replace it, I ran the washer through a couple of rinse cycles and determined it was bad again... so I replaced it. It lasted about a year and half. Just enough time for me to forget how to get into it...Thanks for watching! Hope this heled you! Kevin
Is a drain pump the same as the water pump relay?
No a relay will send power to the pump. Are you getting an error code? Thanks for watching our video. Kevin
No the water is loud when it’s going into the drum! I’m thinking it’s the water pump but can’t find a video for that
I don't think there is a pump for that. I believe it enters the tub via a solenoid and a valve. I would be curious as to what you find. I may have that problem too. Thanks for your comment. Kevin
Never did show how u got that basket out.
Mr. Goodwin, First, thanks for watching and commenting. Are you talking about the basket where the clothes go? I never removed the basket. Only the front cover of the machine. If you want to visit our website www.millgapfarms.com. You are welcome to email me and we can talk about the process I went through. We could even do it here if you want. I've done this twice and have a good recollection of what I did. Thanks Kevin
How can I do a test mode? 🙏🏻
Omar, Testing the pump can be a challenge. Below is a video from a fellow in Florida who made a cord to test his. This is exactly what I would do to test a pump. Let me back up a bit. The last couple times I had to replace my pump, water was left in the machine. Removing the pump was what I needed to do but first I had to drain the washer. Which was a pain. In doing so, I was able to check the filter and one time was able to get the pump working again because the filter was clogged. In other times, that didn't work and I had to drain it again after testing it then install a new pump. As I remember, the pump wasn't too expensive and replacing it seemed like the best option. One time pulled the pump apart and tried to clean it. It worked for a short period but still needed a pump. The last couple times I replaced the pump, instead of testing, I bought a new. It's been almost 2 years since the last time and now I'm thinking I need to order one because it's going to fail soon. Here is the link to the fellow's video. I hope this helps. Thanks for watching our video! Kevin th-cam.com/video/YhX2-uJLC3s/w-d-xo.html
Same issue but replaced drain pump and ran fast cycle and still giving OE code
Morgan, thanks for watching. A couple things come to mind. I'm guessing you pull the filter to see if there is something suck in it? Our was calcified once. Can you hear the pump humming when it's in a cycle? When you pulled the old pump, did it seem stuck? Mine is always wobbly and once or twice it was stuck. Thanks Kevin
@@MillGapFarms oh my goodness, my husband installed it in wrong so tried again and it worked ! Thanks for the video !!!
Glad to hear it's working. I've done worse! Kevin
What is the pump part number?
Ms. Ruelas, I would not use my part number. On your unit look in the door opening with the door open. You will see your model number. That is what you will want to use to make sure you get the right part. If ours is not the same model, the parts may not fit. I know this may not be the answer you are looking for. You're welcome to send the model number to me via our website www.millgapfarms.com and I'll search it for you. Thanks for watching! Kevin
Hello.... Ours cuts off completely while in the wash cycle and gives PF code. Which is a power failure code... but there's no power failure. So it's anyone else having this issue?
Have you disconnected the power cord or shut off the breaker and try the reset process in this video? We have not experienced a “pf” code? Thanks for watching and commenting. MGF
Whoever tries to fix this from the bottom, let me help you out, don't. Just follow the video. Yes you can see the pump from underneath but accessibility is virtually impossible. You just can't see what you're doing.
Please take a minute to read my response. Thanks for watching our video. Here are two videos where I changed the pump from the front. th-cam.com/video/9zQsNN7wNd0/w-d-xo.html th-cam.com/video/wgZMFXZlhyY/w-d-xo.html I've done it this way for about 5 pumps on this same washer. I tried the method in this video as a suggestion from a viewer and I have to say it worked very well. To your point, it is difficult to know where the screws are located. Having done it so many times, it was very easy for me. If attempted this without TH-cam, I think I would really be frustrated because I would not know how many screws to remove or where they are located. After using this method, I am confident the next time I do this repair, and there will be not just one next time, but on the next one, I will do in about 30 minutes. And I won't argue with the spring around the gasket!!! Thanks for taking the time to watch our video and share your thoughts. This is how we learn! Kevin
You could have changed it from the bottom to many unesisary steps
Adam, Thanks for watching and commenting. I could not get my hands in the space to remove the hoses. How were you able to make that happen. I know I'll be changing this out soon. This was the second pump in less than 3 years. Thanks Kevin
My model was nowhere as complicated. Just unplugged the washer, took off the bottom panel, unhooked the hose, disconnected the electrical plug, removed 3 screws, and out it came. Put in the new one with reverse steps. Super easy, about 15-20 minutes. I previously had gone in to make sure the hoses weren't clogged. Old pump only 3 years old also. Glad I have mine and not yours.