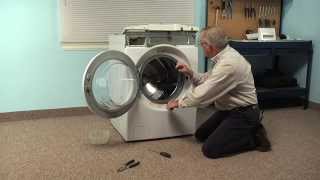
Replacing the Drain Pump on a Front-Load Washer

ฝัง
- เผยแพร่เมื่อ 18 ม.ค. 2016
- This video from Sears PartsDirect shows how to replace a broken drain pump in a front-load washer. The drain pump removes water from the washer during the drain cycle. If you washer won’t drain, you can replace the drain pump using the steps in this video.
Visit us at:
www.searspartsdirect.com?sid=soc:youtube:replacing-the-drain-pump-on-a-front-Load-washer
Or call 1-800-437-1673 to speak with a parts specialist.
The video includes these parts. Look up your model to make sure you get the right parts for your washer.
Drain Pump
www.searspartsdirect.com/part...
Find parts for your washer at:
www.searspartsdirect.com/part...
Or click here to schedule an appointment with a repair technician. www.searshomeservices.com/rep...
Transcript:
Unplug the power cord from the wall outlet. Using a Phillips screwdriver, remove the 2 screws on the back of the washer that secure the top panel. Gently pull the top panel toward the back of the washer and lift it up and off. Using a Phillips screwdriver, remove the screw on the back of the control panel. The screw is on the right side as you face the front of the washer. Release the locking tab at the back of the dispenser drawer and then pull it completely out of the dispenser housing. Using a Phillips screwdriver, remove the screws on each side of the dispenser housing. Unplug the wire harness connections for the control panel by pressing on the release tabs and sliding the connectors apart. Stand in front of the washer and lift up on the control panel to release the top. Pull the control panel off the washer. Open the drain pump filter cover at the bottom of the washer front panel. Remove the screws that secure the plastic pump housing to the frame of the washer. Remove the plastic pump housing. Use a Phillips screwdriver to remove the mounting screw from the bottom of the front panel. Use the outer spring pliers to expand the spring clamp and remove it from the door boot. Release the rubber door boot from the lip around the opening to the washer tub on the front panel. Remove all of the screws from the top of the front panel. Close the washer door. Tip the top of the front panel out and disconnect the wire harness from the door lock assembly. Pull the front panel off the washer. Place a shallow drain pan in front of the washer. Remove the plug from the small drain hose on the pump body to drain any water remaining in the pump body and washer tub. Reinstall the small drain hose plug and move the drain pan out of the way after draining the water. Place a towel under the pump body hoses to catch water that may spill out when you disconnect them. Use pliers to release the spring clamp and pull the drain hose off the pump body. Repeat the process to pull the recirculation hoses off the pump body. Release the spring clamp and remove the tub-to-pump hose from the pump body. Pull the wire harness connections off the drain pump and recirculation pump. Release the wires from the tiebacks on the drain pump. Remove the bolts that secure the drain pump to the washer base. Remove the pump body and set it on a work surface. Don’t forget to remove the towel from the washer. Remove the drain pump mounting screws and pull the drain pump out of the pump body. Insert the new drain pump into the pump body and reinstall the mounting screws. Reinstall the pump body in the washer base and secure it with the mounting bolts. Reconnect the wires to the new drain pump and the recirculation pump. Route the wires through the tiebacks on the drain pump. Reconnect the tub-to-pump hose and secure it with the spring clamp. Reconnect the recirculation hoses on the pump body and secure them with the hose clamps. Reconnect the drain hose to the pump body and secure it with the hose clamp. Put the front panel in position and reconnect the wire harness. Lift the front panel onto the frame and line up the mounting screw holes at the top. Insert the mounting screws at the top of the front panel and tighten them firmly. Position the door boot around the lip of the opening in the front door panel. Secure the door boot with the spring clamp. Insert the screw into the bottom base of the washer in the opening for the pump housing and tighten it. Push the drain pump filter housing into the front panel recess. Reinstall the mounting screws and tighten them firmly. Close the drain pump filter housing door. Position the control panel on the top of the front panel. Reinstall the screws in the dispenser housing. Reinstall the screw on the back right side of the control panel. Plug in the wire harness connections for the control panel. Push the detergent dispenser back into the drawer housing. Push the panel down and forward to seat it on the washer frame. Reinstall the screws to secure it in place. Avoid overtightening. Plug the washer into the outlet. - แนวปฏิบัติและการใช้ชีวิต


Once I got the silly Outer Spring taken care of this was an easy job. Thanks so much for the step-by-step walkthrough, probably saved me 300 bucks! 👍👍
These directions were perfect. I don’t know how much money this video saved me. I’d figure no less than $150
Thank you! Followed this and was able to DIY my drain pump! Perfect instructions. 👍
Helpful video! It was a huge help to have any extra set of hands to get the wire ring back around the gasket. I did not have the special tool so I used needle nose pliers and a flat heat screw driver. Also, I recommend putting the wires back into the pump before bolting it back in as it a tight area to do it afterwards. Thank you again!
Incredibly fantastic this is available to help me replace the drain pump on my Kenmore 796 40272 washer. Slightly different screws and hose connections than mine, but video is well made and concise to get all the steps right in the right order. Thank you for providing it!
Both the drain and recirculating pumps use AC motors so the polarity does not matter. Regardless, on my washer, the recirculating pump wires are blue on top terminal, black on bottom and the drain pump has black wire on top terminal, brown on bottom.
Can the pump be replaced from the hole at the bottom of washer ? Instead of taking so many things off ?
I just flip my Kenmore on its side after draining it. No need to disassemble anything but the pump and hoses.
On the left side or right? I watched the repair man and he just tilted it back against the wall.
My LG: I drained from the front bottom hose, unscewed the 2 screws in that hose housing and then tilted the matchinne back. A helper held it while tilted back. VERY easy to disassemble and replace part this way saving lots of time.
Best video ever for this job.
Good video but they should have shown more detail once removing the pump from the housing. I had no way of knowing if I was installing backwards.
Also the screws that secure the pump is both plastic not good considering if you strip screw you are going to have a leak
Not sure if I’m correct but I read that N is for neutral(black), and L is for live (colored) for wiring in case anyone else had problems like me. The pump should have markings under the connector for L and N, but generally just better to take a picture of the wiring before you take it apart.
Hello, one thing missed is when rewiring the pump which color wire goes where? Which color is Load, which is Neutral?
The wire harness plug on many drain pumps will only fit one way so the neutral wire and line wire align correctly. If the harness fits either way, you may find markings on the pump that indicate which way to align the wires. On some models, you’ll need to refer to the wiring diagram to see which wire connects to which terminal on the drain pump. If you need help connecting the wires to your washer’s drain pump, let us know the model number of your washer and we’ll try to help you connect the wires properly.
Does it mAtter how the wire harness connection is reconnected?Or can they go in either slot?
It’s best to connect the wires to the drain pump spades in the same order that the wires were originally connected. On some drain pumps that use AC current, it may not matter which way you connect the wires to the drain pump. Check the rating label on the drain pump to see if it uses AC current. If you need more help connecting the drain pump wires, let us know the model number of your washer and we’ll try to help you further.
How do you know what is the correct pump to buy it with (replacement)
This is hellacious, I am so sorry for anyone who has to go through this process. My model has three screws on the bottom front, and a lower front panel comes off, and the pump is right there. Another screw to loosen the pump unit, undo the two hose clamps, remove the wires, and the pump is out in less than 2 minutes. Could be replaced in 5. My dryer is stacked on top, if I had to disassemble my unit to the amount shown here, it would take an hour, and that's assuming I knew every step. I imagine many units just end up in the dump because no one wants to pay a repairman $$$ to do this. Oh, and my replacement pump was under $30 on Amazon.
How much it may cost I have draining problem on my Lg Intellowasher.
The part is around $48.00 dollars. But there is a tool for the spring that holds the front door rubber boot that is expensive. Around $100.00 and it's important that you have that to do the job properly.
@@davepiercy47 Is the tool really required? I've seen videos where the spring around the front door rubber boot comes off pretty easy.
Actually this part can be replaced by just removing the bottom - no need to remove the front and back panel, rubber gasket, etc. My husband just replaced it $24.00 part from Amazon..running like a new washer!
How do the wires on the pump plug in I have a brown and black wire on mine
My washing machine model is 7964126
Doesn’t matter, it’s AC and not polarity sensitive.
Hi, I my drain pump didn't come with that white casing. What part number is that so I can order it separately?
Let us know the model number of your washer and we'll try to help you find that part.
@@searspartsdirect LG WM3997HWA The "bad" part pulled from my washer was # 4681EA1007G, and thank you!
@@lynnmadore7373 Here's a link for the drain pump casing for that model: www.searspartsdirect.com/product/3ghkr3yjam-0026-795/id-3108er1001e
This washer is so badly design. Why do you need to disassemble the ENTIRE washer to change a part that can fail often?