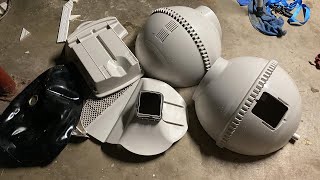
Disassembly of Litter Robot 3 Open Air (including liner, two pieces of globe, and shield/sifter)

ฝัง
- เผยแพร่เมื่อ 22 ต.ค. 2022
- This is a very basic video explaining how to take the litter robot three open air apart- breaking it down into two pieces of the globe, two pieces of the waste drawer, taking out the rubber liner, and taking out the sifter/shield on the inside. This one does not have the connect feature, I'm not sure if that process would be different or not. I explained everything with the idea of someone who has no knowledge of tools in order to hopefully help someone out! I wanted to put all of this into one video to save someone some time. I link the assembly video below!
LINK TO ASSEMBLY:
Titled REASSEMBLY of Litter Robot 3 Open Air (including liner, two pieces of globe, and shield/sifter)
• REASSEMBLY of Litter R...
Tips BEFORE taking this apart:
-You are going to need a Phillips screwdriver. All screws are hand tight, taking off and putting back on, but if you want to use a small hand drill you sure can. I recommend not using a big drill in order to not accidentally strip out the screws on accident.
-I recommend whether you use a hand screwdriver or a drill to get one with a magnetic tip/ability. Some of the places you have to put screws are a bit tricky to get them lined into and it can be frustrating dropping them over and over
-There are two "in disguise" screws on the front with a white "plug" on them. You can pry these OFF with a flat screwdriver. These are pointed out in the video.
-DONT TOUCH THE GREEN PART OF THE SENSOR! This is also pointed out in the video
-Taking apart the LR3 is a one-person job, but it helps to have two people during the assembly when you are putting the globe back together.
#litterrobot #litterrobot3 #litterrobotIII #support #instructions #cats #litterbox #howto #dissasembly #takeapart - แนวปฏิบัติและการใช้ชีวิต


![[LIVE] : ONE ลุมพินี 69 | คู่เอก "กุหลาบดำ vs นาบิล"](http://i.ytimg.com/vi/PNM6U8e_HMo/mqdefault.jpg)


The green DFI sensor that you're talking about is the older version that people have a lot of problems with. If you look online you'll see the newer one that they have out that one I would recommend, it's called "DFI Kit + Pinch Detect". Just in case you clean it and it goes bad and think you messed it up a lot of times it's just an issue with that part.
Thank you lady I needed some guidance on disassembly and the video helped 100%!
😊👍👍👍
Hard to watch because the camera a moved too much. Would have been good though. Thank you
Getting kinda nauseated with the camera moving around so much
아니 내가 기계치라 모르는거야뭐야 분해해보니 너무 더럽고 고장안난게 신기할정도로 뭐라고하냐 센서???? 그...막 용접된 초록색보드 그게 엄청나 많은데 다 노출되어있더라ㅜ투명한 칸막이 대충 둘러놓긴했는데 3개월쓰고 고장안난게 신기할정도면 심각한거 아니야 이거 매우 심각하지 드라이버로 나사푼것도ㅠ아닌데 나사풀면 얼마나 심각할지 고장이 나는 한이 잇더라도 나는 나사풀고 봐봐야겠더라 대충 분해해봐도