omg that's crazy light! Seeing how much work went into this, I'd be an order of magnitude more scared of crashing it than I already am of crashing my fragile DJI FPV.
TBH, I can't wait to crash that thing and see where it'll break. I'll start easy to see how it flies, and increase risk levels as I go until it breaks. That won't be that hard given my piloting skills. I would say 90% of the effort went into mold design. The rest was pretty straightforward. The layup itself was actually really fun.
That was a masterclass, fascinating, thanks for sharing. Beautiful result too. I may have missed it, but what is the curing time of the resin? Must be a long time since the layup takes ages by hand and you wouldn't want to rush it!
I had a few minor crashes from 1-2m in height on concrete. There was no damage. I filmed some of it, just need some extra shots/crashes to edit the videos. I'm planning to do it in a week or two. Depending on how hard I get sidetracked.
@@AlenHR it's cool man, forged carbon method is on my wish list rn, especially after saw easy composite vids and yours (especially the tow lining part) How strong is your resin mould tho??
SideFX Houdini. It is not made for this kind of stuff, but it worked for me. I've been using it for years professionally for game dev (VFX, procedural geometry) so I figured I'll give it a go in product design.


Great video! Looking forward to the analysis!
Thanks, I'll compare it with a few standard 3in frames I have. After that, I'll probably break it and start working on v2.
omg that's crazy light! Seeing how much work went into this, I'd be an order of magnitude more scared of crashing it than I already am of crashing my fragile DJI FPV.
TBH, I can't wait to crash that thing and see where it'll break. I'll start easy to see how it flies, and increase risk levels as I go until it breaks. That won't be that hard given my piloting skills.
I would say 90% of the effort went into mold design. The rest was pretty straightforward. The layup itself was actually really fun.
This is so cool I've been thinking about prepreging a drone frame for so long! Its insane how light you got that!
That was a masterclass, fascinating, thanks for sharing. Beautiful result too. I may have missed it, but what is the curing time of the resin? Must be a long time since the layup takes ages by hand and you wouldn't want to rush it!
Thanks! I used a mix of slow (90min) and fast (15min) hardeners. I had plenty of time. Took me about 30mins per part so it wasn't so bad.
Amazing.
Wow!
Super clean!
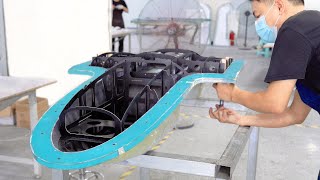
Amazing work. are the hole just for releasing the part or are they for resin relief too?
For releasing the part, there was some clearance between the walls of the mold when fully closed to allow for the resin to escape.
epic choice of music
Any update on how you crash it?? Is it plenty strong??
I had a few minor crashes from 1-2m in height on concrete. There was no damage. I filmed some of it, just need some extra shots/crashes to edit the videos. I'm planning to do it in a week or two. Depending on how hard I get sidetracked.
@@AlenHR it's cool man, forged carbon method is on my wish list rn, especially after saw easy composite vids and yours (especially the tow lining part)
How strong is your resin mould tho??
Do you have the cad files for this drone?
I modeled it in Houdini, so there is no CAD data. You can see the entire process in part1.
What is the software used to 3d model the mould?
SideFX Houdini. It is not made for this kind of stuff, but it worked for me. I've been using it for years professionally for game dev (VFX, procedural geometry) so I figured I'll give it a go in product design.