This video was done incredibly well and slow so that it’s easily explained for ANYONE to do this! My dog could follow this tutorial, it’s that well done! I’ve seen thousands of these car videos and you’re the best I’ve come across, thank you. Incredibly simple and well put instructions
@@AdonayLopez I hooked mine up and everything is working except when I put it in reverse the backup camera dosnt come on, it says backup camera not available yet
Hello everything is working fine but the back up camera I have a 2011 Volkswagen Jetta 2.5 SE this keeps saying the rearview camera system is currently unavailable. Please help.
Just installed mine less than a week ago and this video made it sooo easy! They do seem to have made some updates to the head unit since this video was shot so you no longer have to splice any adapters or the turning mechanism, it's fully plug and play. One thing I will note is that the new power cable that runs to the fuse box comes with the fuse splitter attached and will NOT fit through that hole shown in this video. However it does have a breakway splicer that comes apart with a quick pinch from a set of pliers. Would have saved myself an hour or so of jostling around with the cable if I'd just thought of this right away. Other than that this video still holds up and is the absolute best guide to installing these OEM apple play stereos. Thanks so much for you work on this!
Now that you've had the radio for a couple of years, how is it working for you? I'm looking to replace mine and the current model seems to be the RCD360 for my 2013 Gold TDI wagon.
Glad I found this video. I've had a 2011 Jetta 2.5 SE for a few months now and I've been looking into upgrading the radio to have Carplay. I also already have a sub wired up so this plug and play really saves me from having to completely rewire everything again lol thank you. it's so hard to find stuff online about Jetta's
Hey I also have the 2011 vw Jetta also I did the install today the backup camera isn’t working not the Bluetooth or buttons on the steering wheel but the Apple CarPlay and radio is working just fine what did I do wrong?
Followed this and it worked out great; put aside 2 to 3 hours for the install there's a lot of fooling and fiddling around that's not in the video as to be expected, but it went flawless. Thank you for this detailed video. Thanks YOU ARE THE MAN.
I just received my RCD 330 today and installed it on my 2012 VW Jetta TSI. The installation process took me around 3 hours, including setting up the parking camera. Everything went smoothly, and I'm thrilled with the results! Nice video.
Got the radio with Android auto and Apple car play. Install was quick due to this video. The radio came with a new wiring harness and did not have to open the connector @ 20 min in. Plug and play! The ground wire was shorter than yours as well. Just used a screw at the back of the radio space that was holding the plastic radio mount to the frame. Thanks again!
James Meldrum III i think you may be using the new radios that are replacing the one i installed, may be the RCD360; Im planing on installing it on my next build, thanks for the input and Im glad i was able to help.
Just bought a 2012 Jetta. It doesn't have a backup camera and I'm not ready to get one yet. But I saved your video for future reference when I'm ready to upgrade the head unit and add the camera. Thanks!
Thanks to the steps outlined in this video, I was able to successfully get the install done successfully. Excellent video, so very well explained!! Thank you! It took me under 6 hrs to do the job. My challenges were in running the wires past the door trim plastics near the hood release handle, and the back where the video cable goes into the trunk area. Also the part running the fuse & signal wires under the dashboard to the the head unit area. Otherwise, I knew exactly what to expect and to go about with the installation. Everything working great! Really satisfied. Thanks again!
Bro...seriously...thank you so much for this video! Got my radio and camera installed today in my 2014 MK6 Jetta. I love it! Could not have done it without this video!
@@MrGiovannibayolo I have not…honestly though, I did trade it in for a Camry recently. Loved my Jetta, but it had waaaay too many miles and I got tired of trying to fix and replace everything. Needed something reliable for work. The radio and camera was working great for me the whole time.
@@dmolenik Thanks for replying! I’m going to go ahead and do it! Love my Jetta also. Zero issues for me! Just wish I had the CarPlay and camera. Hopefully I have zero issues.
@@MrGiovannibayolo if you do everything exactly like this guy says, you’ll be just fine! The wiring was a little different from the harness in this video, the company change the plug a bit, but it wasn’t that difficult.
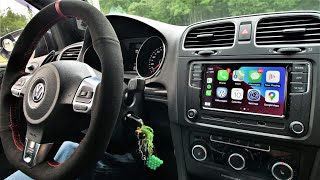
I put one of these in my car which is a third generation Volkswagen beetle, and the quality that it adds to the car is amazing. I grew up driving cars. They just add basic radios and if you’re lucky some of them have Bluetooth. Having Apple CarPlay and android auto Built-in and having it just work reliably is a noticeable upgrade to any car. I had that same exact radio in my Volkswagen beetle and I replaced it with the same exact Apple CarPlay unit and I like it because it’s a legitimate OEM Volkswagen part. That means that it’s going to be good quality and it’s going to add to the value of the car because I know that aftermarket units can actually take away from the car especially those touch screens that are really shitty quality and believe me, I’ve used one of those, but I like the knobs, because having a physical volume button or knob is always a win and the fact that you get reliable GPS straight from your phone but on that big screen is also a plus. I had an android unit before that claimed it was compatible with Apple CarPlay and android auto, but it absolutely was not. It said you can use Spotify or TH-cam Music or Pandora all of your favorite music streaming apps work and I’m like my phone is great and it gets good network, but for some reason the hotspot is really shitty which meant that I was basically limited to Bluetooth if I wanted to stream music, and the built-in, GPS on the android unit was unreliable at best and completely unusable at worst. So the fact that I have an OEM Volkswagen part that is compatible with Apple CarPlay and works wonderfully is a game changer and it looks really nice in the car. The unit you put in looks really nice and you did a great job adding the back up camera.
Amazing tutorial on installation of reverse and rcd330 for Jetta 6. Very professional and detailed. As the seller for the radio and backup camera, I appreciate your sharing. Looking forward to more videos from your channel.
I just installed on my 2012 GLI and it worked perfectly with my RCD330 187F with android auto and carplay. Takes a bit of time and patience if you really want to make the cables neat but it's well worth it. I was tired of using my RCD330 and having "rear view camera not available" appear when backing up. Looks OEM and this tutorial helped me out a ton.
Wow! This is one of the best produced, informative videos on any car work I've seen. I'm looking to upgrade my radio on my MK6 as well. This will help tremendously. Thanks so much.
Thank you for this video! Very helpful to get everything set up. One thing that was different for me is that my previous backup camera had an extra cable coming out of it. The cable is fused to the camera and it took me a while to realize I had to disconnect the cable further down to be able to take it out. I also wasn't able to figure out how to cleanly route the wire from the back seat to the trunk, so I just put the seat down and routed it through there to the trunk. The wire is a bit exposed but it's working now and it's good enough for me.
Really awesome tutorial! Got a RCD340 + camera on the way and this is exactly what I was looking for. Mines a 2013 MK6 GLI so it’s a very very similar model to yours
Excellent explanation. Best one out there. I went and got the camera in this video from the same seller just because of this video. Can't wait for everything to come in.
@@R0my626 Everything went amazing! Got the camera in the mail around 3PM and had it set up and installed by 5PM. Aside from the blistering Alabama sun and those pesky metal clips that VW loves it was easy as pie. I did have more trouble running the wire behind the radio in my VW Passat than the OP did in the Jetta. Seemed like everything was more compacted. But once I got the wire down the back everything went as planned. I would HIGHLY recommend buying the camera from the seller listed on this video. It made everything plug and play.
@@jeremycallahan9453 crazy timing, literally installing it now. but my cam isn't working, I used the fuse he showed in the video but it says cam not available. scouring the interwebs looking for a solution. but yeah I bought from the same dealer. must have had ours on the same plane lol. where did you plug ur ground wire btw?
@@R0my626 when I first installed the camera it did the same thing. I flipped the plug around in the fuse box and it started working. As for the ground wire, on the Passat it was a little more difficult to find a spot. What I ended up doing was attaching it behind a screw that was used to screw the cover panel above the accelerater pedal. It conveniently was connected to a cockpit brace. It took me a while to find a place that would work though. Keep looking 😀 you'll find a perfect spot I just know it!!
Thank you for this video.. it was better than the video Ddren has linked for the install on his website. Got the back up camera installed and everything works great thanks to this video. Thanks again!
Me and my MK6 applaud & thank you, Been looking for a nice new radio set up and the OEM look really upgrades the feel! I think the backup cam shouldve came with but you found the perfect in between.
Thanks for the handwork making this video :) I am sure it is not easy to keep camera filming it and do installation at the same time for sure! I am purchasing VW Jetta 2014. Looks like this will be my my step #3 after clean rust off out of underneath and replace rims. I appreciate for this video! cheers!
Hello sir I came across your comment and wanted to ask how is your daughter’s Eos? I’ve been wanting to buy one and I was curious if it gave her any problems. Thank you!
Brother, thanks to your video I just performed the installation. I installed a wireless transmitter and receiver in between since I was lazy to run the cable through the car.
I must say: I’m facing a couple of issues with my setup though, the camera angle is not great, it is pointing to the floor... I do not know yet if this is a side-effect of the wireless transmitter yet (but I doubt it). I have to review your video again so I know how/where to source the CAN - and CAN + from, since I currently do not have any guidelines on the camera.
@@alfonsogutierrez6286 yeah its very simple to tap into the guide lines cable, about the angle maybe the camera unit it’s defective and points down to much. Is it like the one I install on the video?
@@AdonayLopez It’s not the exact one, since I need one with an RCA connector, but looks almost the same as yours. I will double check what can be done to fix the angle, another fun weekend project. Thanks again brother for this amazing video.
Would this work on a facelift? Facelift is basically the same I am just not sure if the wiring is the same...also I think you're the only person in all of youtube to make sure the lines move on reverse camera when you turn your wheel which is pretty impressive so thumbs up for that.
Great video and I just installed the same RCD330 and AV camera in a 2015 Tiguan. When testing the backup camera I got a blank screen when in reverse so was concerned I damaged the camera cable when installing it. After some troubleshooting I discovered the tailgate/trunk must be closed for the camera to work so now everything works great. My car had the OEM backup camera (RGB) but this new AV camera provides a better picture IMO.
I also got a 2015 Tiguan. How did you get the camera to work? I installed RCD330, Apple CarPlay and the radio both work. But the backup cameea view is not available. Did you use the video adapter - like this one www.amazon.com/Harness-Adapter-RCD330G-Octavia-Santana/dp/B08LBK65VW/ref=sr_1_4?crid=HHFANPCMHEKC&dchild=1&keywords=rcd330+adapter&qid=1615708728&sprefix=rcd330+ada%2Caps%2C209&sr=8-4 for RCD330? Or you solely changed your backup camera?
@@jasdn93bsad992 I added both the RCD330 and a new backup camera and wire exactly as shown in the video. From what I understand there are converters available to allow the original VW backup camera and cable to work with the RCD330 but many people have reported issues or poor video quality. I did not want to deal with that which is why I replaced the camera and ran the new wire to the radio.
@@jasdn93bsad992 You need to remove all the trim pieces on the inside of the hatch to get to the nuts holding the camera. I used this video to see the process. th-cam.com/video/O-UCkgMLHdg/w-d-xo.html
Thanks for the video. This helps a lot for installation of head unit and backup camera specially the cabnus connection on my VW Jetta 2009. Appreciate it
FYI if your airbag light is on after a successful install even after checking the fuses: Sometimes when you disconnect the passenger airbag switch, it can throw a fault when the battery becomes reconnected. If you followed all the steps in the video and it's working in your vehicle, there's nothing wrong with the airbag system, the code just needs to be cleared. I had this problem for a while until I was informed about it by a VW tech and had the code cleared at a dealer.
This video was super helpful for my install. More or less exactly the same on an MK6 Sportwagen except the fuse box placement is different (located behind side dash panel) and it was a bit more involved routing video cable through the hatchback, but it all worked out. Thanks for making the video!
@@nicholasfalldine1784can’t remember the exact fuze we chose to backpack from, if I remember to I’ll check the panel soon. As for the cable routing I had all the tailgate plastics off and a good portion of the one side of the trunk interior so it’s all routed with the factory electrical which passes through a rubber accordion boot from the hatch to the body so you’ll have to follow that. To do it properly without wires everywhere you basically need to get down to the factory harness that runs into the tailgate if that makes sense. Just follow that.
I see in the description a recommendation from another user to use F13 fuse slot instead of F3 which is shown in the video. Is F13 the right and better one to use? Mine is a 2012 Jetta S
Thank you, great detailed video. Was wondering how does the backup camera work with a manual transmission (Stick)? how does it know to activate the backup camera when you put it in reverse gear?
Do you have a link for the camera only? I already have the rcd330 installed and I'm confused by the multitude of cameras listed with the various harnesses. This is THE BEST video out there on this install, thank you!
if it's not (if it isn't) just a hobby of yours, please share the details of your business, like name, location , etc.. so we all can give you some good reviews just by watching you in action where you make it not just US simple, but whole wide world simple :)
Thank you very much for the awesome words, I’m doing this as a hobby for the moment maybe in the future if all goes well I’ll start my own business. For now i really appreciate if you could share my videos with friends and family and tell them to subscribe if possible. Thank you so much again!
Great information, thanks. The links are dead, I've done searches and everything seems to be sold piecemeal. I'd like to buy a kit with everything like you have. Note that I have a 2014 Jetta Sportwagen which is MK6 based. Any help will be appreciated.
Hi! I’m planning to install this to my 2013Jetta Hybrid. I’ve already got a back camera. Hoping I can still use it so long as it shows clearly on the new display. Any reason I shouldn’t?
It turned out really good! Congratulations... Mine didn't come with an integrated camera but it has gps and mirroring and all the connectivity features via Bt. but it's not a 5 mouths it's an MK6,5 jetta 211cv 2016. Who knows I'll venture to put a camera, I'll follow your explanations that there will be no mistake a real high didactic material, Congratulations
Hey, firstly, very detailed and easy to follow video. So thanks for that! Secondly, the links in the description are for the RCD280. Is this the one you got? Or is there another link?
This video was done incredibly well. Am going to change my stereo on 2014 Jetta after watching this. I have a quick question please. What’s the difference between rcd330,360,330 plus and all. I appreciate if you give me an answer
@@MrGiovannibayolo I read somewhere that the RCD330 is the original from a company called Desay that makes head units for VW and the other two are clones.
Wonderful video. I am interested in doing this to my 2014 Jetta SE. Are you able to help me find updated information on the system to purchase? I am having trouble with the links you provided and the items on Amazon I cannot seem to find the same type of truck latch camera option. Lastly, my steering wheel has a control media buttons. Do you know if they’ll still work or is there a special adapter?
It appears you connected the backup camera fuse to the F3 fuse connection which is used for the airbags and has power whether or not the car is on. I followed this video and now my airbag light is on. I think it is more appropriate to connect the rearview camera to the F13 fuse connection because it only has power when the car is turned on. It also is used for the reverse lamps. When connected to F3, my airbag light turned on and the head unit did not recognize the camera after initial use. Now that it is connected to F13, it works perfectly.
Unfortunately not all fuse boxes are the same even if you have the same car. That might be what happened. I specifically chose the fuse that i showed on the video because i tested it by removing it, and it turn off the power just for the dash. But thank you for letting me know I’ll post your comment on the description so others trying this install can know to look out for this issue. 👍🏼
Buen trabajo amigo.. y muy detallado en cada parte. Gracias por explicarlo paso a paso, sin omitir nada. Estaría dispuesto hacerlo a un Ford fusion 2010 ?? 👍
Best tutorial on the subject. Do you have a recommendation if the camera turns on for about 30 seconds, then turns off and the radio displays, "camera unavailable?" I'm wondering if I don't have a good ground or a loose connection somewhere.
theemperorisnaked a bad connection may be the issue, that only happened to me once before and I checked all the connections and grounds once more and that fix my issue. Maybe it’s the same on your case.
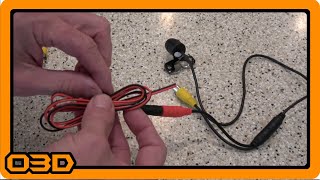
Just did my camera install yesterday, thank you for the excellent video! Everything worked perfectly but there were two parts in the process that I got stuck on for anyone else watching this in the future: At 9:30 the large plastic trim beside the rear seat also has a hidden T20 screw near the top that is accessed via a small plastic door that you pull open (with the seat back down). You'll need an extension to reach it. This video shows it at 1:07 th-cam.com/video/Oui1L7zmu64/w-d-xo.html&ab_channel=NestorAutoRepair Also, to go from the back seat to the trunk it helps to straighten out a wire clothes hanger and tape the end of it to the camera wire in order to easily pull it through.
Thank you for the video - it was very helpful. I am installing in my 2014 Jetta SE w/ Connectivity. Could not have done it without this video! I did manage to get the camera working but there are other dashboard lights on afterwards like the steering wheel problem light. My fuse box is different from yours but I think I got the dashboard one (10amp third one over). Did I wire it wrong or does the fuse matter? thanks!
Thank you very much for the kind words, that means allot and im very happy that i was able to help. Unfortunately I’m not familiar with you steering wheel problem i never encounter that issue on my installation. But i would check and try to make sure the fuse is plugged all the way in the adapter and that the adapter it’s also plugged in all the way in the fuse box. If not you could try using a more convenient fuse to see if that would fix that issue. Let me know.
@@AdonayLopez I took it apart, checked everything, put it back together and... still had the same issue. Finally smartened up and looked up in the car manual. Turns out, if you disconnect the battery for a bit you can get that steering error. The solution is simple: drive the car around a bit and it goes away! I did that and everything is working great!!
Hey man thank your for the video! If my car already has a camera in the back will I just be able to buy the radio and just plug it in? Thank you so much for the great video!
It depends on what camera in your car. If it's vw RGB camera, it doesn't work with the new radio. You may send pictures to the eBay seller. Find the eBay link in video description.
Boudlal Mohammed I’m glad you liked the video, thank you! About the sound quality it seems to be the same, the only thing I didn’t like was the fact that uses only 1 antena receiver instead of both so the signal its not so strong. But it doesn’t bother me so much.
Amazing video. Can you post link for just the camera. I already have rcd330, and I see a few options on Amazon for the camera, but don’t know which model you have and would love to follow your instructions 1:1
Exactly the video I was looking for, you explained everything so well. I might have missed it, but do the steering wheel buttons still work after the replacement?
Yes they do, I don’t mention that on this video because this car doesn’t have buttons on the steering wheel but im working on another video and this one does have the buttons and they still work. 👍🏼
I have a question i have bought an RCD330 plus for my golf mk6 variant and also want a rearview camera. It has an adapter cable with canbus gateway between and a single ACC cable that is not pluged in. When i buy a camera can i connect the red wire from the camera to the acc. Or does it need to get power from the fusebox??? If you can anwser that question i would be thankfull
Almost the same except Jetta 6 uses trunk release handle type camera while Jetta 5 uses license plate light camera as below. www.ebay.com/itm/254070353604
Awesome video! Question - Will this still allow me to use my usb and cigarette lighter? Also the eBay listing say it is no longer updatable. Is that a problem for anyone? Thanks!!
Thank you for the detailed steps, i was able to install radio and backup cam in my car following same steps. However i have one issue there is no audio on car speakers while making/receiving a phone call via apple carplay. Have you noticed such issue or know a fix for same? Thanks in advance
@@AdonayLopez I tried that but no luck. Also tried reset the unit and with another phone too. Please let me know if you find any fix or if anyone else knows please share the info. Thanks
Buen video, solo vi una falla la cual fue que le desconectaste la luz del airbag ( abajo del control del a/c) y por eso se prendió el testigo en el tablero pero de ahí en más perfecto trabajo
Great video! Did I enjoy the step-by-step by any chance? Would you happen to know if this would fit on the 2017 Jetta S? With the steering wheel compatible and back up camera
Yes it will fit a 2017 with the steering wheel control but the camera you have to install the one that comes with this radio so it work properly the (oem) camera or the original that comes in your car will not fit the new radio.
Does your jetta 2008 have 8 button steering wheel? If so you need to notify the seller before making order because the canbus emulator is needed for your 8 button steering wheel control the new radio.
Really helpful video. I was thinking to upgrade my Jetta 2013 with this kit. I just have one question for u, does it fit with 2013 Jetta 2.0 tradeline??
Hola Adonay, Increíble video muy bien explicado. He intentado seguir el mismo proceso en mi VW Scirocco y la verdad me ha servido de mucho. La diferencia es que mi cámara está en la luz de matrícula, aún así todo es muy similar. El problema es que al encender la radio 330, es como si no tuviera la cámara. Sabes que puede ser? He tenido durante un año y medio la radio instalada sin la cámara y cada vez que ponía marcha me decía que no encontraba la cámara. Ahora con la cámara instalada y siguiendo tu tutorial, incluido el montaje de los fusibles como el tuyo aunque en otro lugar el relacionado con "Dash Instruments Panel", la pantalla está toda negra. No se ve nada de nada. Podrías ayudarme por favor? He estado 4h con esto y es la segunda vez que lo quito y lo instaló por completo sin éxito. Mil gracias
Ordered this from the ebay link, got it and installed following your video, super easy! I have a 2012 vw jetta, and now I've been experiencing battery issues, random dash lights coming on and my airbag light is on and can't get it turned off. Any suggestions? Thanks!
The airbag light came on my car as well but it was my fault because i disconnected the radio cover and unplug the paver air bag indicator light and that caused my airbag light to come on and stay on. The only way to turn it off is by plugging in a diagnostic computer and manually turn it off. About the battery i haven’t have issues with draining. How old does your battery say it is on it?
See the description of this video. If you have a multimeter, you can find the fuse slot which is controlled by car key. Namely, when car key is on, the fuse slot is on, when car key off, the fusr slot is off.
Where did you get the two radio cables under the steering wheel, I bought mine but I could not install it because I don’t know where you got that red and organs cables


This video was done incredibly well and slow so that it’s easily explained for ANYONE to do this! My dog could follow this tutorial, it’s that well done! I’ve seen thousands of these car videos and you’re the best I’ve come across, thank you. Incredibly simple and well put instructions
Thank you buddy! 👍🏼
@@AdonayLopez I hooked mine up and everything is working except when I put it in reverse the backup camera dosnt come on, it says backup camera not available yet
How much for the dog?
Bonjour je vous installer rcd330 avec caméra sur une sharan 2013 est-ce que si possible merci le site pour acheter s’il vous plaît merci ?
Hello everything is working fine but the back up camera I have a 2011 Volkswagen Jetta 2.5 SE this keeps saying the rearview camera system is currently unavailable. Please help.
Just installed mine less than a week ago and this video made it sooo easy! They do seem to have made some updates to the head unit since this video was shot so you no longer have to splice any adapters or the turning mechanism, it's fully plug and play. One thing I will note is that the new power cable that runs to the fuse box comes with the fuse splitter attached and will NOT fit through that hole shown in this video. However it does have a breakway splicer that comes apart with a quick pinch from a set of pliers. Would have saved myself an hour or so of jostling around with the cable if I'd just thought of this right away. Other than that this video still holds up and is the absolute best guide to installing these OEM apple play stereos. Thanks so much for you work on this!
Now that you've had the radio for a couple of years, how is it working for you? I'm looking to replace mine and the current model seems to be the RCD360 for my 2013 Gold TDI wagon.
Glad I found this video. I've had a 2011 Jetta 2.5 SE for a few months now and I've been looking into upgrading the radio to have Carplay. I also already have a sub wired up so this plug and play really saves me from having to completely rewire everything again lol thank you. it's so hard to find stuff online about Jetta's
How does it the sub sound with the head unit
Hello, i also have a 2011 Jetta 2.5 se, did this end up working for you? if so what problems if any did you run into?
@@derrickb7123 po
Just got a 2011 myself did everything work ok ?
Hey I also have the 2011 vw Jetta also I did the install today the backup camera isn’t working not the Bluetooth or buttons on the steering wheel but the Apple CarPlay and radio is working just fine what did I do wrong?
Followed this and it worked out great; put aside 2 to 3 hours for the install there's a lot of fooling and fiddling around that's not in the video as to be expected, but it went flawless. Thank you for this detailed video. Thanks YOU ARE THE MAN.
I just received my RCD 330 today and installed it on my 2012 VW Jetta TSI. The installation process took me around 3 hours, including setting up the parking camera. Everything went smoothly, and I'm thrilled with the results! Nice video.
This video is the best video to explain the RCD330 radio and back camera's installation, I have see on the youtube!
Got the radio with Android auto and Apple car play. Install was quick due to this video. The radio came with a new wiring harness and did not have to open the connector @ 20 min in. Plug and play! The ground wire was shorter than yours as well. Just used a screw at the back of the radio space that was holding the plastic radio mount to the frame. Thanks again!
James Meldrum III i think you may be using the new radios that are replacing the one i installed, may be the RCD360; Im planing on installing it on my next build, thanks for the input and Im glad i was able to help.
i love how clearly you explain things in your videos. and your voice is so relaxing!
Just bought a 2012 Jetta. It doesn't have a backup camera and I'm not ready to get one yet. But I saved your video for future reference when I'm ready to upgrade the head unit and add the camera. Thanks!
Thanks to the steps outlined in this video, I was able to successfully get the install done successfully. Excellent video, so very well explained!! Thank you!
It took me under 6 hrs to do the job. My challenges were in running the wires past the door trim plastics near the hood release handle, and the back where the video cable goes into the trunk area. Also the part running the fuse & signal wires under the dashboard to the the head unit area. Otherwise, I knew exactly what to expect and to go about with the installation. Everything working great! Really satisfied. Thanks again!
Bro...seriously...thank you so much for this video! Got my radio and camera installed today in my 2014 MK6 Jetta. I love it! Could not have done it without this video!
Hey! I have the same car. Have you run into any issues after 4 months of having it installed?
@@MrGiovannibayolo I have not…honestly though, I did trade it in for a Camry recently. Loved my Jetta, but it had waaaay too many miles and I got tired of trying to fix and replace everything. Needed something reliable for work. The radio and camera was working great for me the whole time.
@@dmolenik Thanks for replying! I’m going to go ahead and do it! Love my Jetta also. Zero issues for me! Just wish I had the CarPlay and camera. Hopefully I have zero issues.
@@MrGiovannibayolo if you do everything exactly like this guy says, you’ll be just fine! The wiring was a little different from the harness in this video, the company change the plug a bit, but it wasn’t that difficult.
@@dmolenik awesome! Thanks again man appreciate it. I’ll come back once I buy it and install it.
I put one of these in my car which is a third generation Volkswagen beetle, and the quality that it adds to the car is amazing. I grew up driving cars. They just add basic radios and if you’re lucky some of them have Bluetooth. Having Apple CarPlay and android auto Built-in and having it just work reliably is a noticeable upgrade to any car. I had that same exact radio in my Volkswagen beetle and I replaced it with the same exact Apple CarPlay unit and I like it because it’s a legitimate OEM Volkswagen part. That means that it’s going to be good quality and it’s going to add to the value of the car because I know that aftermarket units can actually take away from the car especially those touch screens that are really shitty quality and believe me, I’ve used one of those, but I like the knobs, because having a physical volume button or knob is always a win and the fact that you get reliable GPS straight from your phone but on that big screen is also a plus. I had an android unit before that claimed it was compatible with Apple CarPlay and android auto, but it absolutely was not. It said you can use Spotify or TH-cam Music or Pandora all of your favorite music streaming apps work and I’m like my phone is great and it gets good network, but for some reason the hotspot is really shitty which meant that I was basically limited to Bluetooth if I wanted to stream music, and the built-in, GPS on the android unit was unreliable at best and completely unusable at worst. So the fact that I have an OEM Volkswagen part that is compatible with Apple CarPlay and works wonderfully is a game changer and it looks really nice in the car. The unit you put in looks really nice and you did a great job adding the back up camera.
Amazing tutorial on installation of reverse and rcd330 for Jetta 6. Very professional and detailed.
As the seller for the radio and backup camera, I appreciate your sharing.
Looking forward to more videos from your channel.
Thank you very much! 👍🏼
Feng Richard my friend i have a new question from a subscriber, please see if you could help him. Thanks
Feng Richard his name is karim soufiani
I just installed on my 2012 GLI and it worked perfectly with my RCD330 187F with android auto and carplay. Takes a bit of time and patience if you really want to make the cables neat but it's well worth it. I was tired of using my RCD330 and having "rear view camera not available" appear when backing up. Looks OEM and this tutorial helped me out a ton.
Thank you, I’m glad i was able to help.
Did you need to setup anything on the car computer with vagcom or odgeleven in order to activate the camera?
Wow! This is one of the best produced, informative videos on any car work I've seen. I'm looking to upgrade my radio on my MK6 as well. This will help tremendously. Thanks so much.
Thank you for this video! Very helpful to get everything set up. One thing that was different for me is that my previous backup camera had an extra cable coming out of it. The cable is fused to the camera and it took me a while to realize I had to disconnect the cable further down to be able to take it out. I also wasn't able to figure out how to cleanly route the wire from the back seat to the trunk, so I just put the seat down and routed it through there to the trunk. The wire is a bit exposed but it's working now and it's good enough for me.
Thank you for the video man I bought this camera for my RCD330 and followed your video everything works perfect
Matthew Cunningham that’s awesome! I’m glad i was able to help.
Really awesome tutorial! Got a RCD340 + camera on the way and this is exactly what I was looking for. Mines a 2013 MK6 GLI so it’s a very very similar model to yours
Have you got the fender audio? How did it all work out?
did you install it? how was it?
Excellent explanation. Best one out there. I went and got the camera in this video from the same seller just because of this video. Can't wait for everything to come in.
let us know how it went
@@R0my626 Everything went amazing! Got the camera in the mail around 3PM and had it set up and installed by 5PM. Aside from the blistering Alabama sun and those pesky metal clips that VW loves it was easy as pie. I did have more trouble running the wire behind the radio in my VW Passat than the OP did in the Jetta. Seemed like everything was more compacted. But once I got the wire down the back everything went as planned. I would HIGHLY recommend buying the camera from the seller listed on this video. It made everything plug and play.
@@jeremycallahan9453 crazy timing, literally installing it now. but my cam isn't working, I used the fuse he showed in the video but it says cam not available. scouring the interwebs looking for a solution. but yeah I bought from the same dealer. must have had ours on the same plane lol. where did you plug ur ground wire btw?
@@R0my626 when I first installed the camera it did the same thing. I flipped the plug around in the fuse box and it started working. As for the ground wire, on the Passat it was a little more difficult to find a spot. What I ended up doing was attaching it behind a screw that was used to screw the cover panel above the accelerater pedal. It conveniently was connected to a cockpit brace. It took me a while to find a place that would work though. Keep looking 😀 you'll find a perfect spot I just know it!!
@@jeremycallahan9453 lol I did the same thing with my ground as well phew. ill keep working on that fuse, you using carplay or android auto?
Thank you for this video.. it was better than the video Ddren has linked for the install on his website. Got the back up camera installed and everything works great thanks to this video. Thanks again!
Me and my MK6 applaud & thank you, Been looking for a nice new radio set up and the OEM look really upgrades the feel! I think the backup cam shouldve came with but you found the perfect in between.
Thanks for the handwork making this video :) I am sure it is not easy to keep camera filming it and do installation at the same time for sure! I am purchasing VW Jetta 2014. Looks like this will be my my step #3 after clean rust off out of underneath and replace rims. I appreciate for this video! cheers!
Absolutely brilliant how to video. Top work
Great step by step video on doing this. That is the best type of TH-cam video that I also try to make on my channel. Keep up the good work.
Thanks bro!
Excellent clear video... thank you. Going to install one for my daughters 2008 Volkswagen Eos.. Hope it’s not too much of a difference.
Hello sir I came across your comment and wanted to ask how is your daughter’s Eos? I’ve been wanting to buy one and I was curious if it gave her any problems. Thank you!
Just installed the same thing...thanks for the video and suggestion on what stero to buy.
You're the man! You made the install so easy. Thank you for this video!
No problem bro, thank you. 👍🏼
One of the best install videos I have seen.
this was a very detailed install! i’m impressed with how you took your time and explained everything. i have no questions. i feel i can install easily
Brother, thanks to your video I just performed the installation. I installed a wireless transmitter and receiver in between since I was lazy to run the cable through the car.
Cool, i never worked with one of those... send me the link to where you bought it so i can check it out. Thanks
I must say: I’m facing a couple of issues with my setup though, the camera angle is not great, it is pointing to the floor... I do not know yet if this is a side-effect of the wireless transmitter yet (but I doubt it). I have to review your video again so I know how/where to source the CAN - and CAN + from, since I currently do not have any guidelines on the camera.
@@alfonsogutierrez6286 yeah its very simple to tap into the guide lines cable, about the angle maybe the camera unit it’s defective and points down to much. Is it like the one I install on the video?
@@AdonayLopez It’s not the exact one, since I need one with an RCA connector, but looks almost the same as yours. I will double check what can be done to fix the angle, another fun weekend project. Thanks again brother for this amazing video.
AWESOME! 👏Please share a new link for the camera.. I already have the radio.
And will this work for my old VW Passat stationcar 2007
Would this work on a facelift? Facelift is basically the same I am just not sure if the wiring is the same...also I think you're the only person in all of youtube to make sure the lines move on reverse camera when you turn your wheel which is pretty impressive so thumbs up for that.
im not to sure what the facelift may be, sorry buddy
Did snap-on sponsor yet?! lol good video boss
@@rickyreyes4235 i wish haha, had to try tho 😅. Thank you.
Awesome video mate. I'm interested in how the sound quality is on this one, compared to the original unit?
Great video and I just installed the same RCD330 and AV camera in a 2015 Tiguan. When testing the backup camera I got a blank screen when in reverse so was concerned I damaged the camera cable when installing it. After some troubleshooting I discovered the tailgate/trunk must be closed for the camera to work so now everything works great. My car had the OEM backup camera (RGB) but this new AV camera provides a better picture IMO.
THANK YOU SO MUCH
I also got a 2015 Tiguan. How did you get the camera to work? I installed RCD330, Apple CarPlay and the radio both work. But the backup cameea view is not available.
Did you use the video adapter - like this one www.amazon.com/Harness-Adapter-RCD330G-Octavia-Santana/dp/B08LBK65VW/ref=sr_1_4?crid=HHFANPCMHEKC&dchild=1&keywords=rcd330+adapter&qid=1615708728&sprefix=rcd330+ada%2Caps%2C209&sr=8-4 for RCD330? Or you solely changed your backup camera?
@@jasdn93bsad992 I added both the RCD330 and a new backup camera and wire exactly as shown in the video. From what I understand there are converters available to allow the original VW backup camera and cable to work with the RCD330 but many people have reported issues or poor video quality. I did not want to deal with that which is why I replaced the camera and ran the new wire to the radio.
@@chrisaheuer How did you take the camera off? Mine is a 2015 Tiguan. The camera doesn't have screws exposed to the outside.
@@jasdn93bsad992 You need to remove all the trim pieces on the inside of the hatch to get to the nuts holding the camera. I used this video to see the process. th-cam.com/video/O-UCkgMLHdg/w-d-xo.html
The radio is no longer available on eBay is there o other option great video by the way thanks for taking your time
Thanks for the video. This helps a lot for installation of head unit and backup camera specially the cabnus connection on my VW Jetta 2009. Appreciate it
FYI if your airbag light is on after a successful install even after checking the fuses:
Sometimes when you disconnect the passenger airbag switch, it can throw a fault when the battery becomes reconnected. If you followed all the steps in the video and it's working in your vehicle, there's nothing wrong with the airbag system, the code just needs to be cleared. I had this problem for a while until I was informed about it by a VW tech and had the code cleared at a dealer.
This video was super helpful for my install. More or less exactly the same on an MK6 Sportwagen except the fuse box placement is different (located behind side dash panel) and it was a bit more involved routing video cable through the hatchback, but it all worked out. Thanks for making the video!
Hi there! How did you route the wires through the hatchback? And which fuse does the adapter get plugged into?
@@nicholasfalldine1784can’t remember the exact fuze we chose to backpack from, if I remember to I’ll check the panel soon. As for the cable routing I had all the tailgate plastics off and a good portion of the one side of the trunk interior so it’s all routed with the factory electrical which passes through a rubber accordion boot from the hatch to the body so you’ll have to follow that. To do it properly without wires everywhere you basically need to get down to the factory harness that runs into the tailgate if that makes sense. Just follow that.
I see in the description a recommendation from another user to use F13 fuse slot instead of F3 which is shown in the video. Is F13 the right and better one to use? Mine is a 2012 Jetta S
Perfectly explained tutorial! Thanks so much for sharing. I'm doing this
Thank you, great detailed video. Was wondering how does the backup camera work with a manual transmission (Stick)? how does it know to activate the backup camera when you put it in reverse gear?
Yes. It also works with manual transmission. When you put reverse gear, car central unit will send signal to inform the radio via CANBUS wires.
Do you have a link for the camera only? I already have the rcd330 installed and I'm confused by the multitude of cameras listed with the various harnesses. This is THE BEST video out there on this install, thank you!
www.ebay.com/itm/254069436435
Hey man, thanks for that video. It was very helpful. I followed it and installed camera and radio in VW Golf mk6.
if it's not (if it isn't) just a hobby of yours, please share the details of your business, like name, location , etc.. so we all can give you some good reviews just by watching you in action where you make it not just US simple, but whole wide world simple :)
Thank you very much for the awesome words, I’m doing this as a hobby for the moment maybe in the future if all goes well I’ll start my own business. For now i really appreciate if you could share my videos with friends and family and tell them to subscribe if possible. Thank you so much again!
Excellent tutorial. You make it sound so simple.
Martin Durcan thank you very much.
Extremely well done video, thank You!
I have a 2015 SEL TDI, and this would be an upgrade. Nice video.
Very good video. You should do more. Everything was clear. Thank you.
Hi Buddy
Really Thanks
Today I Finally fixed My Car Camera 🙏🏻
Great information, thanks. The links are dead, I've done searches and everything seems to be sold piecemeal. I'd like to buy a kit with everything like you have. Note that I have a 2014 Jetta Sportwagen which is MK6 based. Any help will be appreciated.
Thanks for the video, does this setup create the ability to talk hands free as well?
Yes it does!
Awesome video! Can u please tell us of this stereo still works with your steering wheels controls ? Thanks
Yes it does! 👍🏼
Great tutorial! Is this compatible with a fender stereo system? I have a 13’ Jetta MK6 TDI curious if it would work in my car..
Yes its is, just make sure to have the battery disconnected before installing the new unit.
Hi! I’m planning to install this to my 2013Jetta Hybrid. I’ve already got a back camera. Hoping I can still use it so long as it shows clearly on the new display. Any reason I shouldn’t?
Hey man thanks for the video guide, installed mine today was a great help!
What car was it ?
It turned out really good! Congratulations... Mine didn't come with an integrated camera but it has gps and mirroring and all the connectivity features via Bt. but it's not a 5 mouths it's an MK6,5 jetta 211cv 2016. Who knows I'll venture to put a camera, I'll follow your explanations that there will be no mistake a real high didactic material, Congratulations
Hey, firstly, very detailed and easy to follow video. So thanks for that! Secondly, the links in the description are for the RCD280. Is this the one you got? Or is there another link?
This video was done incredibly well. Am going to change my stereo on 2014 Jetta after watching this. I have a quick question please. What’s the difference between rcd330,360,330 plus and all. I appreciate if you give me an answer
I have the same question. I saw Amazon sells RC360,330 etc. any difference? I’m assuming maybe it’s just a newer version
@@MrGiovannibayolo I read somewhere that the RCD330 is the original from a company called Desay that makes head units for VW and the other two are clones.
Wonderful video. I am interested in doing this to my 2014 Jetta SE.
Are you able to help me find updated information on the system to purchase? I am having trouble with the links you provided and the items on Amazon I cannot seem to find the same type of truck latch camera option.
Lastly, my steering wheel has a control media buttons. Do you know if they’ll still work or is there a special adapter?
Did the lower AUX input in the center console still work?
This man has helped me with sm😂
It appears you connected the backup camera fuse to the F3 fuse connection which is used for the airbags and has power whether or not the car is on. I followed this video and now my airbag light is on. I think it is more appropriate to connect the rearview camera to the F13 fuse connection because it only has power when the car is turned on. It also is used for the reverse lamps.
When connected to F3, my airbag light turned on and the head unit did not recognize the camera after initial use. Now that it is connected to F13, it works perfectly.
Unfortunately not all fuse boxes are the same even if you have the same car. That might be what happened. I specifically chose the fuse that i showed on the video because i tested it by removing it, and it turn off the power just for the dash. But thank you for letting me know I’ll post your comment on the description so others trying this install can know to look out for this issue. 👍🏼
Thank you, i have updated the description below the video, stay safe.
Bit late but where did you get those silver things on your steering wheel. Looking sharp 👌
Is this basically the same installation process for an MK6 GTI?
Great video! Thanks for taking the time to share !
Great video. Was able to get backup camera up and running by connecting directly to fuse box how you have it. Thank you!!!
Buen trabajo amigo.. y muy detallado en cada parte. Gracias por explicarlo paso a paso, sin omitir nada. Estaría dispuesto hacerlo a un Ford fusion 2010 ??
👍
Claro que si!
Excellent video explanation! Liked the video and subscribed
Best tutorial on the subject. Do you have a recommendation if the camera turns on for about 30 seconds, then turns off and the radio displays, "camera unavailable?" I'm wondering if I don't have a good ground or a loose connection somewhere.
theemperorisnaked a bad connection may be the issue, that only happened to me once before and I checked all the connections and grounds once more and that fix my issue. Maybe it’s the same on your case.
Did you managed to fix the problem? I have the same issue with my camera. It turns on for 30 sec and then go black.
@@SuperBani4ka I gave up trying. No backup camera for me
Just did my camera install yesterday, thank you for the excellent video! Everything worked perfectly but there were two parts in the process that I got stuck on for anyone else watching this in the future:
At 9:30 the large plastic trim beside the rear seat also has a hidden T20 screw near the top that is accessed via a small plastic door that you pull open (with the seat back down). You'll need an extension to reach it. This video shows it at 1:07 th-cam.com/video/Oui1L7zmu64/w-d-xo.html&ab_channel=NestorAutoRepair
Also, to go from the back seat to the trunk it helps to straighten out a wire clothes hanger and tape the end of it to the camera wire in order to easily pull it through.
Thank you for the video - it was very helpful. I am installing in my 2014 Jetta SE w/ Connectivity. Could not have done it without this video! I did manage to get the camera working but there are other dashboard lights on afterwards like the steering wheel problem light. My fuse box is different from yours but I think I got the dashboard one (10amp third one over). Did I wire it wrong or does the fuse matter? thanks!
Thank you very much for the kind words, that means allot and im very happy that i was able to help. Unfortunately I’m not familiar with you steering wheel problem i never encounter that issue on my installation. But i would check and try to make sure the fuse is plugged all the way in the adapter and that the adapter it’s also plugged in all the way in the fuse box. If not you could try using a more convenient fuse to see if that would fix that issue. Let me know.
@@AdonayLopez I took it apart, checked everything, put it back together and... still had the same issue. Finally smartened up and looked up in the car manual. Turns out, if you disconnect the battery for a bit you can get that steering error. The solution is simple: drive the car around a bit and it goes away! I did that and everything is working great!!
Jason Peterson awesome! I’m glad everything worked out perfect. Thank you for your feedback as well, this way i can help others as well. Thank you.
So what fuse did you end up plugging into?
Hey man thank your for the video! If my car already has a camera in the back will I just be able to buy the radio and just plug it in? Thank you so much for the great video!
It depends on what camera in your car. If it's vw RGB camera, it doesn't work with the new radio. You may send pictures to the eBay seller. Find the eBay link in video description.
@@fengrichard7367 Thank you! Will do!
Thx for the Great video i would like to know did you notice any sound quality change from the old HU u had and the new rcd330 ?
Boudlal Mohammed I’m glad you liked the video, thank you! About the sound quality it seems to be the same, the only thing I didn’t like was the fact that uses only 1 antena receiver instead of both so the signal its not so strong. But it doesn’t bother me so much.
Amazing video. Can you post link for just the camera. I already have rcd330, and I see a few options on Amazon for the camera, but don’t know which model you have and would love to follow your instructions 1:1
Exactly the video I was looking for, you explained everything so well. I might have missed it, but do the steering wheel buttons still work after the replacement?
Yes they do, I don’t mention that on this video because this car doesn’t have buttons on the steering wheel but im working on another video and this one does have the buttons and they still work. 👍🏼
Great, thanks!
This is for a regular 2014 Jetta also correct ?
You are the real OEM deal
Great video man, will be doing this install with confidence now!
Best tutorial in youtube brother👍 will be ordering because of this video
Incredible tutorial! Any idea if this is similar to a 2009 Volkswagen Scirocco?
I’m not familiar with that model here in USA but the radio unit it’s probably the same. The latch on the back may be similar to the Golf
I have a question i have bought an RCD330 plus for my golf mk6 variant and also want a rearview camera. It has an adapter cable with canbus gateway between and a single ACC cable that is not pluged in. When i buy a camera can i connect the red wire from the camera to the acc. Or does it need to get power from the fusebox??? If you can anwser that question i would be thankfull
Perfectly explained tutorial! Thanks so much for sharing
The pigtail you took out of the harnesses at the 6 minute mark what is it for?
Thank you so much for your fully detailed explanations. Thumbs up for your work.
Great video Adonay, do you think is the same process for an MKV?
Almost the same except Jetta 6 uses trunk release handle type camera while Jetta 5 uses license plate light camera as below.
www.ebay.com/itm/254070353604
Awesome video! Question - Will this still allow me to use my usb and cigarette lighter? Also the eBay listing say it is no longer updatable. Is that a problem for anyone?
Thanks!!
What is the black cable at the end you used to put the wires into the blue harness at 21:07??
Thank you for the detailed steps, i was able to install radio and backup cam in my car following same steps. However i have one issue there is no audio on car speakers while making/receiving a phone call via apple carplay. Have you noticed such issue or know a fix for same? Thanks in advance
yes I had the same issue recently, I was able to fix it by disconnecting both battery terminals for 1 minute and then replug them in. hope it helps.
@@AdonayLopez I tried that but no luck. Also tried reset the unit and with another phone too. Please let me know if you find any fix or if anyone else knows please share the info. Thanks
Buen video, solo vi una falla la cual fue que le desconectaste la luz del airbag ( abajo del control del a/c) y por eso se prendió el testigo en el tablero pero de ahí en más perfecto trabajo
Si gracias, me di cuenta después que pasó.
Excelente tutorial ! La instalación para un Jetta 2009 es igual ?
No estoy seguro, pero casi todos son parecidos no lo veo muy complicado.
Great video! Did I enjoy the step-by-step by any chance? Would you happen to know if this would fit on the 2017 Jetta S? With the steering wheel compatible and back up camera
Yes it will fit a 2017 with the steering wheel control but the camera you have to install the one that comes with this radio so it work properly the (oem) camera or the original that comes in your car will not fit the new radio.
You can send pictures of your jetta 2017 radio and steering wheel to the seller.
Great Video! I have a 2008 vw Jetta. I’m not too sure of that system would work or if I need another type?
Does your jetta 2008 have 8 button steering wheel? If so you need to notify the seller before making order because the canbus emulator is needed for your 8 button steering wheel control the new radio.
@@fengrichard7367 no buttons on mine! I’ll be sure to buy one from you real soon. Thanks for the help!
Really helpful video. I was thinking to upgrade my Jetta 2013 with this kit. I just have one question for u, does it fit with 2013 Jetta 2.0 tradeline??
Nishanth Chakilam yes sir it works with all Jetta models.
Adonay Lopez thank you 😊
Hola Adonay,
Increíble video muy bien explicado. He intentado seguir el mismo proceso en mi VW Scirocco y la verdad me ha servido de mucho. La diferencia es que mi cámara está en la luz de matrícula, aún así todo es muy similar.
El problema es que al encender la radio 330, es como si no tuviera la cámara. Sabes que puede ser?
He tenido durante un año y medio la radio instalada sin la cámara y cada vez que ponía marcha me decía que no encontraba la cámara.
Ahora con la cámara instalada y siguiendo tu tutorial, incluido el montaje de los fusibles como el tuyo aunque en otro lugar el relacionado con "Dash Instruments Panel", la pantalla está toda negra. No se ve nada de nada.
Podrías ayudarme por favor? He estado 4h con esto y es la segunda vez que lo quito y lo instaló por completo sin éxito.
Mil gracias
Solución:
Cerrar el maletero 🤣😭
Do steering controls works?
Ordered this from the ebay link, got it and installed following your video, super easy! I have a 2012 vw jetta, and now I've been experiencing battery issues, random dash lights coming on and my airbag light is on and can't get it turned off. Any suggestions? Thanks!
The airbag light came on my car as well but it was my fault because i disconnected the radio cover and unplug the paver air bag indicator light and that caused my airbag light to come on and stay on. The only way to turn it off is by plugging in a diagnostic computer and manually turn it off. About the battery i haven’t have issues with draining. How old does your battery say it is on it?
Really nice video, helped a-lot. I read your description, i just have one question which fuse should i use for my 2013 jetta auto comfortline
See the description of this video.
If you have a multimeter, you can find the fuse slot which is controlled by car key. Namely, when car key is on, the fuse slot is on, when car key off, the fusr slot is off.
@@fengrichard7367 thanks for the reply
If you don’t know wish fuse arrangement you have you can look it up in your cars manual so that you can maybe use the F3 or F13.
@@AdonayLopez thanks
Where did you get the two radio cables under the steering wheel, I bought mine but I could not install it because I don’t know where you got that red and organs cables
Do you have a contact in Miami that can add an rcd330 and flip backup camera in my 2013 beetle?