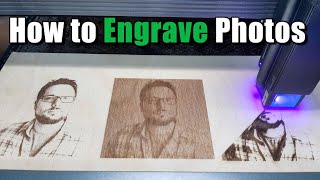
How to Engrave Photos Using Lightburn & Thunder Laser

ฝัง
- เผยแพร่เมื่อ 16 พ.ค. 2022
- In today's video, I show you how to engrave photos using lightburn & Thunder laser. You could utilize these tips regardless of your machine and machine power. I take you through the whole process, from uploading the photo, adjusting your settings, engraving your wood, and finishing your piece. Hope you enjoy!
___________________________
* Product links for everything I use on Amazon: www.amazon.com/shop/simplysallie
*Want your first 40 shop listings on Etsy for free? click link below!
etsy.me/2CDgfk0
*Cosmo's ink: shrsl.com/395ud
* My favorite place for vinyl & craft supplies:
mycraftsource.com/?partner=18...
Coupon Code to SAVE (enter at checkout): simplysallie5
*Heat presses I recommend from HPN: shareasale.com/r.cfm?b=113707...
* Code to SAVE 15% off Johnson Plastics Plus (great place for SUB blanks!): 9PSM8
* What I use for my small business/Etsy tax/ bookkeeping: paperandspark.com/?ref=200
* Where I get my fonts: fontbundles.net/ka-designs/71...
. . . . . . . . . . . . . . . . . . . . . . . . . . . . . . . . . . .
SOCIAL:
1-on-1 education call with me: www.simplysallie.com/book-online
COME JOIN MY FACEBOOK GROUP! : / 2664129370349590
Jon's (husband) Channel: / @reallifetested2605
Instagram: / simplysalliediy
E-mail: simplysalliesc@gmail.com
Website: www.simplysallie.com
DISCLAIMER FTC: This video is NOT sponsored. Links included in this description might be affiliate links. As an affiliate, I earn a small commission from qualifying purchases. Thanks for supporting my channel! - แนวปฏิบัติและการใช้ชีวิต


![ตัวอย่างภาพยนตร์ #Venom: The Last Dance [Official - Sub Thai]](http://i.ytimg.com/vi/DHPjvAwmnRE/mqdefault.jpg)


I love all the detail; especially, how you can see their whiskers.
I was mesmerized! I loved how they came out with the high definition lenses. The detail is amazing. Jack and Leo are beautiful and you did an amazing job! Great video.
Aww thanks Naomi! I appreciate the kind words 🥰
The detail is amazing!
the laser is so satisfying to watch, love the pictures.
Thank you! It is so cool to watch!
This is very helpful. Thanks for the great video.
Thanks for the guidance. Love the GSD
awesome video i am going to use tis to create and detail some of my wildlife photo, thanks for the video it was super informative
Wow! That’s so cool!
It's so cool to see it come to life! 😍
Wow just beautiful❤️
Thank you!!
I love this video. Thank you! Where do you get your high def lense? I have a thunder nova 35/100....
Great video and very helpful. Question: Where did you get your HD lense?
you du great job, thanks so much
Hi. What’s the reason for No air exactly? Is it not dangerous not having air on? I’ve a 100w tube 2 inch lens but find my photos not very good. Any advice would be very much appreciated. Thanks and thanks for your video
Do you have an special settings that you use in lightburn other than the defaults?
Nice work! How do you determine the distance from the laser to the wood?
Thank you! Where do you get your wood?
Did u get all 3 heads available when u got your laser? Also, do u have the rotoboss Jr or Sr? I'm in the middle of buying one! 🤗 just having some decision paralysis lol
What type of wood works best in your opinion
Which is the best wood for photo engraving
What does it mean HD lens? I just bought a WeCreat laser machine. Can I do what you did with that machine?
Can one export the black and white image ? If yes in what formate? DXF?
If you click Tools> Adjust image, you get a side by side comparitor of the images to see the changes in definition as you do it
With the high definition lens, who long did it take to burn the two dogs?
what was it that you used to remove the background
Silly question but how did you get the original images of the dogs from being the originals to the more cartoon looking style?
I am trying to get to the point where I can do photos when people provide. You results were awesome. I understand your high definition lens, which I am guessing is a 1.5" lens does make a difference in the results. But, do you think some of the difference was also the fact that you made your 2" lens example smaller picture engraves. Does reducing the size of the photo impact the quality of the end engrave. Also, how id you sand these - by hand or with ROS and what grit - that wasn't shown. Did you seal the wood before engraving with some sort of sealer to help with burning? So much I want to learn.
Not speaking for Sallie, but yes...the size most definitely plays a role in the quality of the engraving. I was just engraving something last night and first did it as 3x5. Didn't like it that size, so I went to 8x10(ish) and it was perfect with a 2" lens. I generally hit them with 220 on ROS very lightly!
@@youshouldseewhatisaw1804 thank you. Still haven’t started tackling photos but looking forward to it.
Well done! Can you mix photo and line art in the same file/burn?
Yes you can!
Hey Sallie, I was wondering where u got the wall shelves that are holding your vinyl rolls? I definitely need that set up! Lol
amazon -
They came out SO good! Can't believe how big Leo is! You have some handsome boys!
Thank you so much! Yes he is huge now! Catching up to Jack!
They came out awesome....why is there a line on Jack just below his shoulder? is that just something in the original pic?
It was actually the wood! It had a line through it right there. I wish I would have lightly sanded the wood first but it's not too noticeable!
Why is there a line on, I thinks it’s jack’s picture. It’s almost like a whole one line didn’t get lasered? Why would that happen?
Nice work....one question. You see that "skipped line" through the dog on the left? You can see it at 10:24 in the video. We get that same issue with several of our photo engraves on our Thunder. For this reason, we still use our Glowforge for most of our photo engraves. Is this common for you as well?
Ive only had it happen one time! Not sure what caused it but the rest of the times I have not experienced it!
@@SimplySallie That's good. It is better when we defocus....but still shows up sometimes. It's very odd!
@@malonecustomdesigns I'll have to do some research and figure out what it's from! Wondering if it's the wood type?
@@SimplySallie We have seen it happen on baltic birch and purebond maple. It really doesn't seem like a material issue to me. I've inspected several instances and it looks like a "skipped line". It shows up worse after sanding of course.
Doubt it’s the wood. Do you have a flame detector? Could be mechanical I’d think rather then electronic except maybe speed causing a hiccup.
So funny if I follow her exact instructions on the exact machine I get noting but a huge black box on my wood.
It is very important when using Lightburn to adjust settings and choosing a dithering method like Jarvis to NEVER resize a processed image. You can do it but the quality will decrease significantly. Always resize the pre-processed image in Photoshop or an editing software capable of bicubic re-sampling - then re-import it at the size you exported.
what grit u sand it with
220 grit!
yay, I am the first viewer!!!!
Thank you for the support! 🥰
1filters, 2Artisics, 3 Photocopy.
Nice BUT Photoshop/Adobe is big monthly subscription. I will move on.
You don’t need photoshop, just a software to remove the background. I just used photoshop in the example!