Budget Motorcycle Seat Foam Repair and Restoration Tricks and Tips - FULL RESTORATION

ฝัง
- เผยแพร่เมื่อ 14 ก.ค. 2024
- This week we are restoring a 1970's Honda CB seat!. We try a little DIY modification and shaving custom foam job on the seat cushion and lay down one of the best seat covers I found on ebay. Luckily we did not need to do much rust repair or crazy fiberglass hacking on the seat pan. We use our bag of tips and tricks to fix repair the seat pan and seat foam and add a nice new vinyl cover upholstery by the time we are done with this project. We even do a little chrome restoration rust repair with some nickel plating later in the series!!! Even though this is a Honda seat, you should find some of these techniques suitable for your Yamaha, Suzuki, Kawasaki, Harley Davidson, Indian, Triumph, BMW or any brand of bike. Street bikes, dirt bikes, adventure bikes, should all be very similar on the vintage stuff.
If you are receiving value from watching my videos, please return the favor and share my videos with your friends and family and on social media. You can also subscribe to my channel here www.youtube.com/@BIGFOOTBIKES...
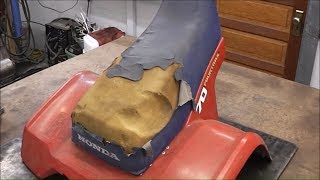
We started out by assessing the holes, sun fading and other damage on the seat seat cover. It was trash. The vinyl was torn, the chrome was rusted, there wasn't much let of the seat but don't fret. We can make it like new again.
During our brainstorming process we figured out a cheap way to fix the holes in the foam using a $10 closed cell camping mat from Walmart. Think of it like a really big flat pool noddle. I think we are going to fix some of the rusty chrome hardware with some polishing and do some nickel plating! The disassembly process took a little time since I've never worked on a vintage Honda CB seat before but we figured it out. Luckily the hardware was in pretty good shape and nothing was missing. The seat pan was really rusty but we fixed that right up with the Central Pneumatic Harbor Freight special sandblaster and a little Rust oleum low gloss black paint.
We then move on to fixing up the rusty chrome hardware on the seat. We started by polishing up the old bolts and buckles with some steel wool. We also sandblasted the really rusty stuff to bare metal and repainted. We spent most of the day prepping one single bolt for polishing and nickel plating. We started by buffing it to a mirror shine on the harbor freight polishing wheel. Then we cleaned the bolt up with a cheap ultrasonic cleaner I got on eBay. After that we plated the bolt in my diy home made nickel plating setup. The bolt turned out shiny as new!!!
After that, we figure out how we are going to fix the old rotted out seat foam. The plan is to use an electric bread knife to chop the top off of the original seat and use the trimmed off pieces to fill the holes in the seat. We then, use some 3M high strength 90 spray adhesive to glue a $10 closed cell foam camping mat to the original seat foam. We then use a dual action sander to start shaping the new foam topper to shape.
I found a nice way to lay down your new seat cover perfectly tight and wrinkle free! The trick is to cut up a bunch of carpet tack strips and rivet them to the seat pan. This gives you a ton of little spikes to stretch and hook the new seat vinyl too. You can stretch and reposition at ease until you get everything perfectly smooth!
After the carpet spike are in place we start sanding our $10 Walmart camping mat seat foam repair. We start by rough trimming everything with an electric bread knife and sand everything to the final shape with 80 grit sand paper on a pneumatic sander. We then test fit the new seat cover and continue to shape the foam as needed. The final trick to covering up all of our seat foam damage repairs is to glue down a piece of flex foam sew in fabric. The flex foam hides any little imperfection in the old foam below it. The new seat cover from Amazon was really nice quality. It stretched over the carpet tack spikes perfectly. We used a chrome suv and truck door ding trim piece from O'riely Auto. The stuff looks just like the original Honda chrome trim.
For the finishing touch, we cut out a Honda logo stencil on the vinyl cutter and use a little Duplicolor white vinyl dye to spray on the logo. It turned out fabulous.
0:00 - Intro
0:30 - Tear Down and Cleaning the Parts
14:00 - Cleaning and Re Plating the Chrome
24:42 - Fixing the Seat Foam
41:58 - New Seat Cover Installation
All Bigfoot Bikes and Brews content is for entertainment purposes only. Bigfoot Bikes and Brews videos feature activities performed in controlled environments by skilled individuals. Please DO NOT attempt to duplicate, re-create, or perform anything you see in these videos. Personal injury or property damage may result trying anything you see in these videos. Bigfoot Bikes and Brews, persons shown in these videos and any contributor, ARE NOT LIABLE for any such injury or damage. Bigfoot Bikes and Brews makes no representation about the adequacy of any safety precautions and equipment used in these videos. - ยานยนต์และพาหนะ


Check out the Live chat replay. I answer some questions in there! Also, if you are receiving value from watching my videos, please return the favor and share my videos with your friends and family and on social media. You can also subscribe to my channel here www.youtube.com/@BIGFOOTBIKESANDBREWS?sub_confirmation=1
Great video brother!! That seat came out amazing!
Thanks, I'm going to redo a 1974 XL seat really soon. I have to do some foam repair on that one too. I got some ideas to do a little bit more professional job on this next one.
Absolute chaos and no plan at all. I love it 😂
It sure turned out nice didn't it !
Super fun!
And good results too!
Great job! I learned a lot.
Cool! I am going to be restoring another seat really soon and will make a video of that too. Thanks for watching!
Looks familiar ( the seat pan and this channel name) sup Jay
Hey Matt, I have a XL175 and a TRX seat that I'm going to be fixing up really soon. I'll get some better video on those. Thanks for stopping by!
@@BIGFOOTBIKESANDBREWS no doubt bro see u tomorrow night
@@garagemcmatt Yessir!