Great video and cool to see the comparisons of the different techniques. One tip If I may... The Alclad chrome and others like it work best when you dial down the pressure on the airbrush. I go around 8-10 PSI. Also, when you apply over the gloss black you do not apply the chrome to 100% coverage. The goal is about 70-80 percent. The chrome gives it a metallic tint but it's the gloss black showing through that makes it look like real metal. Also - another tip... I find using flat black primer as the base coat followed by gloss clear works best. The clear gloss goes down smoother than the glass black so you get a more even surface and less chance for orange peal.
I was thinking the same thing. I usually skip the ads in videos as I already pay monthly for TH-cam but this was didn't get in way of the content as much so I let it go.
I've gotten mirror finishes from rattle cans. Sand, primer, sand, paint, wet sand, paint again if you sanded too thin and primer shows through and then wet sand that down again. Then clear coat and wet sand that with a fairly high grit, then use micro mesh polishing pads up to a few thousand+ grit. Once it seems good, hand buff with car wax to get the maximum shine.
Would be very interested in seeing how a resin print version of that stacks up with paints typically used for miniature painting. Across the 4 major paint lines you've got tons of Chrome, Metallic and Candy paint options, I'm sure you could get a hell of a result using those
Alclad has some great metalizer paints no doubt, but for my money, I haven't seen anything that beats the chrome finish of MOLOTOW, it's usually a paint pen kind of thing but you can get a refill cartridge and use it straight in the airbrush with no real diluting and it has an amazing chrome finish.
I have to say I like how you handle putting an ad in your videos. You keep doing what the video is about with the smaller video overlay ad. With my ADHD I get bored quick so I usually skip ahead when there are ads, but yours I watch all the way through. Thanks for that.
I've seen some prop makers actually use the HVAC Aluminum tape as an option as well. Then you can even polish it, or scuff it to make it more matte. It is very stiff so it might be a little rough for rounder surfaces like this, but that is also a possibility.
PVD gets used a lot for Hero props now. Powdercoating was popular for when you needed a lot of something. For 'steel' we use an inky blue base with some lighter highlights. Takes a lot less topcoat and you get more interaction from light sources.
I made a Mando helmet at the beginning of this year and ended up doing a gloss black coat and then added graphite powder on top and it turned out "pretty great". This was after days of sanding, using filler primer, more sanding and wet sanding lol Just figured I'd share my process. Love your videos, man!
Using Molotow Liquid Chrome Ink pen refill ink through an airbrush is a really good option for chroming. It's pretty cheap & has a mirror finish that is excellent.
I love Molotow's liquid chrome but the pens are 11 bucks a piece, I can't imagine refill ink for it being more cost effective than the bottle of Alclad chrome. Also in my experience if you so much as brush the stuff with your finger it loses its shine without applying some clear varnish over it, so there's a cost on top of just the paint.
@@drakocarrion I know he said it was expensive, but my question was is it cost effective vs just spending the money on the Alclad paint. I went and checked it just now - you pay 50 bucks according to him ($42 on amazon as of me posting this) for 4 oz of Alclad Chrome but you pay $28 (again, amazon as of this post) for approximately 1 oz of Molotow's ink refill. That's half the price of Alclad Chrome for 1/4 of the size. Absolutely nowhere near as cost effective. On the plus side, it's not lacquer if you're not comfortable working with it, but you'll still need to seal it with something so that your hands don't melt the paint off (presuming you're making a prop)
@@drakocarrion The sealing paint isn't the point here, the point is that you're spending 112 dollars on 4 oz of Molotow ink refills vs 50 dollars at maximum on a bottle of Alclad.
Would love to see the rattlecan version after a wetsand and maybe a clear coat. I wonder if you knocked down the orange peel if it would more closely match the expensive one. Either way, great prop and great video!
I've used the rattlecan paint he used pretty extensively in my props, and can say from my experience the base doesn't matter quite as much since it usually has a "foily" look as long as its sanded to around 220 grit.
Clear coat on rattlecan metallic paint completely flattens it and removes the reflective properties - it would make it more of a shiny grey unfortunately. Would be cool to see rub n buff applied
Greg, youre right, but there are some metallic paints/brands that can look better with it. Like Rustoleum Gold looks better with a clear coat, while the silver flattens out. Its a trial and error thing. I actually made a video on my channel that deals with the optimized process I found when making an iron man helmet
@@ShayneHeluk ooo nice I will check it out! I'm currently 3D printing a life size R2D2 and am in the process of painting the dome silver. I'm going with gloss black, metallic silver rattlecan, then am going to use silver leaf rub n buff as a finishing coat
@@GregsnBacon sounds good! Just remember, the key to any shiny mirror finish is to use a filler primer, sand it, filler, wet sand, then when it’s smooth, apply super thin coats until its covered. If you go too thin, it will orange peel and break apart like with autobody paint. Good luck!
THANK YOU for the Shoutout! Loving the results, Alclad metallics have been a go to for me for a long time. The final detonator looks great. Also it was to great to see the ILTMS gang at SiliCon. Glad we got to visit for a bit.
I'm guessing the next step up from this might be nickel electroplating. From the videos I've seen, you can coat the part with a carbon based conductive layer. Then copper plate it and finally nickel plate on top of the copper. A lot of work but it would actually have a metal finish that you can then polish.
You can actually use metal card scrapers (the wood working tool) and paint scrapers to remove layer lines in seconds rather than minutes and hours. I tried it expecting to destroy my prop only to fully sand a khopesh in 3 minutes. Additionally, you can up the metallic look on things if you buff it with graphite powder.
There is a product called rub ‘n buff by Amaco, it is essentially ultra fine metal powder in wax if I remember right. A lot of prop makers use it as a final step to bring up highlights and edges in things painted to look like metal. Really works well, I’ve seen Adam Savage use it on many of his prop builds. Comes in lots of different metal colors.
I like Rub n buff a lot, too, it goes a long way and looks better the less you use. BUT - for a project like this? Large smooth areas? I wouldn't use it for that purpose.
@@MarkusvonRentheFinkYou are right, not for large smooth areas. I think just a little on the detail lines where the ‘plates’ come together might be good though.
Spaz Stix mirror chrome, both the airbrush liquid and the rattle can, are pretty excellent. The 2oz bottle usually runs about $12-14 for the airbrush liquid. Same procedure: try to sand as smooth as possible, wet sand if you can, and try to get as glossy a black surface as possible. Dust on the Spaz Stix in a few coats, and then buff gently after it's pretty much dry. Any clear coat is going to dull it, so it's up to how durable you need it to be.
I usually have great results by painting it gloss black, then doing a graphite rub. I clear coat after wards and when it is almost dry I do a graphite rub again, this helps to lock in the graphite
Your channel has some of the best subtitles I've ever seen. As someone who struggles to hear, I have subtitles on all the time and yours are 💯 The karaoke style of them coming up when you are actually speaking makes a world of difference to me so I just had to say thank you 👍
I don’t think that I have ever commented about a sponsor read before but I REALLY appreciated the Picture in Picture. I could watch you doing something that didn’t need narration and listen to your pitch for Simply Safe, I never thought about skipping. Wish everyone did it this way. Thanks for thinking of us👍
Alclad seems to be much cheeper if you're in the UK. Their UK branch recently rebranded to HR Hobbies and 30ml (1 oz) bottles are £4.40. So if you're in the UK, you don't have to spend that much to get this great finish. Just remember to use a few very light layers when painting with it, you should barely see the first layer once you put it over the black. The heavier the coat the cloudier the finish is. With a really smooth prop and very light layers, you can get this stuff looking like a mirror.
Awesome stuff guys. As a scale model car builder, Alclad is sort of the bench mark for chrome paint. The Aqua Gloss sealer is pretty cool and easy to use as well.
I've switched to resin printing for the past couple of years and oh man post processing is so much easier. SOOO much more detail, hardly any sanding, you should really give it a try!
@@FindecanorNotGmail yeah I only use the one at my work and it is on a giant factory floor with plenty of ventilation. I have one at home but I never use it because I'm worried about the fumes. But a resin vent hood station/cabinet would be a great build video for ILTMS
Great video Bob! It's always nice to see people attempt these at different levels so that people should know what to expect when they tackle one of these projects. It keeps expectations in line and I hope it also keeps people from getting discouraged when their pieces don't quite come out like they expect.
I'm curious. Could you take that metal infused filament, sand it and then polish it back up to a shine? Another option is to print, sand, finish to a good finish. Then mold it and either cast it out of metal or do cold casting. Either way, that chrome paint one came out beautiful! I agree with the person who said weathering it will increase the metallic look. Esp. with star wars props this works well because most things are "dirty" anyways.
I'd like to see a comparison of layer height and printing time vs sanding time, to what extent does extra printer time save you effort sanding? Is there diminishing returns or do you go as low as you can?
You can get super smooth prints if you put it in a chamber with Acetone vapor. Saves time on sanding. Idk how/what it'll look like with the finer details. But I'd love to see your take on it.
I learned early on in my own DIY endeavors that wet-sanding makes a HUGE difference when trying to obtain a mirror finish from acrylic or lacquer paints, even if they're not metallic colored. Admittedly, it's been a while since I've personally done a project where I painted something to a smooth mirror finish, but the process was very repeatable even with basic rattlecan paints and wet/dry sandpaper from 200 to 1500 or even 2000 grit if you have, and maybe some clear coat and wax to seal afterwards if you wanted to be extra cautious.
Wood PLA is also a very sand-able filament that makes like much easier for something like this that will be finished post print. But resin printers would be the real way to go for things that fit in the print volume or can be effectively pieced out and printed.
This summer I had gotten on a kick of designing and 3D printing prop lightsabers. My first draft one that I completed had no sanding and was just painted without primer, and it looked awful. Granted, I knew it was just a draft to see if fits worked, but I haven't been able to get up the courage to print a finer detail one and put the time into sanding each little detail, let alone know how to go about priming and painting. This video is a god send, and I can't wait to take the knowledge forward into my own work. Thank you, keep up the content, we all love it!🤩
Thanks Bob. I am working on making my own 'neuralizer' from the Men in Black, and was considering 3D printing.... now I can with confidence it will look good!
the chrome paint you used on version 2 can look nearly as good as the alclad with the gloss black base and care you gave version 3.The painted versions would get some depth and realism with a polish of graphite powder.
you can buy cheap mirror chrome for 11€ per 30ml. it is called "minute mirror effect" from cadence. with included spay head, but also easy to airbrush. just like the expensive stuff.
You can also spray the spray paint into a disposable cup until you have enough to pour into an airbrush if you want a better finish without buying a bunch of expensive paint. Ive done it several times with acrylic clearcoat spray paint with great results.
I find that doing the whole process needed for Alclad, even with a rattlecan, can yield really stunning results. I did a Din Djarin helmet with sanding and priming, Flat black, gloss clear, and then dark steel, with gloss again. It made a very nice finish without having to spend a ton of cash.
A final touch or even a separate option to sanding is Alcohol vapor smoothing but for large objects the length of time need will just make the piece soft small objects only
This is super applicable for the smarthome and IoT community as well, i can use this process to make a nice wall mountable case for my touch panels. Thanks Bob!
Great looking prop! The final step it weathering things that look dirty or used look more realistic. Some oil paints, black and browns will make your props feel like they have been carried around and used.
From someone who paints props for a living the only thing I would have done differently on the “expensive” version is to hit your gloss black with a 2K clear and also sealing your Chrome with 2K clear as well. Fantastic work!!!
If you are going to properly sand/fill/surface 3d printed parts or any prop and especially model parts get your hands on some Nitro-Stan Red Putty 9001. Its an auto body putty and is hands down the best thing I have ever found for filling cracks/textures and sanding a mirror finish. It is a go to in my model shop especially when we are making masters like for resin casting and need a perfect surface.
It would be interesting to try spraying the rattle can paint with an airbrush. I have often sprayed into the lid and used the pool of paint to fill details, works great because of the low viscosity. What about doing that and then pouring it into the airbrush?
The mirror paint and maletow( if I spelled it correctly) sprayed through airbrush are only paints to really give a super reflective surface. Alclad is crap. Problem with metallic finishes is the clear coats dull it back down
use the paint from a molotow liquid chrome marker..... the marker itself costs around 6 dollars, the refill bottle around 20 👍. does a mirror shine over glossy black, fantastic results.... but it needs to dry at least 48 hours.
I’ve seen some videos where they spray the rattle can paint into a cup with a little thinner, then use it in an airbrush. Cheaper rattle can paint, but better application with the brush.
Using DFM Blue Curved Cabinet Scraper Cards, will save you hours of sanding. Bill Eddie who did the Ghostbusters props uses this on his prints. I've been using them and have had great results. Also for smoothing you can try spot putty an Acetone.
I used the gloss black undercoat and rub on graphite for my Mandalorian armor. It didn’t come out quite as shiny for film accurate, but for cosplay it worked great.
Instead of all the sanding here is a great tip! Get some UV resin and a UV light and paint it on your print and cure it and then of course sand but trust me, the finish will be far smoother with a ton less sanding. Plus it makes the print much stronger! When using Alclad consider getting their thinner, I swear by their paints and klear kite finishes and thinning it down does wonders for the layup.
Great video! 3D printing is a great way to make props at home! One huge thing to note is that silk filament is highly dependent on printing speed and temperature. Your printed model seemed a bit dull which is typical of printing with too low of a temperature. Try even a small model at higher temps to see the difference!
You should try smoothing out the print only one with acetone or other solvents depending on what it's printed with. It gets rid of layer lines and makes it extra shiny.
Thank you for this video! I'm at the point I want to start trying to do this but I've been terrified of starting. This helps me know what will work for me and the time I have to do stuff!
It takes a hair-pulling amount of fine tuning, but if you can tune the printer to give you 0.04mm layers or smaller, it gets to the point you can hardly see the layer lines anymore. I'd definitely recommend upping the bed mesh setting to 7x7 for that.
If your Prusa's anything like mine, the supports are stuck on WAY to hard. I used to be afraid of losing fingers when removing supports, but now - as I've loosened the connections. things are way less stressful!
I didn't read all the comments maybe someone already recommended. There are huge amount of modell paints available online, model shops, toy shops. They are amazing for this type of projects, great quality, cheap, small amounts, some of them can go straight to the airbrush.
You should try black gloss, then rubbing on graphite powder, using a soft cloth and buffing it afterwards. Produces a very nice metallic finish, much like a gun metal... and a tub of graphite powder is very inexpensive, compared to many of the metallic paints... and goes a very, very long way. But yeah, it's all in that sanding, filling, sanding, filling process. It's the part that takes the longest amount of time and has to be as close to perfect as you can get it. NEVER skimp on the sanding and if you really want a 3D print that is great fro sanding, go resin. Not only can many resin printers, produce way finer details and show far fewer layer lines, sanding s SO much easier and wit enough grits, yo can produce and almost polished finish, especially with wet sanding at the end Anyway once you've buffed and buffed the graphite finish, you will find that finger marks are easy polished/buffed out.. Not so easy on the painted versions and YES, you will want to wear gloves, and protect the work surfaces too, because graphite powder, being so incredibly fine, will get everywhere..Whatever you do, don't sneeze with tub nearby and lid open..
For that prop you could probably use that aluminum tape. I have had good success using that on smaller pieces, you just need to take a little time cutting it and hiding the seams.
How much value would you get by dropping the layer height to a 0.12mm or even 0.08? I've done 0.08 before and got some really smooth surfaces, at the expense of time of course.
total novice here and I have no 3d printing experience, but I wonder if you could lean into the layer lines and use them in such a way to mimic some machining artifacts. Maybe by orienting the 3d model in such a way on the print bed so that as you go through the finishing steps, the layer lines augment the final version in concert with the finish. Just a thought.
Even at 0.1mm, which really you shouldn't go below that layer height as the extrusion becomes uneven at smaller layers, it looks too coarse for a machined look and once you start sanding it, that whole structure is hidden and until you've sanded it perfectly, it just looks messy. If you're filming from a distance, a completely unprocessed print can look convincingly machined, but i can't see subsequent processes enhancing the look or making it hold up up close. Might be worth some tries for comparison, but don't hold your breath. As to why the extrusion becomes uneven, there's a lot of partial explanations, none of them are all that conclusive in and of themselves. There's a particular step to the transport gear that actually grabs and pushes the filament forward with quite considerable force, most extruders have their own gearing which isn't perfectly smooth either, and then they're driven with a stepper motor with fine microstepping but some inherent asymmetry in the assembly causing a little periodic distortion, and ultimately, whatever kind of motor and feedback you'd choose, odds are, you'd always find some sort of periodic distortion as long as your feedback source isn't from filament propulsion, which nobody found a way to measure reliably yet. Bowdens can hide the unevenness a little better, at the cost of worse corner and non-print-move behaviour, particularly when you're retracting and relying on semi molten plastic to just stay in there and ideally not drip, which with PETG in particular is a whole sing and dance and you usually just accept some imperfections.
In scale modeling you give stuff a panel line wash to weather it or make the details pop, that airbrushed one would look even better if you give it a wash.
I was just typing out 'what about Alumaluster' and then you talked about it lol. I've been going down this same path for my Mando armor, so this is good to see (though the paint of chosen is a bit different than yours, but still from Alclad).
you should look into the metallic powders used for makeup effects like seen in the original wizard of Oz tin man makeup, (cant remember the name off top of my head but it starts with an R like Rheon or something like that metallic powders) these are usually smelling like crayon and I am guessing its the tiny metal particles are suspended in a wax substance that rubs smooth easily enough to apply say to skin, when these that I have are applied to a surface it makes that surface texture look like metal that is that texture, so glossy or high gloss paint surfaces look like polished chrome metal, application of the coating is key with this stuff since it can be easily rubbed off if not top coated and the paint will cause it to rise and mix into it, so very super light coating layers of any spray are needed to get it to come out still chrome mirror like surface looking. or coat it with something else that it won't mix into like the glossy clear coating material for leather something I discovered when making masks I wanted a metallic finish on. one last thing, the copper and bronze or brass colored versions do not seem to have the same smoothing spread ability so I would avoid those, and just tint the chrome coating, looking aluminum powder based one, and
props to your use of picture in picture for your add. not only dis I not skip it but was entertained while it played. well done. curious about the beveled flaps in your spray booth. presumably these help keep your filter (presumably behind the flats?) from getting clogged as much? I may have to try that. I'm always blowing through filters.
Thanks! Yeah, it kind of acts like a baffle to grab excess paint. I actually think the older version we had (previous paint booth video) worked better for that purpose.
It's actually fairly affordable to nickel plate a prop. However it's somewhat finicky and just daunting to even consider until you actually do it and sort out the issues, but i would say it looks a lot more convincing than any spray paint. Might be worth the investment, i suggest checking it out. I'm not that far yet myself, i have nickel plated a bunch of things, brass and steel items for technical reasons, but i didn't particularly care about how they were going to look (though i did experiment, and i really like the look that can be achieved), and i never did conductive painting on plastics to prepare them for nickel plating. You can zinc plate yourself as well, but the drawback is that it looks like zinc, while nickel looks pretty awesome. Something to keep in mind though that nickel is considered potentially toxic in contact with skin, apparently a bunch of people have allergic sensitisation to it from contact with low quality stainless jewelry. But for something to put into your display case, it's literally perfect. Another way to achieve a chrome look is silver with Tollens process, but it's difficult to achieve this on the first surface, the surface is fragile, and protecting it with clear spray dulls the look. A possibility to keep in mind is maybe just making the part conductive and then sending it off to get chromed professionally with real chrome, there are shops that do this for automotive restoration. I don't know whether someone has tried that, whether they'll even accept a plastic part as they normally work with metal ones.
I've used Alcad on displays, but I'm wondering how it will look after it's been handled a while. That's the main drawback for most chrome finishes. There have been some very expensive chrome options posted from time to time on the RPF that will hold up under handling, but they are a LOT (!!!LOT!!!) pricier than Alclad.
I looked for the Lacquer online and it's only like 15$ average. Am I looking at the wrong one??? I noticed the one you showed says ALC 4107 whereas the one I'm seeing for 8$ says ALC 107. Can't find that one.
The alclad chrome will work over gloss black or gloss white. If you get the base coat super smooth and shiny, the chrome will work very well. The trick with it is to only lightly fog the chrome over the gloss base coat. If you put it on heavy, it will just look like shiny aluminum.


I am surprised that the "all out" version wasn't electroplating. That said, the lacquer version does look quite nice.
Yeah I was kind of hoping to see his take on electroplating...
I second that. Would love to see an electroplated one. I guess it would be nickel? What else could you use?
Ye EP with that conductive filament
I was hoping he would dark wash the crevices like they do in model to make the metal plates pop.
Great video and cool to see the comparisons of the different techniques. One tip If I may... The Alclad chrome and others like it work best when you dial down the pressure on the airbrush. I go around 8-10 PSI. Also, when you apply over the gloss black you do not apply the chrome to 100% coverage. The goal is about 70-80 percent. The chrome gives it a metallic tint but it's the gloss black showing through that makes it look like real metal. Also - another tip... I find using flat black primer as the base coat followed by gloss clear works best. The clear gloss goes down smoother than the glass black so you get a more even surface and less chance for orange peal.
"I don't like sand"... The perfect clip at the perfect time. Well done.
I love how you handle your commercials. The progress bar, the B-roll in the background, both really nice touches.
I was thinking the same thing. I usually skip the ads in videos as I already pay monthly for TH-cam but this was didn't get in way of the content as much so I let it go.
This is honestly one of the best ways to handle it. Well done
I've gotten mirror finishes from rattle cans.
Sand, primer, sand, paint, wet sand, paint again if you sanded too thin and primer shows through and then wet sand that down again. Then clear coat and wet sand that with a fairly high grit, then use micro mesh polishing pads up to a few thousand+ grit. Once it seems good, hand buff with car wax to get the maximum shine.
Excellent work Bob! That Alclad is sooooo good! =D
Would be very interested in seeing how a resin print version of that stacks up with paints typically used for miniature painting. Across the 4 major paint lines you've got tons of Chrome, Metallic and Candy paint options, I'm sure you could get a hell of a result using those
I don't see why a resin print results would be any different from MDF other than the sanding.
@@scratchinjack608 resin can get finer details since there isn't a nozzle to limit the minimum layer size.
Yes, this screams for resin.
Alclad has some great metalizer paints no doubt, but for my money, I haven't seen anything that beats the chrome finish of MOLOTOW, it's usually a paint pen kind of thing but you can get a refill cartridge and use it straight in the airbrush with no real diluting and it has an amazing chrome finish.
THIS!
I started using Molotow when I saw Adam Savage use it on another prop replica and I haven't used anything else since.
Yeah Molotow chrome out of an airbrush is God Tier
Yep it's really unbelievable how good it looks.
MOLOTOW chome is basically liquid mirror.
I have to say I like how you handle putting an ad in your videos. You keep doing what the video is about with the smaller video overlay ad. With my ADHD I get bored quick so I usually skip ahead when there are ads, but yours I watch all the way through. Thanks for that.
I've seen some prop makers actually use the HVAC Aluminum tape as an option as well. Then you can even polish it, or scuff it to make it more matte. It is very stiff so it might be a little rough for rounder surfaces like this, but that is also a possibility.
PVD gets used a lot for Hero props now. Powdercoating was popular for when you needed a lot of something.
For 'steel' we use an inky blue base with some lighter highlights. Takes a lot less topcoat and you get more interaction from light sources.
I made a Mando helmet at the beginning of this year and ended up doing a gloss black coat and then added graphite powder on top and it turned out "pretty great". This was after days of sanding, using filler primer, more sanding and wet sanding lol Just figured I'd share my process. Love your videos, man!
Just hope it doesn’t rain on it
Using Molotow Liquid Chrome Ink pen refill ink through an airbrush is a really good option for chroming. It's pretty cheap & has a mirror finish that is excellent.
I love Molotow's liquid chrome but the pens are 11 bucks a piece, I can't imagine refill ink for it being more cost effective than the bottle of Alclad chrome. Also in my experience if you so much as brush the stuff with your finger it loses its shine without applying some clear varnish over it, so there's a cost on top of just the paint.
@@SerenadeURA Bob said in this very video that Alclad is expensive. Molotow's ink refills aren't.
@@drakocarrion I know he said it was expensive, but my question was is it cost effective vs just spending the money on the Alclad paint.
I went and checked it just now - you pay 50 bucks according to him ($42 on amazon as of me posting this) for 4 oz of Alclad Chrome but you pay $28 (again, amazon as of this post) for approximately 1 oz of Molotow's ink refill. That's half the price of Alclad Chrome for 1/4 of the size. Absolutely nowhere near as cost effective. On the plus side, it's not lacquer if you're not comfortable working with it, but you'll still need to seal it with something so that your hands don't melt the paint off (presuming you're making a prop)
@@SerenadeURA The requirement of sealing paint applies to the alclad too. It's a moot factor.
@@drakocarrion The sealing paint isn't the point here, the point is that you're spending 112 dollars on 4 oz of Molotow ink refills vs 50 dollars at maximum on a bottle of Alclad.
Would love to see the rattlecan version after a wetsand and maybe a clear coat. I wonder if you knocked down the orange peel if it would more closely match the expensive one. Either way, great prop and great video!
I've used the rattlecan paint he used pretty extensively in my props, and can say from my experience the base doesn't matter quite as much since it usually has a "foily" look as long as its sanded to around 220 grit.
Clear coat on rattlecan metallic paint completely flattens it and removes the reflective properties - it would make it more of a shiny grey unfortunately. Would be cool to see rub n buff applied
Greg, youre right, but there are some metallic paints/brands that can look better with it. Like Rustoleum Gold looks better with a clear coat, while the silver flattens out. Its a trial and error thing. I actually made a video on my channel that deals with the optimized process I found when making an iron man helmet
@@ShayneHeluk ooo nice I will check it out! I'm currently 3D printing a life size R2D2 and am in the process of painting the dome silver. I'm going with gloss black, metallic silver rattlecan, then am going to use silver leaf rub n buff as a finishing coat
@@GregsnBacon sounds good! Just remember, the key to any shiny mirror finish is to use a filler primer, sand it, filler, wet sand, then when it’s smooth, apply super thin coats until its covered. If you go too thin, it will orange peel and break apart like with autobody paint. Good luck!
Love that fade-out logo at @14:36
THANK YOU for the Shoutout! Loving the results, Alclad metallics have been a go to for me for a long time. The final detonator looks great. Also it was to great to see the ILTMS gang at SiliCon. Glad we got to visit for a bit.
I'm guessing the next step up from this might be nickel electroplating. From the videos I've seen, you can coat the part with a carbon based conductive layer. Then copper plate it and finally nickel plate on top of the copper. A lot of work but it would actually have a metal finish that you can then polish.
Or just go all out and use physical vapor deposition 🙂
You can actually use metal card scrapers (the wood working tool) and paint scrapers to remove layer lines in seconds rather than minutes and hours. I tried it expecting to destroy my prop only to fully sand a khopesh in 3 minutes.
Additionally, you can up the metallic look on things if you buff it with graphite powder.
There is a product called rub ‘n buff by Amaco, it is essentially ultra fine metal powder in wax if I remember right. A lot of prop makers use it as a final step to bring up highlights and edges in things painted to look like metal. Really works well, I’ve seen Adam Savage use it on many of his prop builds. Comes in lots of different metal colors.
I like Rub n buff a lot, too, it goes a long way and looks better the less you use. BUT - for a project like this? Large smooth areas? I wouldn't use it for that purpose.
@@MarkusvonRentheFinkYou are right, not for large smooth areas. I think just a little on the detail lines where the ‘plates’ come together might be good though.
Spaz Stix mirror chrome, both the airbrush liquid and the rattle can, are pretty excellent. The 2oz bottle usually runs about $12-14 for the airbrush liquid. Same procedure: try to sand as smooth as possible, wet sand if you can, and try to get as glossy a black surface as possible. Dust on the Spaz Stix in a few coats, and then buff gently after it's pretty much dry. Any clear coat is going to dull it, so it's up to how durable you need it to be.
I usually have great results by painting it gloss black, then doing a graphite rub. I clear coat after wards and when it is almost dry I do a graphite rub again, this helps to lock in the graphite
Your channel has some of the best subtitles I've ever seen. As someone who struggles to hear, I have subtitles on all the time and yours are 💯
The karaoke style of them coming up when you are actually speaking makes a world of difference to me so I just had to say thank you 👍
I don’t think that I have ever commented about a sponsor read before but I REALLY appreciated the Picture in Picture. I could watch you doing something that didn’t need narration and listen to your pitch for Simply Safe, I never thought about skipping. Wish everyone did it this way. Thanks for thinking of us👍
Alclad seems to be much cheeper if you're in the UK. Their UK branch recently rebranded to HR Hobbies and 30ml (1 oz) bottles are £4.40. So if you're in the UK, you don't have to spend that much to get this great finish.
Just remember to use a few very light layers when painting with it, you should barely see the first layer once you put it over the black. The heavier the coat the cloudier the finish is. With a really smooth prop and very light layers, you can get this stuff looking like a mirror.
Awesome stuff guys. As a scale model car builder, Alclad is sort of the bench mark for chrome paint. The Aqua Gloss sealer is pretty cool and easy to use as well.
I've switched to resin printing for the past couple of years and oh man post processing is so much easier. SOOO much more detail, hardly any sanding, you should really give it a try!
So true. We've got a project coming with a WHOLE LOT of resin printing 👀. Detail is fantastic.
The fumes from those though: Have good ventilation! They may not smell, but they are cancerous.
@@FindecanorNotGmail yeah I only use the one at my work and it is on a giant factory floor with plenty of ventilation. I have one at home but I never use it because I'm worried about the fumes. But a resin vent hood station/cabinet would be a great build video for ILTMS
Great video Bob! It's always nice to see people attempt these at different levels so that people should know what to expect when they tackle one of these projects. It keeps expectations in line and I hope it also keeps people from getting discouraged when their pieces don't quite come out like they expect.
I'm curious. Could you take that metal infused filament, sand it and then polish it back up to a shine?
Another option is to print, sand, finish to a good finish. Then mold it and either cast it out of metal or do cold casting.
Either way, that chrome paint one came out beautiful! I agree with the person who said weathering it will increase the metallic look. Esp. with star wars props this works well because most things are "dirty" anyways.
Amazing to see the difference an airbrush and some prep work can do! That last one looks so good! Cool demo of the techniques.
I'd like to see a comparison of layer height and printing time vs sanding time, to what extent does extra printer time save you effort sanding? Is there diminishing returns or do you go as low as you can?
You can get super smooth prints if you put it in a chamber with Acetone vapor. Saves time on sanding. Idk how/what it'll look like with the finer details. But I'd love to see your take on it.
I learned early on in my own DIY endeavors that wet-sanding makes a HUGE difference when trying to obtain a mirror finish from acrylic or lacquer paints, even if they're not metallic colored. Admittedly, it's been a while since I've personally done a project where I painted something to a smooth mirror finish, but the process was very repeatable even with basic rattlecan paints and wet/dry sandpaper from 200 to 1500 or even 2000 grit if you have, and maybe some clear coat and wax to seal afterwards if you wanted to be extra cautious.
Wood PLA is also a very sand-able filament that makes like much easier for something like this that will be finished post print.
But resin printers would be the real way to go for things that fit in the print volume or can be effectively pieced out and printed.
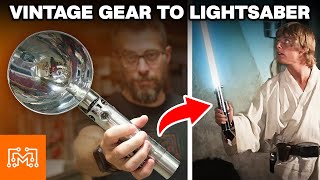
This summer I had gotten on a kick of designing and 3D printing prop lightsabers. My first draft one that I completed had no sanding and was just painted without primer, and it looked awful. Granted, I knew it was just a draft to see if fits worked, but I haven't been able to get up the courage to print a finer detail one and put the time into sanding each little detail, let alone know how to go about priming and painting. This video is a god send, and I can't wait to take the knowledge forward into my own work. Thank you, keep up the content, we all love it!🤩
I think this is the first time I've ever seen a 3D printing video trying several different options. Awesome job!
I used Tamiya TS83 metallic silver rattle can for my Razor Crest model. Came out looking great! Like the Allclad, it needs a base coat of gloss black.
Thanks Bob. I am working on making my own 'neuralizer' from the Men in Black, and was considering 3D printing.... now I can with confidence it will look good!
the chrome paint you used on version 2 can look nearly as good as the alclad with the gloss black base and care you gave version 3.The painted versions would get some depth and realism with a polish of graphite powder.
you can buy cheap mirror chrome for 11€ per 30ml. it is called "minute mirror effect" from cadence. with included spay head, but also easy to airbrush. just like the expensive stuff.
You can also spray the spray paint into a disposable cup until you have enough to pour into an airbrush if you want a better finish without buying a bunch of expensive paint. Ive done it several times with acrylic clearcoat spray paint with great results.
I find that doing the whole process needed for Alclad, even with a rattlecan, can yield really stunning results. I did a Din Djarin helmet with sanding and priming, Flat black, gloss clear, and then dark steel, with gloss again. It made a very nice finish without having to spend a ton of cash.
A final touch or even a separate option to sanding is Alcohol vapor smoothing but for large objects the length of time need will just make the piece soft small objects only
This is super applicable for the smarthome and IoT community as well, i can use this process to make a nice wall mountable case for my touch panels. Thanks Bob!
Great looking prop! The final step it weathering things that look dirty or used look more realistic. Some oil paints, black and browns will make your props feel like they have been carried around and used.
From someone who paints props for a living the only thing I would have done differently on the “expensive” version is to hit your gloss black with a 2K clear and also sealing your Chrome with 2K clear as well. Fantastic work!!!
"I don't like sand" at 10:46 broke me. I can't stop laughing!
😄
Excellent on all fronts: Content, organization, presentation, and delivery, clearly articulated and easily understood. Thanks.
If you are going to properly sand/fill/surface 3d printed parts or any prop and especially model parts get your hands on some Nitro-Stan Red Putty 9001. Its an auto body putty and is hands down the best thing I have ever found for filling cracks/textures and sanding a mirror finish. It is a go to in my model shop especially when we are making masters like for resin casting and need a perfect surface.
Looks great Bob! Thanks for the information. I will be using this for future projects.
It would be interesting to try spraying the rattle can paint with an airbrush. I have often sprayed into the lid and used the pool of paint to fill details, works great because of the low viscosity. What about doing that and then pouring it into the airbrush?
The mirror paint and maletow( if I spelled it correctly) sprayed through airbrush are only paints to really give a super reflective surface. Alclad is crap. Problem with metallic finishes is the clear coats dull it back down
use the paint from a molotow liquid chrome marker..... the marker itself costs around 6 dollars, the refill bottle around 20 👍. does a mirror shine over glossy black, fantastic results.... but it needs to dry at least 48 hours.
My favourite method is rubbing graphite powder over a gloss black base, a small pinch goes a long way so is very cheap too
Great video! I tackled this project with mid level effort and supplies. Going to try again with a resin print as a base!
I’ve seen some videos where they spray the rattle can paint into a cup with a little thinner, then use it in an airbrush. Cheaper rattle can paint, but better application with the brush.
Metallic ABS printing with acetone vapor treating for glossy finish
My guy. That final result was amazing, seriously impressed
Using DFM Blue Curved Cabinet Scraper Cards, will save you hours of sanding. Bill Eddie who did the Ghostbusters props uses this on his prints. I've been using them and have had great results. Also for smoothing you can try spot putty an Acetone.
I used the gloss black undercoat and rub on graphite for my Mandalorian armor. It didn’t come out quite as shiny for film accurate, but for cosplay it worked great.
Instead of all the sanding here is a great tip! Get some UV resin and a UV light and paint it on your print and cure it and then of course sand but trust me, the finish will be far smoother with a ton less sanding. Plus it makes the print much stronger! When using Alclad consider getting their thinner, I swear by their paints and klear kite finishes and thinning it down does wonders for the layup.
Nice, thanks for the tip!
Great video! 3D printing is a great way to make props at home! One huge thing to note is that silk filament is highly dependent on printing speed and temperature. Your printed model seemed a bit dull which is typical of printing with too low of a temperature. Try even a small model at higher temps to see the difference!
Use graphite powder for a perfect metal finish
You should try smoothing out the print only one with acetone or other solvents depending on what it's printed with. It gets rid of layer lines and makes it extra shiny.
Thank you for this video! I'm at the point I want to start trying to do this but I've been terrified of starting. This helps me know what will work for me and the time I have to do stuff!
It takes a hair-pulling amount of fine tuning, but if you can tune the printer to give you 0.04mm layers or smaller, it gets to the point you can hardly see the layer lines anymore. I'd definitely recommend upping the bed mesh setting to 7x7 for that.
Thanks for the video, always enjoy watching!
If your Prusa's anything like mine, the supports are stuck on WAY to hard. I used to be afraid of losing fingers when removing supports, but now - as I've loosened the connections. things are way less stressful!
I don't know where you ordered, but the Alclad paints come in a LOT smaller bottles as well, all of my 107 bottles are 30 ml, going for about $8.
I didn't read all the comments maybe someone already recommended. There are huge amount of modell paints available online, model shops, toy shops. They are amazing for this type of projects, great quality, cheap, small amounts, some of them can go straight to the airbrush.
Absolutely! Take whatever time is needed to get to wet sanded to 600 with automotive primer
You should try black gloss, then rubbing on graphite powder, using a soft cloth and buffing it afterwards. Produces a very nice metallic finish, much like a gun metal... and a tub of graphite powder is very inexpensive, compared to many of the metallic paints... and goes a very, very long way.
But yeah, it's all in that sanding, filling, sanding, filling process. It's the part that takes the longest amount of time and has to be as close to perfect as you can get it. NEVER skimp on the sanding and if you really want a 3D print that is great fro sanding, go resin. Not only can many resin printers, produce way finer details and show far fewer layer lines, sanding s SO much easier and wit enough grits, yo can produce and almost polished finish, especially with wet sanding at the end
Anyway once you've buffed and buffed the graphite finish, you will find that finger marks are easy polished/buffed out.. Not so easy on the painted versions and YES, you will want to wear gloves, and protect the work surfaces too, because graphite powder, being so incredibly fine, will get everywhere..Whatever you do, don't sneeze with tub nearby and lid open..
For that prop you could probably use that aluminum tape. I have had good success using that on smaller pieces, you just need to take a little time cutting it and hiding the seams.
How much value would you get by dropping the layer height to a 0.12mm or even 0.08? I've done 0.08 before and got some really smooth surfaces, at the expense of time of course.
total novice here and I have no 3d printing experience, but I wonder if you could lean into the layer lines and use them in such a way to mimic some machining artifacts. Maybe by orienting the 3d model in such a way on the print bed so that as you go through the finishing steps, the layer lines augment the final version in concert with the finish. Just a thought.
Even at 0.1mm, which really you shouldn't go below that layer height as the extrusion becomes uneven at smaller layers, it looks too coarse for a machined look and once you start sanding it, that whole structure is hidden and until you've sanded it perfectly, it just looks messy. If you're filming from a distance, a completely unprocessed print can look convincingly machined, but i can't see subsequent processes enhancing the look or making it hold up up close. Might be worth some tries for comparison, but don't hold your breath.
As to why the extrusion becomes uneven, there's a lot of partial explanations, none of them are all that conclusive in and of themselves. There's a particular step to the transport gear that actually grabs and pushes the filament forward with quite considerable force, most extruders have their own gearing which isn't perfectly smooth either, and then they're driven with a stepper motor with fine microstepping but some inherent asymmetry in the assembly causing a little periodic distortion, and ultimately, whatever kind of motor and feedback you'd choose, odds are, you'd always find some sort of periodic distortion as long as your feedback source isn't from filament propulsion, which nobody found a way to measure reliably yet. Bowdens can hide the unevenness a little better, at the cost of worse corner and non-print-move behaviour, particularly when you're retracting and relying on semi molten plastic to just stay in there and ideally not drip, which with PETG in particular is a whole sing and dance and you usually just accept some imperfections.
Diamond needle files are great for sanding and cleaning up small grooves.
In scale modeling you give stuff a panel line wash to weather it or make the details pop, that airbrushed one would look even better if you give it a wash.
Bob, you've definitely nailed integrating the sponsor into your videos. Much better than some other channels. 👍
LOVE that 80's logo thingy at the end!!
That "What?" at 5:28 got me. LOL
I was just typing out 'what about Alumaluster' and then you talked about it lol. I've been going down this same path for my Mando armor, so this is good to see (though the paint of chosen is a bit different than yours, but still from Alclad).
Would putting the black base aid in the chrome rattle can paint as well?
Spaz Stix Ultimate Mirror Chrome also works incredibly well for an airbrushed chrome finish.
What about sanding and polishing the metal filament one though? Surely it'd come up super shiney
you should look into the metallic powders used for makeup effects like seen in the original wizard of Oz tin man makeup, (cant remember the name off top of my head but it starts with an R like Rheon or something like that metallic powders) these are usually smelling like crayon and I am guessing its the tiny metal particles are suspended in a wax substance that rubs smooth easily enough to apply say to skin,
when these that I have are applied to a surface it makes that surface texture look like metal that is that texture, so glossy or high gloss paint surfaces look like polished chrome metal,
application of the coating is key with this stuff since it can be easily rubbed off if not top coated and the paint will cause it to rise and mix into it, so very super light coating layers of any spray are needed to get it to come out still chrome mirror like surface looking. or coat it with something else that it won't mix into like the glossy clear coating material for leather something I discovered when making masks I wanted a metallic finish on.
one last thing, the copper and bronze or brass colored versions do not seem to have the same smoothing spread ability so I would avoid those, and just tint the chrome coating, looking aluminum powder based one, and
props to your use of picture in picture for your add. not only dis I not skip it but was entertained while it played. well done. curious about the beveled flaps in your spray booth. presumably these help keep your filter (presumably behind the flats?) from getting clogged as much? I may have to try that. I'm always blowing through filters.
Thanks! Yeah, it kind of acts like a baffle to grab excess paint. I actually think the older version we had (previous paint booth video) worked better for that purpose.
Might be worth trying abs and do a acetone vaporsmoothing to it before sanding/painting.
I watched the video where the gentleman used acetone vapor to smooth out his project rather than sanding it seemed to work pretty well.
I use Tamiya modeling putty to fill my prints. Sands great and takes paint well.
It's actually fairly affordable to nickel plate a prop. However it's somewhat finicky and just daunting to even consider until you actually do it and sort out the issues, but i would say it looks a lot more convincing than any spray paint. Might be worth the investment, i suggest checking it out. I'm not that far yet myself, i have nickel plated a bunch of things, brass and steel items for technical reasons, but i didn't particularly care about how they were going to look (though i did experiment, and i really like the look that can be achieved), and i never did conductive painting on plastics to prepare them for nickel plating. You can zinc plate yourself as well, but the drawback is that it looks like zinc, while nickel looks pretty awesome.
Something to keep in mind though that nickel is considered potentially toxic in contact with skin, apparently a bunch of people have allergic sensitisation to it from contact with low quality stainless jewelry. But for something to put into your display case, it's literally perfect.
Another way to achieve a chrome look is silver with Tollens process, but it's difficult to achieve this on the first surface, the surface is fragile, and protecting it with clear spray dulls the look.
A possibility to keep in mind is maybe just making the part conductive and then sending it off to get chromed professionally with real chrome, there are shops that do this for automotive restoration. I don't know whether someone has tried that, whether they'll even accept a plastic part as they normally work with metal ones.
Hey bob, was wanting to know what airbrush gun you used for the silver paint? Or what airbrush kit would you recommend for a starting DIY’er
I've used Alcad on displays, but I'm wondering how it will look after it's been handled a while. That's the main drawback for most chrome finishes. There have been some very expensive chrome options posted from time to time on the RPF that will hold up under handling, but they are a LOT (!!!LOT!!!) pricier than Alclad.
I looked for the Lacquer online and it's only like 15$ average. Am I looking at the wrong one??? I noticed the one you showed says ALC 4107 whereas the one I'm seeing for 8$ says ALC 107. Can't find that one.
The alclad chrome will work over gloss black or gloss white. If you get the base coat super smooth and shiny, the chrome will work very well. The trick with it is to only lightly fog the chrome over the gloss base coat. If you put it on heavy, it will just look like shiny aluminum.
That looks so cool! Would have made Jabba himself rethink his negotiation tactics. Love the comparison of the different efforts as well.
So well done Bob, really enjoyed this.
It’s neat when you change things up from building something large and awesome to something small and awesome! Thanks for the great advice!
How close were you to just milling one out of aluminum on the Bridgeport?
Not that close :)
Love the different tests. Always good to learn from! 🤘
Resin printer would save you a LOT of time. Also a black wash in those crevices would make the chrome pop better!
Engineered Angler Lures has the best break down of spraying chrome on plastic I’ve seen