TH-cam
US
How to create stunning Props from 3D Prints by Electroplating them!
10:41
The Ultimate Guide to Smoothing & Finishing Your 3D Prints
21:33
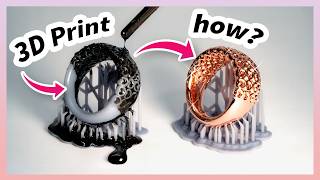
Electroplating 3D Printed Jewelry | FULL TUTORIAL
11:22
OHANA บ้าพลัง EP.134 : เกมการ์ดโอฮาน่า X วัยหนุ่ม 2544
53:39
LIVE🔴 : Cambodia vs Timor-Leste | ASEAN Championship 2024 | 17.12.24
2:40:50
ไฮไลท์ ฟุตบอล ASEAN MITSUBISHI ELECTRIC CUP 2024 : สิงคโปร์ พบ ไทย
09:54
Electroplating 3D Prints | New Graphite Tutorial
HEN3DRIK - Electroplating 3D Prints
ติดตาม
76K
ดาวน์โหลด
โหลดลิงค์.....
มุมมอง 793 430
0
0
เพิ่มลงใน
เพลย์ลิสต์ของฉัน
ดูภายหลัง
แชร์
แชร์
ฝัง
ขนาดวิดีโอ:
1280 X 720
853 X 480
640 X 360
แสดงแผงควบคุมโปรแกรมเล่น
เล่นอัตโนมัติ
เล่นใหม่
เผยแพร่เมื่อ 30 ธ.ค. 2024
บันเทิง
ความคิดเห็น • 828
ต่อไป
เล่นอัตโนมัติ
10:41
How to create stunning Props from 3D Prints by Electroplating them!
HEN3DRIK - Electroplating 3D Prints
มุมมอง 111K
21:33
The Ultimate Guide to Smoothing & Finishing Your 3D Prints
M.M's Prop Shop
มุมมอง 537K
11:22
Electroplating 3D Printed Jewelry | FULL TUTORIAL
HEN3DRIK - Electroplating 3D Prints
มุมมอง 64K
53:39
OHANA บ้าพลัง EP.134 : เกมการ์ดโอฮาน่า X วัยหนุ่ม 2544
ohana clip
มุมมอง 662K
2:40:50
LIVE🔴 : Cambodia vs Timor-Leste | ASEAN Championship 2024 | 17.12.24
BG SPORTS
มุมมอง 438K
09:54
ไฮไลท์ ฟุตบอล ASEAN MITSUBISHI ELECTRIC CUP 2024 : สิงคโปร์ พบ ไทย
TrueVisionsOfficial
มุมมอง 1.2M
25:22
ต้าห์อู๋-ออฟโรด ขอฝึกวิชาเซียน จับหมูป่ามือเปล่า | เฮ็ดอย่างเซียนหรั่ง FULL EP.21 | One Playground
One Playground
มุมมอง 452K
6:35
Anodize Your Own Parts any Color with Household Products
TITANS of CNC MACHINING
มุมมอง 3.2M
10:03
Electroplating 3D Prints | Color Metal
HEN3DRIK - Electroplating 3D Prints
มุมมอง 411K
11:52
Super Shiny 3D Prints | DIY Electroplating
HEN3DRIK - Electroplating 3D Prints
มุมมอง 199K
6:53
Electroplating 3D Prints: the Symphony of Plastic and Metal
Prusa 3D
มุมมอง 74K
8:59
PET-Machine, make Your own 3D printer filament from plastic bottles at home (DIY!)
Tylman Design
มุมมอง 1.6M
18:19
3D print REAL tools
The Swedish Maker
มุมมอง 149K
10:59
Hide 3D print layer lines with Baby Powder and UV resin
DaveRig Design
มุมมอง 1.3M
9:39
I Made The Ultimate Cheating Device
ChromaLock
มุมมอง 1.7M
15:26
10 Cool Inventions Anyone Can Print - The Best Models for Brand-New Printers
Zack Freedman
มุมมอง 1.1M
00:57
ชายชาวประมงกับสัตว์ประหลาด #3danimation #cartoon #viralvideo #animation #3danimationvideo #anime
ลับแล สตูดิโอ
มุมมอง 1.2M
00:59
ความเชื่อคนไทย น้องเหี้ยกลัวน้ำมันก๊าดจริงไหม ??
Superjeew Official
มุมมอง 1.3M
00:18
ฉี่ใส่ท่อ #funny #การแสดงเท่านั้น #comedy #บังเอิญเจอ
แม่พี่มีนกับน้องอันซีน(แม่ยา)
มุมมอง 407K
00:34
ToRung comedy: i just eat cake😂
ToRung
มุมมอง 22M
00:30
เป่ายิ้งฉุบใครชนะได้กิน EP 3 #mysnaxx #มายสแน็คซ์ #มันฝรั่งทอด #mymatenate #มายเมทเนท
MySnaxx by MyMateNate
มุมมอง 649K
01:01
ป้ายจับโจร ติดที่หน้าบ้าส 🤯 #พูลลี่แพรว #แกล้งแฟน
พูลลี่แพรว
มุมมอง 432K
00:43
IShowSpeed and Amy best couple
Nocts
มุมมอง 15M
00:12
อ่าวอยู่ดีๆ เมียก็โผล่มาจ้า 🥲🤣😂 อะอ่าววว #เอมี่กลิ่นประทุม #ซีศิวัฒน์
PT9
มุมมอง 404K