Laundry Room Upgrade || Making Our Laundry Room Functional Again

ฝัง
- เผยแพร่เมื่อ 19 เม.ย. 2024
- Head to squarespace.com/bourbonmothwoo... to save 10% off your first purchase of a website or domain using code BOURBONMOTHWOODWORKING
Merchandise & Plans: www.bourbonmoth.com
Cabinet Build Plans: www.bourbonmoth.com/shop/p/st...
Patreon Page: / bourbonmothwoodworking
Instagram: / bourbonmoth
Links below to tools and supplies:
Lazy Susan: amzn.to/3vZ1WSy
Clothes I love: www.duluthtrading.com/?srccod...
Cabinet Screws: amzn.to/2FhCA7v
Under Mount Drawer Slides: amzn.to/2DSU3mp
Set Up Blocks: amzn.to/2PxGRFK
Wood Filler: amzn.to/30WuV5G
Clamps: amzn.to/2OjyYUh
Square: amzn.to/2tiTPQr
Tape Measure: amzn.to/3b2rnDq
Safety Glasses: amzn.to/2RMLoGv
Drill & Driver: amzn.to/3Gver7y
Festool Rotex: amzn.to/2RPe161
Chop Saw: amzn.to/3Ld2w1E
Flip Stops: amzn.to/3rBNjj6
Table Saw Blade: amzn.to/2RJUCmI
ISOtunes Bluetooth Hearing Protection (10% off code- BOURBONMOTH10) shop.isotunes.com/BourbonMoth10
Bits & Bits Precision Cutting Tools (10% off code- BOURBONBITS)
bitsbits.com/ref/6220/
Nicks Handmade Boots: bit.ly/NicksBootsxBourbonMoth
RZ Mask (15% off code: BOURBONMOTH15)
www.awin1.com/cread.php?awinmi...
Total Boat Epoxy: www.totalboat.com/bourbonmothw...
Grizzly Tools:
Table Saw: amzn.to/3q8Wbu6
Jointer: amzn.to/3gFHE6a
Planer: amzn.to/3xCzH7r
Dust Collector: amzn.to/35AFEWw
Air Filtration: amzn.to/3zyXXsK
Band Saw: amzn.to/3gEtCAm
Drill Press: amzn.to/3xvhxEh
Lathe: amzn.to/3vChWUb - แนวปฏิบัติและการใช้ชีวิต


It's remarkably encouraging seeing a professional make the same bone-headed mistakes you make (routinely) as an amateur woodworker. Thanks for including that.
Agreed, I said that out loud in the general direction of the TV when I saw that scene
House purchased 1964, still updating, fixing and changing in 2024. It will never end but I like your optimism.
TH-cam is hellofa drug
Only a few more years for everything to be in style again!
TH-cam’s a helluva drug
😭
The american dream, taking down ugly 20 year old cabinets to make ugly cabinets that will be taken down 20 years from now
I WISH I HAD YOUR OLD LAUNDRY ROOM.
It would be so much of an improvement over my mess of a workshop with three washing machines in the middle (yes, middle. Thank you, mother!!)
I got teary eyed watching your interaction with your son. I miss those days (I'm a grandma now). Enjoy! Your son is absolutely adorable!
"I forgot a pretend towel" and looking around for one that's not there got me. Lol. That just made my day.
I loved my watching your build. You make it fun with all the narration. You do an awesome job! Thank you
Quick warning, the fluorescent lamp has a toxic layer inside that’s the white smoke you see when braking it. Be carefull with it! Love your video’s!
I freaked when I saw that. Many people don’t know and I’m glad you made the comment. The doors should be opened to air the room and get out until it’s clear.
The white smoke is just powder from the inside glass surface that makes it white, not clear glass. The actual danger comes from the small amount of mercury inside and the vapors from it, which are invisible without a special camera. You would be safer swallowing mercury than it is to breath the vapors. We have mercury spill kits at work to deal with this. Yes, air it out. The good news is that most of it left the room with the old cabinets.
It would be so nice to see a housetour. I really love your videos! Have been watching them for years ❤
I agree!
Jason one of my favorite parts of watching you is you make feel better about the dumb things I do when building. I am a weekend warrior as I’m sure many of your subscribers are and this really helps my fragile ego! lol. So thanks for that. I very much love your remodel video as well as watching you build some of this beautiful furniture. Thank you and keep these vids coming! By the way tell the foreman he doing a great job!!!
I believe you installed the shiplap upside down. The flange should be at the top. Doing it this way now water would enter behind the wall and you would not had to push the boards into the slot.
And, all of the nails could have been hidden...
Dude, I would die for that original laundry room. Our house was built in ‘57. Our laundry room is the washer/dryer crammed next to the AC and water heater with the water spouts just under the main electrical panel.
Hey, I also have a house built in the 90's!
The 1890's...
😂
If you think your 90’s decor looks dated, wait ‘til you see how your ship lap and barn doors look in 10 years.
Right. Magnolias contributions to the future landfills of the world. Along with barnwood feature walls and matching lvt
Iver just wedged in behind the Lazy Suzan. That kid is a hoot.
As always, thank you for showing your screw ups. It makes things so much more accessible. You rock dude.
The one thing that has not and will never go out of style from the 90s, Ninja Turtles! (Referencing his son’s shirt in the demolition section)
I'm with you. Even though I love a piece of beautifully finished hardwood. Being able to tack on the face frame of a painted cabinet sure is easier.
2:47. Sweepin in my socks! Great song!
Really good seeing you getting your son involved
Thanks for the link to Lazy Susan, I was debating about what I was going to do in my kitchen corners.
I'm glad to see that I'm not the only one that makes such frustrating mistakes. LOL
I do believe you had a Cookie Monster behind your lazy Susan!!
LOVE the videos. I don’t trust my ability to measure correctly so I haven’t tried woodworking but I really enjoy watching a (humble) master at work. A video on accurate measuring would be greatly appreciated.
I have that exact washer/dryer set. The pedestals were 100% worth it. My back thanks me every time i do laundry
I subscribed because your sense of humor is most excellent. And the woodworking is kinda cool, too.
03:10 uuuh that's da good smokeysmoke, better inhale it before it's illegal! 😂
I enjoy your videos, well done. You make building cabinet seem like anyone can do it.
Wow, your laundry bigger then my kitchen and bathroom together.
Love to see you let Iver in and do, what he does 👍☀️👍.
About your wife liking detergent. My wife has a Dawn fixation. We stockpile that stuff. Can't complain about it at all though, always have stuff for dishes.
I love it! Wish to have the same wine rack in my house..,
"Cut some the stiles to the correct length". That's what I have been doing wrong. I generally cut my stiles to the incorrect length. I'll try this technique next time instead. 😂
I can see how all this went. Jason to his wife, "Honey, I have all of these plans for 2024. I'm gonna redo the shop and expand it into the silk screening part. I'm gonna remodel that house we got over in central Oregon . After that, we'll see what happens." Jason's wife, "That sounds nice honey. Make sure you get all the stuff done in this house that you promised first, our closets, the laundry room..... Oh, and make sure the Airstream is done too." "Yes honey, I'll get right on that...."
The last room is the hardest to start.
Always like your content, but a couple of things I'm not sure about, I don't think you can have an outlet or switch above the sink for code, and wouldn't the shiplap above the sink go bad with all the damp caused by the sink faucet?
Hettich make excellent cabinet hardware that are incredibly high quality. Far better than that Amazon flimsy thing. They also make a new version of the lazy Susan that swings out in a straight line and then the next section slides out. It can carry so much more. Lloyd
Nice to see the foreman stopping by. Nothing like having a handsome young fella come and contribute some artwork to a project. ❤😊
I've NEVER had a farmhouse sink be that easy! They're always dimensionally off a bit and carving commences. Nice work!
I don't even have a laundry room. Wish I had that one.😮
this is more cabinets than my kitchen has
👏 everytime I wat h one of your videos I'm inspired to make cabinets as well!
Lazy Susan’s are still popular! We just built our house and it was a standard with the builder. Love the pink walls!
I still have a lazy Susan and love it.
18:39 foreman being sneaky and trying to catch you slacking
Ok, at first glance it just looked like the walls need a better color. But then....THOSE CABINETS!!! 😱 I could not stop laughing!!
Liked where 'The Forman' was in with Susan... sneaky little guy!
Face frame pocket screw conundrum: pocket screws vs. Festool Dominos. I've had to make that call before, and choose the Domino for the reason you ran into: easy inset routing that could have run into the pocket screws. Both are really good ways to fasten face frames. The domino doesn't eat up router bits when you don't really want to buy a new one. Great start on the cabinets.
@@Navy1977 I assume 'diamond' is domino? I cut the rails and stiles for the frame. I then use the Domino to create the mortise on the rail ends and stile sides for the loose tenon itself. Those are clamped (square of course) till dry. Then I route the back of the face frame just like Jason did in the video for the panels. I'll attach the face frame to the cabinet using using pins, brad nails, or in heavy use situations, pocket screws from the back. I've actually used dominoes to do that on some shop cabinets for strength. Worked well.
Going to be changing that business name to Bourbon Moth Cabinetry. 🥃✌🏼
Great job on your laundry room makeover and upgrades which look awesome thus far! The lasysusan was an especially nice touch for your wife!
I cannot wait to see the next episode in which presumably you will be building and installing the lower cabinet doors, and constructing the upper cabinets.
Well done, Sir!
I once mad a single quilt cover for my son's bed. It was a whole meter too short! 😆
The amount of "lazy Suzan" in a short time really made me want to know more about lazy Suzan 😂
I coulda used some of those cabinets to re-do my OWN LAUNDRY ROOM!!! You should have called. I'm only 40 miles down the road...... J/K.
Nice work, including the boo-boo. It's gonna look great. Look forward to part 2. Be safe and stay well.
Awesome job as always, thanks for sharing!
Thank you for showing the "struggle bus" moment with the side exposed cabinet! Makes me feel a little better about those projects that just have one issue after another.
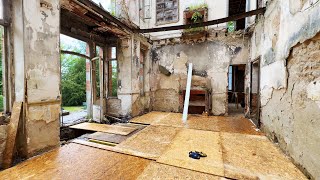
While this is no doubt an improvement, the original laundry room didn't look like it needed much more than a coat of paint to spruce it up... Seemed easy better than most laundry rooms lol
I was thinking the same. Paint the walls, paint the cabinets, add a couple shelves above the machines,call it a day.
Well it wouldn't be much of a woodworking channel if he just painted what's already there, wood it? 😉 It's not called Bourbon Moth Painting. I'm sure there's plenty of makeover channels out there if that's what you want to see. I'm just saying.
@@carlstrohm3785 Was just saying his big reveal of the "awful" existing laundry room was a little underwhelming. I'm all for watching him remodel it. Just found it funny because it's already leaps and bounds better than my laundry room before he started
As I am finishing today my laundry room, after more than 15 years previously doing same as you do, I could say I know what you are talking about...
Great video, best for guys who are prior the whole reno.
18:36..I see the Forman was testing out a potential hiding spot..well done lad..
I’m looking to wedge in a mini-pantry in the garage (super small space), and was trying to figure out how to do something with the corners. The lazy susan idea is CLUTCH!
try titebond quick n thick. we use it for doing trim work. has a faster set time and is super thick so it doesn't run.
Haha, you started with a fully finished, functional laundry room... even if it is not the best. ;) Me... I started with a completely unfinished basement, a washer, dryer and tub sitting along a concrete wall.
It was my first major project... a full laundry room build with a new dual tub & plumbing, dropped ceiling, new walls, upper and lower cabinets, etc. 100% worth the effort! I'm currently remodeling my ground floor (family, kitchen, living & dining). All were classic 70s/80s design with minor updates done in the 90s before I owned it... golden oak!
The difference between a true craftsman and a builder; they know what can't be seen and they take the time to build it to a high standard.
Cringe worthy event ,when the end stile isn’t full height of frame and you have end grain at end of the cabinet.
Really enjoyed this episode. I hope you enjoy the new bit from Bits n Bits😊
Woo Hoo! I'm renovating my laundry at the moment. Totes relevant! 😄👍
Wow, you sure your house was built in the 90s? That laundry room looks like it came out of the 70s (missing the shag carpet though). Hell of an improvement Jason.
To be fair, many Americans are installing brand new kitchens in 2024 that look like they’re from the 70s.
It’s nasty, but cheap and easy.
I’d love to have your 90s laundry room. My 60s laundry is unfixable without taking out walls!
I really enjoy watching and listening to you work. You give me lots of smiles and laughs 👍
That ironing board was made in Morton, Illinois, by Iron-a-Way. They are expensive!! Some have a place for a spot light and iron. My sister had one made for her guest bathroom.
I'm hopeful he's going to keep it... Pretty hand to have!
So nice to have the Forman working off some steam lolol…..nice work as usual
The kids at school: "I got a new Lego set". The Foreman: "I got a Festool Drill driver". 😎
It amazes me after all these videos and skills Jason shares with us in these videos that he has never done something prior to a new house project. Aka the lazy Susan build
I can see you are overseen by a highly competent foreman. Very lucky indeed!
We installed a brand-new Lazy Susan in our brand-new kitchen in our 1964 house. The cabinet is 36 by 36, except it is not. It is supposed to be installed with a 6-inch space behind it on 2 sides. That is 36 x 12 square inches of wasted space. I needed every square inch, but I compromised by not pushing it back against one wall. It is a corner cabinet so there are two walls. This gave me room for my 36 inch sink base.
LOL! My wife had an addiction to couponing detergent and toilet paper we thought it was a joke until the pandemic hit and we were the only ones that were good.
Other than Borax and vinegar... What else do you need?!
Makes the plinths (the correct word for toe kicks) a little higher than the norm to save your backs. I’ve done that with all our cabinets and the difference is amazing.
Awesome! Consider switching the washer and dryer so the dryer is on the right. Your detergent loving wife will appreciate it.
@Navy1977 yes. I'm a retired appliance tech and usually dryer doors will switch but not washer. Longer cords are available and worth it for the convenience over time.
Those shiplap walls look great! That's a good way to hide the ugly plaster and paint. It would have been easier to install the shiplap with the tongue up against the wall. Or in other words upside down from how you installed it. that would prevent you from having to beat in each row.
23:42. Way too big!
Must have been the Bourb...
ICE TEA!😂😂😂😂
Omg! Having done it myself, too many times! I measure 5 times then pre-fit. Love that you included this. You status as a wood shaping god is still intact so . . .😅
The foreman musta had the day off
Pepto pink the best 😂😂
I spent well over a year designing our new kitchen cabinets in Sketchup, then after watching your older videos on building cabinets I scrapped the whole thing and spent another year, ok, not really, just a couple of months, designing cabinets with separate toe kicks, which is the way I will always build cabinets from now on, so easy. As usual I over built them, and built everything out of 3/4" prefinished plywood, or so I thought. When I started assembling the cabinets they were all coming up a little more narrow than they should have been. I couldn't figure it out. Then I realized that my 3/4" plywood wasn't 3\4" plywood. It was 18mm plywood. In my best Jerry impersonating Kramer voice, the difference is negligible. However, it's enough that each cabinet was close to 1/8" too small. In the end it didn't matter, everything went together fine, and there were no major landmarks I had to worry about that would look crazy because of the difference. I'm down to my final two cabinets now, a 4' wide, 92" tall pantry, and the refrigerator cabinet. The boxes and face frames are installed, I've just got to finish the doors, and because they were too tall to build as one unit and get them in the house and stood up I built them with a top and bottom so I've got to do something similar to how you dressed up the end panel on yours. I can't tell you how much I appreciate your videos. You have a knack for making instructional videos that are clear and precise, and also humorous.
LMFAO! Is that Jonathan Katz-Moses' Danny Devito in the background? I almost lost my s... when I saw that. 🤣
Either you don’t pay attention to his videos or not a regular viewer. It’s been there for years.
Another fun watch. Thank you!
Working on our kitchen right now. Thank you for all of the information that you are willing to share with everyone. You the man!
1:18 IDK... The salmon walls with the olive drab green door are kinda awesome! 🤣
Very concise cabinet build. Jason the master of building cabinets
Omg how did you go that long with that Pink?! My wife painted the kitchen a similar color and it felt like our eyes were on fire. It was re-painted a different color by the end of the week
It is looking good.
A "Lazy Susan" is a woodworker who does not take the time to hook up the dust hose to the track saw before making a cut.
Very nice work ❤❤❤❤❤❤❤❤❤❤❤❤❤❤❤😊
Another great video, thank you for sharing!
Thanks for sharing.
Nice!
You are like clockwork with your presentations.
Nice work
Was that the Foreman I saw in behind the Lazy Susan at 18:40!!! 🤣🤣🤣 What a goofball!
You sure make it look easy Brah.
Your little guy is so cool!
My kids asked me to rewind the poop part man times. 😂
Top project!
Way cool and very helpful information, tips, and tricks!!!!
the way you shot the original view of the laundry area made it look like a stanley kubrick horror room XD