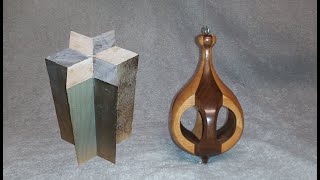
Wood Turning Inside Out Christmas Ornament

แชร์
ฝัง
  • เผยแพร่เมื่อ 29 ก.ย. 2024
  • This is a very simple inside out ornament to turn I show the steps of how I use 4 equal pieces of Walnut to create the inside out turning.
    I made the opening large enough to slip in an LED tealight.
    It really looks good hanging in a darkened area.
    Also hanging in the tree right in front of a light is very pretty as well.
    These are a lot of fun to make and it is endless to what you can come up with.
    The video is for entertainment purposes only
    If you found this video entertaining:
    Please Like and Subscribe and Share if you are inclined
    Look up other turnings I have done:
    Dizzy Twister Turnings
    Segmented Turnings
    Pierre Lussier inspired vase
    Mike Waldt inspired vase
    Tumbling bowls
    Emerging Bowls
    Black Locust Vase
    Droop Bowl
    Bowl in a Bowl
    Offset Bowl

ความคิดเห็น • 572

  • @judithfairchild8620
    @judithfairchild8620 2 ปีที่แล้ว +1

    Really cool! I have a hundred ideas for ornaments but don't have a lathe.

    • @ThePapa1947
      @ThePapa1947  2 ปีที่แล้ว

      Thank you Judith. They are really fun to make. Sounds like you might be wanting to get a nice small mini lathe.
      Thanks for watching,
      Gary

  • @hannesnys4471
    @hannesnys4471 7 หลายเดือนก่อน +1

    I'm blown away by this technique. Beautiful craftmanship sir

    • @ThePapa1947
      @ThePapa1947  7 หลายเดือนก่อน

      Thank you very much! They are lots of fun to do. Happy you enjoyed this one.
      Gary

  • @malbun3275
    @malbun3275 2 ปีที่แล้ว +1

    Hi Gary
    I know what I’m going to turn tomorrow,thanks for showing in great detail how to do that method of inside out turning.
    Regards from nz

    • @ThePapa1947
      @ThePapa1947  2 ปีที่แล้ว

      Thank you Mal and have fun.
      Gary

  • @jenniferhandler6945
    @jenniferhandler6945 3 ปีที่แล้ว +2

    I like that you used tape for the first set of cuts. It makes it a faster project. Nice job!

    • @ThePapa1947
      @ThePapa1947  3 ปีที่แล้ว +1

      Thank you Jennifer glad you liked it. The tape does work great.
      That said I just finished another inside out turning and used a brown paper joint on the ends as well as the tape. Some feel the tape is not enough so I thought I would add another option.
      Thanks again,
      Gary

    • @jenniferhandler6945
      @jenniferhandler6945 3 ปีที่แล้ว

      @@ThePapa1947 Good to know. I'll try it.

  • @balesguy
    @balesguy 3 ปีที่แล้ว +7

    Ok, I've tried making one of these twice without much success. You always make things look so easy, and I'm easy, so I'm going down to the shop and make a third try at it. I know I can do it this time. Thanks for the confidence transfer. ;-)

    • @ThePapa1947
      @ThePapa1947  3 ปีที่แล้ว +1

      Thank you Bill. Yes you can do it! And you will.
      I did another last week and the video will be in a few weeks.
      Let me know how yours goes.
      Gary

    • @dfinchermd
      @dfinchermd 7 หลายเดือนก่อน

      Lovely project. It looks like you take tools across the holes. How do you prevent a catch?

  • @geraldshultz4271
    @geraldshultz4271 4 ปีที่แล้ว +1

    Tricky paying turning off beautiful. Great video.

    • @ThePapa1947
      @ThePapa1947  4 ปีที่แล้ว

      Thank you Gerald glad you liked it.
      Gary

  • @sheilahperry-rosales8748
    @sheilahperry-rosales8748 3 ปีที่แล้ว +1

    I'd take a whole tree of those!

    • @ThePapa1947
      @ThePapa1947  3 ปีที่แล้ว

      sheilah perry-rosales thank you very much happy you liked it.
      Gary

  • @davesullivan3289
    @davesullivan3289 11 หลายเดือนก่อน +1

    Another beautiful turning and well planed out. One thing I picked up on was you used friction polish on the inside. Where do you get get the friction polish. I think it really makes the wood pop. Thanks Gary

    • @ThePapa1947
      @ThePapa1947  11 หลายเดือนก่อน

      Thank you very much Dave.
      Check this video out on how I made it. The stuff has been around for years and is based of French polish
      th-cam.com/video/nV4HeO_u-ps/w-d-xo.html&ab_channel=ThePapa1947
      Thanks for watching,
      Gary

  • @jimmiehall1930
    @jimmiehall1930 4 ปีที่แล้ว +1

    Very informative great job. Thank Jimmie Hall

    • @ThePapa1947
      @ThePapa1947  4 ปีที่แล้ว

      Thank you very much Jimmie.
      Gary

  • @markshuell3198
    @markshuell3198 2 ปีที่แล้ว +1

    Very well done. I made a practice version out of cheap pine. The next version will be black walnut. I hope it turns out as well as yours.

    • @ThePapa1947
      @ThePapa1947  2 ปีที่แล้ว

      Thank you Mark. They are lots of fun to do and I am sure you will do fine.
      Take care,
      Gary

    • @markshuell3198
      @markshuell3198 2 ปีที่แล้ว +1

      @@ThePapa1947 I do have a question. The start thickness is 3 inches. Your initial cut looks like it leaves about 1 inch. Is this correct?

    • @ThePapa1947
      @ThePapa1947  2 ปีที่แล้ว

      @@markshuell3198 it ended up very close to 3 inch diameter at the widest point when it was finished. The 4 strips might be around 1" at the opening though. That shows up at 15:41 where my thumb is pointing.
      Hope that explains what you are asking.
      Gary

    • @markshuell3198
      @markshuell3198 2 ปีที่แล้ว

      @@ThePapa1947 thank you.

  • @jamesanderson2468
    @jamesanderson2468 2 ปีที่แล้ว +1

    Great job. I’m going to try this. Thanks

    • @ThePapa1947
      @ThePapa1947  2 ปีที่แล้ว

      Thank you James and have fun making one of these.
      Gary

  • @jeffrosen8237
    @jeffrosen8237 2 ปีที่แล้ว +1

    That is a great idea! Thanks for sharing!

    • @ThePapa1947
      @ThePapa1947  2 ปีที่แล้ว

      Thank you Jeff and thanks for watching.
      Gary

  • @matthewjohnston1400
    @matthewjohnston1400 2 ปีที่แล้ว +1

    Cool idea. Excellent work.

    • @ThePapa1947
      @ThePapa1947  2 ปีที่แล้ว

      Thank you Matthew and thanks for watching.
      Gary

  • @shawndillon8898
    @shawndillon8898 3 ปีที่แล้ว +1

    Thank you sir I enjoyed your video. Keep on turnin.👍

    • @ThePapa1947
      @ThePapa1947  3 ปีที่แล้ว

      Thank you Shawn and I plan on it.
      Gary

  • @pa_petesworkshop8483
    @pa_petesworkshop8483 2 ปีที่แล้ว +1

    Beautiful. 👍

    • @ThePapa1947
      @ThePapa1947  2 ปีที่แล้ว

      Thank you very much and thanks for watching,
      Gary

  • @gloriamarioghae7650
    @gloriamarioghae7650 3 ปีที่แล้ว +1

    Absolutely lovely.

    • @ThePapa1947
      @ThePapa1947  3 ปีที่แล้ว

      Thank you so much Gloria!
      Take care,
      Gary

  • @billy19461
    @billy19461 4 ปีที่แล้ว +1

    Great turning!

  • @markb8954
    @markb8954 4 ปีที่แล้ว +2

    Nice shape! Nicely done, well explained. Great design & look.

    • @ThePapa1947
      @ThePapa1947  4 ปีที่แล้ว

      Thank your nice comment Mark.
      Gary

    • @angelpeyton3637
      @angelpeyton3637 3 ปีที่แล้ว

      Such a beautiful design! Love the shape of the windows, and the overall shape is simple but elegant. Looks so nice with the tea light. Well done. Merry Christmas to you and yours!

  • @JohnStauver
    @JohnStauver 5 หลายเดือนก่อน +1

    This video got me started on inside out turnings and I have developed my own techniques. I have to wonder though, why so much glue?

    • @ThePapa1947
      @ThePapa1947  5 หลายเดือนก่อน

      Not sure I did this one a number of years ago. I will have to rematch it and see if I have an answer. I assume the final assembly?
      How much glue would you have used?
      I would be curious about your techniques as well.
      Gary

  • @jeffcoplin3118
    @jeffcoplin3118 10 หลายเดือนก่อน +1

    Gorgeous

    • @ThePapa1947
      @ThePapa1947  10 หลายเดือนก่อน

      Thank you Jeff. Happy you like it and thanks for watching.
      Gary

  • @danielbarros8991
    @danielbarros8991 3 ปีที่แล้ว +1

    Amazing! Very Nice.

    • @ThePapa1947
      @ThePapa1947  3 ปีที่แล้ว

      Thank you Daniel happy you liked it.
      Take care,
      Gary

  • @djs240
    @djs240 4 ปีที่แล้ว +2

    Really nice. Thanks for the education and entertainment, just a pleasure to watch something so beautiful being made. Merry Christmas

    • @ThePapa1947
      @ThePapa1947  4 ปีที่แล้ว

      Thank you very much Joey and a very Merry Christmas to you as well.
      Gary

  • @rickhomer934
    @rickhomer934 9 หลายเดือนก่อน

    Merry Christmas Gary. Wishing you and yours all the best.

    • @ThePapa1947
      @ThePapa1947  9 หลายเดือนก่อน

      Merry Christmas Rick!

  • @edithmeagher8509
    @edithmeagher8509 3 ปีที่แล้ว

    That was absolutely stunning!

    • @ThePapa1947
      @ThePapa1947  3 ปีที่แล้ว

      Thank you very much Edith happy you liked it
      Gary!

  • @stevehood10
    @stevehood10 2 ปีที่แล้ว +1

    Nice work! Thanks for sharing I found it fascinating, really like your presentation style.

    • @ThePapa1947
      @ThePapa1947  2 ปีที่แล้ว

      Thank you very much. I appreciate your comments and thanks for watching.
      Gary

  • @damienzinck2526
    @damienzinck2526 3 ปีที่แล้ว

    Very nice

    • @ThePapa1947
      @ThePapa1947  3 ปีที่แล้ว

      Thank you Damien happy you liked it.
      Gary

  • @woodworkingskillwithsagar8802
    @woodworkingskillwithsagar8802 4 ปีที่แล้ว +1

    Always Amazing video👌👌👌take care my friend 'Gary'.

    • @ThePapa1947
      @ThePapa1947  4 ปีที่แล้ว +1

      Thank you so much Sagar!
      Best wishes for you and yours,
      Gary

  • @marklengal9990
    @marklengal9990 4 ปีที่แล้ว +1

    How was the live center attached if it 4 pieces of wood? I would think it would spread apart. Outstanding job. I can’t wait to try it

    • @ThePapa1947
      @ThePapa1947  4 ปีที่แล้ว

      Thanks Mark...so my live center has a short tip which did not go in very deep and was not wedging them at all. And I made sure the edges of the cup cut a grove into the wood. Which helps to hold the pieces together. That combined with the strapping take held just fine.
      You could also glue the ends for just a short distance.
      Some people also use a brown paper glued between the pieces.
      Only do what you are comfortable with.
      Take care,
      Gary

  • @michaelreinhardt4010
    @michaelreinhardt4010 2 ปีที่แล้ว +1

    Gary I been wondering about sanding sealer. My question is What is it for

    • @ThePapa1947
      @ThePapa1947  2 ปีที่แล้ว

      Hi Michael I have always used sanding sealer to raise the grain which allows better sanding. It does seal it as well which allows your finish to lay on nicely without soaking in a lot. Hope that helps,
      Gary

    • @michaelreinhardt4010
      @michaelreinhardt4010 2 ปีที่แล้ว

      @@ThePapa1947 that is very informative Gary thanks for the information.

  • @tomasarguinzoni9022
    @tomasarguinzoni9022 4 ปีที่แล้ว +1

    Great job my friend,merry Christmas for you and your family 🥂🤝

    • @ThePapa1947
      @ThePapa1947  4 ปีที่แล้ว

      Thank you Tomas and Merry Christmas to you and yours as well🎄✨

  • @keg1dog
    @keg1dog 3 ปีที่แล้ว +1

    What do you use for sanding sealer and friction polish? Oh by the way nice piece will have to give it a spin!;)

    • @ThePapa1947
      @ThePapa1947  3 ปีที่แล้ว +1

      I use the Zinsser Seal coat for sanding sealer and the friction polish is a commonly used mix of 1 part shellac 1 part boiled linseed oil and 1 part denatured alcohol.
      Thanks for watching and best of luck on yours. I will probably do another one real soon.
      Gary

  • @bartsimps5601
    @bartsimps5601 3 ปีที่แล้ว +1

    Roughly how long are the pieces?

    • @ThePapa1947
      @ThePapa1947  3 ปีที่แล้ว

      A little over 6" long

  • @HeatherWrightArt
    @HeatherWrightArt 2 ปีที่แล้ว +1

    Absolutely lovely :-) If I wanted to hang this outside, what kind of finish would I put on it? Any chance I could put an environmentally friendly finish on it?

    • @ThePapa1947
      @ThePapa1947  2 ปีที่แล้ว +1

      Thank you Heather. So I would not hang this outside because of the pieces being glued together and it is not all the wide of a joint. I am afraid not matter what finish I had on it the glue would give out.
      But for out side a good poly should be fine. Once dry it is should be fine for the environment.
      Thanks for watching,
      Gary

    • @HeatherWrightArt
      @HeatherWrightArt 2 ปีที่แล้ว

      @@ThePapa1947 I appreciate the answer! I didn't even think about the glue joint, good thoughts, thank you so much🙏🤗

  • @suebob616
    @suebob616 3 ปีที่แล้ว

    Why do you sand in reverse?

    • @ThePapa1947
      @ThePapa1947  3 ปีที่แล้ว

      A few reasons. One it directs the dust away and the other I do not like sanding under the turning between the work and the lathe bed. Thanks for watching and commenting Susan,
      Gary

  • @hydrogreen1111
    @hydrogreen1111 หลายเดือนก่อน +1

    Subscribed. Beautiful. Who would have eve thought of something like that?

    • @ThePapa1947
      @ThePapa1947  หลายเดือนก่อน +1

      Thank you very much I appreciate you watching and commenting.
      Gary

  • @kevgermany
    @kevgermany 3 ปีที่แล้ว +1

    Just came across this. Lovely lamp.
    But the fake candle inside looks terrible. Suggestion. For future lamps turn a recess in the bottom to conceal the lamp. It would still provide the illumination, but not at the cost of aesthetics.

    • @ThePapa1947
      @ThePapa1947  3 ปีที่แล้ว

      Thank you and the fake candle was just an after thought. It has been hanging now for almost 2 years without the candle in it.
      Thanks for watching

  • @PhilAndersonShadyAcresWoodshop
    @PhilAndersonShadyAcresWoodshop 4 ปีที่แล้ว +6

    Really nice turning, Gary! I especially like the design! Very sharp and eye catching! I've never tried one of these but must admit, its very tempting and you make it look easy. Great job!
    Phil

    • @ThePapa1947
      @ThePapa1947  4 ปีที่แล้ว +2

      Thank you Phil I really like your comment about being eye catching.
      I think you should try one...lets see... how do we turn it and leave a natural edge with some bark inclusions? lol
      Thanks for watching buddy.
      Gary

    • @WoodenItBeNice
      @WoodenItBeNice 4 ปีที่แล้ว +1

      You both make everything look do easy. Huw

  • @matthewb8229
    @matthewb8229 3 ปีที่แล้ว +2

    Something I thought of, and maybe it's already been mentioned, but you could drill a center hole down the length of the top portion, and wire a single LED to connect to the tree lights. It would light up the inside, and you couldn't see the LED.

    • @ThePapa1947
      @ThePapa1947  3 ปีที่แล้ว +1

      Great idea! I have put one of the lights in from a back window but it is hard to get it in the right spot. Maybe I will make another one of these just a built in LED. This one is always hung up all year long.
      Thanks for the idea Matthew.
      Take care,
      Gary

  • @fryeguy9939
    @fryeguy9939 9 หลายเดือนก่อน +1

    Can I ask what kind of tape that you used in the beginning to hold those four pieces together ??? It must be some sturdy tape !!

    • @ThePapa1947
      @ThePapa1947  9 หลายเดือนก่อน

      Sure thing. I used the fibered packing tape. It is very strong.
      Thanks for watching and asking,
      Gary

  • @bradbyers7505
    @bradbyers7505 9 หลายเดือนก่อน +2

    Very well done, Sir. I saved this video for future reference. I wish others would adopt your no-nonsense style of narration and instruction.

    • @ThePapa1947
      @ThePapa1947  9 หลายเดือนก่อน

      Thank you very much Brad. I appreciate your comments and I just try and be me when making these videos.
      Thanks again,
      Gary

  • @mdaley3102
    @mdaley3102 10 หลายเดือนก่อน +1

    Very nice. How did you apply the final finish and what did you use.

    • @ThePapa1947
      @ThePapa1947  10 หลายเดือนก่อน

      Thank you Michael. Sorry I must have left that part out. I wiped on sanding sealer and then I sprayed lacquer on it.
      Thanks for watching,
      Gary

  • @M31292
    @M31292 4 ปีที่แล้ว +7

    What a fine job! And a great idea! I like the inclusion of the "candle" in the end. It really suits the piece!

    • @ThePapa1947
      @ThePapa1947  4 ปีที่แล้ว +2

      Thank you Michael I am happy you like it. I am really happy that candle fit inside. But it also looks good with a Christmas light shining through it while on the tree.
      Thank for your comments.
      Gary

  • @goose1127
    @goose1127 2 ปีที่แล้ว +1

    Loved the video the only thing missing is (and I see it on all videos) no one ever talks about the speeds used.

    • @ThePapa1947
      @ThePapa1947  2 ปีที่แล้ว

      Thank you and if you watch more of my videos you will see I talk about speed and tools used.
      That is one thing I get a lot of comments on. This is an older video and I may not have done it as much back then.
      Thanks for watching,
      Gary

  • @bradmcnamar5679
    @bradmcnamar5679 3 ปีที่แล้ว +1

    Quick question. I am very much an amateur woodworker and am trying to do some inside out Christmas ornaments. I have some good hard wood, but wanted to practice on 2x4s first in order to get some practice. I just tried it and the head stock created a huge hole and in no time and the entire piece came loose. I put it together with double sided tape and then taped the ends with duct tape. This same thing happened twice. Am I doing something wrong or are 2x4s just not good enough wood to practice on? Any advice?

    • @ThePapa1947
      @ThePapa1947  3 ปีที่แล้ว

      What I would suggest is for the first inch of each end of the board glue the joint. Use some brown paper between and it will pop right apart. Use the tape the ends. I am working on one right now and I did use the brown paper. It is a added safety measure.
      Depending on the diameter of the tip on your live center it could force the joint apart. So be sure to give it a good start by either drilling a small hole or shape it with a punch. The 2.X4 should work fine.
      Let me know if you have any other questions,
      Gary

    • @bradmcnamar5679
      @bradmcnamar5679 3 ปีที่แล้ว

      @@ThePapa1947 Thanks! I will try that and see how it works.

  • @EpoxyWood
    @EpoxyWood 4 ปีที่แล้ว +3

    Oh yes, I am so happy I came across your channel. Beautiful Christmas ornament, so elegant. A big thumbs up from a new subscriber.

    • @ThePapa1947
      @ThePapa1947  4 ปีที่แล้ว +1

      Thank you very much I appreciate the comment and thanks for watching.
      And thanks for subscribing 😊👌
      Gary

  • @AliIskenderov
    @AliIskenderov 4 ปีที่แล้ว +4

    The stunning geometric feedback result you got from this solution, Gary. Awesome work and candle light gives warmth from your work. Thanks for sharing this experience !!!!

    • @ThePapa1947
      @ThePapa1947  4 ปีที่แล้ว +3

      Thank you for your elegant words my friend. It is 4:45 in the morning here and your words and a cup of coffee has warmed my heart.
      Take care,
      Gary

  • @diydarkmatter
    @diydarkmatter 4 ปีที่แล้ว +3

    wow gary turned out great my friend . i really like inside out turning its very cool . merry christmas my friend .

    • @ThePapa1947
      @ThePapa1947  4 ปีที่แล้ว +1

      Thank dark and Merry Christmas to you and yours.
      Gary

  • @dennisrood1469
    @dennisrood1469 3 ปีที่แล้ว +1

    I love the results and was wondering if one can trees and other Christmas figures

    • @ThePapa1947
      @ThePapa1947  3 ปีที่แล้ว +1

      Thank you Dennis and for sure you can make small trees to put inside.
      I myself think they look better the way they are. But you never know I might turn one with something inside someday.
      Thanks for watching,
      Gary

  • @dougbrust3846
    @dougbrust3846 9 หลายเดือนก่อน +2

    Beautiful

    • @ThePapa1947
      @ThePapa1947  9 หลายเดือนก่อน

      Thank you Doug and thanks for watching,
      Gary

  • @richardpatterson4312
    @richardpatterson4312 2 ปีที่แล้ว +2

    That is fantastic sir. Very well done.
    I love the wood turned gifts especially when there is no kit involved, like with a pizza cutter.
    It's a timeless gift, I mean you can't prove when you made it.
    I've got to get going if I'm going to get a full set for every family members household.

    • @ThePapa1947
      @ThePapa1947  2 ปีที่แล้ว

      Thank you Richard! Last year I made one of these for each of our kids. I have made others for friends as well. They do make nice gifts.
      Thanks for watching,
      Gary

  • @evelynhouston236
    @evelynhouston236 3 ปีที่แล้ว +1

    I liked it but forgot what you were making??

    • @ThePapa1947
      @ThePapa1947  3 ปีที่แล้ว

      Thanks Evelyn. It is a Christmas ornament.
      Take care,
      Gary

  • @RHumphrey
    @RHumphrey 4 ปีที่แล้ว +15

    Very nice, Gary! It's very beautiful

    • @ThePapa1947
      @ThePapa1947  4 ปีที่แล้ว

      Thank you very much Rod I appreciate it.
      Take care brother,
      Gary

    • @robmcgrath5202
      @robmcgrath5202 2 ปีที่แล้ว

      Rod, how coincidental that when commenting on this yours was the first name I saw. Great to see that even you watch others for inspiration, camaraderie, and support.

    • @coliren5
      @coliren5 2 ปีที่แล้ว +1

      @@ThePapa1947 o

    • @ThePapa1947
      @ThePapa1947  2 ปีที่แล้ว

      @@coliren5 thank you!

  • @gordroberts53
    @gordroberts53 3 ปีที่แล้ว +2

    Very nice piece, really like the LED candle, what a great idea! Inside-out ornaments are my favourite to make, I generally turn a small tree with a tiny tenon and glue it inside a small mortice I create with a dremel tool just before I glue the halves together. Like and a sub for you today. Thanks for sharing. Cheers from BC!

    • @ThePapa1947
      @ThePapa1947  3 ปีที่แล้ว +1

      Thank you so much Gord. I did think of putting a small turned tree in it and may someday. But not on this type of shape.

  • @AndysCornishCreations
    @AndysCornishCreations 4 ปีที่แล้ว +1

    Hi Gary...beautiful inside out ornament...great idea with the tea light....like some of the others I have never had a go at one of these...on my to do list!! ..great video...All the best.....Andy

    • @ThePapa1947
      @ThePapa1947  4 ปีที่แล้ว +1

      Thank you very much Andy, for sure it is worth giving it a go.
      I have done about 3 of these and will do more.
      I am working on something right now I have not tried exactly like this one.
      Take care and thanks.
      Gary

  • @rogerdalescott
    @rogerdalescott 4 ปีที่แล้ว +2

    Excellent job Gary! I learned several things from your video. The rubber band Idea was clever. I'm going to put this one on my "To Do List". Thanks and I hope you and yours have a merry Christmas.

    • @ThePapa1947
      @ThePapa1947  4 ปีที่แล้ว

      Thank you very much Roger I really appreciate your comments. I wished I would have filmed the second one I made for a friend. The rubber band sort of popped it back out of the way.
      A very Merry Christmas to you and your family my friend!
      Gary

  • @davidskillestad7093
    @davidskillestad7093 2 ปีที่แล้ว +1

    Great video, great job...
    Pops1947 here.. 👍

    • @ThePapa1947
      @ThePapa1947  2 ปีที่แล้ว

      Thank you Pops 1947 and thanks for watching,
      Gary

  • @tuffymartinez
    @tuffymartinez 4 ปีที่แล้ว +1

    Thank You Gary...Nice turning...Beautiful job...Stay WARM & happy holidays....TM

    • @ThePapa1947
      @ThePapa1947  4 ปีที่แล้ว

      Thank you very much tuffy I am happy you like it.
      I will try and stay warm but its back out to the shop to work on a few projects...
      Merry Christmas my friend,
      Gary

  • @beardedwoodpecker
    @beardedwoodpecker 2 ปีที่แล้ว +1

    Nice video !!!! And great idea marking the tool holder with tape,instead of marking the wood
    All the best Mary Christmas
    Yiannis (Athens Greece)

    • @ThePapa1947
      @ThePapa1947  2 ปีที่แล้ว

      Thank you very much Yiannis and a Merry Christmas to you as well.
      Gary

  • @stevescott8655
    @stevescott8655 10 หลายเดือนก่อน +2

    Wow!

    • @ThePapa1947
      @ThePapa1947  10 หลายเดือนก่อน

      Thank you Steve!

  • @hendrikriedstra7857
    @hendrikriedstra7857 4 ปีที่แล้ว +2

    That was a great video. I really like the shape, i can see this one hanging on my Christmas tree. Thanks for sharing and it's nice not having to hear background music. Thumbs UP.

    • @ThePapa1947
      @ThePapa1947  4 ปีที่แล้ว

      Thank you very much Hendrik I appreciate you comments.
      When I first started making videos I did use a little music. But learning more on how to produce and edit videos I have stopped the music.
      Thank you again for watching and my channel will remain a music free zone.
      Gary

  • @jlyssagraywolf7503
    @jlyssagraywolf7503 ปีที่แล้ว +2

    A very lovely and unique 0rnmiment💙💙💙💙💙💙💙

    • @ThePapa1947
      @ThePapa1947  ปีที่แล้ว

      Thank you very much. Happy you liked it.
      Gary

  • @woodturningwithDave
    @woodturningwithDave 4 ปีที่แล้ว +2

    A lovely project Gary merry Christmas to you and your family

    • @ThePapa1947
      @ThePapa1947  4 ปีที่แล้ว

      Thank you Dave and a Merry Christmas to you and yours.
      Gary

  • @masjabrikdiy8422
    @masjabrikdiy8422 2 ปีที่แล้ว +1

    Bagus sekali selamat malam.teman#masjabrikdiy

    • @ThePapa1947
      @ThePapa1947  2 ปีที่แล้ว

      Thank you very much!
      Take care,
      Gary

  • @stevenhahn2115
    @stevenhahn2115 ปีที่แล้ว +1

    Well, I was planning to enjoy quality time with my lathe today and was thinking of a bowl. Plan B just formulated, and it will be fun. My Mom is getting an ornament for Xmas this year. You have received a new subscriber!

    • @ThePapa1947
      @ThePapa1947  ปีที่แล้ว

      Thank you very much Steven. I am sure she will love the ornament. And thanks for the sub!
      Take care,
      Gary

  • @yvonnehughes3036
    @yvonnehughes3036 2 ปีที่แล้ว +1

    LOVE it! I think I wuld like to try to "capture" a ball inside. Maybe stuff te inside with paper towel around the ball so it's not bouncing around. Such a beautiful ornament just as it is though!!!

    • @ThePapa1947
      @ThePapa1947  2 ปีที่แล้ว

      Thank you Yvonne. I have thought about having something inside. Perhaps I will do that with another shape.
      Thanks for watching.
      Gary

  • @lincolnpointman
    @lincolnpointman 5 หลายเดือนก่อน +1

    I started back in March on my 12 × 20 lathe and in addicted. I will surely try this idea with some spalted cherry I have hanging around. Nice work and thanks for sharing!

    • @ThePapa1947
      @ThePapa1947  5 หลายเดือนก่อน

      Thank you Chris. It is not all that hard to do.
      My first turning was in 1961.
      Have loved it since.
      As a wood patternmaker I did lots of turning.
      Have fun,
      Gary

  • @fryeguy9939
    @fryeguy9939 9 หลายเดือนก่อน +1

    THAT WAS AWESOME. ... Simple but beautiful.... Thanks so much for the video...
    The Frye Guy...

    • @ThePapa1947
      @ThePapa1947  9 หลายเดือนก่อน

      Thank you very much Frye Guy!

  • @thomasrichmond7989
    @thomasrichmond7989 6 หลายเดือนก่อน +1

    Does it matter how the center grains run?

    • @ThePapa1947
      @ThePapa1947  6 หลายเดือนก่อน

      The way it is glued the grain is centered.

  • @oneshotme
    @oneshotme 4 ปีที่แล้ว +1

    Very nice Gary!!
    Enjoyed your video and gave it a Thumbs Up

    • @ThePapa1947
      @ThePapa1947  4 ปีที่แล้ว

      Thank you Russel 👍

  • @EngineerMikeF
    @EngineerMikeF 4 ปีที่แล้ว +1

    What are you using for sanding sealer?

  • @randyblackburn9765
    @randyblackburn9765 4 ปีที่แล้ว +2

    Mighty nice ornament - was about to say that you could put something inside and all at once the candle pops up 👍

    • @ThePapa1947
      @ThePapa1947  4 ปีที่แล้ว

      Thank you Randy, I think the candle goes nicely with this one.
      Thanks for watching and commenting.
      Gary

  • @keithcoleman1729
    @keithcoleman1729 2 ปีที่แล้ว +2

    Thanks, great work!

    • @ThePapa1947
      @ThePapa1947  2 ปีที่แล้ว

      Thank you Keith and thanks for watching,
      Gary

  • @JABoucher09
    @JABoucher09 3 ปีที่แล้ว +1

    No Etsy bummer you should sell your stuff

    • @ThePapa1947
      @ThePapa1947  3 ปีที่แล้ว +1

      Yes at some point I will run out of room and probably need to do something. Problem is that it becomes a job and another thing to deal with on taxes and hard to price something like this.

  • @marycatherinelebouef-op4hf
    @marycatherinelebouef-op4hf ปีที่แล้ว +1

    This is beautiful! I love it so much… everything about it is so amazing! The wood is classy and the finish just makes it look like a million dollars. I would love to get something like that, so if you have a web-store please let me know. I would put people figures with some snow, almost like you are looking out your kitchen window at the kids. Bravo! Awesome!

    • @ThePapa1947
      @ThePapa1947  ปีที่แล้ว

      Thank you very much Mary. I do not have a web site for selling what I make. I do it for the pure enjoyment I get out of doing this. I suppose at some point in time I will need to sell them just to get room to make more.
      Thank you for your interest,
      Gary

  • @AllenOxendine
    @AllenOxendine 3 ปีที่แล้ว +1

    Beautiful Piece, thanks for sharing. I’m a beginner turner so I have a lot more practicing to do. Full View and Like

    • @ThePapa1947
      @ThePapa1947  3 ปีที่แล้ว

      Thank you Allen happy you like it. I hope you subscribed as well as I have more of the same coming up.
      Take care,
      Gary

  • @BobBlarneystone
    @BobBlarneystone 2 ปีที่แล้ว +1

    if a small channel groove was cut just before gluing the halves, then a thread could be passed through it so as to suspend a second ornament, e.g. a tiny bell or glass prism bead, inside the larger.

    • @ThePapa1947
      @ThePapa1947  2 ปีที่แล้ว

      That is a very good idea! Thanks for watching and the idea.
      Take care,
      Gary

  • @TheWoodWhirler
    @TheWoodWhirler 4 ปีที่แล้ว +1

    I've always glued the raw blocks together with paper inbetween each block and I've had them come apart. Caught me off guard with just tape, brave man. Great as usual, Larry

    • @ThePapa1947
      @ThePapa1947  4 ปีที่แล้ว

      I have glued the ends before when turning between centers.. This one was held really good in the 4 jaw chuck and I was using a cup center.
      But you are right it sure could be a not wanted surprise.
      Thanks for watching Larry,
      Gary

  • @scottkrosser9233
    @scottkrosser9233 2 หลายเดือนก่อน +1

    Wow! What a great bowl. You are inspiring me to add a lathe to my shop. Thanks

    • @ThePapa1947
      @ThePapa1947  2 หลายเดือนก่อน

      Thank you Scott. Most all my other machines come in handy for what I do on my lathe. Although I have built a lot more things than bowls.
      Thanks for watching,
      Gary

  • @austinpennington1842
    @austinpennington1842 ปีที่แล้ว +1

    What type of jaw chuck did you use on this piece?

  • @William_Kenny
    @William_Kenny 9 หลายเดือนก่อน +1

    Nicely done Gary thanks for sharing your wonderful ideas 😊👍

    • @ThePapa1947
      @ThePapa1947  9 หลายเดือนก่อน

      Thank you my friend and thanks for watching,
      Gary

  • @grumpywiseguy5992
    @grumpywiseguy5992 3 ปีที่แล้ว +1

    Wonderful work. You are a true craftsman. How many years had you been turning when you made this video? What Sanding Sealer did you use? And finally, a little more detail on the jam chuck would have been appreciated. Maybe you have that explained in another video. This video is still relevant today, and is one of the best on YTube for Inside Out Ornaments. Thanks

    • @ThePapa1947
      @ThePapa1947  3 ปีที่แล้ว

      Thank you Grumpy and the first turning I ever did was a nut bowl in about 1960 or 61. I went on to become a wood pattern maker so I guess I would say I have turned my whole adult life.
      The jam chuck was just a hollowed out piece of wood that screwed onto my live center. Nothing very fancy at all.
      If you have any other questions feel free to ask. Plus look up my video on making your first inside out turning. It is a good way to get started. th-cam.com/video/fmvAoT-9Njw/w-d-xo.html&ab_channel=ThePapa1947
      Take care,
      Gary

  • @michaeldorani695
    @michaeldorani695 2 ปีที่แล้ว +1

    Dear papa you thought me tons of tricks and models and I owe you a lot.thank you very much for your skill that you showed and teach us with generosity. I belive you are one of the best turner in the United States and you remind me mr. Bob stocksdale.wish you a long healthy life.

    • @ThePapa1947
      @ThePapa1947  2 ปีที่แล้ว

      Thank you very much Michael for your very kind words.
      I am happy you enjoy my videos and appreciate you watching and commenting.
      Take care,
      Gary

  • @WoodenItBeNice
    @WoodenItBeNice 4 ปีที่แล้ว +1

    Hi Gary, Another masterclass but this time with spindle gouges and a skew. I tried this a few years ago when I had just started turning. Yes, you guessed it a disaster followed. I will try this again now I have a table saw to be able to cut square and some experience. Fantastic piece. Cheers, huw

    • @ThePapa1947
      @ThePapa1947  4 ปีที่แล้ว

      Thank you Huw I appreciate your comments. I left one with just the inside turned and not glued together just to explain to friends how all this happens.
      The tricky part is figuring out just how deep to cut to get the shape you want.
      I usually draw what I am making other wise it may come out nice but different.
      I don't think you can get a bad design.
      Thanks for watching and take care,
      Gary

  • @mpart_woodlathe-stuff
    @mpart_woodlathe-stuff 4 ปีที่แล้ว +2

    Loving the piece Gary. Thanks for showing us the way 👍😀🙏 -Mike

    • @ThePapa1947
      @ThePapa1947  4 ปีที่แล้ว +1

      Thank you Mike I am happy you liked it and I hope you plan on making one. They are lots of fun.
      Take care,
      Gary

  • @eddiecastelin8341
    @eddiecastelin8341 3 ปีที่แล้ว +1

    very nice, thanks

    • @ThePapa1947
      @ThePapa1947  3 ปีที่แล้ว

      Well thank you very much Capt. Eddie it is an honor to have you watch and comment.
      Take care,
      Gary

  • @jagdishjatav658
    @jagdishjatav658 2 ปีที่แล้ว +1

    Amezing idea and task
    Thanks

    • @ThePapa1947
      @ThePapa1947  2 ปีที่แล้ว

      Thank you very much and thanks for watching.
      Gary

  • @melissabarron1574
    @melissabarron1574 ปีที่แล้ว +2

    I always love your teaching. Thank you

    • @ThePapa1947
      @ThePapa1947  ปีที่แล้ว

      Thanks so much Melissa. Happy you enjoy my videos.
      Thanks for watching,
      Gary

  • @StuffUCanMake
    @StuffUCanMake 4 ปีที่แล้ว +1

    If you thought I was dead, you may be wrong my friend! I am still alive. I am fortunate to catch my Friday Fix on time today. This one is really special! I wish I could also get back to my groove and produce something for Xmas. My wife tells me that at least today we managed to have sustained electricity supply for at least 5 hours and the lights are still on. If the supply holds for the weekend I will produce something. All the best my dear friend!

    • @ThePapa1947
      @ThePapa1947  4 ปีที่แล้ว

      Well you have given me good news that you are hanging in there.
      I am glad you were able to watch today. We will wait for you to get the power back steady and be ready to watch what you create.
      Take care my friend and hang in there.
      Gary

  • @TheTacktishion
    @TheTacktishion 2 ปีที่แล้ว

    why didn't You just us a scraper to do all of it, because you were using that spindle gouge to "scrape" with. It's OK to scrape if you do it properly....!!

    • @ThePapa1947
      @ThePapa1947  2 ปีที่แล้ว

      Not sure how to answer your question. I did the video 2 years ago and would have to watch it again myself.
      You are right it is ok to use the tool which ever way works best at the time.

  • @lyn1991
    @lyn1991 3 ปีที่แล้ว +1

    It’s interesting how you can take an ugly block of wood and turn it into something so beautiful!

    • @ThePapa1947
      @ThePapa1947  3 ปีที่แล้ว

      Thank you Glenda happy you liked it.
      Gary

  • @stephenadams835
    @stephenadams835 2 ปีที่แล้ว +1

    Thanks very much. Great idea, I made a object for my daughter that similarly was made from 4 glued pieces of walnut. Your idea was superior to mine and gave me more ideas. Thanks. Greatly appreciated!

    • @ThePapa1947
      @ThePapa1947  2 ปีที่แล้ว

      Thank you Stephen, happy you enjoyed it. I am sure your daughter loved what you made.
      Thanks for watching,
      Gary

  • @daveurban1018
    @daveurban1018 4 หลายเดือนก่อน +1

    I suspect I'll be asked to make some Christmas ornaments this fall.

    • @ThePapa1947
      @ThePapa1947  4 หลายเดือนก่อน

      Not all that hard to do.
      Have fun Dave!
      Gary

  • @TheMessyStudio
    @TheMessyStudio 4 ปีที่แล้ว +1

    Nice ornament, my friend. I like the organic shape.
    Billy

    • @ThePapa1947
      @ThePapa1947  4 ปีที่แล้ว +1

      Thank you Billy my wife really likes it. A friend saw it and loved it so I made one similar out of oak for her birthday last year.
      Thanks for watching buddy.
      Gary

  • @williamellis8993
    @williamellis8993 4 ปีที่แล้ว +3

    Beautiful, Gary. I really like the tea light idea. You could also turn a small Christmas tree for the inside as an alternative.

    • @ThePapa1947
      @ThePapa1947  4 ปีที่แล้ว +1

      Thank you Bill I am happy you like it. I have thought about the tree on the inside but I like the the inside shape looks and on this one I would not want to interrupt that.
      I gave one just like this one but made of Oak to a good friend of ours. We placed it on her tree with a light behind and I really liked how that looked. It really lit up the inside.
      I do have one planned with something inside that will not be a Christmas ornament though and will do it the future.
      Thanks for watching,
      Gary

  • @annwahlstrom149
    @annwahlstrom149 2 ปีที่แล้ว +1

    This is very lovely, I want one!
    I have to figure out how to make one for myself.
    Well turned.
    🤩❤❤❤👍🎄☃️

    • @ThePapa1947
      @ThePapa1947  2 ปีที่แล้ว

      Thank you Ann! I have a video that shows how you can make one for your first time. It will help a person to understand the process.
      Thanks for watching,
      Gary

  • @gaylegreer9798
    @gaylegreer9798 4 ปีที่แล้ว +1

    My husband tried an "inside-outside" turning a while back; got the idea from his turning club meeting.
    Yours is exquisite!! He'll be trying some cherry for a similar piece. Thanks for the incentive!!

    • @ThePapa1947
      @ThePapa1947  4 ปีที่แล้ว

      Thank you Gayle i am happy you like it.
      Best of luck to your husband when he makes his.
      Gary

  • @royboy6301
    @royboy6301 3 ปีที่แล้ว +1

    Watched this out of interest of how you did the inside wood turning. Very clever ingenious method. Hats of to you.👍👍👍👍👍

    • @ThePapa1947
      @ThePapa1947  3 ปีที่แล้ว +1

      Thank you very much roy boy happy you liked it.
      Gary

  • @maryrandallvaiden7309
    @maryrandallvaiden7309 3 ปีที่แล้ว +3

    This is lovely - and the tea light is the perfect touch!

    • @ThePapa1947
      @ThePapa1947  3 ปีที่แล้ว

      Thank you Mary I was glad the light fit inside. I had them from a different type of turning and they fit right in.
      Thanks for watching,
      Gary

  • @cjgoulet
    @cjgoulet ปีที่แล้ว

    Question: What RPMs are you spinning this and how do you not catch the holes in the center while rounding it? Is that a factor of speed or the angle of your tool? I'd like to try one but I think I'd explode it rounding the center.

    • @ThePapa1947
      @ThePapa1947  ปีที่แล้ว

      I would say I was around 1500 RPM. Speed is a big factor as well as the angle. I have the handle dropped about the same as if it was a solid piece I was turning. Also make light cuts is important as well.
      Thanks for watching,
      Gary

  • @daveharrington7500
    @daveharrington7500 4 ปีที่แล้ว +2

    Great job Gary. Best wishes to you and your family through this holiday season.

    • @ThePapa1947
      @ThePapa1947  4 ปีที่แล้ว

      Thank you Dave and Merry Christmas to you and yours as well.
      Gary