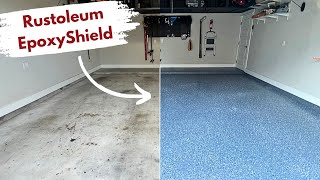
Single Day Epoxy Floor Coating - Stone Coat PRO Flake Flooring System

ฝัง
- เผยแพร่เมื่อ 30 ก.ค. 2024
- Welcome to our latest tutorial from Stone Coat Countertops! In this step-by-step guide, we'll show you how to transform your concrete floors with our new PRO Flake Flooring System in just one day. Perfect for contractors and experienced DIYers, this system ensures a high-end, durable finish with very low VOC's that will leave your clients impressed!
www.stonecoatcountertops.com/...
For PRO questions or project support, schedule a free consultation with Rob! -
calendly.com/rob-stonecoat/st...
___________________________________
Here's a quick overview of the essential products we'll be using. All products are proudly formulated and blended in the USA!
1. Floor Patch PRO:
www.stonecoatcountertops.com/...
Pro-Formulated for Rapid Curing: Ready to grind smooth in just 30 minutes, making it perfect for quickly getting to the next step.
2. Moisture Seal Epoxy PRO Epoxy Primer:
www.stonecoatcountertops.com/...
Moisture Protection: Available in Black, Tan, and Gray, this primer is designed to seal moisture effectively and bond tenaciously to your concrete.
Traditional epoxy flooring requires a multi-step priming process, adding time and complexity to projects. Moisture Seal PRO revolutionizes your workflow with its rapid cure time (ready in 3-5 hours). This innovative primer allows you to tackle single-day installations, doubling your productivity compared to traditional methods.
3. Decorative Floor Flakes:
www.stonecoatcountertops.com/...
Professional Designer Look and Durability:
Our 1/4'' epoxy flakes provide top-of-the-line industrial strength flooring that adds a beautiful touch of color to any room. With five popular custom blends, you'll have optimal flexibility and strength, plus it's incredibly easy to apply.
Superior Protection:
our flake flooring also provides superior protection against spills, stains, dirt, and other damage. Whether it's your garage, basement or even patio outside, Decorative Floor Flakes protect from mold growth and UV rays as well as regular wear and tear so your floors will look great for years to come. Plus with our customizable colors, flakes and blends, you can give any design an individualized touch.
4. Polyaspartic PRO Flooring Top Coat:
www.stonecoatcountertops.com/...
Crystal Clear Finish: Offers extreme durability and UV Resistance, enhancing the look of your epoxy flakes with a Gloss Finish.
Rapid Cure Time: Walk on coated surfaces just 6 hours after application!
In today's fast-paced home renovation environment, time is money. Polyaspartic PRO Flooring Top Coat is a game-changer, boasting the FASTEST curing formula in the industry for professional-grade epoxy floor coatings. Transform your clients’ floors in record time with same-day overcoats, allowing you to complete more jobs and maximize your profits. Say goodbye to waiting days for epoxy to cure-Polyaspartic PRO Flooring Top Coat gets you in, and out, and moving on to the next project quickly and efficiently.
Join us as we demonstrate how to coat concrete with epoxy and flakes, ensuring a professional-grade finish every time. Don't miss out on these incredible products -
click through to www.stonecoatcountertops.com/ to purchase and elevate your flooring projects today!
___________________________________
🏠Join our Community of 90,000+ members!🏠
/ sccinsiders
Follow us on Instagram where we share wonderful projects from around the country!
/ stonecoatcountertop
Watch to see how we transformed this MASSIVE wedding venue with a metallic epoxy floor!
• Transforming Floor Wit...
Want to learn more about Epoxy Flooring? Check this video out.
• How to Epoxy Concrete ...
The perfect video for newbies in the Epoxy World
• Epoxy Resin for Beginn...
___________________________________
About us:
Stone Coat Countertops is an epoxy based TH-cam channel that will show you unique ways to DIY your way to an amazing kitchen, bath, resin art, construction, or design project on a budget. We believe in teaching skills in, woodworking, art, epoxy floors, epoxy countertops, and showing how to get realistic results to make your old laminate, tile countertop, formica, concrete countertop, garage floor, and walls look like renewed works of resin art! Simply put we are always looking for our next project to help all the DIY folks, contractors, designers, artists, and hobbyist, tackle their next makeover. Watch our free how to videos on the skills to make your dreams come to life with epoxy resin! Contact us anytime for free project support, (541) 450-1976 You Got This!
#EpoxyFlooring #ConcreteCoating #ProFlakeSystem #ContractorGuide #StoneCoatCountertops - แนวปฏิบัติและการใช้ชีวิต


![มองหน้ากันไม่ติด (Awkward) - โอ๊ต ปราโมทย์ FEAT. MAIYARAP [Official MV]](http://i.ytimg.com/vi/4b02SY_r6Gw/mqdefault.jpg)

![[LIVE] : ONE ลุมพินี 72 | คู่เอก "ก้องศึก vs โจอาคิม"](http://i.ytimg.com/vi/hT1EOSsRPac/mqdefault.jpg)


I liked this small and short demonstration of how to use and apply the Flake Flooring System. Great demo.
Well......with the drying time can you please breakdown how this is a 1 day job? Even in thos video you guys were there for more then 1 day according to the sun and shadows and the fact you guys were in different clothes.
Great question. due to filming and doing another countertop job at the same time that's why we couldn't do this job in a day, but here's that breakdown:
Grinding: took about 2 1/2 hours by hand. would be less than an hour with a walk-behind grinder
Floor Patch: We got it all applied (2 batches) in less than ten minutes, grindable in 30 minutes. Took about 20 minutes to grind back smooth and then clean dust
Moisture Seal: We got it out and applied in 15 minutes, then flaked the entire in in about 10 minutes. So from the time we mixed, to fully flaked, was just under 30 minutes. This coat cured in 3 hours (5 if it was colder, but it was about 85 that day)
Scrape/Top Coat: as you saw in the video we had to come back the next day, however in a normal situation we could have immediately started scraping once it was dried. the scraping/clean up took about 20 minutes. then we got the top coat fully applied and back rolled in 25 minutes. the top coat was walkable in 6 hours (cured overnight) and the next day it was perfectly fine to walk on
So including the cure times of the floor patch and moisture seal, it was just around 8 hours of work. Add on the 6 or so hours of cure time for the top coat at the end, so it would be walkable around that 15 hour mark. So for the flooring guys out there with crews, if they start early and use the big grinder they could knock these out in a day. given that it's not a huge warehouse floor or something similar
If this was a garage, it would be best to let it rest for 3 days before driving on it but after that it's good to go!
Hope that answered your question!
Thanks
It looks so much better! 👍 When wet, how slippery is it? It seems like you've mostly used it on outdoor or garage cement. How is it on a 2nd story kitchen with a wooden floor? Are there ventilation issues?
Great questions!
This system is compatible over 4x8 plywood subflooring. Ensure the subflooring is sound and not too bowed. Fill the seams and any damage. Sand rather than grind. The Polyaspartic top coat is not very slippy at all when wet with the non skid. The floor utc is not slippy either.
@@mitchquist Thank you!! 👍
Great teaching video
Is your moister seal an epoxy? Or is it a urethane, poly, acrylic, etc?
Mitch, are you still going to do a shower floor install with a window you had mentioned a while back? …pf
Mitch made a shower last month with a window in it for the Renovation Hunters TV show, but we can't show it yet because the network has to air it first unfortunately. and the shower pan he mentioned a while back got pushed due to him traveling to do so many other jobs that took priority. sorry about that! we're trying out best to tackle all these projects
Coming soon!!
@@StoneCoatCountertops thanks for the quick reply…
Aren't the lines in the concrete there for expansion? I'm not a concrete pro, just always thought that's why they are there. It seems like filling them would cause a problem on outdoor concrete.
watching all your videos, would a shower pan floor, over cement be installed similar to this video please ??
I built a 750 square foot shop that I do woodworking in. How well do you think this would hold up to shop tools rolling around on it. Also, I have the large expansion joints in there and what would I do about those
Can this be used as a countertop over plywood or MDF?
They have different products for doing countertops. Check out the other videos.
will it handle winter and snow in NJ?
We did this to our Garage floor. It is dangerous when its wet or damp, or from humidity condensation. It looks good, but slippery when wet.
You used the Stone Coat product and topped with the anti slip product?
did you use our stuff with the non-skid?
😊
Already a solid flat base.....never get a job like that ever.....
what happened to the other stone coat dude the OG i like his big little bro but we need that OG back
I like both guys but personally I think Mitch makes the videos a lot more fun.
More then 2 days not correct