First....almost! Seriously though, Southern you are one of the best blender creators out there. So helpful, concise, and wise. Always love trying out your techniques.
Thank you for this video, it is great and everything is well explained. Reminds me of Blender Guru a lot the way to explain things and it's one of the reasons I treasure your channel. Relearning things like this is valuable and I'm a older blender user who likes learned new tricks.
I needed to understand these options in more detail and you provided. This video led me to buy the Crafty Asset Pack. Definitely could use some guidance with some good base materials. Also, your esthetic is so "Little Big Planet" that it makes me squee. :D Thank you for being you.
Specular is an "artistic control". Think of it as such, don't be a slave to theoretical IOR values. Adjust specular to match what you see or what you'd expect based on knowledge about the material. I.e. looking at rubber in a microscope will reveal lots of tiny "holes" that "sucks out energy", including specular energy. That will in effect lower the overall specularity of the surface even if the theoretical IOR dictates it should be higher. Also you can use it to create fake "shadow gaps", i.e. floorboards not perfectly aligned will not have a gap in there that is fully specular - light will get "lost" in that crack. Don't use grey for metallic. Gradients for AA purposes are ok, but normally stick with fully white (metallic) or fully black (dielectric). Be careful using normal maps indiscriminately on "any" object with any UV layout. Sure, you'll get some disturbed normals, but they may not always point in the direction that is intended. Unless you're baking out normals from high density to lower density mesh use, just be wary of how normal maps work and how they're sensitive to UV layout/directions. I prefer using bump maps, despite being computationally more expensive, require high bit depth and resolution in some cases, and are a bit more finicky to setup to get the expected angles. Neither bump nor normal maps will disturb shadows or create shadows - for that you *need* displacement which can be very expensive to memory and have issues when used as "sourced assets" (at least for now, hopefully this will get fixed). To set the correct bump distance, use microdisplacement first to get the correct result visually, then use the same displacement height as bump distance. Use displacement only, not displacement and bump, when using displacement. Transmission and IOR with metals is nonsensical. And generally you might want to consider using anisotropic shading for most metal parts, and they tend to have undergone machining. That leaves toolmarks which creates those types of reflections. Setting up the UVs for UV driven tangents can be a mess though. If impossible (often), just go for a satin or more polished look and call it a day, ignoring the loss of realism - chances are nobody will notice anyway. Also you may want to use the anisotropic shader for this instead of principled, and obviously there is a lot more to this than radial tangents for creating kitchenware pots. Preview and adjust in a real scene with real lights, not using infinitely far away hdr reflections. Might even have to mix up ggx and beckman based aniso shaders. Last I checked, subsurface scattering don't allow light to pass through. The object itself will be lit up, but it won't affect it's surroundings. For that, consider using thin geometry with diffuse/translucency mix. I never use sss for curtains i.e. For closeups I might do sss curtains for camera only and the translucency trick for the rest, but I haven't needed that yet.
Doesn't blender anisotropic input also need to have the object properly unwrapped. In some engine the uv unwrapping also infuences tje direction. Really wished principled shader got clear coat thickness. Really miss that. Same for a real thing glass and an interference shader
you said you'd show how to make thickness maps at the beginning of the video - as if it was the beginner part of beginner to pro - and then didn't explain it at all! Did you just colour those parts darker then use that coloured model and call it a thickness map? Or is a thickness map a specific thing? Really appreciate creators' videos, but it's gotta be so clear for people who are learning to not just completely waste time!
He shows how he uses Ambient Occlusion node set to "Inside" and "Only Local" and an Invert node to create the thickness information, starting around 5:00, did you watch the whole video?
I have been looking for some of these "artificial de-lighting" softwares/apps that you mentioned for a while now. I cant seem to find any. Suggestions?
Adobe Substance 3d Sampler has a lighting correction function that works pretty well. Aside from that, just did a quick search and Agisoft also has something that looks like it could work, though I think from the looks of it, it might only correct materials that are attached to models? Not 100% sure.
@@ImAnthonyBrooks Thank you! I'll check out Substance's tool. And, yes - I saw that Agisoft has de-lighting software, but it seems only as part of their/a photogrammetry pipeline... which I assume you would have to have the model generated from images/point clouds for it to actually determine what are actual shadows. (I dont know for sure though)


The first 1,000 people to use the link or my code southernshotty will get a 1 month free trial of Skillshare: skl.sh/southernshotty04221
Your videos are an integral part of my Blender learning. Thanks!
Happy to help!
First....almost! Seriously though, Southern you are one of the best blender creators out there. So helpful, concise, and wise. Always love trying out your techniques.
Thank you for the nice comment
Thank you for this video, it is great and everything is well explained. Reminds me of Blender Guru a lot the way to explain things and it's one of the reasons I treasure your channel. Relearning things like this is valuable and I'm a older blender user who likes learned new tricks.
Thank you for the nice comment
do i have a PC or the ability to have access to Blender? no
will i continue to watch Blender tutorials just for the heck of it? *yes*
brilliant work 👍
bought the pack. this is freakin amazing!!!!!!!!!!!
So glad you're happy with it! Tag me in your creations so I can't see what you make.
what is the weight of the whole pack??
please answer
Very useful video and well paced.
Thank you!
Awesome!! Thanks 😊 always interesting and useful
I needed to understand these options in more detail and you provided. This video led me to buy the Crafty Asset Pack. Definitely could use some guidance with some good base materials.
Also, your esthetic is so "Little Big Planet" that it makes me squee. :D Thank you for being you.
This is amazing, thank you!
Glad you like it!
Blender: Sheen is for to make these specific fabrics to look real.
SouthernShotty: I am the captain now.
Cool 3D Animations
Excellent reference!
great tutorial, thank you 🙏🏻
Hadn't watch but probably more useful than my class
Most useful...thanks!
Excellent
Specular is an "artistic control". Think of it as such, don't be a slave to theoretical IOR values. Adjust specular to match what you see or what you'd expect based on knowledge about the material. I.e. looking at rubber in a microscope will reveal lots of tiny "holes" that "sucks out energy", including specular energy. That will in effect lower the overall specularity of the surface even if the theoretical IOR dictates it should be higher. Also you can use it to create fake "shadow gaps", i.e. floorboards not perfectly aligned will not have a gap in there that is fully specular - light will get "lost" in that crack.
Don't use grey for metallic. Gradients for AA purposes are ok, but normally stick with fully white (metallic) or fully black (dielectric).
Be careful using normal maps indiscriminately on "any" object with any UV layout. Sure, you'll get some disturbed normals, but they may not always point in the direction that is intended. Unless you're baking out normals from high density to lower density mesh use, just be wary of how normal maps work and how they're sensitive to UV layout/directions. I prefer using bump maps, despite being computationally more expensive, require high bit depth and resolution in some cases, and are a bit more finicky to setup to get the expected angles. Neither bump nor normal maps will disturb shadows or create shadows - for that you *need* displacement which can be very expensive to memory and have issues when used as "sourced assets" (at least for now, hopefully this will get fixed). To set the correct bump distance, use microdisplacement first to get the correct result visually, then use the same displacement height as bump distance. Use displacement only, not displacement and bump, when using displacement.
Transmission and IOR with metals is nonsensical. And generally you might want to consider using anisotropic shading for most metal parts, and they tend to have undergone machining. That leaves toolmarks which creates those types of reflections. Setting up the UVs for UV driven tangents can be a mess though. If impossible (often), just go for a satin or more polished look and call it a day, ignoring the loss of realism - chances are nobody will notice anyway. Also you may want to use the anisotropic shader for this instead of principled, and obviously there is a lot more to this than radial tangents for creating kitchenware pots. Preview and adjust in a real scene with real lights, not using infinitely far away hdr reflections. Might even have to mix up ggx and beckman based aniso shaders.
Last I checked, subsurface scattering don't allow light to pass through. The object itself will be lit up, but it won't affect it's surroundings. For that, consider using thin geometry with diffuse/translucency mix. I never use sss for curtains i.e. For closeups I might do sss curtains for camera only and the translucency trick for the rest, but I haven't needed that yet.
you are th beast bro
The sheen tent
Hello, I'm new to Blender. Does Blender have a free Material/Shader library of cloth, metals, clay and plastics for users?
Doesn't blender anisotropic input also need to have the object properly unwrapped. In some engine the uv unwrapping also infuences tje direction.
Really wished principled shader got clear coat thickness. Really miss that. Same for a real thing glass and an interference shader
How do i add the material library like you have?
how can i download the free sample pack ?
I can only fined the $35 one.
when i go into the shaders tab the principled bsdf doesn't look like that. how can i fix this?
what is the weight of the whole pack
???
great
excellent :O)
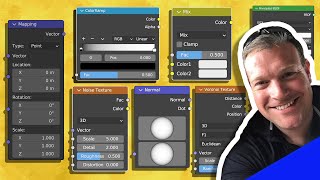
you said you'd show how to make thickness maps at the beginning of the video - as if it was the beginner part of beginner to pro - and then didn't explain it at all! Did you just colour those parts darker then use that coloured model and call it a thickness map? Or is a thickness map a specific thing? Really appreciate creators' videos, but it's gotta be so clear for people who are learning to not just completely waste time!
He shows how he uses Ambient Occlusion node set to "Inside" and "Only Local" and an Invert node to create the thickness information, starting around 5:00, did you watch the whole video?
I was today years old when I realized it was shotty and not scotty
His background looks like my normal map.
I have been looking for some of these "artificial de-lighting" softwares/apps that you mentioned for a while now. I cant seem to find any. Suggestions?
Adobe Substance 3d Sampler has a lighting correction function that works pretty well. Aside from that, just did a quick search and Agisoft also has something that looks like it could work, though I think from the looks of it, it might only correct materials that are attached to models? Not 100% sure.
@@ImAnthonyBrooks Thank you! I'll check out Substance's tool. And, yes - I saw that Agisoft has de-lighting software, but it seems only as part of their/a photogrammetry pipeline... which I assume you would have to have the model generated from images/point clouds for it to actually determine what are actual shadows. (I dont know for sure though)
what is the weight of the whole pack?
how can you get all those materials in Blender ? O_O
Does this include your clay shader?
I think I'm missing some basic knowledge on blender, because I started watching with beginner materials in mind and can't follow this one.
at th-cam.com/video/esb3L7qp5io/w-d-xo.html you can click and hold on the x scale and drag down to the z scale and change them all at the same time
How do I install the material after downloading it?
Append it from the file, option is in the menu
OH MY GOD ITS JUST BLA BLA BLA, HOW DO YOU GET TO ANY OF THAT STUFF. I CANT FIND AND HAVE BEEN LOOKING FOR AN HOUR.
Thats just painful.
Ouch 35 for subpar materials and simplistic models. Ouch... southershitty.... tisk tisk..
Wow! Now my Pack is useless :(
nah your pack is fire bro I bought yours and this one today both awesome
5:50 my whole model stays black :(