2018+ Harley Davidson Softail Rear Wheel removal and install

ฝัง
- เผยแพร่เมื่อ 27 พ.ค. 2023
- I had to change the rear tire on my Harley Davidson Sotail Sport Glide. These are the Steps to remove and reinstall the rear wheel from the shop manual;
1. Remove main fuse. See POWER DISCONNECT
(Page 7-8).
2. Remove saddlebags, if equipped. See SADDLEBAGS
(Page 3-151).
3. Measure wheel alignment. See WHEEL ALIGNMENT
(Page 3-34 ).
4. Remove belt guards, if necessary. See BELT GUARDS
(Page 3-89).
5. FXDRS: Remove rear lighting bracket, if necessary. See
REAR LIGHTING BRACKET (Page 3-129).
6. Remove muffler, if necessary. See MUFFLERS
(Page 6-35).
7. Raise rear wheel. See Secure the Motorcycle for Service
(Page 2-3).
8. Check wheel bearing end play. See SEALED WHEEL
BEARINGS (Page 3-26).
NOTE
Do not operate rear brake pedal with the rear brake caliper
removed. Without the rotor, brake pressure forces the pistons
out of the piston bores. Seating pistons requires caliper
disassembly.
9. Remove rear brake caliper. See REAR BRAKE CALIPER
(Page 3-47)
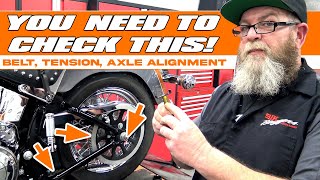
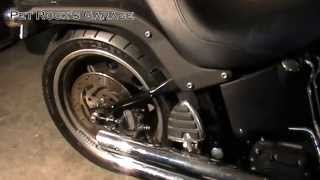
1. See Figure 3-7. Remove rear wheel.
a. Remove E-clip (13).
b. Loosen axle nut (12) using axle nut torque adapter.
Special Tool: AXLE NUT TORQUE ADAPTER
(HD-47925)
c. Loosen axle adjuster screws (10) and slide rear
wheel forward.
d. Remove axle nut and washer (11) or cam (17).
94000737
e. Support brake caliper bracket (2).
NOTE
FXDRS: does not have a right outer spacer.
3.5
f. Remove rear axle (9 or 18), right outer spacer (1 ),
right inner spacer (3) or WSS (4) and left spacer (6).
g. Remove drive belt from rear sprocket (8).
h. Remove rear wheel assembly.
INSTALL
PART NUMBER CONSUMABLE
11100001 LOCTITE SILVER GRADE ANTI-SEIZE
1. See Figure 3-7. Install rear wheel.
a. Apply a light coat of anti-seize lubricant to rear axle
(9 or 18), wheel bearing bores, and bore of wheel
bearing spacer (16).
LOCTITE SILVER GRADE ANTI-SEIZE (11100001)
b. Position rear wheel between rear fork.
c. Install rear axle through left spacer (6), left leg of rear
fork, and rear sprocket (8).
d. Install rear axle through rear wheel.
NOTE
FXDRS: Does not have a right outer spacer.
e. Install rear axle through right inner spacer (3) or WSS
(4), caliper bracket (2), right outer spacer (1) and
right leg of rear fork.
f. Install washer (11) or cam (17).
g. Install axle nut (12). Hand-tighten.
h. Slide rear axle forward. Install drive belt on front and
rear sprockets.
2. See Figure 3-8. Rotate WSS to position shown, if equipped.
Verify wire harness is routed correctly.
3. Align rear wheel. See WHEEL ALIGNMENT (Page 3-34).
4. Adjust drive belt deflection. See INSPECT AND ADJUST
DRIVE BELT AND SPROCKETS (Page 2-33).
5. Verify drive belt tracking properly - ยานยนต์และพาหนะ


Thanks for the video, it really helped me out!!
Awesome!!! I always figure I'm not the only one that is trying to do these.
Thanks for this video, big help!
Awesome! Thanks!
very gd job it has helped me a lot
Awesome!!! Thanks!
Cheers thanks
🍻🍻👍👍
You don’t need to loosen the adjusters if you don’t touch them you don’t have to realign the wheel
That would have saved me some time! Thanks! Those are the little things that you don't know when you start wrenching on your own bike. Thanks again!👍
Obrigado, ajudou bastante.
Awesome! Thanks!
Hey, question on the install. For the caliper bracket was there anything that requires you to bolt on the to the swingarm or does it just slide on.
No it doesn't bolt on just the axle through it is what holds it in place.
the rear sprocket bolts are 1 time use according to HD
Yeah, the mechanic said they were fine to use again. I should have mentioned it in the video. Thanks👍
no gloves with antiseize..bold move, TIN MAN
Hahaha...exactly. I went out and bought a box of gloves right after this...haha
Great video. Where did you get the service manual?
Good question...I've been looking where I downloaded it from but can't find the website I downloaded it from. It was similar to this one:
harley.manuals.cc/p/free-harley-davidson-service-manual.html?m=1
Mine was about $30.
Is it necessary to take off the drive pully in order to get the tire replaced or repaired?
No, I thought I was doing the shop a favor but I didn't need to do it at all.
Is there a trick to removing the brake caliper bracket?
I got this far, but couldn't get it loose.
Thank you
No trick that I found... just fumbling back and forth. It seemed to want to come out with the wheel, but looking back maybe if I had just pulled the axle out just to clear the caliper bracket, then removed it...that might have worked better...not 100% on that though.
But how do you put the call brake caliper back? 🤔
Yeah, I kinda skipped over that. I did a video on changing the rear pads before and left it out here. Need to push caliper pistons in, place back into bracket over disc. Tighten caliper bolts to 28-38ft/lbs
Is there any difference if you slide the axle from the right side and tighten nut and washer on the left side ?
To be honest, I'm not a 100% sure. Having said that, I don't think it would make a difference as there are no distinguishing differences as long as all the spacers and wheel sensors go in the right spot.
It may not clear your exhaust.
Great point!
What size socket did you use?
36 Millimeter
@@streetsean thank you.
Left?
I would recommend cleaning your bike before a "How To" video but other than that great work mate!
Thanks. In person it really didn't look that dirty...the camera really picks it up...I'll for sure give it a once over before doing any others!🍻
@@streetsean cameras always make it look dirtier!
Cost to have tire mounted
Mine was a little expensive, $150. I've heard some get it for half of that or lower...supporting local costs a little more
@@streetseanwhat! 150 bucks to remove and replace tire only?
At my local place, yes. I know you can have it done a lot cheaper, hell, I can probably buy a tool to do it myself for that price, but I figured I'd give him the business
Do you have to remove the brake caliper? I removed rear wheels off of other bikes, and never removed the caliper.
Technical I don't think you do, but according to the instructions you do. I think it makes it easier reassembling when you take it off
Thanks@@streetsean