HOW TO - Epoxy TIPS & TRICKS - Countertop Epoxy - Epoxy Ocean Look - Dirty Pour Epoxy

ฝัง
- เผยแพร่เมื่อ 12 เม.ย. 2018
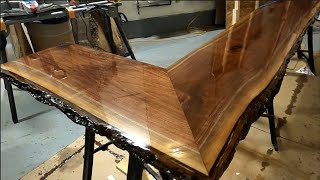
- In this video, we show you how to do a ton of epoxy tips and tricks to make your life easier when pouring epoxy. In the end, you see a beautiful epoxy ocean look we did using the dirty pour effect.
We will cover some tips on mixing, vertical edges, evenly spreading the epoxy across your countertop surface and showing a dirty pour with the epoxy!
You can find more information about our product on our website www.countertopepoxy.com
Countertop Epoxy provides metallic countertop epoxy kits to coat over existing countertops or new ones. Our products are all food safe, heat resistant, UV resistant, and scratch resistant making this epoxy the best epoxy for countertops. This coating is also zero VOC so there will be no odor or toxic fumes when applying the product. Our DIY epoxy countertop kits provide simple steps and video guides to create a custom, durable countertop that will last you a lifetime. At Countertop Epoxy, our goal is to provide our customers with the best support and guidance so their experience from start to finish with our products is always easy and enjoyable.
To enroll in a future workshop, visit - www.countertopepoxy.com/train...
- FOLLOW US ON SOCIAL MEDIA -
Facebook: / epoxycountertops
Instagram: / countertopepoxy
Twitter: / countertopepoxy
Pinterest: / countertopepoxy - แนวปฏิบัติและการใช้ชีวิต


I finally was successful at doing my countertop with epoxy because this man has gone over every single thing that you need to know. Best video I have found on the topic. He's to the point and explains it all very clearly.
That man is what I consider an artist. He uses technique and a plan to create a beautiful end product.
I learned more by watching this video that I have, washing 20 videos of this other countertop epoxy company. They seem to leave out some of the most important information like the whole base coat I just watched you do. I spent almost two hours yesterday tampering around with a sample doing it their way and could never get any product to stay on the top or the edges. Thank you for showing me the right way to do this.
Thank you for stopping by and sharing! We are happy this video reached you.
You are such a great teacher. This is my first exposure to epoxy and I'm sold. I'll call you guys on Monday.
Great advice regarding the wet edge facilitating even downward flow. thanks!
Thank you for spending the time to explain the edges. Nobody else does that.
Am I the only person that found the initial blue looked amazing and was slightly disappointed when that wasn't the finished product? Great video though, thanks.
no you're not the only one . dam i loved that blue
You are a wizard sir. I am using this same product for the first time, though not in the wasteful looking quantities you flagrantly display (makes it look easier, jealous). Thank you for your techniques, made my job much cleaner.
Thank you for all of the tips, I learned a couple more things from your video.
Thank you for your explanation on the edges! This is the best explanation I've seen, yet for getting the surface and edges even and smooth!
Awesome! Thank you!
I like the detailed explanations that you give. For example, nobody else has explained that slowing down or stopping will make the epoxy thinner. An excellent job on that piece, too!!
One of few like this that explains actually applying technique. Such as quick even pulls with roller. Etc. Thanks I learned a lot of helpful information
Absolutely gorgeous! Thanks for the tutorial.
So glad i found this channel. Great explaining and demonstrating!
I have been watching several videos around this and your is the best I've watched. Thank you!
Thank you George!
That is sooooo gorgeous, almost ocean like!❤❤❤
This is EXACTLY what I was looking for - THANK YOU!!! :D
Great tips on the application and behavior of epoxy. That is the type of knowledge you only get by much experience, great work.
Thank you for sharing you knowledge with us! I’m so glad I found your TH-cam channel. 😁
You're welcome! Thank you for watching. :)
Super helpful video can't wait to try some of these techniques on my next pour
Thank you so much I’m about to try the surface tension edge thing because I constantly have to heat and scrape those little bubbles off the bottom edges and it sometimes cracks the epoxy that’s on the sides with it. I’m still a beginner and tried tape but that gets stuck too. this is a really helpful video I hope it works I’ll be back to comment again.
love the video. looks amazing. the edge technique is a great tip as well as the dirty pour. would loved to see what you did after that and if you used a top clear coat to finish it. also would have loved to see more of the finished product. keep up the good work.
By far my favorite design you showcase on your channel.
Thank you steven!
I love the combination of the colours....
It looks beautiful great 👍 job thank you 🙏 for this wonderful do it yourself project
Simply stunning finish ! Wow !!
You are an excellent teacher. I love all the commentary. The more the better.
Thank you.
Found your video very informative.. you solved a problem I’ve been having. Thank you for taking your time to share
That's great! We are very happy to hear we were able to help. :D Let us know how else we can assist you.
Great video - love the colors on the dirty pour - just 2 cent advice - show more of the finished product at either the end or beginning of the video. Such cool colors and hard work deserves recognition!
Thank you John! We appreciate the feedback. We are definitely working towards adding more after shots to our future videos.
The best video I've seen yet. GOOD JOB AND thank you
:) Thank you Carlos!
Man that product is amazing
Great video! Thanks!!
Hope you all enjoy this video and find it useful in creating your beautiful countertops at home! If you have any questions don't hesitate to ask, we're more than happy to answer them for you.
What kind of videos would you all like to see from us in the future? Leave us a comment below! :)
Perhaps you have done this already and I just need to take some initiative to search through your videos, but since I'm here...
I would love to see your take on doing multi-level or multi-pour pieces...
for example, a base coat, then another coat with some clear and accent colors to give it a 3D effect etc.
None the less, great work!
Great suggestion! We can definitely take that into consideration for a video. :)
For countertops and such- is it naturally going to level perfectly or is it going to have raises and ridges? If so what do you do to flatten the uneven parts
U do good work..u know ur stuff
CountertopEpoxy have a question. Where do you purchase the epoxy?
That is nothing less than amazing!!
I've built two fiberglass boats using epoxy, but the part of pouring hardener first never occurred to me. Thanks for the pro-tip!
Thank you. I learned something.
Awesome tutorial!!!! Thanks
Wow. So beautiful!
That was beautiful!
Amazingly talented!!!!
Wow your countertops are a work of art. Im hooked
Thank you!
That’s so badass! I can see white walls with those stations in my salon!!
The god damn epoxy whisperer here, made it look too damn easy. Very talented my friend, thanks for the video.
Awesome video, thanks.
Just brilliant!
This is true art!!!
Dude, that finish was awesome. Thanks for the good tips. Really good video.
You're very welcome, Thank you!
I would like to see a clear finish used from start to finish including edges!
Wow 👌 love it ❤
Great video and awesome tips, thanks for the share.
Thank you Peter!
Beautiful
This truly cool
Awesome tip!
Your art should be a reflection of what's inside of you. This is a nice piece of art.
Thank you. :)
Gorgeous work.... a true artist.
Thank you Sharon!
I have been doing this for years, and I always seem to pick up something new from watching you. Awesome video, very very helpful. I wanna come back to Colorado!!
Thank you so much John! :D
CountertopEpoxy 5
I would love to see you add glow in the dark powder to the epoxy or fiber optics in epoxy
OMG 😮 awesome 👏🏻 👏🏻👏🏻
This ain't painting great advice thanks
Absolutely beautiful.
Thank you!
That’s so cool! Great video! 👍🏻
Thank you Scotty!
Amazing.
At 5:38 my mind was blown. It looks just like granite. I think I'm going to try this. Great video!!!
Amazing video...longer videos are much better. Please do more on glitters and colors you offer and how to use them in residential settings. Also I would love to see you guys use the epoxy over other materials other than the MDF
Kasey Centanni question: I've seen videos using art resin. Same thing?
Omg, incredible!
Thank you!
Thursday was cool
NICE !!!!!😁
It's beautiful !!!😲
Thank you!
Wow im a beginner and that was amazing work, I'm a little confused as to what you did there at the end with the spreading of the colors since it was in fastplay.
As usual incredible work! Do you think I can tint a small amount of epoxy with acrylic paint? I need to fill some small voids in a wood slab I have with no local access to resin tint.
He’s very good with his "product."
Hermosoooo....
Love it.
Thank you!
Great work - good tip about the surface tension. No epoxy video ever tells you how to deal with the overflow "drips" at the edges. Do you watch them form and wipe them with a roller as they accumulate or do you mask-off the underneath of the work at the edges before you pour??? Thanks!
Sick!
Fab!
Why do some people use a blade/rubber edge when the roller seems to create a more even spread and edges? Glad I found this video before I did my table top! Generous and clear instructions. Thank you! :)
Please explain what you did in fast forward part of the video to make the final product.
I have a bar top I want to do just like this.
Thanks
Richard in Florida
Beautiful! I did two painting frames with the epoxy coat and had the all the epoxy on the edges pour off. It left a clean edge on top, but I wanted the edges covered? The first one was just a pour and the second I tried using a brush. How do you get it to stick to the edges? Did I just not have it thick enough? Thanks,
What is the roller nap you are using? Thank you for the great information on spreading it!
Saving me mad scientist experimentation time trying to rid of edge drip and not knowing how. thank you.
Also check out our all about edges video we have helpful tips in it as well!
Awsome as always.. I'd love to see a video of a thick casting pour embedding different objects with the casting resin.
Yes! We can definitely look into doing that :D Thank you for the suggestion.
Amazing job!! Wish you lived in Rio de Janeiro so I could high your service!!
ElMejorActorDeMexico Oi, eu faço alguns trabalhos com resina. Se quiser dar uma olhada no meu instagram @arttonial. Envio para o RJ. Obrigada
Hi love your product. Quick question. I have countertops that have an ogee shaped edge. Would I be able to get a smooth edge with this?
Those cops turned out totally awesome I love the technique and the way you explained it you're very smart man
Trully a Nice work, may I ask wich colours you used for the dirty pour and sprayed at the end of the video. Best regards
So so beautiful
Thank you!
Ur style is great
Thank you!
Absolutely beautiful work. I work with epoxy resin for art so I know a little about what your doing. I’m fairly new to the method and have never done a large piece. We have counter tops to replace and I would love to try method. My question is do you get pits or dust with your product ? How durable is it for normal wear and tear vs granite ect. The resin I’ve used is Art resin and crystal clear. Is the product you sell more durable than these for scratches. Where are you located and how much are your classes
Man that is sooooo awesome!!!! I would love to make those allday long everyday. How did you get into the creating of these and how would one possibly go into business of making them? Im an artist who throughout my life has been blessed in the arts, creative arts, crafty creating, etc.... basically whatever I endevored in that was anywhere related to or in the artistic dept I always did a damn good job doing it. With that being said Ive recently taken a very big interest in the fluid arts as far as the acrylic dirty pouring and techniques related without any idea where Im going with it exactly I can now see a potential light at the endless end of this path I have ventured into. Beautiful work no doubt, I would so greatfully appreciate any piece of advice or suggestions in taking my artistic talent to this level in possibly making a career of it.❤
Hi, What kind of roller did you use ?
Very helpful video
What is the mix in the spray bottle, and what do you use for your top coat? Also how long did you wait after blue coat pour before adddkng in dirty pour?
Hello, how do you avoid the drips on the underside of your edge. Thank you for creating.
Amazing video, What type of roller do you use?
Loved this but my anxiety levels were all over the place when you were showing what not to do lol you demonstrated what I fear doing wrong 😂
exactly. Especially since epoxy is expensive. It's also difficult to clean it up if it goes wrong.
Its not at all like messing up with regular paint.
SO DOPE
Thank you! :D
Excellent teacher, thank you!
Quick note, the endcards at the end of the video block the warning.
Thank you! We will get that fixed. :)
Wow this is.so beautiful man this is truly art i have a question thou can this epoxy thing me used on any type of surface like wood etc?
Yes you can use it on wood! :)
what are the pros and cons to this method vs. building a form around the entire table to pour the epoxy into and then finishing the edges off with saw/router/sander etc.?
Hello how is going i made this table and put exposy on it and i did about 4 tin coats but still separated on some spots what am i doing wrong and where can i buy better exposy is the one from homedepot or lowes good or do i need a better one
This looks like some counter tops at the La Hacienda Mexican Restaurant in Moab UT. Their beautiful!!!!
Yes! These are exactly those countertops! ;)
@@CountertopEpoxy good❤
What was in the spray bottle?