How To Build A Workbench For Your Garage | Easy 2x4 DIY!

ฝัง
- เผยแพร่เมื่อ 6 พ.ย. 2021
- Work Bench Plans and Templates: wilkerdos.com/product/garage-...
Watch how I added wall outlets here: • How To Easily Add New ...
My other workbench (and shop) videos: • DIY Fold Down Workbench
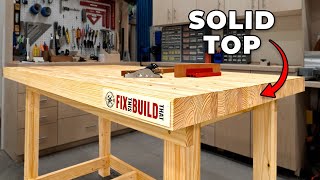
In this video I'm showing you how I built a very easy workbench for my garage! This is an easy 2x4/plywood project that can be built in an afternoon and utilizing a lot of scraps. It's so nice to have a place to tinker, and keep tools, in my garage now.
Subscribe: bit.ly/3gfe5YL | Website: wilkerdos.com
Watch the newest videos: bit.ly/3hBOdaf
Things I Used in This Project:
ISOtunes Hearing Protection: bit.ly/WilkerDos (use code APRIL for 10% off)
Stealth Mask Respirator: bit.ly/3pYLGrm (use code APRIL for 10% off)
Crescent Extendable Speed Square: amzn.to/3c8kPoQ
Triton Multitool: amzn.to/3qgwNBw
ToughBuilt Kneepads: amzn.to/31IyKMc
Reelcraft Cord Reel: bit.ly/3bPgfLu
DAP Weldwood Wood Glue: bit.ly/2Y1vca2
Website: www.wilkerdos.com
Patreon: www.patreon.com/user?u=257047
Instagram: / wilker_dos
Facebook: / wilkerdos
hillcountrywoodshed.com/
Watch more videos!
Shop Projects: bit.ly/2vSoEw2
Outdoor Projects: bit.ly/2Tma2kP
Most Popular: bit.ly/3du8kof
Want to support me? Support the companies that support me:
Triton Tools: bit.ly/2jaC0dD
ISOtunes: bit.ly/2YuZBtr
Armor Tool: bit.ly/2PjJuKJ
Welcome to the official April Wilkerson TH-cam channel! I’m April and I’m the creator of Wilker Do’s. I am an obsessed DIYer and Woodworker. I'm not professional or have any training, so I just pick the project I want to tackle and figure it out step by step. On this channel you will find a variety of content like DIY home improvement, How-To’s, construction, design and more!
#AprilWilkerson #workbench #diy
Save 50% or more on your SimpliSafe security system during their biggest sale of the year. Visit SimpliSafe.com/april to learn more!
Check out the Maker offer from SOLIDWORKS: discover.solidworks.com/maker...
20% off ‘buy now’ link for my viewers: r1132100503382-eu1-my3dexperi... - แนวปฏิบัติและการใช้ชีวิต


![[Full Episode] MasterChef Junior Thailand มาสเตอร์เชฟ จูเนียร์ ประเทศไทย Season 3 Episode 6](http://i.ytimg.com/vi/CVUx09Rx0-M/mqdefault.jpg)


Find the plans to build this project here: bit.ly/3qavC9P
Hi April - That link appears to be broken - tried to access on 08/03/2022
Just found your video. Plans not free when I clicked on the link.
Is this still free?? It's so awesome! I was not able to see it....
@@kenshaffer7387 Hmmm. I just saw this and tried it and it worked. Please try again. Oh, the Plans were free for awhile but now there is a small fee for them. Thanks for watching.
@@blamm5348 They were free for awhile but now there is a small fee for them. Thanks for watching.
Nice, simple build! The only thing I might suggest is putting a lip on the overhead shelf. You sure don’t want vibration making those paint cans walk forward and fall on you! Thanks, April!
Women are THE BEST at teaching HOW to build stuff! Thank you!
Two things I have learned in my many years. 1. No one sits at a workbench in the shop. Raise the table top up between navel and sternum. 2. Like you have done, make the work bench top easily replaceable. I restore cars so after a few years of oily parts, grease and hammering out bearings the top needs to be replaced. I usually use a full sheet cut in half and making the top a double layer. Then you can just flip each layer over when you want a new clean top. It last a lot longer until having to drag another sheet home. As always, your videos are the best.
Thanks for sharing! Glad you enjoy my channel. Thanks for watching.
It depends on the type of work you do, I sit at my bench all the time if I'm doing detailed work.
I built this exact workbench 4 years ago for my 90 yr old father. He couldn't stand at a workbench anymore, but really wanted a workbench again. He loved it, and spent hours sitting at the bench. He kept it in the spare bedroom of his house. It was one of the best gifts I ever gave him. He passed away last year and I have the bench back. I made the bench so it can be disassembled. I also added a LED shop light under the top.
I always sit at the workbench.
Loved this project. As a woodworking wanna be, this is really my first project, my husband has had to makeshift horses and use his saws on the garage floor. This was a beautiful set of instructions! We did a similar build in about 3 hours for the build. We will add the pegboard behind the bench on another day, but appreciation to you for sharing your design! We didn’t have 99” of width space so we came up with our own plans but couldn’t have done it without you! Enjoying your other projects too!
Nice. Very simple and economical to make. I love it when the item you are building is already being useful before it is finished! Some folks with smaller spaces may find it useful to put casters on the bottom so they can reshape their workspace as needed, roll it to the middle of the garage when the car is outside, or roll the bench outside to do the dusty work. Locking casters would be useful for that. Say howdy to Texas for us.
This is crazy. This looks exactly like the workbench I've built for myself some 5 years ago. The only difference is I don't have drawers at the bottom, but I have installed lights under the top shelf. And also a swiveling shelf on the right for a speaker so I can play music while I work, and rotate it to depending where I am in the garage.
Cool design. I like how the upper shelf provides additional storage in normally unused space. It would also be a good place to mount a light.
Thanks! Glad you like it. Yes, that would be a great place for a light. Thanks for watching.
This is gonna be an awesome edition to my garage! Thanks for the idea!
I built a very similar work bench, a few years ago. And use it, for something every week. Added shop lights really helps me see better. And a air compressor & hose reel, was fitted to go underneath. A Large bench vise was the best addition.
I wish you'd been in my life, back then! 😥😁
Some really good tips in this video. Glad I decided to watch before I started building mine, the small overhang for clamping materials down is a really clever idea I wouldn't have thought of and probably tried to invent a workaround later on
Every time I watch Aprils video, I learn something new.
What a wonderful simple idea with the screw in the bottom of the feet. To have them to adjust the hight.
So simple, and so cheap solution.
That is a brilliant idea.
Thanks! Glad you found it useful. Thanks for watching.
Every garage needs a simple workbench. I think this one is a great starter. nice simple 2x4 construction with some practical tips along the way. Thanks for Sharing!
Thanks! Glad you found it useful. Thanks for watching.
Workbench very nice. Great job my friend.
"I'm a professional." 😂. Immediately subscribed.
I'm a brand new DIY Woodworker and was excited to build myself a suitable workbench for my first project. This video was awesome and made my build a success. Thanks so much for your clear and thorough walkthrough!!!
Awesome! Glad it was helpful! Thanks for watching.
About 10 years ago I built a workbench very similar to this. I've disassembled it, moved it, and re-assembled it four times now. I like your version better, especially the top shelf. Looks like it's time to upgrade!
Awesome! Thanks for sharing and for watching.
Nicely done Miss April - Looks great, and is very functional. I like your approach to adding the outlets - you can never have too many when putting them by the work bench. Blessings to you, your family, and your crew.
Thanks so much!
this is so awesome! I'm building out a new workshop and i only have roughout carpentry equipment, this is great for someone who doesn't have a fancy shop tool with planers, jointers, and table saws. I'm so excited, I wish I had seen this tomorrow morning so I could get started!
Glad it was helpful! Enjoy the build. Thanks for watching.
Nice. Well done. I would have mounted the retractable extension cord up high, on or close to the top shelf. With a few well placed J hooks coming down from the ceiling you can string your extension cord across the garage overhead and avoid a trip hazard. I did this in my basement shop and it worked out well.
Very cool series covering easy shop fixtures within the skill levels of the home DIY-er! I'm sure the high ceilings and limited square footage of most home garages means that upper shelf will find some storage uses, besides being a handy place to hang a workspace light. Not being as nimble as I used to be, I can no longer do that 'acrobatic April dismount', much less stick the landing as skillfully you did 😎👍, or even get up there very easily. It occurs to me that attaching a scrap of 2x4 across those 2 back verticals like a ladder rung (on either end or both), midway between the lower shelf and the top, would allow someone to step on the shelf with one foot, the other on the rung, and then onto the bench top, with the upper supports providing a firm handhold.
So glad I found on the Tube. I need a garage bench but tight on room, I will build this but maybe a bit smaller. Thank you April.
Glad I could help!
I did some research into this, while April is the face, muscle and talent of this channel, the little doggie is the mastermind of this entire operation! Notice how he/she is always walking around innocently in the background acting like a disinterested dog just smelling things, but is actually keeping and eye and barking out procedures and instructions to April.
Nice Build, simplicity and functionality all in one. I love to have a peg beg board for my tools, so this is great. Just moved into a new home and looking for a design for my 3rd garage soon to be come shop. Excellent, I love it..."and your little dog too"! Thank you!
Thanks! Yes, my dog is a ruthless Supervisor to be sure! Keeps me on my toes. :) Thanks for watching.
@April, you used lag screws for adjustment purposes, but I think carriage bolts are a better option. The don't damage your floor and you can move them around just a bit easier. Still adjustable though, you only do need a threaded insert... but still... 😉
Nice and simple workbench. 👌🏻
Really nice Workbench! Bolting a Good Vice at the end of it would be another great addition. Great Job!
Aloha, April. Thank you so much for including free plans for this workbench. I’m gonna build this - it’ll be perfect for my big shop reorganisation project! (with my brand new sliding miter saw! yay!) 😀
Great timing, I was planning on building a workbench like this, thank you very much for the free plans.
This is exactly what I needed! So glad to have found this channel! Attempting to build this work bench this holiday weekend!
Awesome! Enjoy the build.
Just retired and new to woodworking. Seen other videos, was gonna skip project. After seeing this, may rethink plans, thank you!
Glad you enjoyed it. Thanks for watching.
This and the storage shelves are SO helpful for my 2022 basement re-do!
Thank you April for taking the time to do this. I'm sure it was rewarding for you, but it has also been very helpful to me as well!
I am SOOOOOOOOO impressed!! 🤩 I can't wait to put together my own!!! Great work, April!!! 💪🏾
Thanks! Enjoy the build. Thanks for watching.
Hello from France Ms Wilkerson.
Another good moment watching your work and tips
Stay safe and take care.
I LOVE April's videos.!! She is awesome!!
Excellent. Fast bulit, sturdy functional. Easily customizable. Simple is good.
Glad you like it!
awesome job April. Keep up the great craftsmanship and hard work my friend April. Keep making. God bless.
The lag screw tip is brilliant especially if its for self use
Wonderful idea April! Thanks!
Thank you for the idea about the rolling draws under the bench. Looks like I have a new project
Glad it was helpful! Thanks for watching.
Love watching your videos. You're amazing and very talented. I like to see that you're incorporating the software into your planning. I used a very similar program when I went back to school for CNC machining. Please keep making excellent videos.
Thank you so much!
Thanks for sharing those tips and the make!
Oustanding work, you are one of the kind not every woman would go and start a project like that or at least feel confortable using tools , love the content keep the great smile.
Thanks! I didn't always feel this comfortable with tools. Starting out, I knew nothing so thoroughly researched each project, starting with simpler projects. I built on my experience and learned from any mistakes and now, I feel I can tackle anything. Thanks for watching.
Adding a piece of hard board to the surface of the bench makes it easier for drilling, cutting and chiseling... when its all cut up you can easily change the surface.
Wait what?
Nicely done April! 😃👍🏻👊🏻
Perfect just what I was looking for. Thank you for the plans! Love how you have the boards color coded. Makes for an easy build. Thanks April 😊
Glad you found it useful. Thanks for watching.
hello.. where are the plans?
@@saumyz in the description
Clean, efficient, and solid. I like the top shelf, wish my space had one. Thanks
Thank you for the content. The best diy workbench. you are able to add on in the future. We cannot ask for more❤
That's a good project easy , fast and usefull thanks April👏👍🇫🇷!
Fabulous!
Great job. Nice easy design. Thanks 😊🙏
Right on April . Nice job
Struttura semplice ma ben organizzata... Complimenti e brava.
love this type of videos simple and straight foward like a real content creator
thank you so much
Nice bench, simple but so practical. You make building look so easy. I love how you explain all the details with easy instructions
Glad you liked it!
I need to make one of these! I currently have some utility shelves assembled like a bench to work from, but I think I want to use them like shelves elsewhere and will need a work bench to replace them!
Wonderful mind & thanks for sharing your ideas!!!
Love the idea with the top shelf, great video.
NICE AND simple... great job
Very nice old school-like design. Probably the only thing I would do different is make the top section detachable. Thats just a personal preference thou lol
Hello April, thank you very much again for everything and specially your joy since I follow you few years back already.
So I followed your link for 3d solidworks and then wrote to ask for info, so looking forward. Later on mean few seconds ago I found out they are in french too. I'm french from Quebec,Canada.
Wonderful! Thanks for sharing.
Thank you so much for this video! I just made my first workbench and made it from these plans. It turned out great. I wish I could share a pic with you. One of my favorite channels. 😊
Awesome! Glad you found it useful. Thanks for watching.
Awesome video, I used this as a base to build my new work bench. I didn't plan it out super in depth, but it came out brilliantly, so thanks!
Glad it helped!
I needed this SO much! Thanks!
Glad it was helpful!
Stick nails are far superior for shear strength than standard wood screws, and coil nails are generally soft and generally not adequate for the job. Folks need to check the specs on their nails to make sure they use the product that meets their needs (load specs, etc.). Love your videos April.
Nice work you've come along way since you first started you are quite a talented Young Lady just don't forget about the plasma table and mig welders don't want the wire to rust up take Care 😎👍
This gives me so much confidence that I can do it myself! Thanks for sharing!
Thanks! Afterwards the satisfaction of looking at what you made is fantastic. Enjoy the build.
Sweet workbench April!
I really like this. it's super simple and practical.
Thank you for this simple project video. As always you provided great tips. I really like the quick useful projects with your insights and advice.
Glad it was helpful!
Looks almost identical to the one me and my grandfather built 40 yrs ago... Nice one April.
Sorry that I missed the free plans by a year. lol Love the video and I'm sure the plans are well worth buying.
Thank you. Awesome video.
Love how simple you make this!
Glad you like it!
This awesome wish I had these skills trying to get started
Thanks for sharing with us April, that’s a great work bench. 🙏🏻🙏🏻👍🏻👍🏻✋🏻✋🏻👏🏻👏🏻
You are so welcome!
Nice plan. I like your practical approach to getting the pegboard cutouts for the outlets
Glad it was helpful!
You and 731 woodworks is all I watch. I love yall!
All your stuff is great. Thanks.
Glad you enjoy it!
Great build, thanks April. Do journals have future plans to add overhead LED lighting to illuminate your work surface. I noticed that the peg board is attached to the wall, allowing you to move the bench to free doorway space. Wishing you and your family a wonderful week and a blessed holiday season. Peace dear lady,
April this video is exactly what I was searching for , I have a small 1 car Garage with not much space for a work bench. This should do nicely. Thanks Laterz Leland
Glad it was helpful!
Love your work! Thanks for all you do!
Glad you enjoy it!
Amazing as always…and the workbench too!
Aw, thanks! Glad you enjoy my channel. Thanks for watching.
Hi there, I know this is an old video, I wanted to make a workbench and ended up with this great project.
Here in Mexico it is not that commun to buy wood, I was surprised to learn 4 * 2 are not really 4 * 2...
Also the wood here with that measurement (at least where I bought it) it is used for construction, and has a very bad finish, so after some work i think i ended up with something acceptable.
Thank you for insipiring me to actually try stuff.
Love your channel
Awesome! Glad you found it useful. Thanks for watching.
Great project!
Good job April...I'm fm Indonesia 🇮🇩 always loves to watch your channel
The little doggies are * adorable 😍🐶
They are but are a mess. :) Thanks for watching.
ARIL!!! I love your videos and your content! Keep doing you and I'll keep watching your vlogs 💯 😁🤙
Glad you enjoy my channel. Thanks for watching.
Yes! Finally another solidworks user.
VERY well planned.
You go girl!!!!!🎉
Oh this looks like my kind of project! I've been looking for an easy garage Bench tutorial. Thank you! I just purchased the PDF
Awesome! Glad you found it useful. Enjoy the build. Thanks for watching.
Love it! Awesome work!
Glad you like it
What a simple work and nice arrangement.
Your video inspiration i have planed in my home
Thanks! I'm glad you enjoyed the video.
Perfect exactly what I was looking for!
Glad you found it useful. Thanks for watching.
Workbench looks great! Now I just need a garage to go with it.
Love it you are a genius!
Wow. Awesome.
Thanks!
Lip for clamps , good idea 😊 Thanks ! Good Stuff 😊
Great plans. Thank you for all you do and the excellent TH-cam How to videos. :-)
Glad you like them!
Very nice simple work bench build. Thank you!
Great! Glad you liked it. Thanks for watching.
very nice build April a lot of times i also use bolts as my adjustable feet to levels something but my method is using T Nuts and 1/4X20 bolts because you can lift the unit with a Pry bar and easily adjust those bolts by hand a downside to my set up is if you do need to slide the item on the floor a distance th the bolts can really change thir position but that’s not normall a big sue for me. as it’s usually i only need to pull things out to find something or do a cleanup i of course to bore out the Wood wher the T Nut is fastened so the Bolts can be both all the way in or out it’s stronger then Commercially sold Adjustable Feet and has a Industrial type of look IMO
Excelente, muy práctico y cómodo 👍🙏