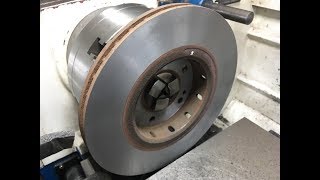
Resurfacing a warped brake rotor with a Bridgeport and rotary table

ฝัง
- เผยแพร่เมื่อ 8 ม.ค. 2015
- In this video I show how to setup and machine a warped brake rotor using a rotary table. I show how the surfaces are trued to the wheel mounting surface and made parallel again.
UPDATE: I reinstalled the rotors on the car and took it for a test drive, all of the pulsing and vibration was gone. The finished thickness of both rotors ended up being within .002". The right side rotor was less warped than left side, this corresponds with less tie-rod wear, so yes warped brake rotors can cause frontend component wear! The bearing cups on the inner tie-rods are made of plastic, so the vibration of stopping seems to have caused wear or creep in the plastic cups.


![[MPD직캠] 베이비몬스터 직캠 8K 'LIKE THAT' (BABYMONSTER FanCam) | @MCOUNTDOWN_2024.6.13](http://i.ytimg.com/vi/8qa-nm9bCLs/mqdefault.jpg)

![ทัศนศึกษาโรงงานผลิตโค้ก [THAI/ENG SUB]](http://i.ytimg.com/vi/M9y-TJBNem0/mqdefault.jpg)

What is amazing is that this guy didn't feel sorry for himself and worked with what he had. He made due with what was available and the result was not only usable but within minimum tolerance. I would have done the same and used the rotor as long as possible. Especially if it was just not possible to afford new ones yet. I say bravo! It works and gets you by.
I have done this for years and it works great. I can do 4 faster than I can get to the store. I use a large mill for the cutter. But the principle is the same. I tried it on a lathe once...This is much easier and the finish and parallelism is better. You are spot on with your sequence.
We did this when I was in engineering school. We used a cog belt to get the table to go at a consistent speed. Square CBN insert for a 45 degree grooved finish. .020" between the tool marks for the final pass. This is a good method. The floating caliper was able to accept .020" of runout, and .010" of taper. Get the rotor flat. Remove any cementite. You're good to go. Yes, you can index from the mounting flange to keep everything parallel. The cooling vanes have core shift. The brake discs are balanced at the factory to remedy that.
The rough surface makes pad bedding go faster. Pad bedding is all about the contamination on the freshly manufactured pads.
Brakes don't always work by abrasion. They often work by endothermic bonding. I was on a project where we made the interface between the disc and the pad trigger an endothermic chemical reaction which galls pad material onto the rotor surface, then shears it off with the ceramic binder in the pad material. That's why you can't always replace iron rotors with stainless ones. The chemistry won't work completely.
I am really happy for the knowledge I gained from the video, now I knew how factories resurface the new rotors.
Dude, you rock. I've been saying all along this is more than capable method for doing this. I hate throwing away good metal rotors that are well within specifications just rusty and warped.
+Richard LaBarre Thanks for the comment, much appreciated!
I love the fact you covered the minimum thickness specs in this video. I restore old cars as a hobby and I can't count the number of times I have seen drums and rotors cut beyond the minimum thickness. that almost always have a warp or a crack in them when I see them. awesome video by the way, I always used to chuck them up in a lathe on a jig I build for doing it.
Great vid!! When I used to work on cars a lot, I would have the parts store turn any of the brand new rotors I bought just to make sure they were perfectly true. More often or not, they needed it. The parts guy thought I was nuts to turn a new rotor, but after he did it and saw how far off they were, he did it for all the rotors I bought after that. The downside.....slight loss of life on the rotor, but not enough for the customer to even notice. The upside......I never had to make excuses or apologize for any kind of shudder or pulsing after a brake job. I agree with Tom(oxtool).....nice voice and vid!! I can see why it already has over 26,000 views!! :) Keep it up! I subbed. Thanks for the tip on my vid!!
Mike
+bluehandsvideo Thanks for the comment. The brakes are working great now.
I always thought that was stupid until my first run in with an over sensitive customer.
Popular mechanics had an article on building a constant rpm speed control for power tools. It works great at all speeds and retains high torque at low speeds by modulation the ac via SCRS AND USED BACK EMF AT AC ZERO CROSSING FOR FEEDBACK.
Or maybe it was popular science
I did this on a manual Warco mill and it worked.
Here's a machining trick for you. Instead of bringing the quill down to touch, which will always tend to leave some depth mark, bring the quill close and then raise the knee to touch. The knee is far more accurate and has all that weight and mass stabilizing it. Keep the quill as high as it can go too, locked in place, and that increases the rigidity of the cutter significantly. These are ultra-precision-focused tips tho, what you did wasn't necessarily wrong.
Excellent video, I have wondered how accurate doing the job on a home mill / lathe would compare to a a dedicated brake machine. In my humble opinion you have proved that YES it can be done and with extreme accuracy. Thank you for sharing.
+P Wise The advantage of using a fly cutter is that the harmonics are greatly reduced. I've used brake lathes and prefer this method because it helps to re-establish a true datum. Brake lathes rely primarily on balanced cutting and they lack inherent rigidity.
I love this idea - a mill is capable of so much more than specialized brake machines. So what if setup takes a little more time. It might help showing setup checks verifying rotary itself is fully parallel to the table? That's not a frequent check, but anything moved around alot is at risk of being dinged.
I love resurfacing rotors. Some rotors are better quality than other but, why replace it if it can be fixed. This process always amazed me! I wonder what the run-out is for different brands of rotors right out of the box. I would like to see that considering you get what you pay for nowadays. I replace rotors and pads and the rotors go bad but, pads are good. Pads are free and moving and no caliper issues. Great video!
Bravo, did you get to try them out? Had massive vibrations on my bicycle hydraulic disk breaks resurfaced them and then resurfaced the pads just to make the back of the pad parallel to the front of the pad so they are flush parallel with the breaking disk. Had no vibrations and increased the braking capability of the caliper by changing it from two pistons to four pistons. Now when I need to stop I am hitting the wall if you like to call the experience of when I want to stop real quick. Thank you for sharing this tutorial with everyone. Awesome job
Yes, they've been on the car for 5 years now :) Thanks for the comment, glad you enjoyed it!
Good way of doing what is needed, I enjoyed the video, Thanks for sharing it.
Well now, for the Naysayers out there this works and quite well. I had figured I would be getting at least front rotors in the morning so what did I have to loose, I didn't thing one would clean up and be in Min spec. For a shop, agreed no way you could make money as it just takes to long. But for the Homeshop Hobbiest this works. Spent a lot of time finding a way to bolt up a 5 Lug on a 4 slot rotary table, a couple of new T-nuts with 1/4-20 tapped holes to allow bolting from the top worked. Lots of time spent with an indicator just making sure this actually can work. Table has to crank true and make sure the first Top Hat Surface is cleaned up as all else comes from that. With a Last Word Indicator, I couldn't see any waviness at all, zero. Mics said parallel though I found about 3 tenths taper outside to in. I don't see the taper being any problem. OH, the drill motor works well to achieve an even finish. Thanks for posting, I really enjoyed the experience and now I don't have to buy a bigger lathe. :-)
Excellent! I'm glad this worked for you!
I'm a career auto tech and shop owner. I've been reading some of these comments picking this guy's technique apart. First to the guys talking about finish and brake pad bite. It makes no difference what-so-ever. Look at your rotors on your car. They are like a mirror after a few miles and your pads still bite. For the guys saying you can't reference the front surface that is totally wrong also if you just think about it your wheel bolts to the front side, if it was not true and parallel with the back side your wheel wouldn't be straight either. My dedicated Ammco brake lathe adapters hold and reference both the front and the the back. My only suggestion is if you use a chatter band this would maybe give you and even better finish by stopping the rotor from ringing. The finish you have done looks great. Your waviness looks OK. You don't need new rotors what you have done is good. You can get a chatter silencer band at most auto parts stores. Ammco part number 6920. Even having to buy a silencer band your cost will still be lower than new Volvo rotors. I have both a Bridgeport and an Ammco brake lathe. I'd use the Ammco only because its a little faster. I have been turning rotors and doing brake jobs for over 40 years and 2ra or 1.8ra makes no difference what-so-ever. I usually buff my rotors with a scotch brite pad on a die grinder while the rotor is still turning on the machine but many of my techs just put the rotor on the vehicle hot of the lathe with no issues at all. Its just not that critical.
Yeah, finish is only important to the point that rotors aren't glazed when bedding new pads, or bedding old pads to fresh rotors. My understanding, both engine cylinders and brake rotors, need the glazing removed in order for the rings and/or pad to bed properly. The last new rotors I bought were blanchard ground and had a rather fine finish, but enough bite to properly bed the pads. These rotors are still on the Volvo, just haven't gotten around to replacing them yet.
You don't really have to replace your rotors. I'm sure they are working fine and continue to do so. You wont gain anything replacing with new rotors except a lighter wallet. The manufacturers just use whatever equipment they have that costs the least I think for maximum production. The surface finish is totally different for each manufacturer so IMO that wouldn't be a good guide on how to finish. I went to one brake pad manufacturers seminar that pushed no resurface. Just replace the pads if the rotors were not warped. The pads will seat in or bed anyway. There are plenty of backyard techs who just install new pads. Most of my Mercedes customers don't want to spend bucks on new rotors and we just replace the pads on mirror finish glazed rotors. It's not my favorite thing to do but it still works. On American and Asian vehicles I'd rather resurface every time to eliminate the possibility of brake pad squeaking. Thanks for a well done video. This is the second time I watched it.
If you look at most replacement street pads they have a very ruff finish and some even have an abrasive coating to compensate for UH different opinions on rotor finish. There basically re texturing the rotors for you to avoid Glazing squeaking ect , then with some miles after the pads are bedded that wears away into a smooth finish. Im sure any tech doing street brake jobs will tell you there biggest complaint is squeaking and brake noise.
Actually it does make a difference. As they make on vehicle resurfacing disc rotors to the correct cross hatch finish..We used them 35 years ago. The only reason you don't see them used today. Is brake rotors are so cheap being made in China. People just replace them.
But if you try this on Trucks or Vans. You will warp them in quick order. As they get hot fast. And one reason I buy the $120.00 each factory rotors. I got tried of warped rotors damn near shake my van apart slowing down on the highway! If the factory ones lasted 15 years. The new ones will last 15 more...
@@MasterChief-sl9ro Yup... been in the biz since the 70's and it is time vs money.. it is faster and more cost effective for a busy shop to just slap fresh rotors on.. The customer ends up typically with a better finished job too as the rotor material is more substantive and so they tend to not heat so badly.. PLUS... you how many bozo's think they can cut a rotor? errghhhh.. seen guys with no clue on the lathe just chewing up metal till it looks right.. Was not always this way but... there never used to be $20 rotors either..
Very nice video. Another reason I need to own a Bridgeport!
+Larry Hutcherson Sr Yep, Bridgeports are great machines! :-)
I don't see how anyone can go through life without one.
Excellent. Thought I'd seen it all. No I didn't there's always something to learn.You don't need a Bridgeport to do this any vertical mill will do.The novel part was driving the rotary table the cordless drill. Sweet.
THE CASUALNESS IN WHICH HE SAYS "I'M GOING TO SHOW YOU HOW YOU CAN RESURFACE A ROTOR......" AS IF EVERYONE HAS THAT KIND OF MACHINE AT THEIR HOUSE. 🤦🏻♂️😅 I'M JUST KIDDING! 😂 VERY COOL VIDEO!🤘 😎🤘
Fun exercise, even if not the most practical. If I had a bridgeport or a lathe I'd be messing around with the same stuff.
Good topic, had considered doing rotors this way. I'll give it a try with my spare set that needs truing up.
Good video, there's always more then one way to do something. When people get caught up thinking there is only one way to do anything, that will eat your lunch in other words waste a full day trying to do that one thing.
Well done, Ilike your setup!
Great idea thank you for documenting and I will put this idea to practice
Great video. I plan to do just this with both my rare two piece VW discs this week, however I will end up with loads more meat on um than two pieces of paper thank goodness and I will definitely be reaching for a vacuum cleaner or two!!!!
That turned out nice with a real good finish.
+Bobby Horn Thanks!
Great video man! It’s definitely not as efficient as a brake lathe but if you already have the mill it doesn’t cost you anything.
I had to come back to this. I went to a shop to have some slotted brake discs done. The guy used a diamond cup wheel with a coolant mist aimed into the wheel. It was genius, and did a beautiful job. His process was nailed down!
Yeah, I've been wanting to get a cup wheel to try this with. A diamond wheel seems a little exotic for grinding a brake rotor!
@@eformance Could it have been a CBN wheel? Abrasive processes are fascinating.
@@Dr_Xyzt Yeah, that sounds more like it! CBN is typically used for ferrous materials.
Check out Joe Pieczynski 's youtube channel. He used a white A/O cup wheel to make a broach. Ever since then, I've been re-thinking Bridgeports entirely for harder parts. I'm kicking around the idea of an aluminum cap for the table so I can use soapy water as coolant. Kinda like a Crummy Welding fixture plate, but big with drain channels and splash guards.
Great! Yet another way to get er done...so to speak, Greg.
i like your work and video, good job
Mines were terribly warped. My car was jumping all over the place every time I braked. Purchased a new set for the front and what a difference. Good video.
Ive done stuff like this. Its actually best to machine a graduated rotor right on the car. Its a machine that bolts to the hub like a wheel and spins it while an insert machines each side off. A graduated rotor may have run out when you bolt the two together but machining on the vehicle eliminates this. I ran one in the early 90s at a dealership but buying new and just bolting them on solves the problem 9 times out 10. New out of the box is junk sometimes
The trouble with the "turn on the car" and the lathes used in gas stations is that usually the rigidity is poor and the machine gives with the non-uniform cut force of an out-of-true disk..
Well done!
Neat idea 👍! Thanks for sharing!
Thanks for watching!
Am I the only one who had the sudden urge to reach up and put my safety glasses on when he first started the mill. Lol
as long as you dont deviate from the stock thickness those brakedisks could last you a looong thime , they might even hold up better as the tension caused by the casting of the part is drawn out of the metal over time
if they get machined down too thin , and you wear youre brakepads beyond normal theres a chance you can push one of the pistons in the calipers out of their seal causing a big leak and sudden loss of half youre brakes (split system) and total loss of brakes shortly after that ( the brakefluid will still leak out of the system even when its a split setup )
very cool technique. I used a blanchard grinder to do mine so they're pretty damn flat. I haven't tried them out yet so I don't know if the surface finish will produce noise. I also used the same grinder to resurface the brake pads. both have fresh life in them I just hope it works well with how I did it.
I'm sure it'll work great. Heck, I've seen plenty of discs with blanchard grinding marks on them. I thought about modifying this technique to use a cup wheel, a sanding disc wouldn't be precise enough. I'm not sure I want to subject my Bridgeport to a cup wheel though.
Long live Bridgeport!
If you run a rubber belt around the vented part (wrap it around tight 2 or 3 turns) that will take a lot of the ring sound out the machining and gives a bit better finish too
nice job
Great vid
First awesome video well explained in detail unlike many other videos. My question is I have a rotor that does not vibrate or shimmy wheel until it warms up. My concern with resurfacing is that it will resurface fine except when it heats up it’s going to warp again? That being said I put new rotors on the front but actually kept the old ones. So it feels to me like the runout changes as the rotor heats.
I think you are right, without normalizing the rotor with a heat treatment first it will likely warp again. There are probably uneven stresses in the material and when it heats up they become noticeable.
Use the knee for setting the depth next time, just a little more rigid and accurate. Other than that, awesome job. I might need to do this for my ranchero
Parallel to each other is important, but perpendicular to the axle center is what's needs first.
good vid!
this is very good
+Ad Ayad Thank you!
I like your technique, there's more than one way to skin a cat
Love the power feed tool. Hey whats the cutter you're using. Tin Coated tool on a fly cutter?
Thanks for sharing. Best Wishes n Blessings. Keith Noneya
It's an inserted CNMG32.51 1/2 shank LH cutter in a fly cutter head. It's TiN coated and not specific for cast iron, but it worked fine. A CBN insert would have been ideal.
I use aggressive pads to do my disc machining. Never have warped disc cause the pads are constantly keeping the discs true. Usually 2 sets of pads to one set of discs. Never machine in between pads. Downside is dust.
a index set along with your rotary table, a cheap Amazon or Ebay stepper motor and controller would be a nice addition to your mil,
I have an idea for another video with the rotary on the BP and it involves powering the rotary table...
feel like this is a good setup for machining slotted and/or cross drilled rotors.
Yeah, you could definitely do a slotting and drilling op this way, you just need to carefully center the rotor and block it up so you can drill through.
Great video. I usually just turn them on my lathe but this is an interesting way to do it as well.One question did you check the specs on that rotor. A lot of rotors made today are "throwaway" meaning they don't really have enough thickness to be safely machined. Not all new rotors are like that but alot of them are.
joe dellaquila The rotors were around .05mm above min thickness after surfacing.
Very interesting approach. I am curious if you measured the outer rim thickness vs the thickness of the inner most turned surface. I would expect the outer edge to be thinner by a few tenths to maybe even a few thousandths, depending on machine alignment and set up. ( e.g. table droop ? ) I think I may give this method a try. Thanks very much for your efforts.
D. Dodge
+Darryl Dodge I spent quite a bit of time tramming things in, but I can assure you that this BP does have some geometry issues...as they all do! I certainly will not do tenths work on this machine without a lot of effort and fuss!
Bonne travail continu
Thanks!
Nicely done video however remember the rotor uses the inside hub surface as the reference for mounting on the vehicle. You didn't mention how you mounted this on the rotary table, but it appears that you used the outside face, which is ok but not guaranteed to be be true to rotor face. You could end up with 2 beautifully machined surfaces that aren't perpendicular to the hub. This is why brake rotors use an inside flange mount and cut both surfaces at once - to maintain that relationship
+Eric “ss195” G Yep, I am well aware. However the manufacturer must make the faces parallel because the wheel mounts to that surface. The wheel has far more inertia than the rotor, therefore if the rotor hat faces were not parallel, the wheel would runout and cause significant vibration at higher speeds. The purpose of balancing the wheels would be moot because the car wouldn't rotate the wheel in a true plane. In use the rotors work fine and have no vibration. I've had these on the car for over a year now and I have no complaints about the work I did.
+eformance Yes, these surfaces are supposed to be parallel for just that reason but all machined surfaces have tolerance which can be further complicated in used parts by rust, burrs, etc. Additionally, its important to have the rotary table setup perfectly square with the spindle or you'll cut taper in the surface. Nothing "wrong" with your process, just thought its worth mention that there are other factors when doing it this way.
saltcar Off camera I cleaned the mounting surface and used a large file to clean off any rust or burrs, to ensure a nice flat surface. Yes, it's important to tram the mill properly when doing an operation like this.
a late would be easier?
More potential for chatter on a lathe, that's why I used the rotary table.
Was the table level? How do you make sure that it is .good job thanks for your time.
Tramming the head is more important than ensuring the machine is perfectly level. Bridgeports aren't super high precision, a precision bubble level is the usual method, but careful reading of a carpenter's level is about all you need for a Bridgeport.
Bridgeports are versatile! Dude, can I send you parts to be milled? I figure you would be reasonable to some machine shops.
I would have been curious to see how flat the face that contacts the axle was.
Did it make an improvement when driving?
Thanks for the show , something I will try one day with my cnc knee mill.
+Mark Rich I didn't bother to indicate the parallelism of the hub and wheel contact surfaces, but since the wheel must run true to the hub to ensure proper balance (a 25 inch diameter flywheel will be quite obviously out of balance if the rotor isn't machined properly) I assumed the mounting flange was close tolerance. The front brakes are fine now, no pulsation, however the rear brakes are starting to pulse a little.
I did not have the same results as u sir. verified rotary table was true to mill head and proceeded to cut as u demostrated. my TIR was within .0003" after cutting. put rotors on suv and holy smokes they vibrated like hell! Any suggestions.....I already bought new rotors but I have another vehicle to do soon.
Check your ball joints, I found that bad ball joints caused a shimmy in the front-end of my truck under braking.
I am a Machinist, I have experimented with resurfacing my own rotors, here are my thoughts... is it worth it? It depends, if your rotor is fairly new and it is not badly warped then yes, if it is older and has a lot of miles on it and or has deep grooves or is warped a lot than no. I have done them on both manual and CNC lathes a good machinist will dial the part in in about 2-3 minutes then a couple light cuts at 20 seconds each flip the part and dial it in perfect reading off the back of the finished side another 2 minutes then 20 seconds to face that side total time is 4-5 minutes a piece. I can do 4 in 20 minutes easily.
Smart idea! but I think its even smarter using a lathe. when you turn the handle and the needle jumps, I belive that's the rotary table not spinning evenly. on a lathe, the surfaces can be machined with one setup, making them perfectly parallel and flat. if you don't have a lathe, this may be the next best thing :) thankyou for the video!
+the russian machinists I've been driving the car for almost a year and a half with these rotors, they have no perceptible shudder under breaking and work fine. Getting a rigid and accurate setup in the lathe is difficult without a faceplate. Turning the rotors true without chatter is another challenge. It's easy to remedy both problems with a rotary table and a fly cutter. I'll take a few tenths TIR on a machined rotor surface *any* day of the week, and twice on Sunday.
I've done many rotors on my lathe without using my faceplate. No difficulty at all. Just takes practice, you know that! I like your video and set up so I mean no disrespect and with the amount of un- knowledgeable comments about how you did it wrong I wouldn't want to encourage them, um, nobodies. I own an actual brake lathe now so I get the job done quite easily and I dont even need to be standing there throughout the cut. To the skepticle viewers watching, be aware that there are other very accurate methods of getting the job done. It was milling machines and lathes that made the one operation machines and they certainly can do the simple little skim that is involved, in this example, a rotor.
Most home machinists don't own a lathe with a 14 inch plus swing to do a job like this. The majority of home lathes are in the 6 to 10 inch swing range, too small to swing a disk the fact that the guy has driven the car for more than 2 years without issue proves his method is OK. Nobody is suggesting a commercial brake shop should turn rotors on a milling machine. In fact since most rotors are coming from China rotors are becoming a scrap bucket item.
Rob C you are very right, i didn't think about that. I'm a machinist and can do stuff at work on larger machines. Sometimes I forget lots of people don't have that opportunity :)
It appears that you had the mounting flange surface bolted to the rotary table and I noticed that you cleaned the surface well which would be OK. Your machining would have made the back surface parallel with the mounting flange. Then you cut the second or front surface using your first cut as the reference. Yes that should do the trick. Very creative use of your milling machine. My question being an automotive shop owner is how long did it take you with set up and machining? I would think a brake job done this way paying a skilled machinist like yourself would cost many hundreds!!! I also agree that new rotors should be cut with the other gentleman. It depends how the autoparts or dealer stored them on their shelves and how flat their shelves are. Gravity and improper storage can warp a new rotor. Nice job. I use an abrasive disc on a die grinder to give a non directional finish after I turn rotors on my Ammco Brake Lathe with the rotors still in motion on the lathe.
+Douglas Tees Initial setup and figuring was probably 30 mins, if I had to do it again, figure on 20 minutes setup/prep and 10mins per disc for machining.
I just purchased a Bridgeport. I was envious of yours! My Ammco brake lathe has problems turning modern large light truck rotors. I think your set up would be the answer. I'm having to repair a lot of damage and wear from abuse and I'm doing some upgrades on my Bridgeport. I'm rebuilding the knee with all new bearings, replacing the x and y lead screws and bearings, x axis power feed and installing a 2 axis dro. My next addition will be a rotory table. What do you think about using an indexable face mill on the rotors? A set of adapters to turn large brake rotors for a Ammco brake lathe would cost much more than a rotary table, for your information, and you can do all kinds of fun stuff besides rotors on the rotary table. One thing you might also try is using a chatter band like we do on the Ammco lathe to deaden the ringing. You may get an even nicer finish however the finish you got is amazing already.
how much does the process take off...rotors now adays are so thin.
Are you talking about the future or the present? Really, you only take off enough to clean up, no more. As long as you are above min thickness, it technically doesn't matter.
I did mine a similar way
Looks like they could also use a trip thru the bead blaster
I really like turning with a mill….I’m in the market for a turn table….any pointers on tables…?
This is an 8 inch Phase II table made in Taiwan, it's what I would consider the minimum viable quality. Buying used is almost always the best value, find an old unit made by a recognizable manufacturer. Troyke is a fairly high quality manufacturer, so if you can find one of those and it's not beat to hell, jump on it.
Surely you need to index to the inner centre surface, rather than the outer surface...
The inner being the mating surface with the car...
Looks an ideal finish..
Correct. Also the hub flange needs to be spotless clean before new or resurfaced rotors are fitted to avoid run out.
Sure glad to see Evan bringing this up. When machining a rotor, use the mounting surface as the datum. Don't forget the hub’s rotor mounting surface has to run dead true. Any run-out of the hub is magnified on the rotor and both the rotor and hub mounting surfaces have to be clean. The caliper float should only compensate for heat fluctuations in the rotor during breaking.
The rotor-to-hub surface must be parallel to the rotor-to-wheel surface for the wheels to remain in balance. The lack of high-speed vibration is confirmation that the surfaces are parallel.
hi sir, my rotors are somewhat new yet they need resurfacing. there is nothing shown visually. the question, can i keep the same brake pads after resurfacing my rotors since they have 60% life left in them? thanks
Yes, you can keep your pads, but you must use a sander with rough grit paper (40-60 grit) to scuff the pads so they are rough again. The pads will be glazed after use and they need to be rough in order to properly bed into the rotor.
Yeah! I'd have two new discs and two sets of pads for 40 quid bought and on by the time the first side is done.........but if your total skint, or stuck, then this is the video. 👍
Yep, the cheapest pad and rotor kit is $40.79, if you're into that sort of thing. I'm not sure I want to trust my life and vehicle to the cheapest bidder.
Did you true your flange faces before you mounted the rotor to the turn table ? Did you check the runout on the turn table when you mounted it to the table ?
Yes, the flanges were cleaned up with a file. The rotary table isn't perfect, but it's good enough (I bought it new and it hasn't been used more than a handful of times).
If it were mine, and sense it a.ready set up, I'd run a carbide end mill around the perimeter just for the new look factor.
good vidio
Nice idea. I may have to try that. I am a professional Senior Master mechanic at a Ford Dealership for many years 20+. I have been trying to find a way to do this at my home machine shop. I'm curious if my face mill would work better than a flycutter. Also it always drives me a little crazy when people use the term WARPED ROTORS. According to all the training I've received over the years it's not warped. It's thickness variation. Most likely caused from differences in the cast material and how it reacts to heat causing a difference in the wear. Thanks for the video, very interesting.
I chose a fly cutter because it has exactly one point of contact along a circular path. The idea was to limit the amount of cutter contact to prevent chatter. I think a face mill could cause chatter on a poorly supported workpiece such as this, for the same reason a brake lathe chatters.
Worth thinking about for sure. I can get tons of rotors for practice. I've been thinking of ways to build a chuck/arbor setup for the lathe and/or mill for awhile. On the hunter BL505 we use at work we use a awesome 3 jaw chuck that slides over the 1" shaft of the machine that makes resurfacing the rotors very quick and easy. I would love to find a way to make that work at home somehow. That chuck from Hunter is over $800. If it's not a quick set up it's not worth doing because the Part Store can do them for about $15/each (I don't trust their work) Thanks for the quick reply. If I can help with any photos I would be glad to, but it looks like that worked ok. Don't know if you tried them on a vehicle to see.
The rotors have been installed on my Volvo V70R for the last 2 years. I haven't put enough miles on it to get around to replacing them yet. The method worked great....these rotors have 140k miles on them.
To the people getting excited about how precise brake rotors must be.... please. Ask me how I know you've never actually removed many that were actually in service. Some of the most messed up stuff is on the road daily as a result of simple use and the uneven wear that ensues. I have turned them myself in my lathe, although I do not recommend turning rotors on any machine tool you like as they do not produce chips but nasty metal dust that will try to ruin your machine. It's not rocket science. In a pinch I blocked the rear of a superduty one night before a trip half way across he country and with the truck in overdrive at idle used a HAND GRINDER to straighten out a rotor surface since all stores were closed and the race was the following day. The brakes had zero issue and that rotor remained in place for a year or so until the rear pads were again worn out and I did pads and rotors at that time. Hand grinder on a rotor spinning at engine idle. That setup took about 1:40 seconds start to finish. Oh the humanity!
Look at some ACTUAL vehicles sometime that have been IN USE for a time before you pontificate about the supreme importance of brake rotor surface ra and runout in the ten thousandths of an inch or so..... Fake news. We are dragging a composite pad against a piece of steel, not designing an F1 rocket here.
I just want to know why you plan on replacing them in a few months after you just machined them to spec? I would run them until I need a brake job. At that time, knowing that they were already machined to near minimum the last time, replace them then.
I haven't replaced them yet. They've been on the car 3 years so far, no problems.
Interesting thanks.
You could also crank up the Bridgeport to the highest speed and use a grinding cup wheel mounted on an arbor. then hard spots or heat checks on the rotor are no problem
+1995dresser I have an idea for a video that is a variation on this. Yes, I think you could use a cup wheel to blanchard grind the surfaces. A flywheel grinder doesn't spin much faster.
Hi
I would have like to have scene you measure them for being parallel. I believe the reason rotors are sanded after they are turned on a brake lathe is to prevent the "Elvis Presley Effect". I bought a set of new brake rotors several years ago and when I went out to test drive the car there was a loud popping noise. What it turned out to be was when the rotors were turned they had small groves in them just like a record. When the brakes were applied the pads being new and rough grabbed the groves and the brake calipers were moving in or out just like a needle does on a record. When they reached a certain point they would pop back then start all over again. When I first heard it, I thought to myself what the hell is that.
Thanks for sharing
John
imystery man
You want to achieve a non-directional surface. A brake lathe turns in the direction the rotor turns so you grind/sand to break up the directional pattern the lathe machining process leaves ... With no line to play you have a quite rotor :) He achieved a non-directional surface...
Hobo Rosser I know all about he non-directional surface needed, I was wondering how parallel they turned out.
imystery man I just did a brake job on a Ford pickup and the new rotors were just a turned surface, although smooth. For fun I decided to measure the runout of these brand new rotors, it was 0.003". The runout of the rotors from this video was less than 0.001" when I was finished.
I suspect that your problem was likely due to not replacing the anti-rattle clips and lubricating them with a high quality grease -- this will cause uneven wear of the pads, noise, and sticking pads. Also, proper bedding procedure involves several light and moderate stops from several speeds, if not done this can also contribute to noises, etc. The last new rotors I installed (on my truck) were blanchard ground and had a rough non-directional surface. FWIW, the new rotors mentioned above exhibited no ill effects from simply being a turned finish, however that's not how I'd do it and not conventional wisdom -- the parts shop sold some bottom dollar parts.
imystery man When I measured the thickness of each rotor, I did it over several locations, the variation was less than 0.001", so if you have less than 0.001" runout and less than 0.001" variation in thickness, you can conclude the parallelism was less than 0.001" and total deviation from the hub mounting surface was less than 0.002". Based on recent measurements of production rotors, this is a smaller error than the tolerance allowed on new parts.
eformance The problem I had with the brake job was the rotors were cut coarse and there were groves in them just like a record, it was over 25 years ago and way back then I would guess the quality of import rotors was not that good. I bought a ammco brake lathe and turned a lot of rotors myself but these were before I bought the machine.
"Quick Timmy, grab me my lathe"
Thought of doing this that way, never done it though. Great job. Did it stop pulsing?
+Joel Stewart The vibration went away, now I have to do the rears!
+eformance so this was about eight months ago... Did you do the rears, and how was the final ride?
+Glenn Lawrie-Smith I have still yet to do the rears. I just got the car licensed again after having to get a replacement title from out of state.
Dampening has always been recommended by all brake machine manufacturers (elastic band, bonded lead weight). Oscillations may cause material fracturing. Thanks.
+63mrl Hmm oscillations and material fracture, good info!
Great job !! but you don't worry about that fine dust?? it goes everywhere
+fly3209 Yeah, it goes everywhere, but since the axes were stationary for the milling, I just vacuumed it up and wiped down the ways. Bridgeports don't lend themselves to way covers, you tend to lose travel and chips get trapped in the bellows.
Should I resurface the rotors everytime I change the brake pads?
I don't, unless the surface is uneven or damaged.
Hey Perry,
For some reason I pictured you as slightly older. Nice to see your face. You speak very well on camera. Nicely done.
Cheers,
Tom
I am having trouble with my front brakes? Have new rotors and brakes,pads?but when I go about one to two miles,and the brakes,get hot and lock up And the rims are hot? Wants with it and can I fix it?
+Michealr Brannan It sounds like you have frozen brake calipers. The brake caliper is sticking and not releasing, causing the brakes to get hot and stop the car. Eric The Car Guy just talked about this on his ETCG1 channel the other day: th-cam.com/video/q2Uhb_ZNaXg/w-d-xo.html
eformance would you please call me? Would you give your numberplease?
+eformance bad hoses can cause that too...
I would of indicated the refinished surface (bottom) to ensure the to be turned surface is absolutely square.
It works! - That`s o.k.
How long did it take to machine the rotor?
Actual machine time was about 20mins per rotor, but the whole job, with filming was a couple hours.
neat!
The inside inner part should also lined up
I've been on the automotive trade over 50 years this proves that we have some dangerous people in this trade
nice
Im wondering how parallel the two surfaces are to each other. I feel the best way to machine a rotor is on the car, but you have to spend the time to set it up properly.
You can see the parallelism at the 8:00 mark, it barely tickles a 5 tenths indicator. The rotors have been on the car for 4 years now, a few k miles, and they've been fine.
I don't see how checking one side tells you that its parallel to the other side, but have never machined rotors this way. I would check them with mic around the rotor. If they have been good for 4 years thats all that really matters. Thanks for the feed back
8:57 how did you make out? A lot of machinists make the mistake like you seem to have by cutting one side by the hub mounting surface and the other by the wheel mounting surface which aren't always perfectly parallel and end up with a terrible pulsating. You should first start with the hub mounting surface and skim the wheel mounting surface to make sure they are exactly parallel. The calipers can handle a little wobble side to side without noticing, but if the rotors get thicker and thinner as they go round by even the slightest amount, you get lots of pulsating.
It worked fine. The inside surface is mounted to the hub, the outside is what the wheel mounts on. If the surfaces were not parallel, there would be a very noticeable imbalance of the wheel at speed. These are the original rotors from new, and it never had any imbalance, even at Max-Q 😁 I haven't bothered to replace these rotors since I turned them.
@@eformance That's awesome. I know they are supposed to be parallel, but no one notices slight wiggle in the rim, especially if they have big enough sidewalls. I've seen some doozies. A friend of mine tried to do the same thing as you (a professional machinist for 30 years) and realized after he mounted them back on the car and ended up taking them off because of the brake pulsating to find out what he screwed up and sure enough, the hub mount side wasn't perfectly parallel with wheel side. He machined the wheel side while mounted on the hub, and redid the inside rotor surface and it worked great. It also helps to run the micrometer around to check. I'm guessing Volvo has pretty good quality control. Unlike some american companies that I won't name.
I did one on a lathe it worked fine. Don't let the cutter dwell ah
What size rotary table is that, 10"? Also, what size flycutter are you using? 3"?
It's an 8 inch rotary table and the fly cutter was about 3 inches in diameter.
Awesome, thanks. I think this method looks very good for rotors that are still in decent shape. Gonna try it myself on my smaller mill.
Why the rotor bend from the beginning ?
Heat cycling to begin with. Then I did a botched turn job on it a while back, I didn't keep the surfaces parallel. That's why I chose to mill the surfaces, so I could get them back to true, instead of the depth of cut varying on a lathe bit, causing small changes in thickness.
new these are about 30 or 35 each for my truck. My local auto shop turns these on a machine made for turning rotors for 10 dollars each. I can't do the set up and machine them on a milling machine for 20 bucks plus tear down and clean up!
At the time they were about $99 each and for a car that doesn't get driven much, this was fine. Now the OEM replacement rotors are $64 each. I will probably do these next time I take the front wheels off, since I have to do a rack too.
@@eformance I would ask a automobile machine shop. They will have a brake surface machine. In my town they machine them for 10 dollars each.