Arduino IoT Cloud ESP8266 NodeMCU Alexa Home Automation system | Internet of Things projects 2021

ฝัง
- เผยแพร่เมื่อ 4 มิ.ย. 2021
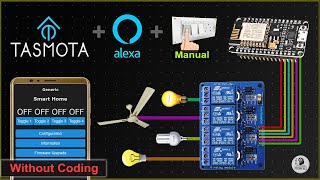
- In this Internet of Things projects, I have shown you how to make the Arduino IoT Cloud ESP8266 NodeMCU Alexa Home Automation system to control relays with voice commands and manual switches. I have used all the free tools for this IoT-based smart home system.
$2 for 1-4 Layer PCBs, Get SMT Coupons: jlcpcb.com/RHS
Download PCB Gerber file for this NodeMCU IoT based home automation project
drive.google.com/uc?export=do...
Visit the following website to get electronics components, modules at a very reasonable price
utsource.net?source=TH-cam
During the tutorial video, I have covered the following topics:
00:33 Control appliances with Alexa using Arduino IoT Cloud ESP8266
01:11 Control ESP8266 NodeMCU without internet.
02:28 Required Components for this NodeMCU IoT project.
02:40 Circuit diagram of NodeMCU Alexa home automation project.
04:01 How to set up Arduino IoT Cloud for ESP8266 NodeMCU.
07:10 How to create Arduino IoT Cloud dashboard
08:07 Program NodeMCU with Arduino IDE
10:08 Setup Amazon Alexa App to add Arduino IoT Cloud.
11:14 Control relays with voice using Amazon Alexa App
Required Components for each room for this NodeMCU home automation
1. NodeMCU
2. 4-channel 5V SPDT Relay Module
3. Push Buttons
Amazon India Affiliate links:
NodeMCU : amzn.to/3fJA4EG
4-channel 5V Relay Module : amzn.to/2BQ5Y3o
Echo Dot Alexa(4th Gen) : amzn.to/3srCiPA
Amazon United States Affiliate links:
NodeMCU : amzn.to/2WoR2A2
4-channel 5V Relay Module : amzn.to/3r2HuJ4
Required Components for the NodeMCU control Relay Module PCB:
1. Relays 5v (SPDT) (4 no)
2. BC547 Transistors (4 no)
3. PC817 Optocuplors (4 no)
4. 510-ohm 0.25-watt Resistor (4 no) (R1 -- R4)
5. 1k 0.25-watt Resistors (5 no) (R5 -- R9)
6. LED 5-mm (5 no)
7. 1N4007 Diodes (4 no) (D1 -- D4)
8. Push Buttons (4 no)
9. Terminal Connectors
10. 5V DC supply
Click on the following link to visit Arduino IoT Cloud sign up page
store.arduino.cc/digital/create
**Here I have used the FREE plan of Arduino IoT cloud, so you can control maximum 5 relays with the FREE plan.
**You don't need any Alexa devices like Echo Dot. You can just use Amazon Alexa App for this IoT project.
**Real-time feedback is not added to the sketch.
**This sketch contains 3 files. keep all the files in the same folder.
Download Code for this Arduino Cloud NodeMCU smart house automation project from the following article.
iotcircuithub.com/arduino-iot...
During the Arduino IoT cloud tutorial video, I have explained all the steps to make this NodeMCU ESP8266 smart home system with Arduino IoT Cloud to control the home appliances with and without the internet. I have also shown how to connect Amazon Alexa with Arduino Cloud to control the relays with voice commands. If the NodeMCU connected with WiFi then you can control the relays from anywhere in the world with Alexa. So with this smart house project, you can convert any appliance to IoT devices and control them through the internet.
So, now you can just say "Alexa, turn on Light" to control the home appliances.
#internetofthings #homeautomation #alexa
-------------------------------------------------------
Thanks For Watching...
✅ SUBSCRIBE ✅LIKE ✅SHARE ✅ COMMENTS
Find out more such projects: iotcircuithub.com/
Facebook: / techstudycell
Instagram: / techstudycell
Telegram: t.me/techstudycell/
Twitter: / techstudycell
-------------------------------------------------------
Other useful Internet of things projects:
Latest NodeMCU projects playlist:
• NodeMCU Projects
Latest ESP32 projects playlist:
• ESP32 Projects
ESP32 Smart Home System with Amazon Alexa app & Manual Switches
• ESP32 Smart Home Syste...
Smart Home with Google Assistant & Alexa using NodeMCU ESP8266
• Smart Home with Google... - วิทยาศาสตร์และเทคโนโลยี


Great project, yours is the first project I see using Arduino cloud Esp8266. Thank you so much.
Thanks
Awesome video, nice work and very well explained. Please continue like this, I enjoy your videos very much !
Thanks for the feedback.
Nice video and great work, wondering the Arduino IOT cloud can also update the status of the device if I manually switch on/off ?
at the end of the video when you guide us to select the node mcu board , the node mcu board is not showing in the board section...what to do?
FIRST COMMENT
I'M WAITING FOR THIS
WOOWWWWWWW
THANK YOU SO MUCH
THANK YOU SO MUCH
Welcome
@@TechStudyCell
Next Our Kindly Request-
ESP32, 8 CHANNEL RELAY + GOOGLE ASSISTANCE + BLINK
I TRUST YOU ❤️❤️❤️🔥🔥🔥
Excellent! Useful, helpful, clear and concise, well explained and documented, no loud and distracting music. BIG THANKS
Bro which relay do you use and with which components. Cause if we make pcb, then we can't use the relay module but instead use the relay with some components like resistors and diode. Can you tell what they are and circuit diagram for them.
Дорогой индус! Твой гортанный английский это что что то с чем то!
Лучше говорил бы на своем хинди!
This is another mind blowing project you made....
Thanks
Can we use TTP223 touch switch instead of push button
Sir can we add ir also for these projects if their is no internet connectivity?plz replay
Very useful smart home project. Thanks for sharing👍
Welcome
can i use a dh sensor along with the alexan and arduino iot cloud
Hi Tech Studycell... Great Projects from you... Small doubt shall we turn on lights by saying the wake word as Alexa, Go to Light one??
I have done same process just like you, but at the time, when I click on discover device in alexa aap, it says no device found but shows all my 4 switches in device option, but as I turn on and off these switches, it doesn't work with nodemcu even after it is connected with my mobile by hotspot
You are the best sir
I think this is first project using Arduino IoT Cloud, after releasing from Arduino....🎉🎉
Could be. Arduino IoT Cloud with ESP8266
Hello, tried to replicate your work in my home with just 1 bulb. Does nodeMCU can connect also in a hotspot environment? the light indicator didnt turn on in nodemcu but it is connected in my hotspot.
With out using the manual switch did i want to change the code??
Hi, love yours projects. Did you see the new Blynk Iot app? Looks like its amazing
Yes. Already started working on it. Thanks
Thank you, you're the best.
How to make this same project on latest esp8266 because in latest one there is no red and blue light , and if we upload same code it not switch on relays maybe code wants to update . So can you tell me or make video on with latest node mcu esp8266 board .
Ben fatto il tuo progetto... Bravo
how to use the touch sensor near the push button?
Thank you so much for your time and for sharing your project. I have a questions ragarding the files, is not possible to combine all the files into only one file?
Yes
@@TechStudyCell Thanks man! grettings from Costa Rica
Very good, friend!
Tks...
Superb bro!!!!! Thanks.for.this amazing tutorial
Most welcome 😊
same connection, the manual works instead voice only receives the signal but does not turn on the relay how can I solve?
Hello and thank you for sharing your knowledge with us. please with which application can i open the (gbr) and (drl) files? In my country our currency is not higher than our currency, so it is impossible to order or have paid applications. Thank you in advance and sorry for the inconvenience
#define SwitchPin1 10 //SD3
#define SwitchPin2 0 //D3
#define SwitchPin3 13 //D7
#define SwitchPin4 3 //RX
these manual switches will create issue if left on/off based on different pins.. can you check and consider them?
Nice. How do we update the app to show the status of the light when you use the manual switch. TY
You can monitor real time feedback
its good to see your project
its better if you sell these ready pcb.
For PCB please send email to connect.techstudycell@gmail.com
Need help, BLDC fan cantrolling and alexa cantrolling
CaN you help me with this
Hello my friend I have a RESISTOR 5.1K OHM 1/4W 0.25W with
Can this cause me problems?
Excuse me Sir....
May I know
The WI-FI range of this
Node MCU board....which the Range of distance from we operating .....
Great brother this working 🙌🏽💐💐
Great 🎉🎉🎉👌👌. Thanks for sharing. Very very useful
Hello i got issue Error compiling for board NodeMCU 1.0 (ESP-12E Module).
Plzz reply me sir kitne range se control krrr saktee
Awesome project
Thanks
What if the board blows off due to some technical problem then the manual switch also won't work then how to encounter this situation ???? Kindly help
Very interesting project bro.👍👍
Thanks
I have issues I contacted my switch and switchs are blynking not constand off ya on Please Help How can I fixed
Great project congratulations
Thanks
Nice project man. Can you tell me some resources to learn nodemcu programming. I am a beginner.
Sir, mera Arduino uno reverse output results deta hai example (HIGH,= bulb off hota hai
Sir can i get real status feedback in Arduino iot cloud app like blynk app.
Please help sir.
Great job keep it up
Thank you
i am not getting Tnink ID at it cloud Web page
, what to do?
Can you show if the arduino code is successfully uploaded?
Very good project I like you so much 🙏
Can we connect it directly to the 220v?
I don't know what the problem is but my mcu doesn't connect to wifi. I am using mobile hotspot with 2.4Ghz frequency
Does this work with google assistant too?
sir will this code work with esp32?
Will the same code run on ESP32?
this is awesome project. Can you add a stepper motor?
Hello. thank you very much for your many tutorials. I would like to please you do a tutorial to control Arduino leds with neural waves. neuroscience. Thank you
Noted
I am facing an issue.. When i try to control it with buttons, bulb start blinking... Means on/off repeatedly.
Please help me.....!
hello
excuse me, your explaination is not clear in terms of code. When i downloaded my code i found that switches need code but when i downloaded your code i found it is different and all pins are defined.
Thank you,
Pls add manual switch not like push button..
Or give the direction to change code
Excellent presentation.
Thanks for your feedback
Super👌
Thank you
How Can we replace push buttons with switches
amazon alexa app installed. But it not open.it show "No network available .Please try again." [please fix this problem.]
how can we add temperature sensor dht11 sensor in code
Good Project ! but custom design PCB from JLCPCB Price is cheap for PCB but the shipping charges are 12 times more than a PCB price
For PCB please send email to connect.techstudycell@gmail.com
@@TechStudyCell Sent an Email waiting for the reply
Super
Sir do the same thing with esp32 please !!! Btw learned a lot of things from your videos, thanks a lot
Ok. Thank you
@@TechStudyCell yes sir please
Thanks Bro, I liked your project and implemented in my home as well. just one request can you please share the code for manually operate the devices with normal Switches (other than push button). Waiting for your replay.
Thanks in advance...
Bro you know to change the name
switch1 to roomlight
Wow.
I like your work, it is inspiring!
Please, I recently purchased ESP8266. Unfortunately the device driver could not install automatically with my version of window 7. After several attempts, I managed to install the drive from sparkfun. I have installed the esp8266 in my Arduino ide library. The problem now is I am unable to upload a simple code inside the node MCU device. I always get error, "port can't be opened, access denied". If I manage to open serial monitor on code view, I get the following error "port 4 busy" what do I do please?
Under my computer device manager, esp8266 is installed as port 4.
Try to use different USB. Also update the Arduino IDE
@@TechStudyCell
Thank you Sir
I'll try to update the arduino IDE, that is the only thing I have not done so far.
if i control with switch what i need to change in this code sir plz let me know {when i presh switch relay onoff onoff } plz give me solution tq so much sir
this code is not uploading its shows error that indicates error on library
Bro if i want to use switch instead of push button what's the changes in scatch
Hello bro plss tell me
Hey. i have a problem when i tap (on) on the alexa app realy turn( off) and when i tap (off) relay will turn (on) what is the problem?why the orders are reverse (I use exaclly your code on your website
There is mistake in the coding just change the wording in void loop from relay high to low and from low to high in the ending of the code then it will work properly
Sir kitnaaa range hai control krne kaa
Your code is working wrong when I turn on it off and when I turn off it on. Please help me.
Android phone she coding hoga sir y project ke liye Answer SIR
How to control the fan speed with it??
Hey, Tech Studycell can we control by google assistance How?? please answer I need Help
No. Only Alexa
mast h bhai.... is blynk going yo be paid or not.?
I am using ESP12F and SD 3 is 5v, So Iam not able to control manually.
You can use D4 instead of SD3
Sir can you please do this Same project with switch.
todo salio excelente solo un error de tipeo en ( digitalWrite(RelayPin3, LOW);
Serial.println("Device2 ON");. saludos! desde argentina
muito bom
Bro I have an doubt we control the Alexa from anywhere and it has any ranges pls msg me
Bhai is circuit ko direct switch board me kaise lagay wiring kaise kare
Do don't get any error in compiling the arduinoIOT cloud?
I am getting errors while compiling
Can u plz help me out to purchase PCB and related components..
To purchase this complete project please send email to connect.techstudycell@gmail.com
Plz give me code this project with target switch
Sir all conection ok but really not on?
redefinition of 'const char THING_ID []'
....someone help
Greetings from Brazil!!
what happens I can't compile the Error Below:
Arduino: 1.8.14 (Windows 10), Placa:"NodeMCU 1.0 (ESP-12E Module), 160 MHz, Flash, Disabled (new aborts on oom), Disabled, All SSL ciphers (most compatible), 32KB cache + 32KB IRAM (balanced), Use pgm_read macros for IRAM/PROGMEM, 4MB (FS:2MB OTA:~1019KB), 2, v2 Lower Memory, Serial, None, Only Sketch, 115200"
In file included from C:\Users\carlo\Desktop\PROJETOS\CONTROLE WIFI\CONTROLE CASA\COM ALEXA\Code_NodeMCU_Alexa_ArduinoIotCloud_4Relays\Code_NodeMCU_Alexa_ArduinoIotCloud_4Relays\thingProperties.h:4,
from C:\Users\carlo\Desktop\PROJETOS\CONTROLE WIFI\CONTROLE CASA\COM ALEXA\Code_NodeMCU_Alexa_ArduinoIotCloud_4Relays\Code_NodeMCU_Alexa_ArduinoIotCloud_4Relays\Code_NodeMCU_Alexa_ArduinoIotCloud_4Relays.ino:17:
C:\Users\carlo\Desktop\PROJETOS\CONTROLE WIFI\CONTROLE CASA\COM ALEXA\Code_NodeMCU_Alexa_ArduinoIotCloud_4Relays\Code_NodeMCU_Alexa_ArduinoIotCloud_4Relays\thingProperties.h: In function 'void initProperties()':
C:\Users\carlo\Documents\Arduino\libraries\ArduinoIoTCloud\src/ArduinoIoTCloud.h:103:64: warning: 'void ArduinoIoTCloudClass::addPropertyReal(Property&, String, permissionType, long int, void (*)(), float, void (*)(Property&))' is deprecated: Use addProperty(property, Permission::ReadWrite) instead. [-Wdeprecated-declarations]
103 | #define addProperty( v, ...) addPropertyReal(v, #v, __VA_ARGS__)
| ^
C:\Users\carlo\Desktop\PROJETOS\CONTROLE WIFI\CONTROLE CASA\COM ALEXA\Code_NodeMCU_Alexa_ArduinoIotCloud_4Relays\Code_NodeMCU_Alexa_ArduinoIotCloud_4Relays\thingProperties.h:30:16: note: in expansion of macro 'addProperty'
30 | ArduinoCloud.addProperty(Chave1, READWRITE, ON_CHANGE, onChave1Change);
| ^~~~~~~~~~~
C:\Users\carlo\Documents\Arduino\libraries\ArduinoIoTCloud\src\cbor\lib\tinycbor\src\cbortojson.c: In function 'value_to_json':
C:\Users\carlo\Documents\Arduino\libraries\ArduinoIoTCloud\src\cbor\lib\tinycbor\src\cbortojson.c:578:38: error: expected ')' before '__INT8'
578 | if (fprintf(out, "\"simple(%" PRIu8 ")\"", simple_type) < 0)
| ^
| )
C:\Users\carlo\Documents\Arduino\libraries\ArduinoIoTCloud\src\cbor\lib\tinycbor\src\cbortojson.c:637:39: error: expected ')' before '__INT64'
637 | r = fprintf(out, "%s%" PRIu64, val < 0 ? "-" : "", ival);
| ^
| )
exit status 1
Error compiling for NodeMCU 1.0 board (ESP-12E Module)
With others Sketch compiles normal.
Thanks!!
Hi sir nice project please make control 8 relay with rf remote and android phone use nodemcu 8266 please sir
I want to change the devices name should I also change the devices name in code please reply
Bro i changed but showing compilation error 🙁 in program
@@abhisvibetech6121 thanks bro
Sir we can use phone charger for code in node nodemcu
Sir please comment
Bro For powering mobile charger is ok
But programing you need a smart phone Or PC
Broo it can give security 🤔
How can we use TTP223 instead of push button
yes. but it should give LOW output when it sense any touch
Great tutorial. Thanks. I am in Nigeria. My Amazon Alexa app does not seem to be working here. Installed but cannot open on my android phone. Keeps closing by itself. Please help. Thanks.
Then you can only control from Arduino web dashboard and Arduino IoT cloud remote app
Okay. Thanks. Will use those.
Sir you have done a good job but there is mistake in your code when we say turn on the light gets off and when we say turn off the light gets on in your code you have written HIGH turn Relay off and when LOW Turn Relay ON it is opposite in HIGH it should be ON and LOW should be OFF and in your vedieo you have not shown to connect the wifi credintial in our arduino iot cloud
Whats the limit for variables to add in free version?
5 variables