Arduino IoT Cloud 2021 - Getting Started with Arduino & ESP32

ฝัง
- เผยแพร่เมื่อ 8 พ.ค. 2024
- Learn to use Arduino's and ESP32 with the updated Arduino IoT Cloud.
Article with code: dronebotworkshop.com/arduino-...
More articles and tutorials: dronebotworkshop.com
Join the conversation on the forum: forum.dronebotworkshop.com
Subscribe to the newsletter and stay in touch: dronebotworkshop.com/subscribe/
Talk on the forum about this video: forum.dronebotworkshop.com/20...
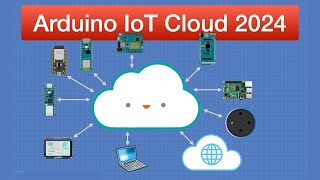
The Internet of Things (IoT) can add a lot of convenience to our lives, with a myriad of connected devices available from hundreds of manufacturers. But it’s even more versatile when you can build your own IoT devices.
There are a few products that can assist you in creating your own IoT devices, like Blynk and IBM Node-Red. Today we will look at another one of these products, the Arduino IoT Cloud.
The Arduino IoT Cloud has actually been around for a couple of years now, but recently it was given a “facelift”. In addition, Arduino has updated its cloud plans, there are now four tiers including a free one.
One of the big improvements is that ESP32 and ESP8266 support is now included in the free plan!
Today we will see how to get started with the Arduino IoT Cloud. I’ll show you how to select a plan and set up your workstation with the Arduino Create agent. Then we will build a few cloud devices using an Arduino Nano 33 IoT board, and Arduino Nano RP2040 Connect board and an ESP32 WROVER module.
Here is what we are covering today:
00:00 - Introduction
02:18 - The Arduino IoT Cloud
06:09 - Selecting a Cloud Plan
09:41 - Installing the Arduino Create Agent
11:21 - Building your first Thing & Dashboard
25:25 - Adding a DHT22 to your Thing
32:36 - Two Things with no Dashboard
41:25 - Using an ESP32
49:47 - Conclusion
I also will show you a few “bugs” in the current implementation of the Arduino IoT Cloud, as the product is constantly being updated some of these may be resolved by the time you view this video.
And although I subscribe to the “Maker” plan, the experiments we are doing today can all be done with the free plan. So it won’t cost you anything to get started. - แนวปฏิบัติและการใช้ชีวิต


![500 บาท สุ่มกินสตรีทฟู้ดริมทะเล หาดจอมเทียนพัทยา 8K [HDR]](http://i.ytimg.com/vi/aZLagyZyQE4/mqdefault.jpg)


Hi everyone - It's come to my attention that there has been someone masquerading as myself, responding to some comments here with a link to a Telegram chat to win a prize from me. THIS IS A SCAM, I am not holding a contest, nor do I have a Telegram account. PLEASE DO NOT RESPOND TO THESE MESSAGES!!
It's happening on a lot of my videos, I'm taking steps to remove them manually, but as I have 162 videos, it will take some time. If you do run across a suspicious comment, I would appreciate you letting me know at info@dronebotworkshop.com.
Thanks!
Bill (The real one!)
So sorry for the long gap between videos, have had a bunch of tech issues (hopefully now resolved) plus I'm involved in a new robotics project (plus the resurrection of an older one) that I'll be showing you very soon, and it's been taking up most of my time. Hope you enjoy the video!
Your content is always worth the wait. Thank you for your efforts.
No problem quality content is more appreciated than frequent content
Robotics 😍😍😍😍 we are waiting!!
Was actually looking for a video on this topic yesterday perfect timing thank you!
No problem at all. We are patient for quality content !
As a 74 year old novice I decided to give this project a go, it took me a day to get it working with the Arduio Nano33 IOT. Most of the time was spent solving issues that were unrelated to the excellent tutorial. Thank for the great work Bill.
A ton of capability revealed here in an easy to understand straightforward manner. Thanks for putting this together.
Bill,
This was another great educational video. I'm glad to get exposure to this topic and find an option for over the internet control. Thank you for showing both the Arduino and ESP32 for the same application. It gives those of us who don't have much exposure to the ESP32 but quite a bit to the Arduino a better understanding of how to bridge the gap to the ESP32. Thank you for putting this together and sharing.
i just wanted to say you are the best teacher you got me through uni projects and gave me so much knowledge.
thankyou for your hard work
even though i am becoming an artist and have left engineering as a career choice i still love to watch your videos :D
An engineer is an artist
You're sorted
I'm contemplating setting up an Arduino MKR controller to control a couple of AC outlets and monitor temperatures at a remote location. This video is a treasure-trove of getting started.
Thank you so much! This is amazing!
Very good introduction, thank you 😀
I already have a project in mind for this, something I’m currently doing with three ESP32s and a Raspberry Pi running a NodeRed flow. My current set up is quite hard to maintain. When I add functionality I have to remove the ESP from its enclosure, then connect it to my pc then upload the revised program, then put it back in its enclosure. This takes time and could create problems with the connections as I have to disturb the boards they are mounted on. The OTA functionality will save having to remove them from their enclosures and the dashboard feature can release my Raspberry Pi for my next project.
One of the best channels I've found with such a huge amount of information. Clear and easy to follow.
Good to see you back sir. A beautifully put class. Thanks and stay blessed.
THANK YOU so much for doing this. I borrowed a book from the library "Connecting the Arduino to the Web" and I found it way too complex. This method is way easier.
Finally getting into Arduino Cloud. I was resisting for the longest time: I’m happy with the IDE.
But you have convinced me. And saved me time figuring all this out. Merci and dressings from Ottawa.
This was one of those videos that have a classic light bulb moment, BING!
A simple alternative to NodeRed and MQTT, for a home barometer project, now there's an idea that I can use. Thanks.
A thoroughly interesting video.
I really love your workshop videos, they have helped me out on many occasions
This is great Bill, exactly what I was looking for to build my first IoT project.
Montréal? So am I! :D Thanks for all your videos! I’ve learned a lot with you! Today I was proud to connect a RGB LED and control the intensity of each color with 3 sliders from IOT. I placed the breadboard on my balcony and went far away (but close enough to see it) in my car to control the LED with my phone!
Thanks for the video. Your presentations are clear and well explained, with a lot of good info. I have subscribed and plan on joining the forum.
Yet another outstanding video. Many thanks Bill for al the efforts you put into this awesome TH-cam channel. 👍👍👍
Outstanding! Really appreciate you creating and sharing your work. It doesn't "just" happen, represents a lot of work. What are you using to draw your circuit diagrams? Cheers
Roger I agree great work. I am 79 and still learning.
Lots of things (lower case things) to know. rewind and play, rewind and play. THANKS BILL!
As always, an excellent video! Thank you for sharing it!
Thanks for all of the effort you put into these videos.
Thank you Sir. Just today I started to learn about I cloud. This helped me so much. Profitable time spent with you.
This looks really cool and accessible. And you are doing a great job demonstrating it. I would really like this to be independent from a central server I have no control over.
Great videos. Very well explained and covering interesting use cases. Appreciate the effort sharing your knowledge.
Great video. You may want to have a short video on initial connection of the IOT cloud, especially where you get the error can’t find device driver or device driver not installed, and how to correct that. Thanks again
Thanks for sharing because it taught me how good the Arduino IOT platform now and how easy it is to use. Plus, great to see a fellow Ubuntu user!
Excellent video, Bill, as always. I didn’t know how bad I needed this until I watched this video. Question, you mentioned Blynk in this video. Did you ever get a chance to to a tutorial on Blynk? Just curious since I couldn’t find it. Did I miss it? Keep up the fabulous work!
Thank you! Now I have a much better understanding of the Arduino IoT
Hi Bill,
Great video as always. I had a little issue with the Nano 33-iot. It wasn't being recognized by the IOT cloud interface. I went into the arduino ide and set the device to Nano-33-iot and the port that was recognized. After doing these steps, the devices was recognized by the IOT cloud interface. I guess I should have known this, but others may have the same problem. It doesnt seem that this step should be necessary, however. Thanks again for a great video and ALL of your great videos!!😃
A fellow Canadian, cheers from N.S.! Do the exact same video with AWS, Azure, etc. This is in demand and timely! Keep up the great content!
Thankyou for your demonstration.😄
Thank you, this was really good. Keep up the good work.
I was very confused until now. Thanks very much
Thanks for this tutorial!
Very very informative and interesting. Thanks for your effert to creating such amazing tutorials. 🎉🎉🎉🎉 thank you so much 🙏
thank you, amazing video. need more on ESP32
Ur videos are highly apreciated sir.... Thanks....
Finally.Thank you for great video like others
Some very strange responses to this video. Thanks for the time to make this. Another option for controlling remotely. Good to know.
Awesome job as usual. I would be very much interested about your view / comparison with the Blynk IoT service!
Another great instructional video. Thanks ! Arduino IoT Cloud is a great tool !
Thank you for the video! Awesome content.
22:25 Serial Monitor Moved -> [Sketch] tab -> click on the 'magnifying-glass' icon (opens serial monitor in new browser tab).
27:38 dht library - if not found in search, click on the [LIBRARY MANAGER] button (above search)
Such a nice explanation, this video require million of likes
Excellent detailed explanation!! Thanks very much
Excellent explanation, thank you very much! 🤗
Its really wonderful presentation. Thank you sir❤️
An excellent video!!! I would also like to watch comparison of other IOT platform like Blynk and others, whilch one is easy to use and better. Thanks.
great video as always I'm using my arduino as a mini webserver for itself so i can control a bot from the browser this would be awesome for the ease of the app application
Thank You Sir. Very Helpful
nice instruction/ tutorial, very clear.
simply awesome !
thanks !!!
Muuy Buen video...saludos desde SPS, HONDURAS.....veo tus videos.
Thanks for the great tutorial.... just two quick comments/questions : 1. In the sketch for the first thing, could we not just have used DigitalWrite(myLd, RedLED) instead of the if...else and 2. when using delay(500) in the main Loop routine won't we be hanging up the board (thread) and not calling the ArduinoCloud.Update() method as often, thereby introducing a 1/2 second propagation delay? would it make a more responsive solution to use a counter to decide when to read the DHT22 and call the update more often to get a more regular cloud synchronisation? .... just curious.
I just love your videos. Thank you so much for sharing your knowledge. I would be grateful if you could please provide a video on creating 32 buttons and a slide potentiometer joystick emulator using either pi pico or Arduino Micro/Leonardo (whichever you have to hand). I would like to add this project to my flight sim. I have seen so many videos about this but not detailed. I have watched most of your videos and you make them so easy to follow. If you can help, this would be much appreciated.
Thank you for your excellent video!
Great video, thank you. The IoT Cloud looks fantastic, wish I could think of a project to make. The max temperature should be 50c here in Australia.
I'm in Aus, and I have a photo where my car was showing 52 degrees outside - it was a freak heat wave day.
And -35C here in Norway in the Winter. Summer can be hot here 33-34 C
@@oladunk9986 We don't really understand 'cold' in Australia.
Fantastic video! I wonder how much network traffic the devices require if they need to constantly communicate with the cloud. I don't like that it opens a gateway into your home network and you store your wifi credentials in the cloud.
I checked your channel yersterday and there was no update from a month, i was really concerned that everything was ok or not....
On other hand i was thinking you are working on a big project so i was exicted for the upcomming video..
Anyway.... glad to have another video....
Thank you so much for this helpful video sir. God bless you
Could you also make more videos on how to connect different sensors as well
thank you
Mind blown. Thanks so much.
I just picked up the Arduino Opla. I cant find much information out there on it. I love your videos. I am watching this hoping to solve my issues.
Very Exciting!
Thank you so much, so helpful and really nice video
Excellent. Thank you.
Very useful! Thank you.
Really excellent content
Arduino update
Super interesting 👍
Thanks for the video
thanks, super presentation, many many useful tips, and good wishes..
Do you have any videos that show how the Arduino can monitor an input and send a text or email based on a state change? Really great videos and I finally got my Arduino connected.
Tiny thing: at 42:44, that LED shows the kathode on the left, I think? The “cup”. But your ground connection is on the right.
Bunddle of Thanks
Sir
Great video so clearly presented. Maybe you cover this in another video, If I built an IoT switch and I took the board to my friends house I would have to enter his ssid and password to make it work. Is there a way to connect to his WiFi by pushing the WPS button on his router ?
Great tutorial....cheers.
im new to this and am clueless. but i really want to learn this so badly
Any recommendations regarding the use of Blynk vs Arduino IoT Cloud?
super amazing❤
DroneBot, i like your video's. Tnx for making Them. Also with Arduino cloud, the options described can be achieved with a raspberry pi and internet
Really very interesting!!😀
Any suggestions on what Arduino starter kit to buy. Yes, i do have some programing skills. Thank you DVD:)
Wonderful!
Such a great video. I wonder if using this framework mobile app can access thing ( diy IP camera ) directly to access video stream for example???
Hi Bill and everyone that could provide an input. My question is, can a PWM pin with 3.3 volts output be boosted using a boost converter and the PWM not get affected or will the PWM be affected if I use boost converter to increase the voltage output from 3.3 volts to 9 or even 12 volts?
Thank you for all your great tutorials!
Great video. I have ordered a Nano 33 IOT and a temperature sensor with the intention of installing it in my shed and connecting to the Arduino Cloud. One thing I am not clear about is the power supply to to Nano. Will I be able to power it using a standard USB power supply?
Great video ,keep it up !!!
Love it, so very useful
Interesting video and a very promising technology !
Can you or have you got a tutorial on generating the schematic layouts in your video's. Which software are you using to create the schematics?
Thank you
Excellent
Hello, thanks for your explanation, I liked the video, it informed me correct, but I must tell you that I have used tinkercad, it is similar to this Arduino cloud, it is free and the circuits are not lost over time. Anyway, both proposals seem interesting to me. Greetings - Hola, gracias por su explicación, me gusto el video, me informó correcto, pero debo decirle que he usado tinkercad, es similar a esta cloud de Arduino, es gratis y no se pierden los circuitos con el tiempo. De todas maneras ambas propuestas me parecen interesantes. Saludos
Hello Bill, thanks for the video but pls what’s the name of the software you used to simulate the hardware connections.
Thank you for your very clear explanations, even for an old fool like me. When will I be able to put
even the weight, my bees will be happy. Kind regards from San Felice Circeo Italy A.B.
You videos are great but a little hard for the absolute arduino beginners.
?Could you do a short series on arduino & raspberry pi for beginners unfamilar with them or just recommend a few TH-cam playlists that meets your quality standards?
For example:
How would you go about implementing a way to connect each board without access to IoT platform?
Thanks.
Would it be possible also for you to do a demonstration for Blynk platform?