How to Vacuum Bag Small Parts

ฝัง
- เผยแพร่เมื่อ 17 ต.ค. 2019
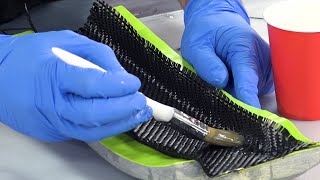
- This is a video about how to make a vacuum bag for compacting and curing composites - and how to avoid some common problems. This video goes with an article on vacuum bagging at Explore Composites! It's easier to show some important details of the process with moving pictures of me actually doing it.
Here's the article:
explorecomposites.com/article...
See how to make a vacuum bag and how to tailor pleats to fit over a mold feature without skewing or bridging.
Three important things to take away from this video:
1 - Make your bag big enough!
2 - For small/medium things, put the tacky tape on the bag first.
3 - Keep your bag pleats symmetrical across the bag.
For more practical composites knowledge - about tooling, wet layup, infusion, pre-pregs and more - check out Explore Composites!
explorecomposites.com/
This was my first-ever video! - แนวปฏิบัติและการใช้ชีวิต


Thanks for explaining the Dart/Pleat concept. That helped me a lot
Thank you
I will change how i bag up my infusion in the future. Thank you.
It is super handy for smaller stuff. I remember when I first saw somebody make a bag this way - it just hadn't occurred to me but seemed so obvious in hindsight!
For big infusions I'm still probably going to make up the bag in place because of risk of damage to the film from handling.
Yesterday I performed a very poor vacuum bag process and can only hope that when I debag, the part is workable. I’ve watched this video before but for me, nothing is a better teacher than the 3 step method… 1. See the process demonstrated correctly. 2. Execute the process poorly, because I missed a few key points. 3 watch the professional demonstration again- this time noting all the mistakes I made. If I have to remake this part, it’s going to be Much Better. Thank you ♠️
I totally agree about your 3 step process! My first vacuum bag was a disaster - I had only read about it in a book. So many little details are only obvious once you see them. Hope it all came out well!
After doing a “test” bagging is it possible to reuse that bag or do you start from scratch with new bagging material again?
It is possible to reuse if you’re careful and limit how much resin touches the bag using a bleeder fabric. Sharp resin shards are hard on bags. Many bag films tear easily with low humidity and are rubbery when in a moist environment. If you cut away sealant tape and keep the bag from tearing you may be able to use a few times. Probably not for infusion though!
hello, I would like to know in percentage terms how much the largest bag of the mold must be. thanks
It depends on part geometry. For couples things you sometimes have to double each dimension. For flat stuff 10-20% more is often fine.
Smaller only Boeing 777
I could put a bus in that bag