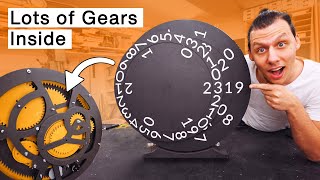
Tourbillon Clock Flywheel Table | Actually Keeps Time!

ฝัง
- เผยแพร่เมื่อ 24 มี.ค. 2021
- I 3D printed and converted a giant winding Tourbillon Clock to work with an Arduino, then attached it to a table made from a Flywheel for my brother. Steampunk inspired.
In this video I am using an Ender 3 with an Ender Extender 400XL Kit. I've had the kit for over a year and love it! If you are looking to purchase one, I have affiliate links below, thank you.
Download the Tourbillon Clock Files: www.myminifactory.com/object/...
Video I used for bulk of Arduino Code: • 28BYJ-48 stepper motor...
Arduino Stepper Library: www.arduino.cc/en/reference/s...
To see other project files: lucasbuildsstuff.com
Affiliate Links:
2mm Stainless Steel Round Bar: amzn.to/3Ym0Yt7
3mm Stainless Steel Round Bar: amzn.to/3YkLDJi
Arduino Kit (includes Stepper Motor and Driver): amzn.to/3qqSnc5
28BYJ-48 Stepper Motor w/ ULN2003 Driver: amzn.to/3OoIa7V
PLA: amzn.to/3OI4F9o
Ender Extender Kit: enderextender.com/collections... - วิทยาศาสตร์และเทคโนโลยี


Cool Project, I really love the antique vibe of this, the color of the prints match super well!
I just wished you could have made the fork work, that would have really made it complete for me :)
Thanks for watching! I'm planning on making a follow up with the fork working
I mean, since the mechanism is mounted horizontally, the whole tourbillon thing is just for show anyway. It's meant to balance out the distortions due to gravity but gravity works uniformly when mounted like that. Soooo.... yeah.
@@unvergebeneid a hairspring oscillator is unaffected by gravity, position, or any other mechanism of external acceleration.
@@jackp.1711 Cool fact, but this is mainly about the escapement from what I gather.
But I'm curious, what do you think all the added complexity of a tourbillon is for?
@@unvergebeneid From what I've seen, the original purpose for a tourbillon was, indeed, to counteract gravity, but it was later proven to be unnecessary. But it's a really cool complication so a lot of high end watches keep it.
I have no idea how I got here, but that's a really cool table! Great job!
Gotta love the TH-cam rabbit hole 😂
@@LucasBuildsStuff I've fallen into the 3d printed clock one but like I'm not complaining
Me too though
Scaling up something like that is no easy feat. A lot of people wouldn't have been able to do it, or would have given up. Very good job, and an AWESOME final product!
Thank you! It definitely took a lot of music and coffee lol😀
Thanks for all the suggestions on getting the fork/flywheel to work! I'm going to make another video trying them out! Please leave a comment if you have any more ideas!
Bro, such good quality of a video and not a 1k subs. I hope you become more successful my dude, you have my respect.
Gonna have to downvote because of how much you massacred the sacred art of tourbillon clocks.
I was impressed enough by the 3D print, the build, the modifications, the motor... and then I saw the whiteboard maths! ha! Incredible stuff Lucas. It will be great to see you do more :) - Rob
Thank you! Sometimes I feel it's easier just drawing it all out lol 😅
The dead-on smooth fit of the Arduino housing into the center hub was just as satisfying as the clock itself.
Whoah, as someone who loves to look at clock mechanisms, that’s one badass idea for a table! Great job!
that was great work, than I thought about the guy that made this 3D print and even how much work that even is.
Yea, I can't imagine the amount of gears he went through getting the tolerances just right!
Awesome project, hope your brother liked it!
Awesome job. I love to see cool projects like this. Keep inspiring us!
Mind blown...... definitely worth a subscription. Well done. Looking forward to future content. Thank you for sharing such a high quality video.
Got the next few videos in the works!
Your production quality is amazing, im shocked you have so few subscribers. Keep up the good work!
Thank you 😃
"Tore BEE Yawn". You're welcome. And thank you for this random coolness!
Love when people include the emphasis as well as the pronunciation
I thought I was going crazy with how he was pronouncing it, haha. Good to know I did have the correct pronunciation in the back of my head.
Assuming it's french then the first syllable is "tour", as in "tour bus" but with the french "r", not tore. The second is "bee" but not emphasised. The last is "yon" but not sounding the "n". As usual if you want to emphasise a syllable it's the last one.
Love the background tick tock and bell sounds also
This is your best build yet!
Thanks!
This is dope as hell. I love it!
That thing is absolutely epic!
Awesome work, and I cant wait to see the fork update, subscribed!
Thanks! Just wrapping up a few other projects and then I'll be working on it!
Awesome! Sure it would be nice to get the turbillon working, but the amount of work you put in to scale and print it, and ultimately get it keeping time, is crazy! Bravo!
Thank you!
Amazing stuff my dude!! looking forward to the follow up!
These kind of projects are the things i'm always too lazy to start on haha
Thanks! I'm the exact opposite, I'm quick to start projects, getting the bulk done and then dragging out the final 10% lol
Great respect is due you for a phenomenal feat! I wish I had enough gumption!
Thank you!
Really enjoying your videos my guy🤙
Thank you 😃
something about this tourbillion in pieces at 2:50 just really makes me feel happy. I don't know why i love feats of engineering so much, but i just do.
Also, that moment when you realize that someone in the 1500's designed the first tourbillion cores with literally none of the technology today's age has. Man must have been a true genius and this must have seemed like witchcraft to the untrained eye.
Yea it's crazy some of the old technology they had!
Beautiful!!! So Fascinating!!!
Thank you! 😃
That sir is Awesome!! Watched the whole video! Subscribed!! 💖
And this is youtube on its best. Amazing. Thank you for sharing.
Interesting. Well done, and it looks nice. Cheers!
Thank you! I appreciate the compliment!
This is really cool. I really liked how you modified Dan's design to do this, cause that guy can make some really cool stuff.
Thank you!
Cool Project!
Thanks! Glad you liked it!
Good job!
This channel is going to blow up!
FYI, if no one has mentioned it yet, the Arduino will do microsecond delay.
delayMicroseconds();
Amazing project and didn't expect it to be so precise. I mean: most of my mechanical watches would only need a week or two to drift away 3 minutes from proper time keeping. Keep up the good work!
Thank you! 😃
You are inspiring. Great work! Btw, I am a color nerd and am sure that if you put golden background circles under the copper Roman numerals, your clock will look even better!
It will unify the clock visually by relating the outside ring more with the center. 🔥 You are a great talent!!
Wish we thought of this earlier!
Super well done. Wow
Thank you, glad you liked it! 😃
I love the math you did and the app you coded. This is amazing, man! Have a sub from me.
Thank you!
So, basically you 3D printed a bunch of gears for a movement that is electronically powered. It takes away all the magic behind the mechanical engineering of a Tourbillon. Even though in a horizontal position the Tourbillon will have no gravity compensation, the fact of just driving the power with an electronic device takes away all the merit of a mechanical clock. Mr. Breguet would be crying in his grave.
Pretty cool-looking table tho.
I'm planning on finding a way to bring the magic back and thanks!
Christ! I know how long it takes to scale things up and make adjustments in Fusion 360 . This is a huge time vampire! Good for you being persistent! I would have tapped out early on.
Great job! I want to motoize my clock now!
Do it! There's lots of good ideas in the comments here to get the tourbillon to work too!
WOOOOW!! INCREIBLE!!
The song you chose both gave me ptsd from school and a head ache from it repeating
I remember while editing I was debating if I should find other music but it grew on me and I decided to just send it 😂
@@LucasBuildsStuff I'm sorry to hear that 😂
May or may not have inspired my GCSE piece O_O
Amazing video!
Thanks! Good Luck!
Damn dude you killed this
Thank you 😃
i never knew you were this talented,i thought only CC was smart.great job lucas
Hahaha thanks?
It's True, he hides it well
Hahaha oh man. So that means you subscribed right?
Thank you for the video and teaching me the math.
Dunno how I got recommended this but loved the video subbed!
Thank you 😃
Just a comment with everyone blaming you for the fork not working :
The way you set up the stepper is not compatible with the principle of the clock escapement mechanism, but I think you found the easiest way to get a proper clock working and doing it the proper way will be very hard if you actually want to keep time.
The escapement has a natural resonant frequency which is what the clock is built around. That resonant frequency is defined by parameters like the flywheel weight, the stifness of the spring and probably the amount of friction too.
You won't be able to make the clock turn with the escapement working if the speed of the clock (set by your stepper) doesn't match the resonant frequency of the escapement which is one of the two reasons I see for it not working here.
Normally the clock is meant to get its power through the unwinding of the larger spring which puts pressure on the gears, pressure is transfered through the gear to the escapement, and the escapement uses that pressure to maintain its oscillation at its natural resonant frequency thus keeping the timing of the clock. The escapement locks up the clock most of the time and can only be driven in a very small window when the gear escapes, so with your stepper you'll never be able to sync up the step with the moment when the escapement is ok to turn (said differently: you'd need to perfectly match the phases), that's the second reason I see for it not working.
To get the clock working with the escapement you should do what you mentionned initially : mounting the stepper to simply keep the tension on the big winding spring. But having an accurate clock with the escapement working will probably be quite difficult because the timing is set by the resonant frequency of the escapement. So you'll have probably have to experiment a lot with the parameters and/or the gear ratios to find the perfect combination. If you manage to do it and get close enough, you should be able to fine tune the speed of the clock with the tension of the big spring (more tension can reduce the speed by a few percent).
Thanks for taking the time to explain that, it clarified a few assumptions I had!
Amazing. Your channel will grow more subs
This started off so well, but you've ended up losing the whole point of using the Tourbillon mechanism. I think your problem is really down to the use of a stepper motor, it doesn't make sense in this mechanism.
The original setup uses a spring to provide a constant torque and an escapement mechanism to keep the time. You've replaced the spring with a motor set to a constant speed which is incorrect - What you actually want is a DC motor driven with a constant force. Without a spring between the DC motor and the escapement mechanism the motor will end up starting and stopping but that's fine as long as you drive it with a current limited driver, setting the current limit such that the motor won't burn out or heat up excessively. The original escapement mechanism should then work as intended and that part is responsible for the timing.
Thanks for the idea, I didn't even know you could do that! I have a project I want to do that that could come in handy for
amazing !
its crazy that people who cant even pronounce tourbillion can just 3d print one. Great work
So cool
You are a lunatic. This is great!
Great mathematics Sheldon
nice 997 wallpaper 😀👍
I actually watch the channel that you got that design from, and the first mistake you made was scaling the entire model up. That then caused enough variation in the flywheel attached to the escapement mechanism to then make the mechanism to tick at a slower rate of speed due to friction, increased weight, etc… Though I think that attaching the weights to the ends to increase the momentum was smart, the issue you ran into happened to be caused by the fact that the flywheel must first work up the speed and momentum for that method to be affective, and since you mistakenly broke the spring (which likely wouldn’t have provided enough energy anyways) that caused a fatal error in the entire mechanism due to the tourbillion mechanism.(which is pronounced tore-bee-on, by the way.) So the moral of the story is to talk all major design changes over with the creator of the mechanism to ensure that what you are changing happens to be inconsequential to the overall functionality of the model, and this miscalculation on your part is very easy to dismiss because the initial thought when it comes to mechanical models in the general public is that scaling the entire model up equally (so long as everything remains in the same proportions) will not affect the design. This is not the case here, as you can see, because the timing and function are based in the centrifugal force in the flywheel, which is altered by the mass. I apologize for the horrible time of morning I decided to comment in in my time zone by the way, and I hope you had the patience to read all the way to the bottom of this comment here, which I also apologize for, and I hope you have an outstanding day!
Hey! I did read all the way to the bottom, thanks for the info! 😀
Hey I just had another feasible idea how you can have a perfectly running clock while keeping all the mechanism alive and the clock authentic.
You would just need two things:
Hook the clock up to a rotary encoder so the arduino can see how fast the clock is turning...
The arduino then compares that to its perfect clock (quartz oscillator) and measures the error.
Then the arduino needs to be able to change the inertia of the flywheel - which is what gives the clock its frequency. This sounds really hard but isnt - just hook up a tiny servo to a mechanism on the flywheel, that will move some mass slightly outwards or inwards - slowing its frequency down or speeding it up.
The programming to do this is also not that hard, there is libraries for servos etc. - that way the arduino would constantly tune the flywheel to have the perfect speed and catch up or slow down to meet with the correct time again.
You just need a rotary encoder - or potentiometer on the flywheel for example - and a way for the arduino to control the flywheel frequency - youve already come so far, maybe you can do this, idk.
That's definitely thinking outside the box, seems like it would be a challenge, I like it!
This is a great idea and really well executed! Great job!
Thank you!
Should put fork back in, really needed for full effect. Gear the stepper motor so you can spin the motor faster and get the torque needed to turn tourbillion. Just a thought. Great job by the way. Looks fantastic.
Holy Moly!
Holy shit. This must have taken like 30+ hours to do. Insane build for your brother
He said just the printing took 7 days for 2 printers...
@@jeffreylebowski4927 yeah, but i ment in actual labour. But even the printing time is impressive
You can set up the winding automatically with the Arduino you can get it to wind itself everyday for however long it takes it to wind down
REALLY COOL PROJECT! I'd love to have one. You should go into business just building these, but maybe with a wooden base (painted to look like metal) to save on weight and cost.
Thank you! That's a good idea, that table takes a few people to move lol
Wow, the creator of the model should pay you 25 bucks. You did a fantastic job making a real clock.
Haha thanks! You should see his new design, looks sweet!
Insanely cool. Ive tried printing a small, simplifed version before but it didn't work all that well 😅. Might have been worth adding bushings for something that'll be running 24/7
And the way that center stepper mount fit 😍
Cool project, just letting you know that all Arduino microcontrollers use a ceramic oscillator/resonator which has a 0.5% tolerance for its 16mhz frequency - the 16mhz quartz is only giving its signal to the smaller microcontroller handling the USB connection - I found out the hard way when I was making a tracking system for my telescope... - So if you havent already make sure the oscillator signal used by the main MC is actually a quartz one... - there are cheap RTC (Real time clock) Modules you can hook up to the arduino that have Quartz oscillators with an at least 3ppm accuracy).
0.5% tolerance can lead to a 7 minute error per day...
Thanks for the information, I wasn't sure exactly why people were recommending I use RTC but after looking into how oscillators/resonators work and the different types it actually makes sense!
Looks nice but after I've seen how it was handled it made me very sad. I'd like to print out the bigger version of this clock too (I have printed the 1:1 version so far) so I was wondering how did you figure out the finetuning of the turbillon (dealing with the inertia and spring parameters). I'd say the dead winding mechanism is fine at least you don't have to bother with revinding. But.... damn, dead fly wheel? The heart of the clock not beating at all? As I said, it's nice but very sad.
Yea, I know what you mean, I know the flywheel could turn if I used a bigger stepper motor although I'm not sure how the timing would of ended up working out.
On the bright side it actually ended up being better for the table that it was silent, and thanks!
@Paul van Dinther There's been a lot of great suggestions on how to get the flywheel/fork to work, I might just have to rebuild the clock and make another video trying them out! 😅
@@LucasBuildsStuff It would be definitely worth to try. I know this will cost some time to do but now the most of the clock is just for the show. The only functionality that was left are transmission gears to outer rings. But these gears are designed with respect to step of tourbillon. You could ditch these gears as well and replace it with simple 1:12 gears ratio (hours:minutes ring ratio) because the stepper motor would provide you anything you need as input. I'm just pointing out that most of the mechanism is dead and even transmissions lost their purpose because of the dead tourbillon. Anyway I'd like to emphasize few quite positive things. The idea and the build are exceptional. I was thrilled to see this idea come to life (even though there are obvious downsides which could be overcome). It required a lot of design changes to original parts. The diameter is ~230% of original. The height of the clock looks like remained approximately same. Adding locks to split parts. Changing size of pins affected all wheels. So this must have taken a lot of trials and errors to be completed (this is valid for the 1:1 version of the clock as well). I think If you manage to fix the design this would add the lost spirit to the clock (tourbillon clock without tourbillon). I admit the clicking sound would be quite loud but this is a mechanical clock after all. It is same like to have old cuckoo clock in house. You can hear it, you can feel it, it adds to the house a magical spirit.
Great Job man. Wish i could get your files. My wife loves big clocks and ive been wanting to do something like this for her.
Thank you! Enlarging the clock from the original isn't too hard, just really time consuming. If you're up to it, Fusion360 has a free version you can use!
I really want to do this as a wall clock, and I’d consider a real metal hair spring on the balance wheel, and replacing the spring drive with a constant torque motor instead.
We’ll see if I ever get around to it though. 😅
Love it man ! Keep it up !
Thanks! Glad you liked it!
To keep the time you could more accurately just add a small magnet to the hour ring and a reed switch/hall effect sensor. If the arduino detects the sensor is triggered early it can stop sending steps until the time catches up with the clock and if it doesnt detect it by the top of the hour it can keep sending steps until the clock catches up.
At least that way you don't need to worry about the accuracy of the arduino internal clock over time and it can easily be paired with an RTC module capable of adjusting for daylight savings etc
That's a great idea 🤔 Thanks!
Very creative! I just wonder how much that will cost? I love these things
Nice video. Could you tell us what color filament you used for the stepper motor/arduino casing?
Hey! It is Eyrone Ultra Silk Dark Gold
www.amazon.ca/dp/B08CXWJNWY/ref=emc_b_5_mob_t?th=1&psc=1
Thanks for watching!
Its a bit late but it would be cool to add a small main spring to the motor, That way you could use the motor like an automatic winder and have the clock be driven normally. You could also add a sensor to see how much tension is in the spring and adjust the motor speed so it wont run too fast or slow. (Or do like automatic watches do and have the spring slip if it gets too tight and run the motor every now and then.)
Using delayMicroseconds(66241) you won't need the 1000th step extra delay. However, cool project!
I'll try that out, thanks!
awesome build! I only recommend getting a realtime clock chip. they are cheap and can handle seconds per year.arduino bare is terrible at long timekeeping.
Great build dude!
Thanks and love the name 😂
Did you ever get the fork/flywheel working again? If the system has too much resistance you might want to consider getting one o' them fancy geared motors what has a crapton of torque at the cost of speed.
Not yet, but I will be doing a follow up video once I do!
If you want to be somewhat accurate with the arduino, you shouldn't be using delays, and instead switch over to using the millis() function.
The issue with delay is that the other functions in the arduino code also take time, and this time gets added on top of the time you add using delay functions, causing the clock to run too slow. Using millis() this can be prevented. After that you're left with the accuracy of the crystal on the arduino PCB deciding how accurate the clock will be over time.
Beautiful project! By the way, its pronounced Tour-Bee-On
Intriguing video! Here's a question though: how much power does the system draw?
Thanks! The estimated power usage ended up being around 300mAh @ 5-6v 24/7
yeah a stepper motor is not compatible with a tourbillon it will just stall. you will need to have a normal dc motor acting on the middle gear with a constant torque, essentially pretending to be a spring. Then to make the Tourbillon tick at the correct time adjust the weights on the flywheel, just like the weights on the pendulum of a clock. Also, Tourbillon is more correctly pronounced "tour-bee-on". Hope this helps
It does, thank you!
Great job!! Subbed. Are you going to share all your files once done?
Thank you! On my other projects I do but on this one I used someone else's design and modified it so I won't be. I linked the original design in the description
Yes I bought the files and have built the clock. Cool project.
It's sad you removed the fork, that's like the coolest part; makes the clock actually tic-toc! Couldn't a simple gearbox to give the stepper a mechanical advantage solve the problem? There's no way it was anywhere near its maximum rpm.
It's possible that could of worked, but I'm not sure. I think the maximum for that stepper is 15rpm so theoretically I should be able to use a 30:1 gearbox 🤔
Yeah, I found it kind of funny that there were so many gears that were just for show but then the one that might actually have solved this issue was omitted =)
you could use the 3d prints to sand cast the parts from alloy or other metals make it look steam punky
I really want to build a forge and try sand casting out one day!
good job on the Arduino and the pause that was brilliant
Thank you 😃
appart from the fact that there is absolutely no need for it. using delay is just bad coding. Using a RTC or at least millis() or micros() it can be a lot better. i also wonder how long that stepper will last if it barely is able to turn the clock.
That’s a shiny print bed.
Lol I print straight on a mirror I picked up from Home Depot, no glue, no hairspray
@@LucasBuildsStuff wow that’s smart.
you know what would be cool, if the clock was also connected to a turntable on the table so that things on the table would turn over the course of the day
He got me in the first half NGL......
Haha thanks!
Amazing.
What was total time?
The look is... 👌🏻 Do you sell the modified version?
No sorry and thanks!
How do you learn about the clock making
How you design these different types of clocks
How do you make automatic clocks
Can you share with us
how about adding wifi module to your adunio which allows it to check the time and correct it automatically everyday
This is a great idea
Loved it (except the hot glue for the hands)!
It's probably better without the fork anyway as the noise would have driven you crazy.
Have you considered adding a simple button to go forward/backward 1 hour for DST? Or a rotary encoder to set time easily? Or an RTC with the date to automatically switch for DST? Or an ESP8266 in lieu of the Arduino to check time on a server?
Or connecting it to Alexa to somehow display your reminders and timers?
F) None of the above lol
> Or connecting it to Alexa to somehow display your reminders and timers?
Would be really cool to connect a big analog clock with some rgb leds to display your calendars
@@Synthetica9 Imagine with a more analog display like flip discs :-)
I feel like you just needed some lubricant like a real watch in order to get the fork to work. without the fork, its kinda not really a mechanical clock. good prints though
How did you decouple the flywheel so that it didn't affect the movement? I actually like that idea because it makes the clock technically silent
There's a fork that connects the flywheel hairspring to the escape wheel/gear, you can see me remove it right at the 10:00 mark, yea it actually worked out better for my particular use case lol
3 min per year is assuming that arduino's frequency is 100% right,it will be more like +-100ppm so more or less 1 hour a year,that sounds more likely
After reading through all the suggestions and learning the way the Arduino keeps time, I wouldn't be surprised if you are right, thanks for watching!
I had thought you would have made it the size of the entire wheel
Originally that's what I thought the goal was too but my brother wanted the "Golden Ratio" for the hands vs clock vs flywheel
Tor-Bee-Yon.
imagine crying about a week to print when maybe 10 years ago it was laughed at the possibility of 7 days
And now Bamboo Labs would turn this project into a easy day lol