
ฝัง
- เผยแพร่เมื่อ 23 เม.ย. 2020
- Jeep Wrangler YJ Dana 30 Passenger side Axle Seal: amzn.to/3eHBOOz
Shift Motor Housing Gasket: amzn.to/34XTUHo
Red Line 75w-90 Gear Oil: amzn.to/2XWZ3hG
Proudly sponsored by Enginetech enginetech.com/
Engine rebuild kit I used on my 4.0L rebuild: amzn.to/2WuNdbu
If my videos have helped you save some money , and you would like to give back to the JeepSolid Garage, consider joining my Patreon page!! There's no obligation though. I am happy to help others out, but it does take a lot of my time.
/ jeepsolid
👨🔧 A few of my favorite tools 👇
Milwaukee 3/8 Cordless Ratchet: amzn.to/39x7WAO
24" Breaker Bar: amzn.to/2RnuSNC
Craftsman Torque Wrench: amzn.to/2Wj7JiD
Extendable Socket Wrench: amzn.to/2LJNV2k
1/2" Craftsman Impact Driver I use. Love this thing
amzn.to/2fTDoTR
Dewalt 1/4 impact driver: amzn.to/2GYEJ4w
Be sure to get the kit with 2 batteries. You'll be glad you did!
Craftsman 165 Mechanics Tool Set: amzn.to/2GXRlIg
Excellent tool set that will last a lifetime.
Oil filter Wrench: amzn.to/2IbgT9e
Large Capacity Oil Drain Pan: amzn.to/2OjqXjh
Subscribe: / jeepsolid
Follow Me!!
Facebook: / watchjeepsolid
Instagram: / jeepsolid
Twitter: / dale_jeepsolid
Professional business inquires: email me at dale@jeepsolid.com
#jeepyj #jeepwrangler #jeeps
Some of the links provided are affiliate links, where I earn a very very very small commission for directing you to the website. If you make a purchase, it does not increase your cost, but helps me fund my channel. Thanks for watching JeepSolid. I am not a certified mechanic, just a hobbyist who enjoys working on Jeeps. - ยานยนต์และพาหนะ


*_FANTASTIC!_* You're the only person who has uploaded instruction on how to replace this seal on a Dana 30 CAD axle. Factory service manual and other manuals don't address this. Very clear, well-detailed/filmed and informative. You even provided links for easy access to parts that are otherwise very difficult to find. Many thanks!!!
The very best Jeep repair instructor on the web. Even includes torque numbers for reassembly. Great job, Dale. Thank you.
Glad I watched your video. New to jeeps and 4x4. Didn't even realize mine was broke. The metal tubes for vacuum were broken right off. Bought a new one will be here on the 29th. Thanks for the video.
Super helpful! My passenger side seal on the front just recently went out. Have no idea when it was last serviced. Gonna be starting a service log and mileage log for my wrangler. Seeing you do these tasks helps me to know if I could do it my self or not. Saving me money on mechanics and showing me the correct way to do it. Thank you!
I really appreciate the safety things that you do, there are lots of learners or young fellas watching. Thank you for preaching safety!
This is GENIUS!!!! Love the ingenuity!!!
My son bought a YJ (4 banger) last month and we have already started to fix 'er up. We've watched several of your videos already and think they are top rate as we map out a plan to make this Jeep "hunting ready" this coming October.
I hear you about having a second jack stand! About 18 years ago, while working on my old Dodge Power Wagon, we had a jack stand fail. A stroke of luck (and adrenalin) allowed me to roll out quickly and pull my son (then 12 years old) out from under the rig! We've used back-up support ever since.
Thanks again for your great videos!
Oh man!! That's scary. I've heard other sad stories of guys being killed under cars. It doesn't take any time at all to be safe. So glad you and your son are ok.
Love it. Great job! Going to try this on my 93 Yj
Thanks for the great video! Everything worked as shown!! Greatly appreciated!
Hi Dale! Enjoy your vids which have helped me to become a DIYer....
Say, instead of using a weight and a bunch of washers outside the knuckle I found using a 2.470 race/seal driver fits perfectly where the dust ring sits on the end of the axle tube. It centers the threaded rod in the exact position.
Keep the vids coming!
Good job explaining everything. Almost seems easier to create a gadget in the actuator housing instead, but my seal is still good, so I won’t be doing that. Always enjoy watching your method. Keep it up.
Super vidéo, tout ce que je cherchais, un grand merci 🙏🏻👍👍👍
Enjoyed the DIY
Very helpful thank you. The washer kept moving pulling the seal in crooked, make sure you have more than one on hand. I bought the 6764A seal installer kit from amazon for the end to pull the seal in using the installer tool you showed. I found that it went in better by holding the nut at the outer end of the threaded rod and tightening the nut in the CAD to push it in. I had to reposition the rod to adjust the puller when the seal started going in a little crooked.. as others have said, go slow, a tiny bit at a time to make sure it's going in straight. When the seal does go in the pressure releases, you can feel it. Then tighten it until it feels tight and doesn't want to move any more. Remove the nut and washers-puller to make sure the seal is past the groove at the outside of the seat. Another good tip was to lower the outer end of the inner drive shaft to angle the drive shaft up to get the splines to engage in the differential. Now to clean up the vacuum shifter and install it and torque everything back down.
I took a couple pics of my modded tool, but can't load them for you. Mahalo, Mike
nicely done dale.excellent video...you and the family stay safe.
Thank you! Will do
Than you for this! Bonus, now I know I’ll have more work to replace my drivers side seal.
Nice job and explanation on the DIY puller kit as having done this job on my 1995 YJ l know the difficulties you face to achieve a good install
Followed this to a tee. I was a little intimidated by the threaded rod rig, but it worked great. Thanks
Thank you for sharing your knowledge. 😊
Very creative..awesome 2 thumbs up 👍👍
You are the man! Thanks bro!
Thank you for your video,amazingly I have e thesame problem , I have learned a lot from your videos , now I am confident I can do Myself
Awesome!! Glad it helps you out.
Thanks for putting together another great video on installing the outer axle seal. I really appreciate the ingenuity with the washer setup.
I can't seem to get mine fully shouldered in the housing though. I am wondering if you have ever encountered getting stuck flush with the tube opening at the shift motor housing with a millimeter of shiny machined metal gleaming at you on the wheel side?
Anyone got advice?
Good video. Thanks
Nice video. Cant get hub out though.probably been ther 37 years
Nice thanks
Awesome method of changing that seal. I used an old hole saw blade of the right size with the teeth ground off on a threaded rod. Washers appear to be just as good or better. I think I mangled two new seals before getting the third one in successfully. Buying extra seals is good advise based on my experience in other words..
If you had MILKY GEAR OIL I would have changed that also but VERY SMART WAY OF DOING THINGS DALE SIR. You were very safe with 2 jack stands, a tire plus the jack. Anything else & it gets in the way of doing your job. DAMN NICE JOB DALE, DAMN NICE, KEEP THE FAMILY SAFE SIR.
Thank you! I plan on draining and replacing the gear oil. I probably should have mentioned that when I noticed it was milky, but also wanted to show how to save as much gear oil as possible if it was still good. Thanks for the feedback and stay safe as well!
GOTCHA DALE, I'm not a YTUBER as you are & forget you are teaching us how to do certain things. Learn a lot on your channel SIR, THANKS FOR DOING THESE VIDS. FOR US IN THESE KRAZY TIMES.
Felicitaciones 🍀☘️✨
I’m glad this worked out for you, but I can’t figure out what’s going wrong. I’ve destroyed 4 new seals already trying this method. It simply doesn’t work. I’ve followed everything you’re doing and it gets cocked in the tube every time.
I have the factory manual and read several forums and this seal is such a pain that the ONLY proper way to do this is using the install too from spicer. Jeep part 6228-1 and 6228-3 to fully seat the seal and prevent failure again.
I really enjoy your videos, but I’m so frustrated this went so easy for you. Lol
I’d recommend calling a couple of tool rental places and seeing if the proper tool is available. I got lucky and my local shop is going to lend me the setup tomorrow. THANK GOD! 😁
Nice! Glad you are able to get your hands on the tool. Sorry you went through so many seals, I know that can be frustrating. I guess the key for me is double and triple checking that everything is centered. I am sure you did as well, but it can be a pain.
JeepSolid I did triple check...but I guess I’m cross eyed. 😆 heading out to borrow this tool. Hope this works. 🤞🏻
13mm axle bolt and a 7/16 shift cover bolt. Oh Chrysler. Reminds me of a dodge I used to have.
Hi Dale, Love the videos and I've learned a lot. Rebuilt all the steering so far and noticed the leak on the passenger side that you mention here. I got the old seal out, but I notice an o-ring on the outside where the old seal came out. I don't see that o-ring in your videos. The o-ring seems to be glued in. Is this just a remnant from the old seal and can be removed? Does it need to be replaced? Any advice is appreciated.
Update. I just went in a removed the o-ring. The previous seal had a o-ring and the thing sits outside of where the new seal sits. If you look at the video at 17:50 you see a black ring just to the left and outside of the new seal. That was where the o-ring sat. I shoved a vacuum though the axle shaft to catch any debris as I removed the o-ring. Once I cleaned it up, I followed the video and all is good.
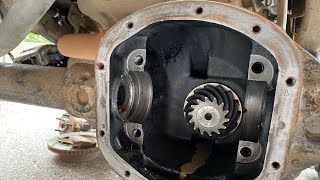
Great video! I thought the seal was on the inside at the diff?
Is there an additional seal on the passenger side of the inner differential housing (where the gears sit)? If so, does this also need replacing when there is a passenger side axle leak?
I watched another video, I believe on a newer model Jeep (than my 95 YJ),where a c-clip was removed in the differential gears from the center shaft, to remove it. I did not have to remove a c-clip in my 95. Confirming there is not one in the 95 with the Dana 30? It just made me wonder about the left and right play of that center shaft without a c-clamp holding it into the gears. Also, do I need to re-install the center shaft before installing the new right side seal at the 4wd shift fork? I'm not at home right now to look at the shaft, but I'm thinking I recall seeing one side of that shaft to be larger than the inner diameter of the right side seal, which would cause damage running it through the seal. I don't recall seeing a groove at the end of the center shaft that would retain a c-clip. I was thinking there was not enough room to replace that seal with the center shaft in place. I do see, in your video, that you made it happen though, so that's what I will do as well. Thanks in advance. Mine is on jack stands and completely disassembled, and ready for both seals to go in. I bought the Jeep used, and upon gutting the gears in front differential, I observed gasket seal on the passenger side of the tube where it meets the differential housing. Someone obviously thought a seal needed to go there as well, but not a slot for one, so they ran a bead of gasket sealer around it. I guess they didn't realize that the gear oil is free all the way to that right seal that you just replaced. lol
What kind of differential is do you have in there cuz I have the same one and I can find the seal
I have an 87 and the seal is different. Seal is exact size of hole. But i got it
What are your thoughts about when you put tire under jeep about adding 2x4's maybe a couple rows in a square bolted together for added safety. That's my approach when I get under jeeps.
That's a good idea as well. I'm a fan of beefing up any safety measures. I've even been know to put a big stump under vehicles when crawling under them without wheels on.
Hey, again great video! One question, since the gear oil is milky, shouldn’t you drain all the old and refill with new oil? I would not want to take a chance that something more than water got in.
Yes. That is my plan. The gear oil is toast.
Strange question - When you jack up the axle with the floor jack, where are you setting it?
Interesting method . I’m thinking my caliper spreader tool would fit right in there and push the seal in rather than pull it in .
I used a bearing driver on all thread. I used thick piece of metal to drive her home. Are you deleting to one piece drive shaft?
Make it look to easy haha. So far I’m two messed up seals trying to install.
Do you know where it's going wrong?
So how about putting the wheel on and dropping jeep off the jacks, to make sure front axle parallel before adding diff oil.
If you do it as you describe front axle still tilted so wrong fluid level will result
How long of threaded rod did you get?
Some of the bolt tightening is mentioned in foot pounds; some in inch pounds. Shouldn't they all be in ft lbs?
What size axel tube seal would that take?
How do you find the Milwaukee ratchet? Is it good for breaking bolts loose or just speeding up removal afterwards?
It’s not great at breaking bolts loose. But huge time savor when removing multiple or long bolts. I personally really like it. Glad I got it 👍🏼
Too cool. I had to replace the universe on driver side. My 12 point bolts that held bearing hub up were big time tight. So was the bearing hub in yoke.
I can imagine in a rust state, those 12 point bolt heads could be a nightmare.
Also, differential on back does not have a drain. For a 4X4, a sad cost saving by the maker.
As a side note, I was replacing rear tail pipe and needed to get track bar down to get it in. Never was able to break that silly torx bolt. Front is hex. So go figure. I shimmed my front for proper caster and tried it without track bar. I hooked it back since Jeep then felt too loose at speed Did kill some of the low speed bump steer but loose is worst.
Loose actually could have been from toe. Jeep has cheap shackle lift and had 5 deg caster. Needed 3/16 toe in to bring back steering wheel to center. When I added 4 1/2 deg shim, I had kicked back toe to 1/16. Might have been OK if I had made it 1/8.
Yeah, excessive rust can be a killer. Makes so many jobs much more difficult. Glad you got yours fixed up! It took some ingenuity.
What's the brand on seal
That was very sleek, most machanics would coppy that procedure if they were smart.
Haha!! Thanks. Always looking for the simplest and inexpensive way to get things done, but also doing it right. I don't have every tool a true mechanic has, so I have to make due sometimes.
Tried this set-up 3 times today and it will not pull the seal in. I've lubed it and centered it but it just will not work. Ended up messing up the seal. Luckily I bought 2 so I will try again tomorrow. Very frustrating.
I'm in the same spot right now. I've tried twice with everything perfectly aligned and still going in crooked... arg
Thats the seal i was sent but mine is flat
I did every step. Finally got the seal in. Now my tire will not move. You cant even push it. I even put the entire jeep up on blocks and tested every tire. Rears spin in 2wd. In 4wd both rears and driver side spins. I cant even manually turn the passenger side tire. What did i do wrong? When i try to drive it, it feels like every tire locks up.
Will this setup work on the drivers side as well?
Nope. Driver seal is different
@@JeepSolid so your homemade press won't work on the drivers side?
What year is ur jeep
🤔🤔 i didnt have to remove my diff cover for either side, 3 piece axle only one you remove diff for is middle shaft, on YJs anyway
I'm having a pretty hard time getting my seals to drive in straight, I've tried 2x so far. I'm not sure what else I could do to get them going straight in.
It's tough to get it lined up straight. That's the key. Having everything as centered as possible. seal centered. rod centered so it pulls straight. washers all centered. Pulling force at knuckle centered...
Same problem. I’ve destroyed atleast 5 passenger side seals, won’t go straight. Driver side went in fine though. I’m giving up and taking it to a shop.
@@jakeyaboi6824 Where dale was using a big weight as a huge washer on the knuckle, I was using a 2x8 piece of wood. I tried switching to a piece of square tube steel with a hole and used that as a washer and I got my seal to drive in straight. I think the soft wood was crushing and letting the rod go in crooked. Also put a little Ultra Black Permatex on the outside of the seal just incase to prevent any leaks.
Wait what is that? It didn’t engage the 4 wheel drive the transfer case does that! You must have a rubicon that locks the front axle for post traction
Please send me the code for the seal thanks
Yep, the wife’s Tupperware works great
is this the rear axle seal?
I show in the video
Just like a big truck you need a seal driver the it will go in the seal and up against it so what I will do is put the threaded rod with a washer a little bit bigger then the seal to stop it from driving to far and a socket the same size of the inner part of the seal. Same size as the shaft If the socket don’t fit over the threaded rod drill it and put a nut to hold them together. Now you have a professional seal driver. Now you can make a better video❤smack it with a hammer on the end of the threaded rod to drive it
Don't put the seal in backwards!... Lol
But then you get the fun of doing the job again 😀
Damn dude did you run your wife over with the Jeep 😲
Haha!! I know, right??
Do you not add gear oil into the cad through that center top bolt?
Nope
That’s odd I alway added oil there till it fills up I assumed it would be a fill port due to all the kits an even stock covers have a what I assumed was a fill plug. What’s the point of that bolt/ opening? Thanks for your reply I appreciate it!!
Yeah. Not sure why that’s there. The fluid there flows through the differential as well. The diff, you fill to the fill hole which is lower than that bolt hole. Manuals say fill to the fill hole on the diff. I’d think filling to that bolt would lead to overfilling. But good question.
I’ve worked on 2 different yj’s I’ve owned an always filled there on that bolt assuming that’s where you fill it the few times working on the cad an upgrading them to cable locks. Little over a year later I have a leak on passenger side which is why I wanted to see options on how to pull an replace the seal then I seen you add oil to def an I was like oh $h!t I definitely been doing that wrong ahaha thanks again for your reply an videos