
ฝัง
- เผยแพร่เมื่อ 12 มี.ค. 2021
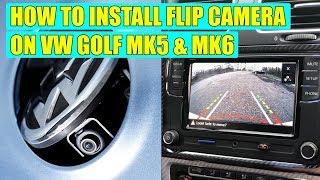
- How to install the VW flip badge rear view camera on a MK5 GTI. How-to's include radio, interior panels and rear seat removal, wiring, metal cutting, and fuse panel tap.
See description for time stamped steps, seller info, tools and tips!
Added functionality: bluetooth, touch screen, Apple CarPlay, Android Auto, USB, SD Card, Aux, steering wheel control and reverse camera with dynamic parking lines.
This is my first automotive video tutorial. Forgive any disappearing and reappearing panels (or daylight!) When considering paying a professional installer several hours of labor, and knowing they might damage delicate parts of my car, I decided to do it myself.
I am not a professional mechanic or electrician. However, I spent many hours researching all the steps before performing the install, and everything works perfectly. That being said, I apologize if there's any missing, mistaken or misleading information. I spent several more hours editing and notating the footage in order, so that others can do this, too.
KEY STEPS:
0:25 How to remove hatch trim
1:50 How to remove rear window wiper motor
4:52 How to remove rear badge
5:07 How to cut MK5 hatch to fit motor
7:41 How to remove trunk side trim
8:45 How to remove C Pillar trim
10:19 How to install RVC wires in the rear
14:30 How to remove rear seat bench
16:22 How to route RVC wires through the car
16:51 How to remove rear interior side panel
20:26 How to remove hood release handle and lower A Pillar panel
21:05 How to remove lower dash footwell panel
21:28 How to remove MK5 radio head unit
26:52 How to route RVC wire through the dashboard
27:37 How to install dynamic parking line video wires
29:47 How to wire tap fuse panel
31:39 Rear view camera display test and demonstration
31:59 How to secure the wires
SELLER:
Ddren www.rcd330.com/shop
I bought the RCD 330 (Noname 187B version), rear USB, flip camera and MFSW control canbus gateway simulator all from Ddren. Incidentally, one of my badge's plastic harness connectors was damaged during shipping, but not Ddren's fault. He was very responsive and helpful in sending a fix quickly, with no charge.
I know they can be gotten from AliExpress, eBay, and competitive websites. However, I appreciated the customer service and all the products you need in one place. Each product has descriptions, photos and videos. Here you can see the additional wire processing Ddren does to make the installation easier for you. • Flip camera further pr...
The forum is a very valuable resource if you have further product or application questions. Ddren is very responsive there as well.
www.rcd330.com
TOOLS USED:
T20 Torx
T25 Torx
Phillips screwdriver
Flathead screwdriver
Plastic trim removal set
1/4" ratchet
10mm socket
13mm socket
Zip ties and clippers
Grabber with retractable claw
Flashlight
Puller for wiper arm
Penetrating fluid (eg WD-40, PB Blaster)
Rotary/cutting tool (eg Dremel) and touchup paint (MK5's only)
ADVICE:
Treat yourself like the customer-
pull firmly, don't yank and measure twice, cut once.
Good--fast--cheap
You can only have 2, and it won't be the 3rd. You want to be cheap and good, so it will be slow. It will take more time than you think.
The most difficult steps were
-routing through the rubber tube
-removing/installing the rear side trim
Leave slack in the video wire near the camera.
Zip tie and reinstall everything only after you've tested the system. You don’t want to think you’re finished, only to have to pull things back apart for trouble shooting.
Good luck! Please give a like. - ยานยนต์และพาหนะ


I was always wondering if it is possible to install a Golf 6 rear cam in a Golf 5, I never search for it but your video appears to me, how lucky I am !
Mate , this is the 1st absolute complete video from top to bottom with everything need to know about how and why to do it , all I can say it`s hand up for the video , for the time and for showing everything there is to know
I just completed the same installation in my 2007 Rabbit 4-door. Running the wiring from the truck to the dash was much easier in the 4-door variant. One thing that I missed, and wasted 3 hours because of, is that the camera only displays a black screen when the truck is open. I hadn't closed it since all of my wiring was still loose. As soon as I closed the trunk everything started working great!
This is probably the best automotive how to video I have ever had the pleasure of following! Thank you!
Pro tip: use a little smear of silicone paste(dielectric grease) on the wires to help slide through the boot, and run your wire(s) along the top, and run down the A pillar
I just ordered all this stuff for my wife's 2014 Beetle TDI. It's going to be a long haul getting all the trim removed to get everything installed, but this video should help a lot with the wiring and to figure out where everything goes. Thanks for posting!
My son and I installed this RVC in our 2 door MK6 (2011) GTI. Was mostly smooth thanks to your video. Struggled some fishing the wiring through the rubber flexible tubing between the body and hatch, but patience prevailed. Seem to be more wires feeding through that tube in the MK6 than what I've seen with MK5 videos. For others that may be installing in the MK6, we were able to route the power and video cable under the rear seat side panel without removing it. We pulled the front of the rear seat up and then were able to tuck the cables under the side panel. The reverse light wiring is a little different in the 2011 MK6 (assume all MK6)--all the wires were white and there were three of them. I ended up taking the wiring clip out of the back of the reverse lamp housing and using a multimeter to test for the reverse wire while my son had it in reverse. It ended up being the right-most wire looking at it in the orientation it is inserted into the lamp housing. I connected to the left reverse lamp. Appreciate the detailed video and tips!
I’m very glad that it helped! That rubber tube was indeed frustrating, but as you say, persistence gets it done. Thank you for the additional tips, and happy reversing 👍
@@asolon tried doing this exact install a couple weeks ago, and like you and @jamiepearson6448, struggled with the rubber tube routing between the body and the hatch. Question for you both: my rear back-up cam has an RCA "4-pin" connector like the one in the video. Pretty sure we have the exact same wiring from the same seller. When I try to snake that 4-pin connecter through the rubber tube, I could not for the life of me fit it through the hard plastic opening of the boot that meets the car body. Did your MK5 rubber tube have that same hard plastic mold on the end? Did you you just force it through, or break the plastic in the process? Any help would be appreciated. Cheers!
Thank you so much for this video, by far one of the best install videos out there. Well done.
Thank you for posting this. I'm about to install the same kit in my 2010 CC and your video was very informative and answered a lot of the questions I had in my head.
So were you able you install it on your CC? How did it go?
Been thinking about doing this mod. Thanks for taking the time to make this video!! You the man!!
Very very thorough. Thanks for the detailed guide!
I feel you!
When I got my Mk5 GTI I immediately installed a sub in the trunk. Routed the power cable on the left side of the car, routed the signal cables on the right side of the car. Total PITA to remove the trim panels and reinstall them.
Then a few months later I installed Golf 6 look LED tail lights which required me to run 4 cables through EACH rubber going to the trunk (Yes, 4 thick cables). Spent more than 5 hours on just getting the cables through the rubbers. It was not a fun day.
But in the end I managed to install the lights and get the wires through the rubbers, and the lights look awesome!
As a step in a project, “run the wires” doesn’t sound so hard, but turns out it’s pretty time consuming. Definitely a patience tester!
Well done! The detail and advice you provide is fantastic. May be attempting this in our MK6.
Great, thanks! Should be an easier go for you- no metal cutting, and less dash to remove to get the head unit in. Good luck!
did you end up doing it on the mk6? If you did how did it go?
Thank you very much!!. This video helped me a lot. Very detailed. Great job!!!
Super informative, thank you!
Awesome👍 Super helpful THANK YOU!
Fantastic video good job
Awesome dude and good job
Installed it yesterday on my MK5 2007 that also has 2 doors and everything works fine !
Your video helped me a lot to get the job done faster :D ( took me around 8 hours )
Excellent! Glad it helped. Enjoy!
Hey!! Just got an MK5 Golf GT 2007. I have a couple of questions if you don't mind:
1. Will the dynamic steering function work on this model?
2. @asolon do your SW buttons work with RDC330?
Thanks so much for this! At 33:06 - I didn’t realize the wiring from the camera unit itself (within the emblem) needed some slack.
I had tested mine and it worked fine before, then I tidied up my wiring and all of a sudden it stopped working. Kept saying Rear view camera not available. I took off the tesa tape I’d applied and let the camera wire slack a little. To my surprise, it worked lol.
Same! You’ll notice the footage there is a different location and was next day actually, haha.
At first, I’d not left enough slack, it was preventing the camera from fully extending and the inside of the badge itself was blocking the top of the image, until it eventually unplugged the wire. I was SO disappointed even thinking about pulling things back apart, but it was obvious as soon as I got the hatch trim back off.
@@asolon is everything still working great for you? I started having issues. The reverse camera works sometimes but will sometimes go black and say “Rear view camera not available...”
In a bit of a loss now... it’s very intermittent.
Yeah, mine’s working no problem. Sorry to hear you’re having trouble. Sounds like the issue you’re having is to do with the video cable itself. I’d reconfirm the connection near the badge has enough slack so that it’s not pulling the plug and giving an intermittent signal. Then check your 12v power and grounding connections are good. Be sure that your ground is on bare, unpainted metal.
@@asolon Yeah I checked all the wiring and everything's good. I was actually having this issue months ago but it worked fine a few days later so I left it alone. Started having issues again which prompted me to order new cables from the seller and re-do everything from the beginning, which is when I found your video. I think I'll be chalking this up to camera issues now and might order from a different seller. For now, I'll take apart the unit and replace only the camera with an identical looking one off Amazon (camera looked identical, with the same 5 pin connectors). I'll let you know what happens! Thanks :)
@@asolon Got a new camera unit. Works perfect now! Not sure what happened with my previous unit, camera seemed to be defective since I didn't bother changing the cables and it worked.
Super video , mám stejny problém , dekuji opravím podle tveho návodu
Thanks for the extensive guide! My only concern is the drain. Might need a longer drain pipe to tap into the drain directly. Being in Canada, we have quite a bit of salt and I can see the hatch rusting from the inside out if the brine sits there.
Certainly understand the concern. The bottom of the hatch sheetmetal appears to have a slight downward gradient towards the open hole, and I live in SoCal so wasn’t as concerned. For you and others in wintery climates, you could just head to a hardware store and find some inexpensive line to route it. Mk6 and other models that had the flip RVC available from the factory have a rubber plug in the center hole that can be removed iirc
Awesome job, I did everything you did. But I got the 4 door, didn't have to remove back seat, thx
Incredible detailed video, thanks! I have golf 5 2004 and found the emulator from the store you’ve mentioned in description. Unfortunately I find the other adapter for camera line Can +-. I would if can drop me a link.
"I'm proud of myself". You should! Amazing job at logging all the technical details. Thank you. I'm training myself so I can do a job like yours. Few questions, how long (hours) did it take you to do the whole job? Are you thinking about hooking up parking sensors to the head unit too?
Thank you! I did the job over 2 half days. You ought to be able to get it done in a day/several hours. I was figuring out some of the processes myself, reviewing videos, and recording along the way. Removing and reinstalling the rear side panel and upper B pillar cost me a lot of time, which is why I annotated the video a lot around that area to save viewers' time. Working the wires through the rubber tube by the hatch, and the metal cutting (MK5's only) were time consuming as well. MK5's didn't have OEM park assist sensors available. Good luck!
Wow very intricate upgrade . I appreciate the pain you wenr through to get this video done. Very thorough too! I would have stopped and installed a new dpeaker while that panel was off hahahhahaha and ut qould have yurned into a 3 day job .
AWESOME JOB
Has anyone figured out how to use the MK7 emblem reverse camera with aftermarket unit?
This looks like my next mod
Give it a go! Having CarPlay and a RVC have breathed new life into it for sure. Definitely took some time and patience, but I’m glad I did it!
This was great!!
can you help me how did you code the Gateway, for me there is no view for camera coming not even black screen. coded 5F and 19 to enable rear view camera.
26:00 Instead using the Adapter that prevents the battery drain you can replace the gateway with that one from the Mk6. That‘s what I did.
Great detailed tutorial! Do you know if this camera would work with a different head unit such as an Xtrons?
Seems reasonable that it would, but I don’t know it for a fact. Give a shop a call and they might be able to give you some advice. Good luck
Hello. I am looking for rear wiew cameras for my golf mk5. Is there any way to get this flip badge camera any cheaper? Every where I looked they're 100€ or more... I would appriciate the help😅
Followed your tutorial and got everything installed correctly and the camera works but the image on the head unit is black and white and is repeated 9 times (9 little images of the same thing) any thoughts on what or where I went wrong ? MKV R32
Does the radio or the system matters because for me everything seems to be working fine except my screen just stays black
Maybe it’s something I missed in the video but I installed it all. Camera works but my hatch doesn’t open. It’s all plugged in and hooked up properly.
Sounds like you might not have used an “unswitched” fuse to tap. You need to find a fuse that still has power when the ignition is turned off. Simple tester should locate one for you, like in the steps around the 30:00 mark. The position might be different than my video as the fuse locations change depending on model year and equipment level. Good luck!
@@asolon I have mine hooked straight up to the battery. Even when the car is on the hatch doesn’t open
Which rearview camera works for mk5 golf the website linked all says mk6 or newer
Anyone done this for a Polo 6r? Been trying for weeks now but cant get it to work. I'm also using an aftermarket radio.
My question is which fuse already powered the rear latch?
7:35 - 7:41 is it the left hand side because the driver side is the left? my car is right hand side so would i remove the panels on the right of my car? thanks
Why would you need a rear camera on a hatchback
What spec is your camera?
Can you provide the direct link to the camera?
Up in the description 👍 (sorry, it’s pretty wordy)
Will this work for the rcd360 pro?
How did you get the rear usb port??
Hi I have a question. I have a RCD 330 installed into my Golf Mk5 and I am thinking of getting a multifunctional steering wheel like the one you have. I currently have the standard steering wheel which doesn’t have steering wheel controls. My question to you is can you change to the next song and previous songs using the buttons on the steering wheel? I know you can increase and decrease the volume but I am mainly interested in being able to skip to the next and previous songs so I don’t have to keep pressing on the RCD 330 display Screen.
Would be very grateful if I could get an answer to this. I am unsure as the multifunctional steering wheel on the MK5 Golf has up and down arrows and not left and right arrows … so I’m unsure if they would work to skip to the next and previous tracks when using apple carplay/Bluetooth music connection from your phone to the RCD.
Sorry I missed this. I am able to change tracks, however it also cycles the MFD display at the same time. 🤷🏻♂️
Anybody help, can I do this with a jetta 2006
You did nit have to use delay box?
If latch gets constant power , will it drain the car battery ?
The latch shouldn’t drain it. It’s the same as a door lock having power. But the head unit potentially could, if you have an earlier production canbus. I used the wire harness adapter from the RCD330 seller to prevent that on mine.
Where can a buy the badge with the camera?
There’s several sellers, but the info and link to the one I used is in the description 👍
I dont have that cap in my golf 5 8:00
Does it still pop the trunk?
Yes, same functionality
What the name of the thing that you bought from Amazon?
Do you mean the green tool I used to pull wires through? I just saw it at an AutoZone, but there’s tons like it if you search flexible claw grabber tool.
@@asolon thanks for the video 👍🏿
Does the mark 6 camera work on the mark 5?
It does, but with some modification I showed in the video: a small piece of metal needs to be removed inside the hatch, and one of the 3 legs from the wiper motor as well.
asolon do you have the link to the exact reverse camera i would need for my mark 5 gti
Yup, should all be in the description!
Can you paint the badge
Yes, the camera is in a compartment behind the badge.
Having trouble with reverse wire
Check out 10:45
hello does the camera need can bus to work . thnx
The canbus tap provides the signal for the dynamic parking lines on screen, but is not required for the camera to operate.
There is no way I can do this myself
Can totally be done if you familiarize yourself with all the steps first, and you’ll save yourself several hours labor costs having someone else do it. I also figure when I sell it, who wouldn’t want the touch screen and camera vs another without?
@@asolon exactly Man that’s why I bought this thing. Very excited just very intimidated I’ve watched this video and plenty others a bunch of times. I have my torqs and pry tools in hand. I’m just 17 and never done anything like this before so I don’t wanna mess up.
@@rawsondenna6329 and did you do it?
Imagine opening your dashboard console up to fit some chinese head unit breaking the plastics in the meantime whilst its not giving you the ick 😂 people are weird