Very interesting and valuable, thank you. Yes I've used fuzzy skin a few times, I really like the texture and the look of it. One issue for me is the increased time tho. Working on a small piece of furniture at the moment and having fuzzy skin enabled can mean an extra day or two of printing. 😅
@frankadrianart Thanks for watching and glad its hopefully useful. I didn't touch on print time bc I've only seen it add a few percent to the total print time when layer size is the same. One perk I think is you can get away with thicker layers and improve the visuals of the while reducing print time. A small piece of furniture where fuzzy skin adds a day doesn't sound very small! 🙂 I was intrigued so I checked out your channel. Pretty cool stuff as well. Subscribed
@@willofthemakerYeah it was was very useful so thanks again :) Yea I didn't even notice the increase in time on my smaller prints so didn't know that was a thing. But for example my furniture piece on bambu a1 is 500g filament and takes around 10 hours at 0.32 height. If I add some slight fuzzy skin and now it's 35 hours.. but it's a specific type of print with 2 walls in vase mode, so I guess that's why. :D I'm glad you liked my channel 🙂
Oh one thing more, the fuzzy skin adds about 75 grams of filament to the estimation on my furniture piece! So I guess fuzzy skin is not all roses and sunshine 😅
@@frankadrianart wow that seems crazy to have that much of an affect. Maybe the slicer is changing the speed for fuzzy skin? IDK I don't use bambuslicer so not sure if that's a thing. That or did it change layer height? Anyways interested to see the final print.
I want to experiment with fuzzy skin amd vapor smoothing to see if it helps layer strength. The increased surface area and potentially more contact area after smoothing hypothetically might create a nice hard candy shell over the exterior of the print.
@@DrewLSsix would love to see the results. I think as long as the fuzzy skin thickness isn't too big it could help. At some point it might make it weaker. I think in general the fuzzy skin improves cosmetics but to some extent at the cost of strength bc the layers aren't always on top of each other as it goes outside. Essentially a tiny overhang. On the other hand, they do go inside and interest with the inner wall which would make a good bond
@@willofthemaker I have been playing around with fuzzy skin too, and I came to the conclusion that it can definately be used to increase part strength. I use bambu slicer and with "all walls" on fuzzy, the layer adhesion between multiple walls on the same layer becomes much stronger because they slightly overlap. Without fuzzy skins parts shattered along those wall lines and with the fuzzy walls, it took more forces, and when it broke, there was no distinction visible between walls and layer lines. Although It might also have to do something with the lower speeds resulted from printing fuzzy.
@@henkheijmen great information! Thanks for sharing. I think the overlapping will do more to add strength than the slower print speeds. But both probably contribute
@@Yo_Hahn You probably could and would be a good choice to have it both have some cushioning to it but also TPU is pretty durable. I'd say you would want it fairly stiff with only a little give.
No Sir I printed them in PETG. The problem with TPU is once it's stretched it will deform and get loose. If you do use TPU then make sure you glue the grips on then you should be ok. @@Yo_Hahn
Ghosting is part of it. Also Z seam and layer lines. Plus i like the matte surface. Adding klipper would be awesome though. but probably not worth it on my old printer. My new Wuxn does much better with ghosting. almost none existant. Thanks for watching!
@@malloott totally reasonable thought. Just hard to justify the money and time needed for it. It seem like it quickly gets to the point of "I can just buy a new printer that does it for the same price" territory.
fine.. you talked me into it. I'm buying a 3d printer. The fit and finish was my last hangup, I have no more excuses. Thank you actually, this is really exciting.
This is a really good topic. I was wanting to play around with the settings to try to match the bottom surface when I use a PEI textured plate. Thank you for the presentation and all the work you put into it. It is greatly appreciated.
Glad it helped. I agree how it is nice it matches the textured be surface. Just need to get the top surface textured! Been playing from time to time with putting a part on a heated print be upside down and under some weight with some levels of success but comes with a lot of issues on that.
@@willofthemakeri found out if you use the maze pattern on top surface + 10-15% infill it will make top surface fuzzy a bit too Because there is not enouch support for maze to stay flat
I had thought fuzzy skin was just a gimmick. Something for…as in your example of fuzzy bear. But, seeing your examples, the finer texture results reminds me a lot of SLS prints. I love that slight pebbly texture. Looks like I’m going to be doing some fuzzy experiments this week. Thanks for opening my eyes.
Honestly the name is doing itself a misnomer. It should be called add texture or noise or something to give it more credence to what it can actually do. I was trying to do more high quality prints to potentially sell and got an SLA printer for that which comes with a ton of downsides with that. Then I saw what fuzzy skin actually came to and my world changed lol Glad it helped. Good luck with your experiments! 👍
I wish there was an easy way to do in f360. Unfortunately I don't know a good way except on flat pieces and patterning but complex shapes? Yikes Glad the video helped
Nice tip. I will be using this for 2 processes. Adding tooth to the part for a Bondo layer to do super smooth parts and the other as a tooth layer for laminating other materials to the print with epoxy. Thanks
Thank you for experimenting on this. I've used it a few times for more organic looking prints, but never thought about dialing it in and trying to get a nice texture out of it for more practical prints. I'm really hoping to see more options for this feature become available, like being able to paint it on different surfaces in a print, have options beyond randomness (like being able to paint a stippled texture directly on a surface in the slicer), being able to put it on surfaces that need to be bonded so there's more surface area for adhesives, etc. The precision of newer printers in particular could make this a game changer. I'm about to go print a piece with the fuzz and see if it helps hold onto body filler a little better.
Thanks for watching and glad it helped. There are some methods that you can do some of that with I didnt get into. I think Prusa and Bambu slicers have more functionality for things like that. @NeedITMakeIt made a video about this in a video a couple months ago. Look for his video titled "This Slicer Feature WAS Useless Until Now - Feat. Bambu X1 Carbon" I think it can really help you 👍
Thanks for this. I did a few tests on Cura after watching this. Soon after I started printing out all the parts I will need for the Voron 2.4 3D printer I am building. Funny thing is I forgot to turn the fuzzy skin off but I really like the look and will continue to use it.
I’d highly recommend converting your printer to Klipper. Turn off acceleration control in Cura and do resonance tuning. Klipper resonance tuning is a game changer. The speed and quality improvements are very impressive as long as the rail bearings can keep up.
The printer was in desperate need of a tuning when I made these. I've made some big improvements with some "basic" changes (belt tuning, physical dampening). It's hard to say if i want to upgrade this old thing much vs buy a new printer and keep this one as is. It's slow but I've improved the quality a lot since then and it's been reliable for nearly 10 years without much fuss
Depending on what you print and if you don't want to do manual postprocessing this is extremely nice. Using modifier blocks you can be very selective where to put it, so you don't fuzzy sliding surfaces.
Now I'm curious whether I can abuse that feature for other use cases, like simulating book spines by making the length of the waves really long. Would be great for stuff like "book nook" dioramas.
Thank you, I love the look of these parts compared to the generic 3d print. Only problem I have is that I use a glass bed, so the bottoms will be smooth while the rest of the print won't be. I should probably get a PEI sheet..
In the past I've tried smoothing prints by painting or otherwise adding various materials - polyurethane, wood filler, bondo, etc. - and I've had mixed results. The striations of the print layers still tend to come through since no matter what you do there's still an underlying pattern to them. Next time I'm trying something like that I'll add a bit of fuzziness, if that breaks up the underlying pattern then perhaps the resulting smoothing will work better.
Super helpful, thank you very much!!! I got my best results on an Anycubic S3 Mega with 0.15 resolution, 0.15 thickness and 0.25 point distance. A fine textured surface without any lines.
Awesome! Glad it's helpful for you. A few have commenting on how it can help with post processing like glue, paint, or filler bonding which is also a cool feature
bro holy fark liked and subbed clear and concise research with printed examples no shilling legit af thank you only about 4 other i watch to learn 3d printing from your now one started on an Ender 3 fully modded with linear rails, dual z klipper fw recently switched to X1C so now i am learning actual printing
Haha thanks man! Good work with the ender upgrades. Definitely helps really understand how these things work. Good luck and glad to have you aboard. Tons to learn!
I have zero 3D printing experience, but I am ordering my first 3d printer next week (X1C) This video is going to be a great help, because I will be using fuzzy skin a lot in the future. Thanks
Really good examples - saves a ton of time and material, as opposed to me doing it from scratch. I might have to try this on some boxes that I'm mass-producing, because battling z-wobble and banding on the straight walls is getting annoying and costly. Something like this 7:13 where I believe I'm looking at 0.30mm / C / Density 4 / Pt Dist 0.25... bottom row - 3rd from left. Thanks for the info. I subbed.
Awesome! Really happy to help. Fuzzy skin I think looks awesome and has the additional benefit of basically erasing those hard to resolve issues. Wish you the best! I've started selling 3d printed items I design. How's it going for you?
I've used it mainly for complimenting my real work as a builder/installer - nothing like being able to provide build-to-suit parts (eg: I just installed custom gate hooks in a client's home, where they didn't want the original hooks to be drilled into their cast iron features.) I'm doing what you're doing - just designed a hard-shelled waterproof box that I'm pretty sure will sell, but totally unsure of the marketplace (Etsy?) and the price (can I make a profit?) Maybe you should document the process of your attempting to create a sellable product... I know there's plenty of vids on it, but they get a lot of hits.
@@josephpk4878 gotcha. What your doing is one of the things I love about what 3d printing enables. Relatively quick, inexpensive custom solutions. Right now I have an Etsy store selling accessories for fountain pens. I started a few months ago and people seem to like the product but only sold a small amount so far. One thing I'm thinking of is that Etsy is a great place for general "artisan" products that have a wide appeal but really niche things, most people just go to their favorite retailers. So it kind of depends. Might change selling strategies at some point to try and sell to known online retailers. I'm also planning another brand for 3d printed automotive parts which could be fun. Great to be able to mix hobbies like this. I've thought about documenting it. If it picks up steam I probably will.
Exactly - get into manufacturing custom and replacement parts for established brands and the money suddenly looks good. I'm targeting the yachting industry - I have history in boats/yachts - and, luckily, have friends in high places. Literally just got off the phone from promoting the capabilities of 3DP in custom parts/accessories. The fuzzy-skin concept came in when he mentioned a contractor that installs custom textured vinyl dash kits. I immediately offered matching component accessories. Now the idea's in his head and I'm hoping for a project. Good luck with the channel and printing.
@@josephpk4878 that is awesome! Congrats! ASA could be a good choice for it's natural uv resistance and high thermal properties. I'd imagine yachting industry can be quite profitable. Another reason im interested in going automotive (besides it being my main passion in life). Higher prices in general. Good luck! Thanks. Nice to have the channel finally getting some traction. Hopefully have found what works
interesting to use it with the wood filament. To try and give a more wood texture or something else? the matte surface affect is great with fuzzy skin for knocking down the shininess.
@@willofthemaker exactly! I’ve always been surprised that it’s not more commonly used for getting a more “wood like” appearance with wood filament, considering I’ve see people come up with a customer gcode to add temperature variation to get some natural looking color differences. But the fuzzy feature is right there and just a simple check mark lol. Also I’d assume it would help the filament hold stain better although I’ve never stained wood filament so I’m not sure.
@@ResyekttThats aweosme. great thinking. I still hold that fuzzy skin is a terrible name for the feature. maybe Add texture or noise would have people try it more often.
On the bottom, you can use a textured build plate to get the same effect. Wont be a perfect match most likely but still get a texture. Top surface, unfortunately there isnt a good way - at least in cura. Not sure about the other slicers as i havent really dived into them yet.
I’m considering getting an A1 for my first printer. Is this slicer setting able to be applied to only a specific face so all inner features keep tolerance without fuzzy skin?
Yes they have. It seems to be more prevalent in their videos lately as well. They call it noise which I think is a much better name than fuzzy skin (my whole fuzzy wuzzy bit was about). Glad to see it being more utilized for sure
Great video, it really helped me a lot as i am new in the 3d printing field and struggle with printing spheres especially in fuzzy mode enabled. I am aware that in this case, the sphere being cut it should not be a problem, but i am struggling to print the sphere as a whole because even though the sphere looks printable in the slicer as the sphere has a small flat bottom surface the outer layers with the fuzzy skin seem not be able to stick to the printed object even though the overhand seems not to bad and the issues occur only on the lower part of the sphere, not on the upper part(where it comes together again) can you maybe suggest how to change or adjust the slicer settings in my particular case? for now i tried printing with 0,3mm layerhight as my object to print is pretty large. thank you!
Thanks. Hope you have good success using it. Belts are pretty loose on the old printer and needed to be tightened. But I thought it would be a perfect showcase of the power of fuzzy skin
A question, I'm trying the fluzzy skin on a cube with Creality Print but it only prints it on 3 sides of the cube, there is a smooth one and I can't find an option for it to do all four, any ideas? In the other laminators does it do all 4? Thank you
Honestly, not sure. Never used craft print but if it's like Cura, every now and then the fuzzy skin generation isnt perfect. I fix it by moving and reorienting the part (rotating it) and have it regenerate the print. Maybe that will fix it? Hope this helps
@@willofthemaker With figures of animals or dolls there is no problem, only with gepmetric figures with 3 or 4 faces (cubes, pyramids, triangles) one is always smooth, even if the figure is rotated. Being an experimental feature, I suppose they are, well, experimenting. Thanks for the reply
@@franciscoporras8864 definitely still not a perfect feature but it's been around for awhile. Maybe just never got enough usage from the community. Sorry it didn't help. Only thing I can think of is maybe resaving the file but that is a shot in the dark
HI! I'm new to 3D printing but this effect is really interesting. I tried to print a piece and got the result. Just a question (probably very stupid) about the top and bottom layers, can't you get this effect? Can it only be used on walls? Thanks for your time
Firstly, welcome to the world of 3d printing! What printer did you get? No stupid question, you can get a texture on the bottom surface if your printbed is textured. (A textured PEI sheet). There are smooth ones, textured, and even some that have a carbon fiber look which shows in the bottom layer of the print. Basically the printbed's surface gets transferred to the first layer of the print. The top is not really possible. One person commented on doing maze setting, but that isn't available in Cura so I can't say for sure. Either way it is likely not the same as fuzzy skin but maybe give some sort of texture. Hope that helps. Have fun!
i have a print dimension issue. I’m trying to print a round part that’s 2.0 inch diameter 1 inch tall. . The part is coming out 2.000 on one side and if i check a different spot (180) it’s at 1.990 ( .010 difference) out of round. How can i get this dimensions closer to 2.0 inches diameter? I have default settings pla P1S
Is it in one axis? Like purely X or purely Y? If so you need to tune your steps per mm. Check out www.layerfused.com/3d-printer-calibration for a good calculator. I'd say TH-cam how to do it with Bambu. I'm not sure how to do that on those printers
Unsure whether this also holds for Cura (who the heck still uses Cura), but in OrcaSlicer you can combine vase-mode with fuzzy skin. That not only gives a special surface effect, but also makes a "straight" vase-mode the wall more stiff as the parts sticking out make the total wall wider.
Haven't tried combining vase mode and fuzzy skin in cura but I'm sure it's possible. It's almost like diamond plating in that regard. The bends/deformations add to the rigidity. Cool tip!
@@willofthemaker Absolutely. Any opportunity to piggyback off the efforts of others' research to expedite my own process is a win in my book. Not all of us 3d print for the love of 3d printing. Some of us use it as means to an end for other things. So there's a lot of us out there who aren't going to dig through and test a million different options out there to find what's best for whatever purpose, because we rely on people like you to do it for us. :D
Holy cow! This is eye opening. Thank you! I was wondering if fuzzy skin wears out the 3d printer much faster, but if it saves printing time with higher density then my question is invalid.
Great idea mate! but I'm worried that having this matte finish with fuzzy skin will cost me on the lifetime of the motor 😮. Can we compare the cost of this method with the cost of using matte filament instead?
It's honestly hard to do. The amount of fuzziness and exterior walls makes a big difference. So heavily model and settings dependent. I'd recommend slicing a model without fuzzy skin, then slicing with the settings you want and compare the material amount difference as well as the time difference. See how much the price in normal material is but with fuzzy and compare to matte material without fuzzy
Can it be defined so that some faces have a fuzzy texture while others do not? You accidentally made that happen on a part and then rotated it away. I can see this being useful when purposefully done. I imagine it's done just like switching to a different filament but without actually switching and purging etc., and I could see this being cool for making a grippy part on an otherwise exactly-sized model. One use case would be a container or a phone case with a textured outside and a smooth inside.
There are some ways to it. I cura it's a bit clunky but you can essentially create overlapping geometries that have their own modified settings. Probably the best way to do it. Or have it be similar to a multi material set up with different bodies and choose settings individually from that. You can also set fuzzy skin to outside only to not affect inside geometries which could work for a phone case
It's there any way to choose where a part is or isn't fuzzy? For instance, if you print a container where you need dimensional accuracy on the inside but the fuzzy texture on the outside.
In Cura, there is a setting for external walls only which could be what you are looking for. Besides that you can use support blocker (or I suppose other intersecting models) as overlapping model settings and modify that way
@@davidrgilson happy to help. Another channel did a deep dive as well. @needitmakeit a few months ago. I might do my own video as well bc there have been some people asking for it
@@elpabloncho print time does increase a bit. I've seen 10% but one person commented a tripling which I thought seemed unlikely. Printer life with the accelerations? Not sure. Could see it having an effect on lifetime for sure. I've been using it for about 5 months now and hard to say. The printer I've mainly been using it on is nearly 10 years old and hasn't had any issues
I haven't yet but have a feeling I'm going to be switching slicers soon. Not sure if I'll do Prusa slicer or orca slicer. Maybe play with both. Cura used to be awesome but seems like it has really fallen behind
It's toward the bottom under experimental settings. You need to go into the advanced slicer settings if you haven't already. If you still can't find it, it probably means it's hidden. Click the three bars at the right of each settings group to display the options to view and make sure fuzzy skin is checked
Nice video! But you made a special point of adding a top surface to the test model and then never showed or mentioned it... I am assuming it doesn't get the texture?
Thanks! These models only had a very small top surface but no, no texture. One person commented that a "maze" setting on top surface could help with a texture but I'm not familiar with it. I have done a couple experiments of putting a print upside down on the textured be surface heated to the glass transition zone of the plastic. Have gotten some results but its not great yet and only useable in some types of prints and only on the top surface. I think we need a texture iron!
Thanks for sharing that! Good points, nice examples and didn't waste time teaching how the like and subscribe buttons work! (I liked and subscribed) (because I wanted to)
I noticed that none of the top layers had the fuzzy effect applied. Was this missed in your settings or is it a limitation of Cura? I started using the concentric pathing for top layers to make them look less "3d printed" however that fuzzy texture could be what I'm looking for it if it's possible. I would have liked to have seen that done in your video but I'll be looking to give it a try at home myself to see what's possible. Thanks for the video.
VERY good eyes. looking at these parts clower, it seems the effect is result on the last few mm of the print. Some variants are more affected than others. I think theres a couple things happening. The part is getting very small and seems maybe Cura is throwing its hands up to some degree. The other "issue" is these parts are very thin and have minimal infill and top layers so the outer points at the top are essentially unsupported overhangs and the filament is sagging down into the print making it look a bit smoother. I havent seen this on other prints i use fuzzy skin on that maintain a decent size and mainly support over the previous layers.
I like the .2mm one but, and it is a big but, I don't like the way the machine shakes. This can not be good in the long term. So I really only do it where it is make or break.
Ok so here is my opinion on this in short: I think I will try fuzzy skin more often for the neat texture it could provide, but I would never see myself using it as a means of reducing print times, nor for hiding ghosting, I just don't need it for that, resonance compensation works wonders. What do I mean? You're right we shouldn't dismiss fuzzy skin as just a gimmick, I did know it was more for creating a texture for hiding layers than imitating the look of fur, but I have also kinda dismissed it as just some whacky setting myself. I think I will try it more often for when a texture might be nice. I wan't to see how fuzzy skin may affect the look of certain materials which themselves already can have wildly different finishes/textures, like for example a glossy/shimmering PETG print might benefit from it a lot. Or the already very matt and layer-hiding PLA-CF (or any cf material) might have even more potential for making professional looking parts. But when it comes to the quality and speed "gains" I have to disagree a little bit, at least if we're talking in a more general sense and look at what features and capabilities even entry level modern 3D printers are starting to have, look at the Bambulab A1 for example. Clearly for your printer and your use case there is a big difference in the finish and print time. But from what little experience I have using fuzzy skin I know that without heavy tuning of the stock profile it's a LOT slower to print then regular outer walls. I Actually wonder what speeds your outer wall is at and if it's any different when using fuzzy skin and if just turning down the outer wall speed, so the overall time is similar, might not already greatly reduce ghosting. I did some slicing tests with a larger box shaped fan duct thing, in Orca slicer at 0.16mm layers, sliced for a P1S. I sliced the same part with identical settings besides with or without fuzzy skin (0.8mm point distance 0.3mm thickness), the normal one would take 2h23m (27m for the outer wall), and the one with fuzzy skin was thought to take 3h46(1h 49m for the outer wall). This difference was to big that one with fuzzy skin at 0.28mm layers instead of 0.16mm wasn't even faster at 2h35m. Since my printer utilizes resonance compensation and thus is moving pretty fast fuzzy skin is slowing it's down substantially to be able to reproduce the shape of the line.
Great post. I think the main benefit is definitely texturing the print more than anything else and it is just very poorly named. "Add texture" or something to that effect would be better. Hiding issues with a print like ghosting or the z seam are secondary benefits, especially on older machines. If you have some sort of compensation like input shaping, ghosting is practically a non issue. But yeah, my printer was in a desperate need of a tune up when I did this video. Was able to get a pretty significant improvement in some hardware tweaks without changing gcode. Of course further improvement with different slicing parameters but largely at the expense of speed. (My next video is covering this) That being said, regarding fuzzy skin improving print time, it's really dependent on a few things which in my uses has been beneficial. One is the size of the part's perimeter. Obviously the bigger the part the more fuzzy skin which would slo it down. I've used it on those dash pieces while printing vertically. Went from .15 to .30 layer height more than made up for fuzzy skin in this case while improving the look. It also depend on how subtle you want it to be. I find a thickness of 0.1 is adequate while not adding too much time. I wonder how much that would reduce your part compared to 0.3. I've never used CF filament yet but from what I've seen it already has a pretty good matte (maybe slightly textured). A very subtle fuzzy skin is likely all that's needed
We can dream! Actually you might be able to hack that using overlapping geometry modifiers with different fuzzy skin settings. Super clunky but could happen
@@Smrts955 what slicer do you use? I'm used to cura which I think is behind the times. Probably switch to something new soon. Pretty sure the other slicers might have better features that could be hacked up. I'm thinking of when painting different colors on the part in slicer maybe you could use that to change fuzzy skin parameters. Kind of a guess tho
I had this turned on by accident one time back when I first started printing... Couldn't figure out why my prints all came out like garbage back then lol.
@@willofthemaker It took me a solid 3 prints to realize it was a setting in the slicer and then I had to scroll through each individual setting to figure out what it was and of course the setting was all the way down at the bottom of the list
It would be really nice if we could "paint" areas for fuzzy skin, or mask off areas that we would not need fuzzy skin. For example, parts of a piece that need a tolerant to be snapped together or something... If there was a way to do that, that would be tremendous
In Cura, there is a way to hack the support blocker to have it change model settings where it overlaps but is limited by its square shape. There might be plugins that allow for better capabilities for painting. I am pretty sure in bambuslicer and Prusa slicer you can somewhat paint it. @needitmakeit has a video diving into this if you are interested
I’m curious what printer are you using, that ringing in the Z seams are the most I’ve ever seen, either you got a poorly maintained printer or a factory dud
It's a 9.5 year old printer with minimal maintenance. Tightened the belts a year ago and did a tune up but haven't touched it since. Also upped the accelerations which certainly don't help it's cause haha.


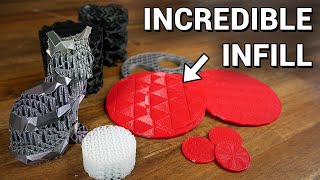


Do you use fuzzy skin? Will you now?
Very interesting and valuable, thank you.
Yes I've used fuzzy skin a few times, I really like the texture and the look of it. One issue for me is the increased time tho.
Working on a small piece of furniture at the moment and having fuzzy skin enabled can mean an extra day or two of printing. 😅
@frankadrianart Thanks for watching and glad its hopefully useful. I didn't touch on print time bc I've only seen it add a few percent to the total print time when layer size is the same. One perk I think is you can get away with thicker layers and improve the visuals of the while reducing print time.
A small piece of furniture where fuzzy skin adds a day doesn't sound very small! 🙂
I was intrigued so I checked out your channel. Pretty cool stuff as well. Subscribed
@@willofthemakerYeah it was was very useful so thanks again :) Yea I didn't even notice the increase in time on my smaller prints so didn't know that was a thing. But for example my furniture piece on bambu a1 is 500g filament and takes around 10 hours at 0.32 height.
If I add some slight fuzzy skin and now it's 35 hours.. but it's a specific type of print with 2 walls in vase mode, so I guess that's why. :D
I'm glad you liked my channel 🙂
Oh one thing more, the fuzzy skin adds about 75 grams of filament to the estimation on my furniture piece! So I guess fuzzy skin is not all roses and sunshine 😅
@@frankadrianart wow that seems crazy to have that much of an affect. Maybe the slicer is changing the speed for fuzzy skin? IDK I don't use bambuslicer so not sure if that's a thing. That or did it change layer height? Anyways interested to see the final print.
Gotta say I thought fuzzy skin was maybe useful for a grip, but never thought about the other perks. Really appreciate that - thanks!
Definitely underrated feature. Glad it helped
I want to experiment with fuzzy skin amd vapor smoothing to see if it helps layer strength. The increased surface area and potentially more contact area after smoothing hypothetically might create a nice hard candy shell over the exterior of the print.
@@DrewLSsix would love to see the results. I think as long as the fuzzy skin thickness isn't too big it could help. At some point it might make it weaker. I think in general the fuzzy skin improves cosmetics but to some extent at the cost of strength bc the layers aren't always on top of each other as it goes outside. Essentially a tiny overhang. On the other hand, they do go inside and interest with the inner wall which would make a good bond
@@willofthemaker I have been playing around with fuzzy skin too, and I came to the conclusion that it can definately be used to increase part strength. I use bambu slicer and with "all walls" on fuzzy, the layer adhesion between multiple walls on the same layer becomes much stronger because they slightly overlap. Without fuzzy skins parts shattered along those wall lines and with the fuzzy walls, it took more forces, and when it broke, there was no distinction visible between walls and layer lines.
Although It might also have to do something with the lower speeds resulted from printing fuzzy.
@@henkheijmen great information! Thanks for sharing. I think the overlapping will do more to add strength than the slower print speeds. But both probably contribute
I used fuzzy skin on handles for my wood and metal files, worked out excellent!
Grips/handles are a huge area that benefits from fuzzy skin. Glad it worked out! Thanks for sharing your experience
Do you print the grips in TPU? Me wheelbarrow lost both grips, so it would be nice to print it.
@@Yo_Hahn You probably could and would be a good choice to have it both have some cushioning to it but also TPU is pretty durable. I'd say you would want it fairly stiff with only a little give.
No Sir I printed them in PETG. The problem with TPU is once it's stretched it will deform and get loose. If you do use TPU then make sure you glue the grips on then you should be ok.
@@Yo_Hahn
So you are using fuzzy skin to hide ghosting. Try klipper and tuning to get as much ghostingo ut as possible
Ghosting is part of it. Also Z seam and layer lines. Plus i like the matte surface. Adding klipper would be awesome though. but probably not worth it on my old printer. My new Wuxn does much better with ghosting. almost none existant.
Thanks for watching!
@@willofthemaker in my experience klipper actually has the most impact on older machines, as there is so much to improve.
@@malloott totally reasonable thought. Just hard to justify the money and time needed for it. It seem like it quickly gets to the point of "I can just buy a new printer that does it for the same price" territory.
Klipper requires just a computing machine like a raspberry pi or an old laptop. So is at worst 50 bucks
It’s hard to avoid all those Klipper preachers nowadays …
fine.. you talked me into it. I'm buying a 3d printer. The fit and finish was my last hangup, I have no more excuses.
Thank you actually, this is really exciting.
Haha that's awesome! Welcome to the club! What do you have in mind?
This is a really good topic. I was wanting to play around with the settings to try to match the bottom surface when I use a PEI textured plate. Thank you for the presentation and all the work you put into it. It is greatly appreciated.
Glad it helped. I agree how it is nice it matches the textured be surface.
Just need to get the top surface textured! Been playing from time to time with putting a part on a heated print be upside down and under some weight with some levels of success but comes with a lot of issues on that.
@@willofthemakeri found out if you use the maze pattern on top surface + 10-15% infill it will make top surface fuzzy a bit too
Because there is not enouch support for maze to stay flat
I had thought fuzzy skin was just a gimmick. Something for…as in your example of fuzzy bear. But, seeing your examples, the finer texture results reminds me a lot of SLS prints. I love that slight pebbly texture. Looks like I’m going to be doing some fuzzy experiments this week.
Thanks for opening my eyes.
Honestly the name is doing itself a misnomer. It should be called add texture or noise or something to give it more credence to what it can actually do.
I was trying to do more high quality prints to potentially sell and got an SLA printer for that which comes with a ton of downsides with that. Then I saw what fuzzy skin actually came to and my world changed lol
Glad it helped. Good luck with your experiments! 👍
I do use it but i would have never done all this testing. Thanks for doing the comparisons on these, so we dont have to, appreciate it.
My pleasure! Happy to help the community
Thank you for trying all those different settings and layer heights, it's a great reference and I'll be saving this for later.
No problem. Happy to help!
Your a cold breeze in a hot summer. Thanks for sharing this, it helped me a lot.
Haha what a nice thing to say! Glad it helped
Thanks! The texture looks great! I'm going to try it now! I thought fuzzy skin was a dumb setting until I saw this! Cheers!
Great to hear! Fuzzy skin definitely falls into the "worst name for a setting" category
thanks lol ive been trying to figure out how to do a simple texture like this for 2 days in f360. saves quite a bit of hassle.
I wish there was an easy way to do in f360. Unfortunately I don't know a good way except on flat pieces and patterning but complex shapes? Yikes
Glad the video helped
This is so cool it makes the prints look so much more professional
Makes a big difference. Glad you like it!
This is Fuzzy Good! Thanks for sharing.
Hey! I loved the video, i just launched a print with a fine fuzzy skin, can't wait to see the result.
That's awesome! Hope you like it. Have fun experimenting with different settings
Nice tip. I will be using this for 2 processes. Adding tooth to the part for a Bondo layer to do super smooth parts and the other as a tooth layer for laminating other materials to the print with epoxy. Thanks
A couple others have commented with similar ideas. I don't do much post processing but this is clearly an additional benefit 👍
Thank you for experimenting on this. I've used it a few times for more organic looking prints, but never thought about dialing it in and trying to get a nice texture out of it for more practical prints. I'm really hoping to see more options for this feature become available, like being able to paint it on different surfaces in a print, have options beyond randomness (like being able to paint a stippled texture directly on a surface in the slicer), being able to put it on surfaces that need to be bonded so there's more surface area for adhesives, etc. The precision of newer printers in particular could make this a game changer. I'm about to go print a piece with the fuzz and see if it helps hold onto body filler a little better.
Thanks for watching and glad it helped. There are some methods that you can do some of that with I didnt get into. I think Prusa and Bambu slicers have more functionality for things like that. @NeedITMakeIt made a video about this in a video a couple months ago. Look for his video titled "This Slicer Feature WAS Useless Until Now - Feat. Bambu X1 Carbon"
I think it can really help you 👍
Thanks for this. I did a few tests on Cura after watching this. Soon after I started printing out all the parts I will need for the Voron 2.4 3D printer I am building. Funny thing is I forgot to turn the fuzzy skin off but I really like the look and will continue to use it.
That's awesome! Happy it worked out and good luck with your voron build
Fuzzy skin might also be interesting for installing grip tape or simple because the far greater surface area it has.
Definitely. Plus give some additional grip with the texture
I’d highly recommend converting your printer to Klipper. Turn off acceleration control in Cura and do resonance tuning. Klipper resonance tuning is a game changer. The speed and quality improvements are very impressive as long as the rail bearings can keep up.
The printer was in desperate need of a tuning when I made these. I've made some big improvements with some "basic" changes (belt tuning, physical dampening). It's hard to say if i want to upgrade this old thing much vs buy a new printer and keep this one as is. It's slow but I've improved the quality a lot since then and it's been reliable for nearly 10 years without much fuss
Maybe one day I'll look into it more seriously
Thanks for sharing and testing different fuzzy settings! 👍 This knowledge will, definitely, help to get rid of layer lines on projects.
Glad it was helpful and hope you have good success with it
Depending on what you print and if you don't want to do manual postprocessing this is extremely nice. Using modifier blocks you can be very selective where to put it, so you don't fuzzy sliding surfaces.
Yes exactly. I plan on doing a video about the untapped potential of modifier blocks soon. I rarely see it, which is also a bit of a shame
Now I'm curious whether I can abuse that feature for other use cases, like simulating book spines by making the length of the waves really long. Would be great for stuff like "book nook" dioramas.
Worth a shot. The one thing is it's completely random, at least in cura, so getting any regularity might be difficult
Thank you, I love the look of these parts compared to the generic 3d print.
Only problem I have is that I use a glass bed, so the bottoms will be smooth while the rest of the print won't be. I should probably get a PEI sheet..
Getting a pei sheet is a game changer for printing. Parts stick better and are easier to come off. plus you can choose texture or smooth
Fantastic video and hint how to improve my prints. thanks a lot for sharing!!
Glad you like found it helpful!
Cool video! I'll try out that setting soon!
Thanks. Hope you like the results
This is a great video - I really like the example prints that showcase what the parameters do. Will definitely use the fuzzy skin option.
this was a solid video dude needs to make another one on this
Thank you, have ideas for more. Just need to get the time
Interesting setting. Since it increases surface area it could be good for post processing like spray painting. Thanks for posting! Good work!
Definitely a good point! If you get the settings dialed in right, it could mimic a rough texture perfect for painting. Thanks!
In the past I've tried smoothing prints by painting or otherwise adding various materials - polyurethane, wood filler, bondo, etc. - and I've had mixed results. The striations of the print layers still tend to come through since no matter what you do there's still an underlying pattern to them. Next time I'm trying something like that I'll add a bit of fuzziness, if that breaks up the underlying pattern then perhaps the resulting smoothing will work better.
@@facedeer Im really curious to see if the fuzzy skin helps or hurts. when you get a chance to test it, I'd love to hear your results.
I've done a few prints with fuzzy skin, and used other settings to keep other areas smooth.
Yup. Definitely some more advanced things you can play around with. I think cura actually has less advanced features than some of the other slicers
Super helpful, thank you very much!!! I got my best results on an Anycubic S3 Mega with 0.15 resolution, 0.15 thickness and 0.25 point distance. A fine textured surface without any lines.
Awesome! Glad it's helpful for you. A few have commenting on how it can help with post processing like glue, paint, or filler bonding which is also a cool feature
I did not think of that, thank you very much!
Will definitely use this.
Awesome! Glad to help
bro holy fark liked and subbed clear and concise research with printed examples no shilling legit af thank you only about 4 other i watch to learn 3d printing from your now one started on an Ender 3 fully modded with linear rails, dual z klipper fw recently switched to X1C so now i am learning actual printing
Haha thanks man! Good work with the ender upgrades. Definitely helps really understand how these things work. Good luck and glad to have you aboard. Tons to learn!
It was very useful to me, you have gained a subscriber. Thank you so much.
Awesome! Glad it helped. Finishing up my next video about getting rid of ghosting the "right way" without relying on fuzzy skin as well
I have zero 3D printing experience, but I am ordering my first 3d printer next week (X1C) This video is going to be a great help, because I will be using fuzzy skin a lot in the future. Thanks
Great to hear and good luck with your printer. Welcome to the community!
@@willofthemaker thank you! :)
What a well made comparison, well thought out and easy to take in, great video!
Thank you! Appreciate the kind words
This makes me want to try fuzzy skin on parts I'm going to fill and sand. I wonder if it would aid in that process, or hinder it.
A few have commented thinking it will aid it. I think it should ultimately help. Good luck with your trials! Would love to know how it goes
Really good examples - saves a ton of time and material, as opposed to me doing it from scratch. I might have to try this on some boxes that I'm mass-producing, because battling z-wobble and banding on the straight walls is getting annoying and costly. Something like this 7:13 where I believe I'm looking at 0.30mm / C / Density 4 / Pt Dist 0.25... bottom row - 3rd from left. Thanks for the info. I subbed.
Awesome! Really happy to help. Fuzzy skin I think looks awesome and has the additional benefit of basically erasing those hard to resolve issues. Wish you the best! I've started selling 3d printed items I design. How's it going for you?
I've used it mainly for complimenting my real work as a builder/installer - nothing like being able to provide build-to-suit parts (eg: I just installed custom gate hooks in a client's home, where they didn't want the original hooks to be drilled into their cast iron features.) I'm doing what you're doing - just designed a hard-shelled waterproof box that I'm pretty sure will sell, but totally unsure of the marketplace (Etsy?) and the price (can I make a profit?) Maybe you should document the process of your attempting to create a sellable product... I know there's plenty of vids on it, but they get a lot of hits.
@@josephpk4878 gotcha. What your doing is one of the things I love about what 3d printing enables. Relatively quick, inexpensive custom solutions.
Right now I have an Etsy store selling accessories for fountain pens. I started a few months ago and people seem to like the product but only sold a small amount so far. One thing I'm thinking of is that Etsy is a great place for general "artisan" products that have a wide appeal but really niche things, most people just go to their favorite retailers. So it kind of depends. Might change selling strategies at some point to try and sell to known online retailers.
I'm also planning another brand for 3d printed automotive parts which could be fun. Great to be able to mix hobbies like this.
I've thought about documenting it. If it picks up steam I probably will.
Exactly - get into manufacturing custom and replacement parts for established brands and the money suddenly looks good. I'm targeting the yachting industry - I have history in boats/yachts - and, luckily, have friends in high places. Literally just got off the phone from promoting the capabilities of 3DP in custom parts/accessories. The fuzzy-skin concept came in when he mentioned a contractor that installs custom textured vinyl dash kits. I immediately offered matching component accessories. Now the idea's in his head and I'm hoping for a project. Good luck with the channel and printing.
@@josephpk4878 that is awesome! Congrats! ASA could be a good choice for it's natural uv resistance and high thermal properties. I'd imagine yachting industry can be quite profitable. Another reason im interested in going automotive (besides it being my main passion in life). Higher prices in general. Good luck!
Thanks. Nice to have the channel finally getting some traction. Hopefully have found what works
Wery informative, detailed content! Thanks!
Thank you!
Since the fuzzy feature came out I’ve used it anytime I print wood filament, in addition to petg when I don’t want the print to be so shiny
interesting to use it with the wood filament. To try and give a more wood texture or something else?
the matte surface affect is great with fuzzy skin for knocking down the shininess.
@@willofthemaker exactly! I’ve always been surprised that it’s not more commonly used for getting a more “wood like” appearance with wood filament, considering I’ve see people come up with a customer gcode to add temperature variation to get some natural looking color differences. But the fuzzy feature is right there and just a simple check mark lol. Also I’d assume it would help the filament hold stain better although I’ve never stained wood filament so I’m not sure.
@@ResyekttThats aweosme. great thinking. I still hold that fuzzy skin is a terrible name for the feature. maybe Add texture or noise would have people try it more often.
thank you for sharing, the tricks work well on my project!
How do you add fuzzy to the top & bottom layers only on a flat object?
On the bottom, you can use a textured build plate to get the same effect. Wont be a perfect match most likely but still get a texture. Top surface, unfortunately there isnt a good way - at least in cura. Not sure about the other slicers as i havent really dived into them yet.
It's basically dithering, very cool.
Pretty much. Would be nice to have more pattern options. Maybe one day
Need to test this with matte filament.
double matte!
I am gonna make 3d printed steering wheel for sim drifting so should i use fuzzy skin?
The added grip fuzzy skin provides might be a perfect fit for a steering wheel. Would be cool to see!
Thanks!
I’m considering getting an A1 for my first printer. Is this slicer setting able to be applied to only a specific face so all inner features keep tolerance without fuzzy skin?
Can we select specific faces to use fussy skin? Considering glue some pieces together... for example
Slant 3D has shown a lot of good examples of using fuzzy skin as well. Can make a product look much less like it was mass produced.
Yes they have. It seems to be more prevalent in their videos lately as well. They call it noise which I think is a much better name than fuzzy skin (my whole fuzzy wuzzy bit was about). Glad to see it being more utilized for sure
@@willofthemaker Hahaha it was a good Fuzzy Wuzzy bit. Great video!
@@802Garage haha glad you liked it!
Great video, it really helped me a lot as i am new in the 3d printing field and struggle with printing spheres especially in fuzzy mode enabled. I am aware that in this case, the sphere being cut it should not be a problem, but i am struggling to print the sphere as a whole because even though the sphere looks printable in the slicer as the sphere has a small flat bottom surface the outer layers with the fuzzy skin seem not be able to stick to the printed object even though the overhand seems not to bad and the issues occur only on the lower part of the sphere, not on the upper part(where it comes together again) can you maybe suggest how to change or adjust the slicer settings in my particular case? for now i tried printing with 0,3mm layerhight as my object to print is pretty large. thank you!
This seems really useful, thanks for the tip!
Happy to help!
Great video. Thats some ghosting you got there. Good to see it hid them well. I'm going to use fuzzy skin more often.
Thanks. Hope you have good success using it. Belts are pretty loose on the old printer and needed to be tightened. But I thought it would be a perfect showcase of the power of fuzzy skin
I might use the fuzzy skin feature to get some texture on my parts. It's almost the equivalent of using 60 grit sandpaper
It is. Good luck with it! I like the texture for most cases
@@willofthemaker I'll have to be careful with parts that need to insert each other
@@KRGraphicsCG definitely! That's why I was saying if you need precision, best to avoid fuzzy skin
@@willofthemaker apparently in Cura, you can set the fuzzy skin to outside only, which is great for things like screw holes
@@KRGraphicsCG yes indeed! I probably should have included that in the video. My test pieces were solid so maybe why I didn't think of it.
A question, I'm trying the fluzzy skin on a cube with Creality Print but it only prints it on 3 sides of the cube, there is a smooth one and I can't find an option for it to do all four, any ideas? In the other laminators does it do all 4? Thank you
Honestly, not sure. Never used craft print but if it's like Cura, every now and then the fuzzy skin generation isnt perfect. I fix it by moving and reorienting the part (rotating it) and have it regenerate the print. Maybe that will fix it? Hope this helps
@@willofthemaker With figures of animals or dolls there is no problem, only with gepmetric figures with 3 or 4 faces (cubes, pyramids, triangles) one is always smooth, even if the figure is rotated. Being an experimental feature, I suppose they are, well, experimenting.
Thanks for the reply
@@franciscoporras8864 definitely still not a perfect feature but it's been around for awhile. Maybe just never got enough usage from the community. Sorry it didn't help. Only thing I can think of is maybe resaving the file but that is a shot in the dark
This has to be insanely useful for painting the pieces
Please give more info about this type of work
What do you want to know?
HI! I'm new to 3D printing but this effect is really interesting. I tried to print a piece and got the result. Just a question (probably very stupid) about the top and bottom layers, can't you get this effect? Can it only be used on walls?
Thanks for your time
Firstly, welcome to the world of 3d printing! What printer did you get?
No stupid question, you can get a texture on the bottom surface if your printbed is textured. (A textured PEI sheet). There are smooth ones, textured, and even some that have a carbon fiber look which shows in the bottom layer of the print. Basically the printbed's surface gets transferred to the first layer of the print. The top is not really possible. One person commented on doing maze setting, but that isn't available in Cura so I can't say for sure. Either way it is likely not the same as fuzzy skin but maybe give some sort of texture.
Hope that helps. Have fun!
i have a print dimension issue. I’m trying to print a round part that’s 2.0 inch diameter 1 inch tall. . The part is coming out 2.000 on one side and if i check a different spot (180) it’s at 1.990 ( .010 difference) out of round. How can i get this dimensions closer to 2.0 inches diameter? I have default settings pla P1S
Is it in one axis? Like purely X or purely Y? If so you need to tune your steps per mm. Check out www.layerfused.com/3d-printer-calibration for a good calculator. I'd say TH-cam how to do it with Bambu. I'm not sure how to do that on those printers
@@willofthemaker thanks Bud!
you should use your camera's mic for your voice overs.. it was much clearer. and if you use a low pass over filter to get rid of that "fuzz"
Would have been a good idea. I have new software that I think is working better
i think you cracked the code and your channel will grow alot, nice set up by the way, very clean
Thanks, I appreciate it and hope so! Been a long time but watching the stats for this video is definitely exciting
Unsure whether this also holds for Cura (who the heck still uses Cura), but in OrcaSlicer you can combine vase-mode with fuzzy skin. That not only gives a special surface effect, but also makes a "straight" vase-mode the wall more stiff as the parts sticking out make the total wall wider.
Haven't tried combining vase mode and fuzzy skin in cura but I'm sure it's possible.
It's almost like diamond plating in that regard. The bends/deformations add to the rigidity. Cool tip!
Lot of us use Cura. Lot of us like Cura.
@@PoorRoleModel I'm thinking of putting out a best cura extensions video at some point. Think it'd be useful?
@@willofthemaker Absolutely. Any opportunity to piggyback off the efforts of others' research to expedite my own process is a win in my book. Not all of us 3d print for the love of 3d printing. Some of us use it as means to an end for other things. So there's a lot of us out there who aren't going to dig through and test a million different options out there to find what's best for whatever purpose, because we rely on people like you to do it for us. :D
@@PoorRoleModel sounds good. Will do!
hi, i am new to 3d printing so how can i make infill supports like of the inner circle at 2:36
D looks great!
Interesting! Definitely going to use this technique in my future prints. thanks!
Glad it helped!
Great to see, thanks. I guess you have to dial 8n other point on your printer if they show like that… fuzzy is something on top of all that. Good luck
Part of the fun of 3D printing 😅
Holy cow! This is eye opening. Thank you! I was wondering if fuzzy skin wears out the 3d printer much faster, but if it saves printing time with higher density then my question is invalid.
It's more accelerations and decelerations so maybe. But so is gyroid infill. I doubt there's been any measure of how much extra ware it does
Great idea mate! but I'm worried that having this matte finish with fuzzy skin will cost me on the lifetime of the motor 😮. Can we compare the cost of this method with the cost of using matte filament instead?
It's honestly hard to do. The amount of fuzziness and exterior walls makes a big difference. So heavily model and settings dependent. I'd recommend slicing a model without fuzzy skin, then slicing with the settings you want and compare the material amount difference as well as the time difference. See how much the price in normal material is but with fuzzy and compare to matte material without fuzzy
Can it be defined so that some faces have a fuzzy texture while others do not? You accidentally made that happen on a part and then rotated it away. I can see this being useful when purposefully done. I imagine it's done just like switching to a different filament but without actually switching and purging etc., and I could see this being cool for making a grippy part on an otherwise exactly-sized model. One use case would be a container or a phone case with a textured outside and a smooth inside.
There are some ways to it. I cura it's a bit clunky but you can essentially create overlapping geometries that have their own modified settings. Probably the best way to do it. Or have it be similar to a multi material set up with different bodies and choose settings individually from that. You can also set fuzzy skin to outside only to not affect inside geometries which could work for a phone case
It's there any way to choose where a part is or isn't fuzzy? For instance, if you print a container where you need dimensional accuracy on the inside but the fuzzy texture on the outside.
In Cura, there is a setting for external walls only which could be what you are looking for. Besides that you can use support blocker (or I suppose other intersecting models) as overlapping model settings and modify that way
@@willofthemaker thank you
@@davidrgilson happy to help. Another channel did a deep dive as well. @needitmakeit a few months ago. I might do my own video as well bc there have been some people asking for it
Let me point, what about printer life, I use to choose concentric patterns to avoid shaking and vibratios
Also, what about printing time
@@elpabloncho print time does increase a bit. I've seen 10% but one person commented a tripling which I thought seemed unlikely.
Printer life with the accelerations? Not sure. Could see it having an effect on lifetime for sure. I've been using it for about 5 months now and hard to say. The printer I've mainly been using it on is nearly 10 years old and hasn't had any issues
@@willofthemaker thank you for the answer, I can see this feature useful for some little cases but for most of the prints better disabled for me
Have you looked at Orca Slicer? Was going to just play with it 3 months ago, 2 days later I uninsatalled Cura :)
I haven't yet but have a feeling I'm going to be switching slicers soon. Not sure if I'll do Prusa slicer or orca slicer. Maybe play with both. Cura used to be awesome but seems like it has really fallen behind
Thanks for this video Will, it was really helpful to me
Glad it helped!
Looks much better, easier than sanding and filling.
Thanks. Can save a lot of time avoiding that sanding
hi,
i use cura but cant seem to find the fussy skin.
do i need to update something?
It's toward the bottom under experimental settings. You need to go into the advanced slicer settings if you haven't already. If you still can't find it, it probably means it's hidden. Click the three bars at the right of each settings group to display the options to view and make sure fuzzy skin is checked
Nice video! But you made a special point of adding a top surface to the test model and then never showed or mentioned it... I am assuming it doesn't get the texture?
Thanks! These models only had a very small top surface but no, no texture. One person commented that a "maze" setting on top surface could help with a texture but I'm not familiar with it. I have done a couple experiments of putting a print upside down on the textured be surface heated to the glass transition zone of the plastic. Have gotten some results but its not great yet and only useable in some types of prints and only on the top surface. I think we need a texture iron!
Thank you for making this video. From the bottom of my heart. 🙇 Did not know it could be used this way.
Thanks, that's very nice. Glad it could help 👍
Thanks for sharing that! Good points, nice examples and didn't waste time teaching how the like and subscribe buttons work! (I liked and subscribed) (because I wanted to)
Thanks! Welcome to the channel. Hope you like the videos!
I noticed that none of the top layers had the fuzzy effect applied. Was this missed in your settings or is it a limitation of Cura? I started using the concentric pathing for top layers to make them look less "3d printed" however that fuzzy texture could be what I'm looking for it if it's possible. I would have liked to have seen that done in your video but I'll be looking to give it a try at home myself to see what's possible. Thanks for the video.
VERY good eyes. looking at these parts clower, it seems the effect is result on the last few mm of the print. Some variants are more affected than others. I think theres a couple things happening. The part is getting very small and seems maybe Cura is throwing its hands up to some degree. The other "issue" is these parts are very thin and have minimal infill and top layers so the outer points at the top are essentially unsupported overhangs and the filament is sagging down into the print making it look a bit smoother. I havent seen this on other prints i use fuzzy skin on that maintain a decent size and mainly support over the previous layers.
Thanks for explaining! @@willofthemaker
@@ck17350 no problem. Honestly it seems Curas engine is a bit buggy for fuzzy skin so do need to be on the look out for it
6:35 left one looks really good!
I like the .2mm one but, and it is a big but, I don't like the way the machine shakes. This can not be good in the long term. So I really only do it where it is make or break.
I guess time will tell
why do you guys make such long videos WITH ALMOST NO INFORMATION IN IT
We must feed the algorithm!
@@willofthemaker with lower watch percentage? That s stupid, it s not how the algorithm works
Oooh he big maddddd
@@pooppyybuhholehe's right
Dude has a fucked up brain from all the shorts cant watch longer than 30 seconds
Wow, this is amazing! Any idea about how it impacts on disability?
Ok so here is my opinion on this in short:
I think I will try fuzzy skin more often for the neat texture it could provide, but I would never see myself using it as a means of reducing print times, nor for hiding ghosting, I just don't need it for that, resonance compensation works wonders.
What do I mean?
You're right we shouldn't dismiss fuzzy skin as just a gimmick, I did know it was more for creating a texture for hiding layers than imitating the look of fur, but I have also kinda dismissed it as just some whacky setting myself.
I think I will try it more often for when a texture might be nice. I wan't to see how fuzzy skin may affect the look of certain materials which themselves already can have wildly different finishes/textures, like for example a glossy/shimmering PETG print might benefit from it a lot. Or the already very matt and layer-hiding PLA-CF (or any cf material) might have even more potential for making professional looking parts.
But when it comes to the quality and speed "gains" I have to disagree a little bit, at least if we're talking in a more general sense and look at what features and capabilities even entry level modern 3D printers are starting to have, look at the Bambulab A1 for example. Clearly for your printer and your use case there is a big difference in the finish and print time. But from what little experience I have using fuzzy skin I know that without heavy tuning of the stock profile it's a LOT slower to print then regular outer walls.
I Actually wonder what speeds your outer wall is at and if it's any different when using fuzzy skin and if just turning down the outer wall speed, so the overall time is similar, might not already greatly reduce ghosting.
I did some slicing tests with a larger box shaped fan duct thing, in Orca slicer at 0.16mm layers, sliced for a P1S. I sliced the same part with identical settings besides with or without fuzzy skin (0.8mm point distance 0.3mm thickness), the normal one would take 2h23m (27m for the outer wall), and the one with fuzzy skin was thought to take 3h46(1h 49m for the outer wall). This difference was to big that one with fuzzy skin at 0.28mm layers instead of 0.16mm wasn't even faster at 2h35m. Since my printer utilizes resonance compensation and thus is moving pretty fast fuzzy skin is slowing it's down substantially to be able to reproduce the shape of the line.
Great post. I think the main benefit is definitely texturing the print more than anything else and it is just very poorly named. "Add texture" or something to that effect would be better.
Hiding issues with a print like ghosting or the z seam are secondary benefits, especially on older machines. If you have some sort of compensation like input shaping, ghosting is practically a non issue. But yeah, my printer was in a desperate need of a tune up when I did this video. Was able to get a pretty significant improvement in some hardware tweaks without changing gcode. Of course further improvement with different slicing parameters but largely at the expense of speed. (My next video is covering this)
That being said, regarding fuzzy skin improving print time, it's really dependent on a few things which in my uses has been beneficial. One is the size of the part's perimeter. Obviously the bigger the part the more fuzzy skin which would slo it down. I've used it on those dash pieces while printing vertically. Went from .15 to .30 layer height more than made up for fuzzy skin in this case while improving the look. It also depend on how subtle you want it to be.
I find a thickness of 0.1 is adequate while not adding too much time. I wonder how much that would reduce your part compared to 0.3.
I've never used CF filament yet but from what I've seen it already has a pretty good matte (maybe slightly textured). A very subtle fuzzy skin is likely all that's needed
What printer are you using for these tests? Looks like a speed printer that is not shown from your older videos!
Ha I wish! It's my old printer. A Lulzbot kittaz (basically a taz 4)
@@willofthemaker Thanks for responding!
Love it will try it.
Awesome. Good luck, hope you find a setting you like
This would actually be really good bases for minis, sand water grass textures
Great suggestion!
@@willofthemaker anytime :)
For accuracy we might want subtractive fuzzy skin as an option in slicers.
That's a really good idea.
off to test now! thank you mate great video
Good luck! hope you like the results
I did a tissue box with fussy skin and yes you can't see layers. and that was couple years ago
most beautiful intro I've ever seen
Can you apply fuzzy skin to only specific areas of a print? That would be useful.
Thanks man . What a tip !
Happy to help
Now we need a super granular slicer that can assign a different point distance per face
We can dream! Actually you might be able to hack that using overlapping geometry modifiers with different fuzzy skin settings. Super clunky but could happen
@@willofthemaker it would legit be a feature i would want for fuzzy skin because the spacing that looks best on flat and curved surfaces are different
@@Smrts955 what slicer do you use? I'm used to cura which I think is behind the times. Probably switch to something new soon. Pretty sure the other slicers might have better features that could be hacked up. I'm thinking of when painting different colors on the part in slicer maybe you could use that to change fuzzy skin parameters. Kind of a guess tho
@willofthemaker i go back and forth with prusa and creality because i have a ender 3 and creality slicer makes for quieter prints
@@Smrts955 interesting. Crazy how even the software will have an effect on noise. I suppose a controlled ecosystem can do some more fine tuning
what if you wanted fuzzy skin in certain areas?
There are some tricks you can do. Cura you can use a support blocker to not block support but change model settings in the overlapping area
Great information!!!! Thanks!
Glad it could help
woww your amazing bro! thank so much!!
haha Thanks!
I know yt wants you to post 15 minutes but you have to be able to... fill the time without boring me to death. This was a 1 minute video. Tops.
Thanks for the feedback. trying to get better at filtering down.
I had this turned on by accident one time back when I first started printing... Couldn't figure out why my prints all came out like garbage back then lol.
Hahaha I could see that being very frustrating when you don't know what's going on
@@willofthemaker It took me a solid 3 prints to realize it was a setting in the slicer and then I had to scroll through each individual setting to figure out what it was and of course the setting was all the way down at the bottom of the list
It would be great if you could paint on fuzzy skin
Some are thinking with the coarse texture it will help paint adhesion. I don't paint my parts but i could see it being a benefit
It would be really nice if we could "paint" areas for fuzzy skin, or mask off areas that we would not need fuzzy skin. For example, parts of a piece that need a tolerant to be snapped together or something... If there was a way to do that, that would be tremendous
In Cura, there is a way to hack the support blocker to have it change model settings where it overlaps but is limited by its square shape. There might be plugins that allow for better capabilities for painting. I am pretty sure in bambuslicer and Prusa slicer you can somewhat paint it. @needitmakeit has a video diving into this if you are interested
I’m curious what printer are you using, that ringing in the Z seams are the most I’ve ever seen, either you got a poorly maintained printer or a factory dud
It's a 9.5 year old printer with minimal maintenance. Tightened the belts a year ago and did a tune up but haven't touched it since. Also upped the accelerations which certainly don't help it's cause haha.