Apply Rim Light In Photoshop [Pro Hollywood Technique Revealed!]

ฝัง
- เผยแพร่เมื่อ 15 พ.ค. 2024
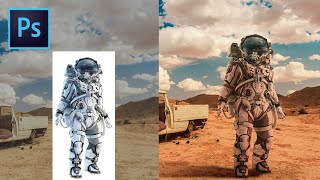
- In this video, you’re going to learn EXACTLY how to professional movie poster designers create and apply rim light in Photoshop.
Thanks to my friend Lisa Carney for lisacarney.com for allowing me to share this technique!
Here’s a breakdown of what you’ll learn in this Photoshop Tutorial:
1️⃣ Create a Channel Pull. This technique will help you create the rim light by using the highlights in your image.
2️⃣ Use Blending Modes to Keep Everything Separate. Keeping things editable is very important. You will learn how to use Blending Modes to keep everything in its own layer.
3️⃣ Use the Color Balance Adjustment Layer to Apply a Color to The Rim Light. The color balance adjustment layer will allow you to apply an individual color to each tone of the image (highlights, midtones, and shadows)
🎯 SUBSCRIBE to get more amazing Photoshop tutorials!
► th-cam.com/users/photosho...
📘 INDEX - Create and Apply a Rim Light in Photoshop
00:00 - Intro
03:20 - Crete the Rim Light from the Highlights.
07:34 - Crete the "Container" layer
09:00 - Reveal the Rim Light effect with a Mask
09:22 - Paint in Extra Rim Light
10:27 - Use the Color Balance Adjustment to Colorize the Rim Light
12:20 - Adjust the Contrast with a Curves Adjustment Layer
LINKS:
Select and Mask Crash Course
► • How to Cut Out ANYTHIN...
Adobe Live Stream
► • Photoshop Compositing ...
1st Copycat Wednesday
► • Recreate The "Perfume"...
Tutorial Assets
► photoshoptrainingchannel.com/...
Become an Adobe Stock Contributor:
► bit.ly/stock-contributor
PTC Newsletter:
► ptcvids.com/subscribe
Premium Tutorials:
► ptcvids.com/shop
Website:
► photoshoptrainingchannel.com
FOLLOW ON:
Instagram:
► / photoshoptrainingchannel
Facebook Group:
► ptcvids.com/group
CREDITS
● Stock Images provided by stock.adobe.com
● Stock Images provided by unsplash.com
● Photoshop video tutorials by Jesus Ramirez
#PhotoshopTutorial #Photoshop #PTCvids


What's your favorite movie poster ever?
You are look like an Indian in this video.
@@Alcemist01 That's a good one!
@@alaminvisuals7955 I had to look that one up! Pretty good!
@@vipgaming1534 A BAD ONE
Can't decide between Avengers Endgame and Character Batman v Superman posters
Oh, Jesus...I've racked my brain for way too many hours trying to figure this out! And here...you just showed me how!!
Un millón de gracias a ti y a Lisa por compartir tus habilidades y conocimientos. Te amo tutoriales mi amigo.
IMPRESSIVE! After watching this, I feel like I've made it into the industry "In" crowd. Thank You for sharing!
What an amazing tutorial! Thanks for sharing this technique in a very clear way! You and Lisa are the best!!
This is huge! Thank you so much for this technique Jesus and Lisa!
I appreciate this tut - I can use this for my digital art hobby - but right now, it is too advanced for me, but I hope to be able to put it to use at some point in the near future. Thanks!
This is the best RIM light technique, simple and the effect is awesome, thank you PTC.
Thank you, honestly an amazing technique. I would definitely give it a try.
Absolutely love this method of rim light
Been waiting for a tutorial like this because i'm passionate at designing movie posters myself. It's great that you were able to get the help of a pro. I'm definitely going to try this out. I hope to see more tutorials from you about this field in the future.
Good work! Keep it up! 👍
Thank you, Sahin!
Thank you, Jesús and Lisa. Very cool technique.
Really amazing technique, the more I watch your tutorials, the more I like you. Thanks for your job, some of us really appreciate. Regards.
So glad you pulled this lesson from Lisa's live stream. It got glossed over. You did a good job explaining. But its a lot different than Lisa's technique. Thank you.
Great stuff. You never disappoint. Your techniques are very simple yet powerful. Please do more poster tutorials
THIS is the tutorial I have been looking for!
Beautifully done!👏👏👏
You are simply amazing! Thank you, sir.
Amazing thecnique. I'll use it in a new upcoming project. Thanks for sharing JR!
Wow, TQVM!! An amazing effect that I am certainly going to try.
Thank you JR, this was a quality education.
This technique seems to work well on images that are already lit with rim light so you can pull that value information from the channels. But what about images with flatter lighting without rim lighting in the base image?
exactly...the title shall be "enhance rim light in Photoshop..."
than you must paint it
Painting is the way to go. Figure out where the light source is and paint highlights on areas where that light will create a highlight. He showed a bit of painting in this video. Similar technique.
You took the words out of my mouth. I stopped watching when I saw the existing rim light, but I love his training in general
I use Levels or Curves with a layer mask
and then color adjust as needed
This just changed my life I swear 👌🏽
Thank you for sharing this technique.
This is KILLER. Thanks for the help
Great as always!
Wow - I saw Lisa speak at Adobe Max like 6 years ago. Her portfolio was great then, but it was amazed to see some of the high profile posters she's created even since then!
Very useful lesson !! Please continue to do such stuff !!
Thanks a lot! It is really cool! It gives a lot of space for creative processing and flexibility!
I do Sports Photography and this is so awesome and useable. Thank you!
Wow ! Really very powerfull technique.
Awsome tutorial.😲
Thanks Jesus! Always great stuff!!
Keep it up bro.You inspire many young editors. Succeeding in TH-cam is no easy feat. It’s too easy to let business knock you down. Instead of throwing in the towel when there is a business problem, pick yourself back up, buckle down, and get to work with these real life inspirational stories.
These inspirational stories prove that with a little hard work, any amount of business success is possible
Really amazing, thanks 😍😍
Muchas gracias por tu trabajo y esfuerzo, también por tu generosidad en compartir.
Fantastic Jesus. I saw some work from Lisa Carney a couple of years ago when she went to B&H Camera in NY for a presentation.
Thank you so much for your kind help!
I am impressed. I like it Thank you for share your Guide/Your friend (Lisa Carney ).
this is amazing technique!! I'm gonna use it tomorrow at work
Awesome as usual - Thank You Both :)
Thank you! Great tutorial!
Thank you, awesome workshop.
THANKS man
So helpful
appreciation
simply amazing
Mind blowing!
Thanks for this great tutorial. Cool technique. I would love to see how you would do this on an image which is not backlit. Like turning a boring image and changing it, making it appear as if it was shot with studio lights. Maybe a next tutorial for that?!? 😍
Check out light wraps th-cam.com/video/Sl0Ajw-Kg-o/w-d-xo.html and adapt/ mask it to suit your outline. Otherwise paint /blend in white highlights.
Coming across this video and I’m actually thrilled....So! Professional
Awesome! Thank you!
awesome technique...great video brother...thanking you 🙏🙏🙏👌👌👌👏👏👏😊
Oh, oh, oh! very clever! Thanks a ton for these insights, JR! (I've come back a year later to remind myself!😄)
Awesome Amazing Tutorial. Thanks.!
U never disappoint, Love your work :-)
beautiful amazing !
Really cool. Thanks
Awesome training video.
Awesome video. Thanx!
Awesome tutorial! I'll admit, the title of the video led me to believe this was for creatng a rimlight effect when NOT shot with a rimlight initially... but, as the video went on, I still found these tips extremely useful regardless, and will give this a try in my next editing session for sure. Thank you for sharing this with us! :)
super well explain love your tutorial 📸
I saw part of the Adobe live stream with you and Lisa Carney. Up until then, I thought I had a pretty good handle on Photoshop. I am humbled. What an inspiration.
Thank you, Frank!
samee
It's was really an amazing trip
thanks amazing tutorial
Brilliant! Thanx Jesus!
thank you man
You are a really Master. Fantastic
Very cool!
WOW! I'm very impressed.
Will you share files from the project?
this tutorial very helping me
I am speachless......!
Awesome Mr. PS wizard! But I have to watch this a few times to understand... 😀
Such an incredible video as always! Thank you👍
I have one question; why do we need to add a new channel layer in the beginning? If we are only to color the highlights white based on the selection of RGB channel, cant we just do it with a fill layer?
hello sir, i really like your teaching and i can understand it easily... thank you for all...
but can you please teach one tutorial on landscape processing... ( like bobby joshi photography style )
thanx...just got my chromebook havent touched ps since 2012 its all coming back to me please do a savage dragon poster
Thank You
Thanks for the amazing tutorial! is it possibile to have the image link ?
Awsome bro
That was awesome, Jesus. Great video.
thank you so much
Jesús, la técnica es espectacular, genial
Noice!! Thanks you!!
I feel that this video should be called ENHANCE existing rim lighting. The perfect image to work with too, as I always see in Photoshop tutorials. Ugh. Come on people, let's see real world examples, tough images to work with, etc. #keepitreal
I was thinking the same thing. There is already an existing rim light.
Yeahhhhhhhhhhhhhh super Jesus!!!!! Thank you Lisa too !!!
This is an amazing tutorial, thanks Jesus.
Just wow
Muito bom esse tutorial
soo goood
Thanks Lisa!! And of course Jesus. This is amazing technique. It could work in the right instance for book covers. I’m going to have to watch it more than once, I love the result.
Very nice
வீடியோ மிகவும் பயனுள்ளதாக இருந்தது மிக்க நன்றி
Very useful This video , big thank you (R.MANOHAR ,Chennai.India)
this technique works only on photos that already have rim light. Not what I was looking for.
YOU ARE THE BEEEEEESSSSSTTTT
Thanks
That’s insane
my thoughts... freakn amazing, very cool :)
Thank you, L0rdCROISSANT!
Very good
super sir..
very useful video👍👍👍
I really like your teaching style (a little slower would be helpful) and the topic. I learned something today.
Do much thanks man
So much 😝✌🏻😑 sorry for
hurry typebucker
Thank you for this. I always wondered some of the behind the scenes techniques and the way you break it down, very helpful Jesus. gracias.
Buenísimo Jesús, muchas gracias. Veo que sigues en tu casa, no salgas y cuídate.
OMG! the best trick I've ever seen! Thanks for sharing it! I'll pay you a beer and a pizza! Whenever you want! Greetings from Italy! ciao!
genial !