*Connect with me on LinkedIn!* ► linkedin.com/in/jesusramirez9 *Trick To Change SPECIFIC Colors in Photoshop!* ► th-cam.com/video/9BYXKIzpmjM/w-d-xo.html *Tutorial Images* ► photoshoptrainingchannel.com/dual-lighting-effect-in-photoshop/
I just love the way you teach J.R. Because you REALLY teach. It's not just: do 'this' or do 'that', just replicate what I'm doing... You EXPLAIN WHY you're doing and HOW some features work so we can understand the concept behind that particular resource, how it works as a whole, and we can apply it to other types of projects in the future. Fantastic! Applause!
In my opinion you’re the best in presenting topics of interest and value related to learning PS. No gimmicks, no fuss, zero clickbaits. Your presentations showcase what’s important and how techniques relate or may be of use in other situations. And better yet, it’s free. “Al Cesar lo que es del Cesar.” Thank you JR.
Thank you for taking this new approach to teaching photoshop. I found you previous videos didn’t teach me much except that photoshop operates with a confusing blizzard of click this and click that steps. Very few things in photoshop are intuitive, I find so I rarely use any of the techniques you have been teaching. Now with more time taken and more of the “why” covered it makes a lot more sense to me. Thank you
I just found your channel and immediately subscribed after watching for the first 2 minutes. I like that you explain the WHY and not just the HOW. Explaining the mechanics of anything to help people understand why they're performing the steps is the mark of a truly great teacher.
Thank you so much for upping my photoshop game! You are the best instructor on TH-cam! I appreciate all the time and effort you put into making us all the more creative. 😁
Very nice and very well described video you are a legend. I didn't learn only the lighting effect but also learnt the new tricks to manage layers and keep control over every step. Thanks, buddy nice job.
Just came across this tutorial and couldn't wait to subscribe to your channel, I love how you elaborate and tutor its really awesome and handy to catch and understand.
You mention the Wacom tablet. They are great. I wanted a Cintiq, but they're super expensive. I went looking for an alternative. I found the Huion pen display for about $200, and I bought one. It was a crushing disappointment. It's in a box of junk somewhere, now. Then I found the Gaomon pen display, also for $200. I almost didn't get it, due to the disappointment with the Huion - but I was desperate, so I went for it. The Gaomon pen display, at $200, is every bit as good as the Cintiq. I am not kidding. Performance. Pressure sensitivity. All the standard settings. All the shortcuts. It seems too good to be be true, but it is true. Every time I use this pen display, which is a lot, I bless the good people at Gaomon. So that's just a heads up, because it can be hard to find inexpensive equipment that actually works. The Gaomon works great.
Very clear explanation and a great effect on your photos! You probably can get this effect using gels during a photoshoot but it seems easier this way isn't it?
Hola Jesús! Muchas gracias por tus tutoriales son increíbles! Hay alguna manera para que photoshop no cree automáticamente una máscara de capa cuando incorpores algún ajuste? Perdón por escribirlo en español pero es que se me da mejor que escribir en inglés! Saludos y gracias!
Si! Del panel de ajustes! (Windows -> Adjustments) En el panle de adjustes, has click el boton de opciones (flyout menu). y selecciona "disable Add Mask by Default."
What's not to like? If not anything else, one can always get the techniques refined on this channel. By the way, if you some day should feel the urge to explain the Posterize adjustment layer, it would be fun, as I never found it useful in any way...........!
I noticed the left side of your shirt had a darkened soiled looking spot on your chest. I first thought you needed to put it in a masked group with a levels lightening layer, then I realized that it was the light behind your microphone that was causing the dirty looking shadow.
Photoshop creations are supposed to be creative, imaginative, different But every 1 literally just uses blue and pink lighting for dual tone effects. Its just become such a damn cliche. WHY WHY WHY???

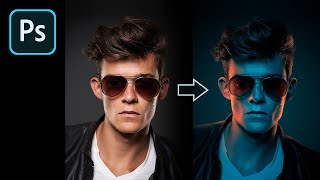

![Apply Rim Light In Photoshop [Pro Hollywood Technique Revealed!]](http://i.ytimg.com/vi/H-z0j2jVka8/mqdefault.jpg)


*Connect with me on LinkedIn!* ► linkedin.com/in/jesusramirez9
*Trick To Change SPECIFIC Colors in Photoshop!* ► th-cam.com/video/9BYXKIzpmjM/w-d-xo.html
*Tutorial Images* ► photoshoptrainingchannel.com/dual-lighting-effect-in-photoshop/
Hi PTC Channel, i got a problem in photoshop
When i go to preset manager, i cant see(also select) brushes. What i have to do ?
I don't know why, but whenever i hear his voice and see him smile, i just want to go and hug him. He's such a sweet human!
Thank you, Real CK!
Yes you say right! He is sweet human!🙂😊
sometimes I watch your tutorials just to see you teaching, you are one of the best online teachers I had ever seen. Keep the fire burning!
I just love the way you teach J.R. Because you REALLY teach. It's not just: do 'this' or do 'that', just replicate what I'm doing... You EXPLAIN WHY you're doing and HOW some features work so we can understand the concept behind that particular resource, how it works as a whole, and we can apply it to other types of projects in the future. Fantastic! Applause!
Thank you, Lu!
I second that! "the Why" is so important! Thanks for yet another great tutorial!
In my opinion you’re the best in presenting topics of interest and value related to learning PS. No gimmicks, no fuss, zero clickbaits. Your presentations showcase what’s important and how techniques relate or may be of use in other situations. And better yet, it’s free. “Al Cesar lo que es del Cesar.” Thank you JR.
You're welcome, J Tinoco! I do try to stay away from clickbait. And if I use a clickbait title I try to overdeliver so that it doesn't feel like one.
Thank you for taking this new approach to teaching photoshop. I found you previous videos didn’t teach me much except that photoshop operates with a confusing blizzard of click this and click that steps. Very few things in photoshop are intuitive, I find so I rarely use any of the techniques you have been teaching. Now with more time taken and more of the “why” covered it makes a lot more sense to me. Thank you
Thank you, Mike! I'm glad that you find the new ones more beneficial
Always love to watch your videos. Amazing techniques and way of teaching. Love you sir from Pakistan.
Thank you, Abid!
I just found your channel and immediately subscribed after watching for the first 2 minutes. I like that you explain the WHY and not just the HOW. Explaining the mechanics of anything to help people understand why they're performing the steps is the mark of a truly great teacher.
Thank you, Jacob!
Thank you so much for upping my photoshop game! You are the best instructor on TH-cam! I appreciate all the time and effort you put into making us all the more creative. 😁
THIS CHANNEL IS GOLD!
Thank you, E N!
This channel is so underrated OH MY GODDD.
You are just too good man. Please continue making more videos like these
Thank you, Vikas! I'll see what I can do
Thanks sir your all Photoshop tricks are very useful and we enjoyed.
You're welcome, Mobile 5!
Great tutorial. I really like how you explain all the steps and why we do what we do. Keep up the good work.
I can not thank your enough for this channel! Just started my photoshop journey and you Sir are making it easier for all of us! Thank you!
This was just what I was looking for..Thanks for sharing! Can’t wait to try this
You're welcome, O.Alden Productions.!
@@PhotoshopTrainingChannel ❤️
Excellent as always mate. Thumbs up.
You're welcome, Ronald!
I used Photoshop ,your tips very useful bro. U r great teacher
I love your tutorials ✌️❤️
Thank you, Safouane!
Boom... Thats incredible 😍😍🔥🔥😍😍
Thank you, Aryan The best!
Thank you so much for the consistent way you teach. This video is so amazing for a beginner in PS. Much appreciatiated
You're welcome, Christos!
You can explain eloquently everything. Great tutorial. 🙌
Love from India!!❤️🇮🇳
Jesus, another great tutorial; so many good things to learn from it. Keep them coming!
Thank you, Anthony!
This was good thank u. , I made outstanding work with this
Very nice and very well described video you are a legend. I didn't learn only the lighting effect but also learnt the new tricks to manage layers and keep control over every step. Thanks, buddy nice job.
superb art
Thank you, magic Spells corner!
thank you for creating a beautiful tutorial
Great video as always.. Thank you for continuing to provide content that is helpful to so many people
This video is GOLD.. thank you so much
Just came across this tutorial and couldn't wait to subscribe to your channel, I love how you elaborate and tutor its really awesome and handy to catch and understand.
Very well explained ! Thank you !!!
please do a video on flyers and how to create different elements for flyers such as backgrounds, lighting elements, etc... thanks, dope videos!
👍
Very nice. Taught me many techniques that I can use elsewhere
This very good tutorials I love the way he delivers the steps
Thank you!
You are a really Master. This is my favorite channel
Thank you, Luis!
I like the lighting and shading
You are great buddy of Photoshop
Thank you, blank man!
very good, fantastic! A way to turn a portrait more artistic
Thank you, CH FILM & HISTORY!
Big thanks!
You're welcome, Naufal!
Very good procedure!!!! Thanks!!
Thank you, Alberto!
Thank you
Really helpfull tutorial.
Thank you so much
Thanks! Great video again. Very helpful!
Thank you, Michael!
I love so much you job.....you are fantastic
Thank you, Andrew!
Thank you so much
Thank you, mostafa!
Excellent tutorial as is usual. Thank you for sharing your knowledge.
Very good tutorial!!! Thanks Bro!!!
amazing thanks
Wonderful! Thank you!
I'm very happy for the vidéos
such a good tutorial my man!! thank you thank you!
amazing tutorial
I like your channel, and your teaching method. Greeting from indonesia
You mention the Wacom tablet. They are great. I wanted a Cintiq, but they're super expensive. I went looking for an alternative.
I found the Huion pen display for about $200, and I bought one. It was a crushing disappointment. It's in a box of junk somewhere, now.
Then I found the Gaomon pen display, also for $200. I almost didn't get it, due to the disappointment with the Huion - but I was desperate, so I went for it.
The Gaomon pen display, at $200, is every bit as good as the Cintiq. I am not kidding. Performance. Pressure sensitivity. All the standard settings. All the shortcuts. It seems too good to be be true, but it is true.
Every time I use this pen display, which is a lot, I bless the good people at Gaomon.
So that's just a heads up, because it can be hard to find inexpensive equipment that actually works. The Gaomon works great.
Very clear explanation and a great effect on your photos! You probably can get this effect using gels during a photoshoot but it seems easier this way isn't it?
I wonder if would be possible to create an action for dual color lighting..?
Definitely. You can set create an action that sets up all the layers and you can just paint in the details with a mask.
I watches all your tutorials even though I don't have photoshop
Thank you, CANVAS ARTS!
This was amazing
THE PHOTO$HOP MASTER!! 💪🏻💥💻🖥⚡️💯👏🏻
Thank you, TheWebStylist!
awe wait for it some.....awesome
Thank you, PAFE CAFE!
I love background changing technique. Thanks alot. What vision of Photoshop is this. Peace!
Thanks! Photoshop 2021
Maestro 👏
Thank you, Creative Design!
What version of photoshop are you using?
you enlightened me
thx teacher
this video very useful
YOU ARE A genius!!!!!!!!!!!
Thank you very much. Respect. ❤️❤️
You're welcome, Ahmet!
Hi Professor .. We want to update the perspective lessons in a simple way, thanks.
👍🙂
i love your channel
Thank you, zareen remendies!
Nice tutorial, I like your diction.
thanks you, Sir
Mine solid colour layer is also Covering model with background what to do?
Damn good tutorial, thanks!
awesome
Hola Jesús! Muchas gracias por tus tutoriales son increíbles!
Hay alguna manera para que photoshop no cree automáticamente una máscara de capa cuando incorpores algún ajuste?
Perdón por escribirlo en español pero es que se me da mejor que escribir en inglés!
Saludos y gracias!
Si! Del panel de ajustes!
(Windows -> Adjustments)
En el panle de adjustes, has click el boton de opciones (flyout menu).
y selecciona "disable Add Mask by Default."
@@PhotoshopTrainingChannel gracias!! Me has arreglado bastante la vida jajajaja
also, after the job is done, how we put this image in a circle ( if the masking is dine within a grouped layer )
In which photo shop are you using
When you go on the Gradient Editor section i dont see the colored boxes. My presets start off with Basics. HELP!
which photoshop software do you ise
Applying the layer mask to a group is definitely a better, more flexible workflow. Thanks Jesus 👍
You're welcome, dunnymonster!
BTW where is the link to this image ?
Here! Sorry, I forgot to put it in the description! But it's there now
photoshoptrainingchannel.com/dual-lighting-effect-in-photoshop/
What's not to like? If not anything else, one can always get the techniques refined on this channel. By the way, if you some day should feel the urge to explain the Posterize adjustment layer, it would be fun, as I never found it useful in any way...........!
Great share! Thank you, Jesus!
SMASHING the LIKE Button!!!
Mantab pak,,
Video description is somewhat messed up. All timestamps are set to 0 and no link for the tutorial image
I just updated it!
I can't find control points in lightning effects,it just automatically places the effect. Could you help me with that?!?
where is the picture link?
photoshoptrainingchannel.com/dual-lighting-effect-in-photoshop/
@@PhotoshopTrainingChannel Thank you so much
great thx! shift + alt wooow
good stuff in here but I feel like this could've been a 6 minute video instead of a 16 minute one
i love you... 🥰🥰💝💝💝
Excellent of your videos I am Telugu language
Thank you, Dj Ramthulla!
ممتاز جدا
❤️
🙂
@@PhotoshopTrainingChannel u are a great tutor man
I noticed the left side of your shirt had a darkened soiled looking spot on your chest. I first thought you needed to put it in a masked group with a levels lightening layer, then I realized that it was the light behind your microphone that was causing the dirty looking shadow.
He invented Photoshop, right? I hope I can revitalize some previous sessions. 🙏
hi
Hello
Photoshop creations are supposed to be creative, imaginative, different
But every 1 literally just uses blue and pink lighting for dual tone effects.
Its just become such a damn cliche.
WHY WHY WHY???
Make one a different color in your project. This was an example and I never said you HAD to use these colors.
water - 99.9%