I see why this video got 73,000 views! Definitely one of the best home builds I’ve seen. And I love how you took bits and pieces of inspirational ideas from other manufacturers. That Baltic Birch is gorgeous and it goes so well with the Escapod like interior. I think my favorite feature or maybe just a feature I’ve never seen before was the space between the stove and the bottom drawer so you can reach your hand in there. And the drawer looked really deep which was so nice to see.
@@TheIoniqGuy let me ask you does it bounce any I'm not knocking your build you did really good on it but I think the A-frame for the tongue should have been underneath the camper more and if it bounces in the tongue that's what you need to do to stop it that you said it didn't have but just a little bit of tongue weight to it so you shouldn't have any problem but if you put a toolbox up there on the tongue you could have that problem and the reason I'm saying this is I build these I know what issues come up and how to take care of it
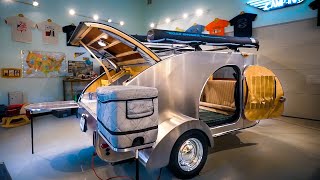
Love the pull outs for you cooler and stove! If you place a towel around your cooler when driving it will meet it cooler, too, and you’ll have a kitchen towel there. Great water jug idea, too!And the price is good! Nice job!
I have been watching DIY builds for three years now of every type, and your build is absolutely beautiful, very clean. I feel you could sell it for three times the build cost. (Not counting labor). Again, good job!! 😎👍
He could sell it at a loss. Unfortunately he'll never get what he has in it. But, it's about the pride and achievement you gain. Not the money. But, usually it's not ever about the money. Not many can say they built a tea drop. Good conversation starter to make new friends out camping and its impressive to most because not many have the will or know how to do the same. Its priceless to him. This means more to him than a price tag could achieve. Nobody will ever appreciate this camper the way he could. I will always build new or remodel to my suiting. Like live in a mobile home I bout when I was 22 and remodeled everything. Made my own cabinets, laid my hardwood flooring. Did all the fancy columns and beams and everything else. The outside is a ratty ole trailer and you would never ever expect to see what you do walking in and once people see the inside the look on their face when they see the soft ambient lights glowing on the walls from the built in lighting in the white trim that bumps up against hand stained tongue and groove pine walls bumping up to burnt brick color walls and the white wainscoting and the rustic dark homemade cabinets and bamboo flooring... they are in shook and say it's the nicest trailer you'll ever see though. Especially when I'm humble and say it's just a ratty ole trailer. That feeling is worth every cent I know I'll never get back
Really appreciate all the ways you've reduced the cost of building a camper that is comfortable, yet has all the amenities most of us want. We stand on the shoulders of giants, so from my point of view, you just liberated the ideas of others and shared them. Open source is all about sharing the knowledge. You just got another subscriber and I look forward to more videos on this camper. Cheers brother
Your craftsmanship is excellent. I like simple builds like yours (although to your complements, yours goes the extra mile)! No need for running water and extra gadgets that take time, space and repairs to maintain. I would love your camper to take on a trip.
I'm just now coming across this video. That is a nice teardrop sir and thanks for the mention in the video. I hope to see it in person one day. Build on!
We have a gathering in Arkansas this year. I know that is a long drive for you but I hope you attend. If not, possibly the great lakes regional gathering would be closer. That is one nice teardrop sir! You did an outstanding job!👍
Would love to see your layout plans, even rough sketch. I like your kitchen layout best of the ones I have seen so far. Also, I had a thought about a mod for your drawer beneath the stove with the low sides for access. Put in panels to bring the sides up to full height but hinge them on the bottom. In the up position they can help keep drawer contents in the drawer. In the down position add flaps so they function like a "drop-leaf table" only the drop leaves fold up instead of down. Gives you temp table top space, maybe to put cooking utensils on or drinks on the back side.
@@TheIoniqGuy Glad you like it. If you try it out I would love to hear about it or see it. Also, how did you manage to make the rear lid over the kitchen so rigid? I remember one of the other vids had problems with theirs not being sturdy enough. Their kitchen design was similar to yours but I like yours better. Your stove and cooler come out perpendicular and creates a sort of galley kitchen effect.
Four galley spars each made of 2 pieces of 3/4" plywood laminated together. Even still I had a little bit of springback when skinning them. I would have done 5 in hindsight.
As I'm no expert, I didn't feel I had the expertise to tell others how to build. Probably would have doubled my build time fussing with a camera and editing. Thanks for the kind words!
I prefer the simplicity of just use boat resin its stronger then steal and bonds at the molecular level so it a perfect seal get a grack no prob sand it out add a layer of resin in theat spot buff it and ur good
Mostly my own design taking inspiration from the Escapod Topo 1 and the Timberleaf Classic for the exterior shape. I have a Google Photos album linked in the description with my profile plan as well as build photos if you're looking for inspiration.
This is a top notch build. I doubt you could buy a better camper at any price. I’m interested in the skin, what did you use? I know you said something, but I didn’t recognize the product. What source did you use for the skin and outside trim?
It’s called Filon. It’s the same material most RV builders use for siding. www.recpro.com/rv-fiberglass-filon-siding-8-5-wide-arctic-white/?campaignid=10108288062&adgroupid=107415455739&keyword=&gad_source=1&gclid=CjwKCAiA9ourBhAVEiwA3L5RFugiysiAHpinnsBHNsok4dT_2XXIe5tG5IDxH89bCnttr35LvNQGyhoCwD0QAvD_BwE
It's called Filon. It's a fiberglass filled plastic. It's used extensively in the RV industry. I rough cut the panels and clamped them to the sidewalls and then used a router with a battery cutting bit to cut it to the exact size. Then it just held in place with the side trim and the doors.
WoW!!!!! Love it. Symmetry is fabulous. Clean lines and shape. Beautiful work. Keeping this video and subscribing today. Question: why two doors vs one with opposing window? Just curious. Love the build.
Thank you! After camping in it for two years, unless you travel alone, believe me you'll want two doors so your partner isn tclimbing over you in the middle of the night to go to the restroom.
@@TheIoniqGuy ah. Totally makes sense. My wife and I just bought a 36’ er and love it for our three 12 yr old boys. I am looking to do something like this (exactly) for our elk hunting trips here in Idaho. 👍
This is amazing!! Great job. I have been looking at the superbright LED strips as well, did you get the 18 lights per foot or 36? I really like the warm glow that puts off.
The strip lights I used are actually right in the middle at 24. They're great at night. Very easy on the eyes. Bright when you need em and dim when you don't
I'm just about to start my cabinets in my trailer and I love the plywood face and doors you did, they look amazing. You must have used a wood CNC machine for them to be so precise. I'm curious did you have access to a CNC if not how did you find someone to do them for you?
I actually didn't use a CNC. I used a thin kerf circular saw blade and a straight edge. For the corners I got the thinnest kerf jig saw blade I could and did those free hand.
@@TheIoniqGuy wow, amazing work. I was a finish carpenter for several years and I cant free hand that well. Great job and thanks for responding I appreciate it!
Absolutely. There been morning when there's been a little bit of condensation on the interior walls but nothing that can't be wiped down pretty easilly.
Hola amigo buenas tardes saludos desde San José Costa Rica tu diseño esta muy bueno yo estoy entrando al mercado de hacer y vender este estilo esta genial y las curvas muy ligeras espectacular donde obtuviste los planos me encanta eres un genio saludos
Thanks for the kind words! Very, very carefully. I made the straight cuts with a thin kerf circular saw and then used a jig saw with the same thickness blade for the corners.
@@TheIoniqGuy Outstanding cutting skills. Please tell me you used some sort of track for the straight cuts. I did not know you can get jigsaw and circular blades with the same kerf. Thanks for letting us know. When I first saw it, I knew you used a CNC..wrong. You da man!
Just curious, but WHY do people limit their builds to just the size of the square part of the trailer frame? It seems easy enough to extend the flooring at least a foot aft of the rear and extend forward onto the traigular front section by at least 2 feet. Instead of curving the top for streamlineing you leave it flat all the way and curve the SIDES in the front to match the triangular shape of the tounge area? That would be just as "streamlined" and also increase headroom & storage forward. Sorry, I just want to think outside of "the box".
I think for many people it comes down to replicating things that they see and people are showing them how to do and that perpetuates similar designs. For me, I wanted something that I could be quickly and without too much problem solving so I went with tried and true design concepts
@@TheIoniqGuy I and going to start a build soon, basically I want the maximum space and minimum weight possible. Most of what I see are heavy 3/4 plywood floors and tiny "pods" built onto the hiddlle of the trailer. I agree 100% that most folks seem locked into a mindset of 4x8 or 5x8 and what they see when they look up "teardrops" on the web. Great build by the way!
Where is your battery location and did you use a RV distribution panel? Like WFCO or Progressive Dynamics? I’m just about to the electric part of my build now.
Battery is behind my galley cabinets. Wish I had mounted it closer to the tongue and it would have given me almost perfect tongue weight. I used this fuse block. www.amazon.com/dp/B001P6FTHC/ref=cm_sw_r_cp_apa_glc_fabc_TF4ZKZ3EES6MKKA3DWV8?_encoding=UTF8&psc=1
The battery is behind the center galley drawers, close to the axle for weight distribution. Charger is behind the cooler as close as possible to the battery.
Great job! I am thinking about doing one. Your build looks professional. What was the brand for the exterior covering you used? Any websites / blogs/ forums you used to help you?
Thank you! It's called Filon. Plastic filled with fiberglass. Very durable and requires little to no maintenance. There's a few Facebook groups and a forum called tnttt.com
@@TheIoniqGuy I'm looking at using Filon as well. Would you use it again? Any regrets over just going with a more common aluminum siding? Thanks for the video - can't tell you how many times I've watched it!!
Thank you! I would definitely use it again. I was planning on using painted .040" aluminum but after reading about having to repaint it every so often I decided on Filon as it's basically no maintenance and won't dent. Not to mention it's far quicker and easier to cut.
@@TheIoniqGuy OK awesome. Thanks for the quick reply. I agree with your choice to go with less maintenance. Thinking of getting my frame galvanized for the same reason.
Thanks! I did build my own trailer frame. I used the generic 60/40 rule. So I placed the center of the axle 60% of the trailers distance not including the tongue. This didn't work out perfectly and I've had to add about 60lbs of ballast to the tongue box to get my tongue weight to about 120lbs. Too much of a hassle to relocate it at this point.
I'm sorry I mistook what you said. I downloaded a side photo of a Timberleaf and then I traced it onto graph paper and figured out my dimensions based on that grid. I then cut that out on a large sheet of MDF to trace with my router.
It's definitely doable but it'll probably take you much longer than it did for me. I've been woodworking and metalworking since I was a kid so if you don't have any experience with power or hand tools it'll be a challenge but definitely not something you can't learn. It's a well rounded project with little bits of everything.
It's bullshit how much stuff is nowadays. Use to be if you built it yourself you'd have it for half the cost. Now everyone thinks that their products are worth 20,30,40,50 dollars. Hell, 4,5 grand prolly would have bought this new. Obviously you wouldn't have the appreciation for it like you do now that you have it and built it. It's just silly the cost of things. Like those clusters for switches and USB ports... 25-40. Like, seriously... couple manufactured ports you bought and slapped on a plastic tray is now worth 30 buck. Greed and low morals. American dream lol. I have noticed to stopping at home depot tho. Go to menards for lumber. They're getting up there with home depot... but, definitely still much cheaper. Also, its sometimes best to find a local lumber yard even if you don't have a menards.


I see why this video got 73,000 views! Definitely one of the best home builds I’ve seen. And I love how you took bits and pieces of inspirational ideas from other manufacturers. That Baltic Birch is gorgeous and it goes so well with the Escapod like interior. I think my favorite feature or maybe just a feature I’ve never seen before was the space between the stove and the bottom drawer so you can reach your hand in there. And the drawer looked really deep which was so nice to see.
Thanks Drew! I really appreciate that
@@TheIoniqGuy let me ask you does it bounce any I'm not knocking your build you did really good on it but I think the A-frame for the tongue should have been underneath the camper more and if it bounces in the tongue that's what you need to do to stop it that you said it didn't have but just a little bit of tongue weight to it so you shouldn't have any problem but if you put a toolbox up there on the tongue you could have that problem and the reason I'm saying this is I build these I know what issues come up and how to take care of it
Love the pull outs for you cooler and stove! If you place a towel around your cooler when driving it will meet it cooler, too, and you’ll have a kitchen towel there. Great water jug idea, too!And the price is good! Nice job!
I love the simplicity.
I have been watching DIY builds for three years now of every type, and your build is absolutely beautiful, very clean. I feel you could sell it for three times the build cost. (Not counting labor). Again, good job!! 😎👍
Thanks man! I really appreciate that.
He could sell it at a loss. Unfortunately he'll never get what he has in it. But, it's about the pride and achievement you gain. Not the money. But, usually it's not ever about the money. Not many can say they built a tea drop. Good conversation starter to make new friends out camping and its impressive to most because not many have the will or know how to do the same. Its priceless to him. This means more to him than a price tag could achieve. Nobody will ever appreciate this camper the way he could. I will always build new or remodel to my suiting. Like live in a mobile home I bout when I was 22 and remodeled everything. Made my own cabinets, laid my hardwood flooring. Did all the fancy columns and beams and everything else. The outside is a ratty ole trailer and you would never ever expect to see what you do walking in and once people see the inside the look on their face when they see the soft ambient lights glowing on the walls from the built in lighting in the white trim that bumps up against hand stained tongue and groove pine walls bumping up to burnt brick color walls and the white wainscoting and the rustic dark homemade cabinets and bamboo flooring... they are in shook and say it's the nicest trailer you'll ever see though. Especially when I'm humble and say it's just a ratty ole trailer. That feeling is worth every cent I know I'll never get back
For being your first build, I think you did a pretty awesome job! Have fun with it. Travel safely.
Really appreciate all the ways you've reduced the cost of building a camper that is comfortable, yet has all the amenities most of us want. We stand on the shoulders of giants, so from my point of view, you just liberated the ideas of others and shared them. Open source is all about sharing the knowledge. You just got another subscriber and I look forward to more videos on this camper. Cheers brother
Wow, thank you for the kind words! This alone makes me want to start creating more content. Cheers!
This camper is incredible and the amount of views for the build is outstanding I wish I could get this many views Well Done
Thank you!
I really think I have watched every build vid on YT. This is in the top 5 of all time. Perhaps top 3. Super nice build!
Your craftsmanship is excellent. I like simple builds like yours (although to your complements, yours goes the extra mile)! No need for running water and extra gadgets that take time, space and repairs to maintain. I would love your camper to take on a trip.
Beautiful! The galley is perfect!
Nicely done. Sweetest build I’ve seen on TH-cam.
I need this in my life lol. Makes camping so much easier. I'm done with tents!
I'm just now coming across this video. That is a nice teardrop sir and thanks for the mention in the video. I hope to see it in person one day. Build on!
Thanks Jay! I'm way out in Connecticut but hoping to get this thing out west in the next year or so.
We have a gathering in Arkansas this year. I know that is a long drive for you but I hope you attend. If not, possibly the great lakes regional gathering would be closer. That is one nice teardrop sir! You did an outstanding job!👍
Nicely done! A real world build, very refreshing.
Awesome build!
Right back at you. Very unique design
Great job ❤❤❤❤
Wow, this is really nice. I would love to have one of these as I want to go camping.
Very Nice job. I plan on doing a 5x8 soon.
Nice work! I’m in the middle of my build right now, I like your ideas. I may borrow some.
That is a BEAUTIFUL build!
Thank you!
You really thought this through well. Nice job.
Would love to see your layout plans, even rough sketch. I like your kitchen layout best of the ones I have seen so far.
Also, I had a thought about a mod for your drawer beneath the stove with the low sides for access. Put in panels to bring the sides up to full height but hinge them on the bottom. In the up position they can help keep drawer contents in the drawer. In the down position add flaps so they function like a "drop-leaf table" only the drop leaves fold up instead of down. Gives you temp table top space, maybe to put cooking utensils on or drinks on the back side.
That's is actually a really cool idea! I might have to give that a try
@@TheIoniqGuy Glad you like it. If you try it out I would love to hear about it or see it. Also, how did you manage to make the rear lid over the kitchen so rigid? I remember one of the other vids had problems with theirs not being sturdy enough.
Their kitchen design was similar to yours but I like yours better. Your stove and cooler come out perpendicular and creates a sort of galley kitchen effect.
Four galley spars each made of 2 pieces of 3/4" plywood laminated together. Even still I had a little bit of springback when skinning them. I would have done 5 in hindsight.
This is amazing and has been a huge help to me with my own build. I can't thank you enough.
So happy to have helped! If you have build photos I would love to see the finished product. theioniqguy@gmail.com
This is super nice! Awesome job. Do a more off-road capable one next!
Absolutely phenomenal! Well done!!
Super clean! Great job.
Great job it's got a very clean look.
Outstanding, very high quality. It's a shame you didn't do videos of the build process.
As I'm no expert, I didn't feel I had the expertise to tell others how to build. Probably would have doubled my build time fussing with a camera and editing. Thanks for the kind words!
Nice interior work! Overall trailer looks great!
Great job! Perfect!
Looks beautiful!
Amazing job.
Nice Job! Thanks for sharing!
First build? Wow!
Indeed it is!
Very nice build!
Awesome! I love the amount of thought that you have put in to your build. Thanks for sharing. :-)
Great build ♡
I prefer the simplicity of just use boat resin its stronger then steal and bonds at the molecular level so it a perfect seal get a grack no prob sand it out add a layer of resin
in theat spot buff it and ur good
Nice. You’ve got skills.
Awesome job!
Nice job
Excellent video - thanks for post. Terrific work on your teardrop! Where did you get the plans? I’m interested in building one myself. TIA!
Mostly my own design taking inspiration from the Escapod Topo 1 and the Timberleaf Classic for the exterior shape. I have a Google Photos album linked in the description with my profile plan as well as build photos if you're looking for inspiration.
Incredible!
Excellent A+
Very nice!
well done
You did an amazing job on this. Your craftsmanship looks like top notch 👌🏻
Did use a CNC to cut the plywood cabinetry? It looks perfect.
Nope, all cut with jig saw and circular saw. CNC would have been nice though
This is a top notch build. I doubt you could buy a better camper at any price. I’m interested in the skin, what did you use? I know you said something, but I didn’t recognize the product. What source did you use for the skin and outside trim?
It’s called Filon. It’s the same material most RV builders use for siding. www.recpro.com/rv-fiberglass-filon-siding-8-5-wide-arctic-white/?campaignid=10108288062&adgroupid=107415455739&keyword=&gad_source=1&gclid=CjwKCAiA9ourBhAVEiwA3L5RFugiysiAHpinnsBHNsok4dT_2XXIe5tG5IDxH89bCnttr35LvNQGyhoCwD0QAvD_BwE
Very nice
Good job appriciated
Great job!! Can you go into detail on the galley seal down the edges. Looks simple but i could do with it being explained. Thanks
I added some closeup photos of the hinge and seals to the Google photos album linked in the notes. Hope that helps.
@@TheIoniqGuy Cheers
Very professional. What are sides made of that you floated?
www.recpro.com/rv-fiberglass-filon-siding-8-5-wide-arctic-white/
It's called Filon. Really nice product.
@@TheIoniqGuy ty!
This is fantastic. What material did you use for exterior finish? Do have clips of how did you make the exterior finish? Thanks
It's called Filon. It's a fiberglass filled plastic. It's used extensively in the RV industry. I rough cut the panels and clamped them to the sidewalls and then used a router with a battery cutting bit to cut it to the exact size. Then it just held in place with the side trim and the doors.
Very nice build. I built one 4 years ago like yourself. Do you have photos or video of the build itself?
Just added a link with photos of the build if you're still interested.
WoW!!!!! Love it. Symmetry is fabulous. Clean lines and shape. Beautiful work. Keeping this video and subscribing today. Question: why two doors vs one with opposing window? Just curious. Love the build.
Thank you! After camping in it for two years, unless you travel alone, believe me you'll want two doors so your partner isn tclimbing over you in the middle of the night to go to the restroom.
@@TheIoniqGuy ah. Totally makes sense. My wife and I just bought a 36’ er and love it for our three 12 yr old boys. I am looking to do something like this (exactly) for our elk hunting trips here in Idaho. 👍
I’m 6’3” so this works for my height too.
It's a fun project. Check out the linked Google photos album for build photos to reference of you wanna see my building technique.
This is amazing!! Great job. I have been looking at the superbright LED strips as well, did you get the 18 lights per foot or 36? I really like the warm glow that puts off.
The strip lights I used are actually right in the middle at 24. They're great at night. Very easy on the eyes. Bright when you need em and dim when you don't
@@TheIoniqGuy awesome thank you! They do look perfect
I'm just about to start my cabinets in my trailer and I love the plywood face and doors you did, they look amazing. You must have used a wood CNC machine for them to be so precise. I'm curious did you have access to a CNC if not how did you find someone to do them for you?
I actually didn't use a CNC. I used a thin kerf circular saw blade and a straight edge. For the corners I got the thinnest kerf jig saw blade I could and did those free hand.
@@TheIoniqGuy wow, amazing work. I was a finish carpenter for several years and I cant free hand that well. Great job and thanks for responding I appreciate it!
Amazing. Do you find it's sufficient just cracking the window with the roof vent for ventilation. Any condensation issues so far?
Absolutely. There been morning when there's been a little bit of condensation on the interior walls but nothing that can't be wiped down pretty easilly.
@@TheIoniqGuy Thanks!
Awesome looking. How to you build them over hanging the frame like that? Where you cant see the frame on the sides.
I rabbetted the edge of the plywood walls so that they would rest on the floor while also extending down enough to cover the tubular frame.
Great video!! Thank you
What RADIUS Would the front be?
Off the top of my head I would say probably 2 or 3 feet
I absolutely love this! Nice job! Do you have plans or anything you could share?
Thanks! They're is a link in the description to a Google photos album with photos and schematics of the sidewalls
Hola amigo buenas tardes saludos desde San José Costa Rica tu diseño esta muy bueno yo estoy entrando al mercado de hacer y vender este estilo esta genial y las curvas muy ligeras espectacular donde obtuviste los planos me encanta eres un genio saludos
Very well done, totally on the same page with taking influences from Escapod and Timberleaf ! Do you have plans available to purchase?
Thank you! I don't but I have some build photos and a profile you can print out for the shape. Link to the Google photos album on the description
Beautiful craftmanship! How did you go about cutting out the cabinet doors with the radius corners? They look fantastic!
Thanks for the kind words! Very, very carefully. I made the straight cuts with a thin kerf circular saw and then used a jig saw with the same thickness blade for the corners.
So what about dimensions ? (Overall outside )Really like your build.
It's pretty much exactly 5x10ft. With trailer a frame it's about 14ft. Width with fenders is about 84".
@@TheIoniqGuy Outstanding cutting skills. Please tell me you used some sort of track for the straight cuts. I did not know you can get jigsaw and circular blades with the same kerf. Thanks for letting us know. When I first saw it, I knew you used a CNC..wrong. You da man!
Thanks Diego! Oh yeah I definitely needed a straight edge. I'm steady but not that steady 😅
What did you use to trim it out on the outside? I've seen it used before but have no idea what it's called. Thanks and looks great!
Wow awesome! Did you buy or weld/build the 5x10 trailer frame?
I welded it myself. Thanks
Awesome build how can I get the plans for this!
There's a link to a Google photos album in the description. That's all I have, I didn't use traditional plans.
Ever thought of selling the plans for this trailer for the do it yourself guys/women?
Just curious, but WHY do people limit their builds to just the size of the square part of the trailer frame?
It seems easy enough to extend the flooring at least a foot aft of the rear and extend forward onto the traigular front section by at least 2 feet.
Instead of curving the top for streamlineing you leave it flat all the way and curve the SIDES in the front to match the triangular shape of the tounge area? That would be just as "streamlined" and also increase headroom & storage forward.
Sorry, I just want to think outside of "the box".
I think for many people it comes down to replicating things that they see and people are showing them how to do and that perpetuates similar designs. For me, I wanted something that I could be quickly and without too much problem solving so I went with tried and true design concepts
@@TheIoniqGuy I and going to start a build soon, basically I want the maximum space and minimum weight possible. Most of what I see are heavy 3/4 plywood floors and tiny "pods" built onto the hiddlle of the trailer. I agree 100% that most folks seem locked into a mindset of 4x8 or 5x8 and what they see when they look up "teardrops" on the web. Great build by the way!
Would you be willing to post links to hardware used, specifically the interior cabinet latches
www.amazon.com/dp/B07B72859G?ref=ppx_pop_mob_ap_share
www.amazon.com/dp/B01N6Z0W68?ref=ppx_pop_mob_ap_share
www.amazon.com/dp/B07CMRBRNH/ref=cm_sw_r_apan_glt_fabc_PHDSTSM2QK7S4MNQE71Q?_encoding=UTF8&psc=1
I used those as well. Pretty similar to the others
Thanks for the quick response
Wow, great job, seems professional..how much did it cost you?
Roughly 7k. With all these stimulus checks coming in though I'm slowly putting more into it though to get it exactly how I want.
Where is your battery location and did you use a RV distribution panel? Like WFCO or Progressive Dynamics? I’m just about to the electric part of my build now.
Battery is behind my galley cabinets. Wish I had mounted it closer to the tongue and it would have given me almost perfect tongue weight. I used this fuse block. www.amazon.com/dp/B001P6FTHC/ref=cm_sw_r_cp_apa_glc_fabc_TF4ZKZ3EES6MKKA3DWV8?_encoding=UTF8&psc=1
Nice, where did you hide the battery I don’t remember you showing that or a port where you charge it from?,
The battery is behind the center galley drawers, close to the axle for weight distribution. Charger is behind the cooler as close as possible to the battery.
Hi I am wondering what the external walls are made of - are they a type of paneling?
Great job! I am thinking about doing one. Your build looks professional. What was the brand for the exterior covering you used? Any websites / blogs/ forums you used to help you?
Thank you! It's called Filon. Plastic filled with fiberglass. Very durable and requires little to no maintenance. There's a few Facebook groups and a forum called tnttt.com
@@TheIoniqGuy I'm looking at using Filon as well. Would you use it again? Any regrets over just going with a more common aluminum siding? Thanks for the video - can't tell you how many times I've watched it!!
Thank you! I would definitely use it again. I was planning on using painted .040" aluminum but after reading about having to repaint it every so often I decided on Filon as it's basically no maintenance and won't dent. Not to mention it's far quicker and easier to cut.
@@TheIoniqGuy OK awesome. Thanks for the quick reply. I agree with your choice to go with less maintenance. Thinking of getting my frame galvanized for the same reason.
Nice job sir! did you build your trailer? if so, how did you determine where the place the axle?
Thanks! I did build my own trailer frame. I used the generic 60/40 rule. So I placed the center of the axle 60% of the trailers distance not including the tongue. This didn't work out perfectly and I've had to add about 60lbs of ballast to the tongue box to get my tongue weight to about 120lbs. Too much of a hassle to relocate it at this point.
On the bottom is the best place !
All in, how much does a build similar to this run? Under 4K?
What size is the camper? Did you use 4x8 ply for sides?
Base is 5x10 with 4 ft sides
Does the fan keep the camper pretty cool in the summer heat
I haven't really used it in anything warmer than a low 70s night but in that type of temperature it works very well at keeping you comfortable.
this is nice! btw how did you adhere the skin?
No adhesive. It's held in place by the doors and the corner trim
Can’t seem to find any wider than 4’
www.recpro.com/rv-fiberglass-filon-siding-8-5-wide-arctic-white/
Very nice build where did you get your temp plate for the sides and roof and kitchen door thank you
Thank you! What do you mean by temp plates?
@@TheIoniqGuy your dimension and. Radius for your curves
I'm sorry I mistook what you said. I downloaded a side photo of a Timberleaf and then I traced it onto graph paper and figured out my dimensions based on that grid. I then cut that out on a large sheet of MDF to trace with my router.
How long and how many hours do you think you have in your build?
Hmmm I worked on it many hours each day for 2 months so maybe around 300 hours
@@TheIoniqGuy wow, that's actually a rather quick build! I love the clean look and excellent quality of your workmanship.
Where is a good place to buy these parts like the hurricane hinge?
Vintage Technologies has pretty much everything you need. Just try to order as much together because their shipping fees aren't very low.
How light is this trailer
Weight
Width
Length
Height
Price
I want to buy
I appreciate your interest but it's not for sale
How difficult would this be for a total beginner to make?
It's definitely doable but it'll probably take you much longer than it did for me. I've been woodworking and metalworking since I was a kid so if you don't have any experience with power or hand tools it'll be a challenge but definitely not something you can't learn. It's a well rounded project with little bits of everything.
If you need to ask don’t bother .
This thing still holding together?
Indeed but it also hasn’t been used in over two years
Whats the weight?
Do you have a build list?
About 1350 with a steel tongue box. No I don't have a list of items used. Let me know what you'd like to know and I'll get you that info if you want.
What is the weight of your final trailer?
About 1300
Where did you get 5’ Filon?
I cut it to width
Seams on the roof work out ok with trim and sealant?
Yeah no issues thus far but it's only seen rain for less than a handful of hours
What size mattress can you fit in it?
It's a queen.
link to doors like this ?
www.teardroptrailerparts.com/doors.html
Do you have a link for the cabinet latches?
www.amazon.com/dp/B01N6Z0W68/ref=cm_sw_r_cp_apa_fabc_GYVF35S14R73JBHN4E65?_encoding=UTF8&psc=1
@@TheIoniqGuy Jay lives a few minutes from my house. Great guy and full of info on the building process. Awesome job on the teardrop btw
When you cut the holes for the marine style latches, do you remember how far from the edge you drilled the hole? I think it’s a 2” hole ?
I have a template I can measure for you when I get home from work. It was trial and error but I got them perfect
2" hole and centered 1-5/16" from the edge. Hope this helps
sheesh
Where about are you In The world?
New England
It's bullshit how much stuff is nowadays. Use to be if you built it yourself you'd have it for half the cost. Now everyone thinks that their products are worth 20,30,40,50 dollars. Hell, 4,5 grand prolly would have bought this new. Obviously you wouldn't have the appreciation for it like you do now that you have it and built it. It's just silly the cost of things. Like those clusters for switches and USB ports... 25-40. Like, seriously... couple manufactured ports you bought and slapped on a plastic tray is now worth 30 buck. Greed and low morals. American dream lol. I have noticed to stopping at home depot tho. Go to menards for lumber. They're getting up there with home depot... but, definitely still much cheaper. Also, its sometimes best to find a local lumber yard even if you don't have a menards.