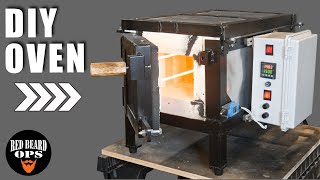
How To Build A Lab Kiln - The Door, The Case, The Wiring - And Finished!

ฝัง
- เผยแพร่เมื่อ 25 ส.ค. 2024
- If you want to have a look at those special videos become a member and join by clicking this link / @thinkingandtinkering
finished build of the kiln


I love how you explain your thought process. Your design isn't overly complicated, but its very clear why you've made the decisions you have. Very rare.
Exceptionally good stuff Robert!
A lovely PIECE of work well done
cheers mate
I have one I salvaged from the scrap yard a few years back. I'll watch these videos again before I start working on it. Thanks for the good videos.
awesome mate - cheers
Rob, this has turned out beautifully. Your videos make everything looks so easy, though I'm sure that comes with practice. I should be building one of these in the next month or so.
awesome mate
You have a great way of presenting your videos....a typical Yorkshire bloke
cheers mate - glad you like it
Unsurprisingly the most comprehensive video I have seen on building a kiln, Cheers Rob. I have already built a gas fired forge which does most things I need it to do, but this looks so straight forward I am tempted to build one.
awesome mate - cheers
Great project. Very well explained. I have heard that some ceramics (fire brick?) Start to conduct above red heat so it's good that you earthed the outer metal work. It would be good to add a bonding wire also to the hinged door. You should turn off the kiln before opening the door too as the red hot elements are at 240vac potential and a shock hazard especially if using metal tongs. The outer case of thermocouple should be earthed too I think. Looking forward to seeing it melt stuff. Wonderfully made video.
cheers mate - but to be honest you are going no where those coils when they are on - the heat is going to do far more damage before you got close enough for a shock - that big copper covered bolt that is the door hinge is loop in enough for bonding - the outer case of the thermocouple is earthed as it is bolted to the metal chassis via a steel clip - you might be over thinking this one mate - but I do appreciate the advice - cheers
Hi Robert I built my kiln 6 years ago - its around 30 cm internal (cube) - used in my small artisan activities.
For those concerned about ceramic fibre insulation and the lungs - I went the route of Morgan Superwool which is available in a number of countries, the blurb claims that the fibres will eventually dissolve in water (lungs) and so are not bio-persistent. This was important for my design because I do not use firebrick - my operating temperature is only 900 deg C and my process involves a lot of door opening so I did not want the thermal lag of firebrick - this means that the fibre is not tucked away "at the back" but is the inner lining of the kiln and so can be disturbed any time I am careless - hence my preference for a 'safer' thermal blanket. I agree if the insulation is only exposed "at the back" and is not frequently handled then it is unlikely that much will go airborne - having said that the 'safer' wool performs just as well and was not more expensive.
An alternative to winding on a smooth bar is winding on a threaded rod (again in the lathe) if you can find one that matches the desired coil gap - it worked very well for me, very uniform coils but I never tried the smooth bar version so it may have worked just as well for me there. I did not do a powered wind as my lathe is small 1960's industrial without a modern electronic speed control and I did not fancy having that much torque pulling a wire through my hands - even then using the un-powered lathe it did not take too long - I used the chuck key to turn the chuck - some might think it "OTT safety" but my reasoning was we have all gotten into a mess with wire at some stage and the thought of an "accidental lassoo-loop" in the wire, a finger and a five horse power motor at lowest gearing hence highest torque did not wet my appetite.
Great video as always ! :-) thanks..
Not over cautious at all. Pretty sensible I'd say.
Wow Robert, you really did that thing up right!👍👍
absolutely mate - cheers
Best three videos I have seen on this channel in a long time. End to End instructions. Thank you.
glad you liked them mate - cheers
A really helpful video. Friendly, humorous and easy to understand. Thank you.
glad it was helpful mate - cheers for the post
Excellent, thank you
glad you liked it mate - cheers
Respekt beautifully build...
Loved it, as always.🍻😎👍
cheers mate
Thank you for the very clear and practical demonstration on how to build an electric kiln.
cheers mate - glad you liked it
You are such an inspiring person. I love the style you are presenting your videos.
thanks for the kind words mate - cheers
A+ videos mate, I know you have got to be happy it is all complete and you have walked us all through the step by step in every way possible. You sir are amazing.
Thank you
cheers mate - thanks for taking the time to write
Your way is amazing 👍👍👍 , know a lot of good engineers and scientist , but you are one of the best ! With both feet on the ground , thats the way we need !!
cheers mate - glad you like it
I got my order of 18 gauge nichrome wire and made a coil by hand without using a lathe or drill. Took a long time but worked ok. I used about 35 feet of wire @ 110 volts and it doesn't have enough power to get to temperature (coils don't even glow red hot) so I will cut a little off the length until it works while trying to keep the current as low as possible to avoid blowing a breaker. I was thinking that kiln was originally about 1000watts but I could be wrong.
Also, the bricks in my old kiln were damp so I used a propane torch to heat it up and dry the bricks out. I had it just over 1000 degrees F (using the torch) so far which is still not high enough but should increase once all the moisture is gone and the current is increased.
Superb ! Great looking and functional Kiln for some Seriously high temperature experiments !
Nice one.
cheers mate - glad you like it
Enjoyed your build. I recently built an electric kiln/ furnace using the heating element from an electric clothes dryer, 240 v. Used the full length at 120 v for low heat, and tapped at about 2/3 point for 17 amp draw high heat setting. Getting easily 1700º F with very little cost.
awesome mate - thanks for sharing
I realy enjoy your video. You give simple explanation and enough information to let us understand the details.
Thank you
glad you liked it mate - cheers
Fantastic tutorial. You have given me all the info I need to repair my furnace. (Glad I kept it) Thank you
glad it helped - cheers mate
Fantastic video series. Looking forward to seeing it in use.
glad you liked it mate - cheers
It may be better to use high temperature silicone/fibreglass cable running to the PID controller rather than PVC flex to terminate the nichrome wire as the terminal blocks will conduct a lot of heat into the cable which which will damage the insulation.
if you think mate - but i have had this exact setup working for 4 years on my big kiln with no degradation
I'm planning on doing a video on making a kiln. Figure I would go into more detail around building the coils and how to increase the life out of them and how that dictates the size your kiln needs to be. I'm learning loads just on the research of the coils. Figured it could help people decide on their personal design.
Thanks Rob,found these videos very useful and informative as usual.Will be making one no worries.
Great to hear it really is a useful bit of kit
Brilliant as always Robert! Thanks so much for the tutorial, I may actually try to use this info to build a glass kiln for shaping and slow cooling the glass.
awesome mate - cheers
Bloody brilliant Rob. Thanks mate.
cheers mate
It looks really good. I can't wait to see it work. I really enjoy your videos. Thank you.
cheers mate
Thank you Robert, very useful device.
cheers mate
Good
Thank you soooo much for the detailed explaination of connecting the electric parts :)
glad it helped mate - cheers
Great job Rob!
cheers mate
Nice rig man Keep up the great work A+
cheers mate
Awesome set of tutorials Robert! Thanks :)
glad you liked them mate - cheers
Thanks mate. Another great video. You make this very simple and straight forward to follow. My hotplate stirrer has been giving me headaches. Lol
Enjoy your weekend
cheers mate - glad you liked it
really nice diy build, I think i'm going to build what you've built as this would work great for cupelling. I have some flour gold filled black sands from the california mother load. i live near the famous feather river. just about anywhere you dig around here has fine gold dust.
I'll send some to ya if you want. you could make a sulfide processing video. you need a little crucible, tongs, flux, lead, and a cupel. you'll get a little gold bead you can keep.
that is an awesome offer mate lol
think im going to make this next. i made the solder bath and it works very well
awesome mate - cheers for the post
Looking good Rob. I can't wait to see what kinda biscuits you pull out of it lol.
lol
A great way to pull out those tiny itchy glass fibers from your skin is Duct Tape. It might remove some hairs too, but it's a fast way of doing it so you stop itching. Just put a strip on the area and peel it off and repeat until they're gone. You can reuse the strip a few times, then use a new one. Some anti-itch cream afterwards helps too.
thanks for sharing this mate - cheers
Or a cold shower closes the pores, so that the fibers do not penetrate deeper into the skin.
what a beatuy, well done! and thanks for sharing!
glad you like it mate - cheers
I am going to build one of these, but I need it to be a bit bigger for pottery, such as a plate or bowl. Has anyone copied this done their own? Any other tips to share?
Very nice work! and the infos are also very nice!
THX for the vid.
cheers mate - glad you liked it
I basically understand how to do the wiring for 110 volts. I would like to wire it for 220 volts because it would be more efficient. Also I have enough brick to make it taller and four heating elements. I do have two SSRs. May I impose on you to list a wiring circuit to do 220v, four element kiln. Thank you very much.
Proper job! 👍 Or as my dad would say, "Just like a bought one.".
cheers mate - glad you like it
Many of the other kiln making videos twist a few layers of the wire together for the sections that pass through the bricks to keep those sections from getting as hot. Probably not necessary but something to consider if that turns out to be a weak spot. Should keep the wire outside the kiln a little cooler too.
Something I did on another (propane) kiln I built was use cheap fiberglass insulation on the outside. Way cheaper than the ceramic fiber and it is protected by the bricks so it isn't directly in contact with the flames or heating coils. It might melt but won't actually burn so it might be worth trying if cost and availability of the higher temperature ceramic fiber insulation is an issue.
true enough mate
❤️Great video thankyou 👍
Glad you enjoyed it
Have you posted the video of it working? Did I miss it ?
Just made one using a bunch of old spiral notebooks, clay and a dryer cord.
I tried insulating the clay by mixing in used coffee grounds to leave voids, but added a bit too much and it ended up leaking... turns out it is a good way to make water filters though
cool mate
What all pieces do you need for the wiring? I need to build one with an adjustable gauge on it like a pottery kiln, not necessarily a digitally controlled one but an adjustable one I can get a feel for what will bring it up to 1110 degrees f and I sometimes need to go up to 1200-1300 degrees to strike glass color with metal oxides in it. So I will need the wiring controls enough to handle those temps. Can you please list all the parts I will need for the wiring besides thermocouple also what is the dif between a thermo couple and a pyrometer?
Amazing video as always, love how conscious you are of reusing old and scrap materials, may I ask where do you go to find leftover scrap metal like that server board, or even electronics like worn out microwaves?
scrap yard or in germany "Wertstoffhof" :D
i just keep my eyes open mate - there's usually something lying around
It wouldn't hurt to spray a little BBQ paint on the fibers, just make sure that they're locked in place & you don't have to deal with the Dust. It may not be a problem though?
you can do what you like mate - myself I wouldn't bother - it's a bit of overthinking really - the thing is in a big steel box and you just aren't going to disturb it for ages
Pro-gamer tip: - rub talc or baby powder into any exposed skin. The glass fibres cannot get into pores that are already full of powder.
thanks for the tip mate - cheers
Regardinga rhe blanket insulation, do you data or imperial proof that is has an effect on heating efficiency?
nicely done, Great Uncle Bulgaria would be proud lol :)
lol - cheers mate
This couldn't have been more perfectly timed. I just so happen to have a need for a kiln at the moment! Thanks again, Rob. Fantastic work
cheers mate - glad you liked it
Genius!!
cheers mate
Another fantastic, entertaining and educational video, Robert - thank you. As always, well peppered with a good helping of simple "common sense" when it comes to things like handling the insulation.
I look forward to more great videos from your channel!
cheers mate - thanks for taking the time to post
can this be used for wax burnouts?
always wanted to know how to do this?
Hello, I made mine with "kanthal" 1mm aprox, but 5 kanthal resistor coils have broken in less than a month, every two burning cycles one breaks. They tend to come out of the grooves on the sides at certain intervals and only with the weight, when heated to 730 ° C they break, or in places where the coils are very close to each other they also break. Is Kanthal that fragile or have they scammed me with the purchase?
How can you have 1 dislike to this ?
Some overpriced kiln manufacturer lol
@@SteveEh lol yes probably
lol - could be
Typo
What was the AWG on the NiChrom Wire you used. I have 25ft of 20AWG 0.64Ohms per Ft on hand. Not enough for two elements.
A technical question at last brilliant,, do you know the formula for reactance I'll bet you do and root mean squared ah great stuff,, try and help me get rid of the trolls giving the thumbs down please ❤️👍
My notes from a previous video say Rob used 1.2 mm wire which should be close to 17 AWG. I just ordered some 18 gauge resistance wire from Amazon which is a little smaller but hopefully will work. (About $10 for 50 feet)
20 AWG might work as long as the length is calculated to keep it from melting.
17awg
Neat bends in the sheet work Rob, have you got a sheet bender or something clever. The paint still looks fine.
i was just careful mate - and i often go over it with a planishing hammer
Just as good as finding a box of meccano! Could put your logo on and sell them?:)
lol - surely more fun for you to make your own
...And, thank YOU very much! :-D
lol - cheers mate
I'm proud to be a womble
lol
Looks great, is there a wiring diagram for what you built?
you don't need one mate - it's not that complicated - it's basically two switches one after the other
You are a smart guy Robert. Do you have any idea what pulls a stick ( in the shape of a Y) to water in the ground or water pipes?
If you hold the stick apart with your hands at the top of the Y then place it level at your knees, with the point of the stick pointing in front of you. The stick will pull down with a strong force, when water or water pipes are in the ground below you!
I made these sticks & played with them when I was a kid. Age 10- 13 yrs. Old. They have to be made out of a certain type of wood & fresh off the tree. (Evergreen types) I remember it being a very strong force!
I doubt even a grown man could hold the stick level!
Why hasn't mankind tapped into this power?
It's not Magic!
Even though it's called "water witching" witching has nothing to do with it.
It's not some evil trick!
There is a real scientific reason for this. I just don't know what it is? Someone told me it has something to do with hydrogen atoms but , who knows?
I remember one day, I was in the backyard playing with this stick & a neighbor kid came over to me & said " you're faking that.... That's not real!"
I couldn't believe He said that!
I told him, No, it is real & it does it by itself......try it!
He didn't want to, but I was persistent & placed it in his hands. I explained to Him, exactly how to do it.
I stepped back about 10 feet & made a line on the ground with my shoe. I told Him, "this is exactly where the stick will point down". Then I stepped back. He slowly started walking towards the line that was between Him and I. When He got to the line, the stick pulled straight down. His eyes got big, He dropped the stick & then he took off running.
The craziest thing out of it all was... He never spoke to me ever again after that!
It's crazy how people look at this subject!
Something unknown is considered Magic, until science understands it & I'm here to tell you, this is NOT Magic!
Anyone can do it, if they know how!
There is ALOT of power there, not being tapped!
I am sorry mate - but I have no idea on that one
Is it difficult to make a lab vacuum oven?
no - you just need an air tight container and a rubber seal
Have you ever thought of doing a induction heater coil project, I suppose it's not much use to you in your research
have thought of it mate - and might get around to it - cheers
@@ThinkingandTinkering ooh yes an old induction hob could serve as a partial donor
Thanks Robert.
How long does it take to roast a chicken in it? 🤪
Alhamdulila!
glad you liked it mate - cheers
Other than being overkill, would there be any harm in using the firebrick at its full thickness(as opposed to cutting them in half)?
nah - it's all just design decisions mate - I had the wool and didn't want to spend on the bricks - but doubling up wouldn't hurt in the least
Wombling free!
lol
Very nice. =)
glad you like it mate - cheers
@@ThinkingandTinkering Love it Robert.
I might have missed it, but what are the white walls made of ?
Jon Jon it’s in the previous video
I split the video into three as people want different things - if you are not sure check out the basic structure video
No thank you mate for sharing. 👍
glad you liked it mate
Hmm water driven fuel cell device? electrolyte for solid state ceramic cells? Looking forward to seeing this, right down the path I want to go with my own research :) If this can absorb water and decompose it then theoretically you could sandwich this layer with graphite and aluminum oxide ceramic electrode plates and create the electro chemical reactions?
Robert are you building a Rocket??!!!
pubs.acs.org/doi/10.1021/cs401208c
I guess so - don't really know to be honest
I’m sorry. I just didn’t understand the wiring setup.
In fact, I haven’t come across any video that clearly explains the wiring. I don’t know why no one doesn’t film the part where they connect the wiring.
Shame you didn't show the damn thing working. Waited 3 videos for that. Least you could have done is turn it on and heat something up.
next video mate - working on it but wanted to do more than just heat something up for the sake of it
@@ThinkingandTinkering meant to say this is awesome.
Rob mate keep demistifying all this stuff and we will all be flying round in our own personal anti grav flying machines ! ,
lol - cheers mate
Rocket science sounds barely more complicated. Yall say how easy it is and go on to talk about what sounds like nuclear physics or something.