High-End Skin Softening in 1 Minute or Less in Photoshop

ฝัง
- เผยแพร่เมื่อ 3 เม.ย. 2017
- ► SUPPORT THE CHANNEL & GAIN PREMIUM ACCESS: / piximperfect
► RECOMMENDED SOFTWARE & GEAR:
✅ My Graphic Tablet: pix.live/wacom
✅ Recommended Budget Tablet: pix.live/wacomlite
✅ Try Photoshop for Free: pix.live/photoshop
✅ Artificial Intelligence Photo Editor: pix.live/luminarai
✅ Unlimited Photoshop Actions, Plugins, and Stock Photos: pix.live/envato
✅ Primary Microphone: pix.live/mic1
✅ Second Microphone: pix.live/mic2
✅ Audio Interface: pix.live/audiointerface
✅ Filmed with: pix.live/camera
✅ Lens: pix.live/lens
✅ Music: pix.live/music
✅ The App I Use for TH-cam Growth: pix.live/ytapp
► PIXIMPERFECT MERCH STORE:
teespring.com/stores/piximper...
► PIXIMPERFECT ACTIONS:
gumroad.com/piximperfect
► LET'S CONNECT:
Instagram: / piximperfect
Facebook: / piximperfect
Twitter: / piximperfect
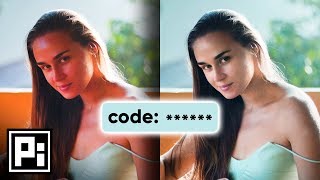
AMAZING way to smooth skin, with the skin texture still intact and beautiful in Photoshop CC. Using this quick high-end skin retouching technique, make the skin look as if airbrushed, in one minute or less. Also, at the end of the video, I'll show you how to do the same thing in 30 seconds or less!
Here's the thing, make sure you do all kind of blemish removal, wrinkle removal or mole removal from the face before applying this technique because you don't want to apply any kind of skin smoothing above blemishes. Hope it helps!
► SUBSCRIBE: goo.gl/iaROYY


Skin soft Photoshop steps :
Ctrl + J
Ctrl + I
Blend mode vivid light
Filter -> other -> high pass -> Value 24
Filter -> Blur -> Gaussian Blur -> Value 3
alt + Mask option
Brush paint white (Don't paint on Sharpe area eyes & highlights)
adjust opacity
Thanks
Thank you! I've made myself an action!
thanks for that, much more useful
This is literally the best channel for Photoshop tutorials. Better than even the most well known ones.
Rhaenyas Phoenix s..
agreed ! hands down man! this dude has no BS at all!
thank you great tutorials man! Keep up the good work
True!!
Me too
Thank you so much for doing a straight forward, well explained tutorial in only a few minutes. There are so many tutorials out there that would have taken over 30 minutes to explain the same method.
Really favoring the minimal retouch these days and this is perfect for that. So easy to add just a hint, or half a hint, quickly! Newly saved action will definitely be my go to. Thank you VERY much.
I've been using this channel for all my Photoshop classes in college, but now we are all learning from home because of the COVID 19 and I just wanted to say thank you for making these great videos and being there for us students who are unable to go to class! You are a great teacher!
Who needs college when you have this channel! I went to college and they are so outdated! Learned more on TH-cam
@@esesmmee iii>
@@esesmmee 0lpppp
of 9 injury
Sinhala and the
You went straight to the point and your steps were clear and easy to follow. Great job! Best tutorial I've ever watched on skin retouching.
After looking at SOOOO many frequency separation tutorials I was losing my mind... all of them felt so overcomplicated with a bunch of unnecessary or personal choice steps. But THIS video is the best and I already feel more confident in my skin retouching skills! Thanks again!
I'm pretty sure you wrote and developed Photoshop - amazing! I'm doing a photography degree and the technical sessions are challenging for someone who is intimidated by Photoshop. However, your tutorials are simply incredible, thank you!
Awesome tutorial. Short, sweet, and to-the-point. I have used it countless times now. Thank you!
What a brilliant tutorial,fast and easy to use! Love your presentation style,bit fast sometimes,but just rewind to recap.10/10!
I had been spending literally hours retouching (not that I'm savvy at all with PS), but this tutorial is a game changer for me. Can't be more appreciative of your sharing of really important knowledge. Thank you.
I've been watching your videos for a couple years now and you have improved my editing so very much! THANK YOU!!!
Brilliant and simple tutorial! As an amateur studio photographer, I do not like retouching photos to this degree, but the beauty of this is that you can change the opacity to match the level of “fakeness” people want. It is such a shame that people want to look like a barbie doll, but with this tutorial their dreams can come true. Thank you!
As a photographer of people, this is quite simply one of the best tips/videos I've ever come across on TH-cam - Amazing - Love Your Videos xx
I've referenced this video SO MANY TIMES. I cant thank you enough for making this and how much it has helped. Cheers!!
This is the best skin retouch tutorial on youtube. The action recording at the end is a true gem. Thank you bro!
Thanks for this!! Love how you break these things down and run commentary.... I passed on three other tutorials where they just move the cursors around the screen.
You hear this often, but you're a blessing! This has changed my newborn photography game and I couldn't thank you MORE!!!
You literally just changed my life...I want to give you a huge hug just for that😂😂😂😆😆😆
I think i know you ! do you remember Automate Community ?
I know its being 5 months but I'd take the hug if its still available😁
Same
@@stevenson77 simp (jk)
😂😂😂😂😂
Literally every question I’ve had about editing has led me here and I’m always answered. Thank you for what you do 🙏
Best tutorial ever 🔥🔥🔥 i am just gonna try this out, thanx man
Your doing a wonderful job my friend keep it up. Thank you for sharing your vast knowledge of PS. It's truly helped me to become a better Photographer
I'm totally hooked on your tutorials, you make everything so logical and simple - thanks!!
ijju
I used this tutorial last year and found myself searching for this specific one again. You explain it so easily and quickly and I'm not that smart with programs like Photoshop lol. Thank you for this!!!!
This was actually so helpful man. Thanks a lot. Respect!
This was one the BEST vids i have ever seen on this technique, it works perfect and flexible on all images. you are a god among men!!
This is the retouching method I've been using since I discovered it. Of course I have pre-recorded this entire process via action tool to save time.
Thank you so much!
I once was lost. But now I'm found... This tutorial has got me BORN AGAIN.
This guy is a genius. He's my favorite person right now. Thank you for creating an easy to follow instructional video!
Brilliant, just what I want. I can't be logging on to youtube and searching through tutorials over and over each time I want to do this effect!
Omgggg, me too! So happy to have found him!!
my skin gets so dry and textured in the winter, it’s SO cold where I live, you just gave me my summer glowy skin back.. thank you!
Your are a blessing and thank you for generously sharing your knowledge.
This is the easiest way I have seen for skin softening. A lot of these tutorials are so involved with 7 layers and a ton of instruction and they are coming up with the same results. Nice job!
finally someone that explains this in the most simplistic way . Your great dude . Lightroom just does not give the same result . Iv finally moved to Photoshop for this . Thanks !!!!!
Keanan Purcell Me too. For the very same reasons.
same
Lightroom is just raw converter, it's not about tune your image
Yup while you can play around with brushes in LR there are things you simply cannot fix. This is one of them.. great quick easy explanation thanks for that pal!
lightroom isn't for detailed editing. No way to get the same result
I combined this tutorial with the other one you made on creating different layers for different frequencies and it is my get-go method for all skin retouching. Thank you!
Agree with this. I use Piximperfect PPP Method for Frequency Separation, Skin Smoothing, and then Sharpening. A 3 step process that has me turning out b/w portraits in about 15 minutes (without rushing).
Awesome work brother. I used the exact steps as you said, really easy and I noticed a big different in the skin smoothness in the picture I was editing. Thanks..Cheers!!
Thank you very much for this lesson. A lot of respect!
Tis is miracle and you the best Photoshop teacher. I love how you explain the process. Thank you!
Thank you so much for this video and all the other videos, Unmesh. Not only are you simply brilliant at Photoshop, you are also a teacher par excellence! Every other video by others had always left me confused and intimidated, but you have the art and skill to make complex things easier!
I would like to ask you one question about this video.
While it works very well as you described for colour images, what is to be done for black and white images, please?
Thank you once again!
Excellent Tutorial. Thank you for taking the time doing this for us!
Sir your videos are wonderful
i will share this video on my fb....just loved it
Works like a charm. I've wasted hours doing stuff manually or trying around with inferior results. Thanks a lot!
This tutorial is really very useful. Thank you for providing such important information. I look forward to watching more tutorials with you. Greg
This wasn't working for me till I played with the HIGH PASS value. Mine was around 6 or 7 instead of 24. Then it works great! Thank you
Wow I love this video because it's Short, quick & simple....
You are an amazing instructor!!!! I love your tutorials, you explain everything in simple terms!!!!!!!!!!!!!!!
YOU ARE LITERALLY THE BEST TEACHER FOR US POOR PEOPLE ON TH-cam, please keep this remarkable free valuable content coming! I learnt alot from you man!
This is a great tutorial. I've seen quite a few from others and the steps were complicated. Oh, and don't worry about the negative comments.
You sir, are by far, my favorite person teaching Photoshop! you are a true Wizard and a great teacher. Thank you a milliiiiii
You certainly make the BEST photoshop tutorials I’ve ever seen!
Thank you so much Unmesh!!! This tutorial is a must watch like you said. Yesterday you showed us a tease and today you delivered a great video. You are very giving and I appreciate all of your effort. I wish you great success, you deserve it.If I was in front of you, I would give you a big hug!! :)
Hey Lizzette, do save that hug for now, who knows, we might actually confront each other someday. You always wish the best for me and I'm very grateful to you for that! My best wishes!
I can't wait to try this awesome technique. I have been searching all over TH-cam for details like this and have yet to come across a video that isn't too long winded or does not give me what I am seeking. I have now subscribed and am very HAPPY!!!
where tha image?
Your voice and the way you explain is so great! Thank you!!
Hi
felt the same.
How do you comment on tutorial? well organized I mean. What do you think?
Wow!!!! This is super awesome. Thank you for the education
Great tutorial, quick, succinct and clear. Thank you!
Thank you Unmesh. That was a great technique.
YES ACTIONS!!!! My first time learning Actions.
Going to try this for sure. Amazing lesson, as always.
thank man you saved my life , My way to edit the skin is long and professional and gives really great results but takes too long and because of that i cant apply it to a lot of pics and sometimes clients want a lot of pic and this way you showed me is quick and gives decent results! i am definitely gonna. use it a lot !! thanks again!!!
Many Thanks!
Hi, Its just amazing. I loved this action.
It would be great if you explain
1) why we take a particular step (e.g. Invert, Vivid Light, High Pass, Blur etc) - meaning what is that we are trying to achieve by using that step, and
2) what is the impact of changing value (e.g. change high pass filter value to 10 or 50 instead of 24, change blur value to 1 or 10 instead of 4).
My request may sound too naive but let me admit that I am quite new to photoshop. Your explanation may go a long way in improving my skills.
Thanks.
As someone with chronic pain, especially in my hands from my autoimmune disease, this is going to help me tremendously, thank you!!
Thank you so much for your amazing videos and super upbeat personality! You are a great teacher!
I love your channel bro! Your videos are perfect 👌👌..... Keep going
You're the best TH-camr, best channel, best teacher, Nicest guy ever!
Omg, this is amazing. Thank you so much!
You make it so easy and enjoyable! Great video! Thanks a bunch... Really grateful
using 42mp files, so the values were much different for me. i used 6.0 for high pass filter and 2.5 for gaussian blur. i also set the layer as a smart object so i am able to adjust the values as needed for any document. thanks! with this tutorial i created a skin retouching action that works for me.
I get to the step after the masks are created and we being to "paint over it" and nothing happens - i used the original values for both filters and nothing. So I used your values of 7 and 2.5 and still nothing ... what am i doing wrong. There is literally no change with the photo. This is a raw image from a canon DSLR.
I would imagine a 42 Megapixel image would be impacted differently that most other non 42 MP images. What are you doing with such a huge image anyways?
He really should have give a "ymmv" statement on the highpass step of this. Otherwise this really is an amazing and quick way to smooth skin.
@@bourbonstreetla I understand that but most people I know don't shoot with that level of detail and it does make sense that some modification will be needed when such a hi resolution image is involved. No?
Kkipkipuca2
I would prefer to ad the effect in a mask (less destructive) instead of paining directly and make sure all brushstrokes are correct. Another tip before applying the effect: Create the first layer as described... Then create a second layer in mode "soft light" with an additional highpass-filter (in order to regain some sharpness) afterwards and group it. Then create a black mask for the group, paint in the effect and reduce the opacity to something between 60 and 80%.
Hiya, can you make a tutorial for that? Thanks.
Thanks for that mate!
this is amazing, u have just made my work more time efficiently
you are simply the 'best'! always enjoying your tutorials, because you are able, to explain things in a simple way...(even the sound quality is very good, compared to other channels) thank you very much!
“We don’t want to make her look young again!!” 😂😂😂 great tutorials man! Keep up the good work!
Unmesh has spent entirely too much time on the computer I fear.
Love you! Thank you for this easy to follow tutorial! You are the best!!!
Very informative and easy 👏🏻👏🏻
Very well explained 🙌🏻 thank you
thank you queen for this tutorial! i love your videos they are so easy to follow!!
Amazing. The time and frustration this is saving me!
Antonia Martinez Phd did it work for u?
You're a wonderful human being, I hope you know this. 💫
You are a GOD SEND!!!! Thank you! I just subscribed! I had to refinish an old B&W photo and had no idea where to start! You saved me! Thanks!
WOW thankyou for this. Been trying to learn this for so long! Explained well. Thankyou Piximperfect x
Can anyone tell me where we can find ctrl i effect menu instead of typing ctrl i
Yah I got it layer
I also used it just now to remove some nasty noise artifacts that Topaz DenoiseAI didn’t catch! I had to lower the thresholds for both high pass and Gaussian blur to about 10% of your values, though. With the original values, the high-pass result was totally different from yours and unusable. Great trick!
Remarkable. You are so good at this stuff dude. Your best video yet!
Thank you so much for the video, you are a great teacher, have been watching your channel for years.
The radius value 24 of high pass filter didn't work for me on my 24MP-12.8MB image. I reduced radius to around 7 & it worked fine. Does this happen due to resolution or is there some other reason behind it? Also,Thanks a lot for all the tutorials, really more helpful in practice compared to most well known channels,recommending it to the community around :)
For the values of High Pass and Gaussian Blur:
1. The higher the resolution, the higher the value and vice versa.
2. The closer the subject is to the camera, the higher the value and vice versa.
PiXimperfect thank you so much for the response & clearing the confusion. Yaa,apart from resolution,the subject distance is also in picture of this process,I had to go for different values in all 5-6 pics in which I applied it,got it now :)
PiXimperfect Thank you brother, thank you for your help.❤️
Sagar Shete k
Harsh Patel Hi kind sir, Mr Patel. You're a powerhouse.
How the hell did you learn all of this? You are the man
You’ve made my life 100% easier... I thank you for sharing this knowledge 🙌🏾🙌🏾
First time I've seen one of this guy's videos, and it's beautiful. Quick....succinct....to the point....informative....Thank you!
Holy fuck.... Thank you brother lmao! I'm way too excited here. This is so simple yet produces amazing results. Thanks for the video!!!
Hi Sir
The fastest and best way I have found ! Thanks
Thanks Valter! 😉
Me 2!
Valter Escrivao yeah.
Best channel for photoshop tutorial i have ever seen😍😍😍😍thanks a lot
Thank you, these are short steps, I've seen others that go into even more steps just for the same effect you explained.
I was gonna make a funny comment on your accent but your video was actually really helpful then 90% of tutorials out there that I was like "This guy is a Genius" Subscribed!!
plz make a tutorial for normal picsl becoz in this photo she is a model and she is already perfect.
waiting for this
whether the subject is a model or not, the technique remains the same...
I'm also waiting
@@Tilbard but, the value isn't. The 24 high pass value and 3-4 gaussian blur value just didn't work for me.
Wow! I am a professional high-fashion photographer for 30 wars and usually this is not my job to fix the imperfection but you just taught me a very useful skill! Thanks a lot!!!
Amazing.
It really took me a minute! Bravo!!!
I just discovered your channel and I'm learning so much, ty
This is one of those channels where you feel guilty about watching this man's videos for free so you feel morally obligated to donate.
lol 😂
don't lol@@eloisaedem6927 This man share his knowledge for free. Tell me whats free today?
Now i can LOL you! Because nothing is free! Thats why i respect this man and we must appreciate his work, also if we can share a penny, it will help us also!
I have just made the action. All I can say "WoW" How differant is this to Frequency Separation with regards to results?
I am curious as well, I think frequency separation will get better results?
I tried this method on one of my pics it’s insane it works really good
I like your teaching method, makes it a lot easier to understand something difficult.
Thank You.