This tutorial is better than those that simply show you what to do, because the reasoning behind every edit is being explained, so people can apply the skill quicker to their work. Great tutorial.
This can be done in LR. Simple subject select in the masking tool. Like Justin, first select the subject, invert, darken the background and decrease clarity/sharpness. Then select the subject in a second mask, and tweak as desired.....usually upping exposure a tad, add some vibrance, contrast, and whatever else to your taste. BOOM! Done in a couple minutes, tops.
@shayanghosh6518 I teach precisely how to edit these photos (3 from this exact series) using only Lightroom in my latest Portrait Transformation course: go.justinlaurens.com/portraitstransform
Subject seperation is well explained in here. I do it alot more subtly though. Because I went to extreme many times and subject looked like it was cropped and pasted from another photo. Most of the times I dont even use all 4 methods together. But I try to do so.
so i have been BEGGING so many of these instagram photographers who do retouching like this to teach me...teach me and they always offer a pay wall before anything. screw em all. thank you Justin for this. this has opened up my skills in Photoshop a lot more. it was the piece i was missing. thank you so much for sharing this knowledge. also you have gained a subscriber FOR LIFE!
My pleasure homie, definitely a LOT more offered behind my pay wall 😂 but happy to provide these free content sneak peeks. Thanks for watching my friend
The pop up visuals to accompany what you are saying, were just perfect! You speak clearly and at a good pace, everything is so clear cut, I couldn't imagine a better tutorial formula. Thank you for this, you've been a great help!!
So glad to hear that my friend! Definitely have a bunch of videos for Beginners on my Channel that should be helpful to you. BTW is there anything in particular you'd like to learn from me in future videos? Let me know!
Flash/strobe could help get most of this done in camera. You trade set up time for editing time though. Really cool to see you take those principals of dual exposure and recreate it with layer masks in Lightroom. It’s almost as if the model was exposed with an off camera flash and the background was ambient in the final product.
Was thinking the same thing. Great technique for influencers who only need 1 or 2 photos from the shoot. Not so great for working pros who need to submit the entire shoot to the client.
There's one other trick you can use to make the model pop. You actually did half of it by warming her up a bit. The other half would be cooling down the background by adding blue/cyan. The eye sees warm colors as closer than cool colors. Years ago I had a photo taken in a mall of a carousel painted in yellows, oranges and reds and in the background was an exit to outside. The light coming in from that was blue by comparison. The slide looked like it was shot in 3D.
You can give groups masks too, so instead having three different layers with same mask, put the layers in group and give that group the mask! Gives the perk to use (different) mask on the layers in case you want to tweak them somehow.
It just pop up again on my feed, I did use it back them,...and today I still using this Technic ,....but with the new Lr!...what it make it so so simple, but it was because of your video I discover the Technic itself . Muchas Gracias!
Justin, please consider repeating this edit with only Lightroom. I am curious whether the new subject masking in Lightroom would allow an even simpler edit to the subject/background with similar impressive results.
Excellent tutorial. Followed it along with an image of my own regardless of how inappropriate it turned out to be in the end. The point was to become familiar with the techniques involved in the whole process outlined in your video. Thank you.
You're very welcome! Very glad to hear 🙏 I am almost finished my brand new Portrait Photography & editing course that contains my new method of creating this effect more simply using only Lightroom (let me know if you'd like to join the Beta test!) :)
im just beginning to learn about colour correction etc, so although a good bit went over my head i'm starting to understand some of what your speaking about. You have a really good teaching style, thanks.
really great explanation of the different concepts of color and how to draw the viewers attention by using those concepts. i would have loved to see more of a non destructive approach in photoshop by not copy the layers but using the smart object more often. because after you've copied all the layers on a new layer, you can no longer adjust anything you've done before because its all fixed on this new layer.
Thanks for the kind words! But do I not convert to smart object each time? If not that’s a mistake I usually do, and would recommend anyone reading this comment to listen to this good advise! Cheers 👍
This is very helpful! I love the “3D/pop” look. I am new to Photoshop and Lightroom but decided to start with learning Lightroom first as it seemed slightly less confusing. Can these exact same steps be used in Lightroom?
Thank you - good call! Lightroom is a good place to start out. And yes the same 'Subject Separation' concepts apply no matter what type of editing software you use. All you need to do in Lightroom is apply a Brush Mask to apply separate edits to both the model & background. I believe you can also use the same Subject Selection tool in Lightroom as well. 😊
Another great example on how to use photoshop to hide our limitations as photographers. You could block the light reaching the background and improve the lighting in the model to enhance contrast and pop, including a slightly orange tone to the light, then adjusting the white balance for it so the background is slightly blueish, and essentially doing everything better, in camera, with light.
Retouching is like a sport. you can't learn to ski by looking at a competition. It takes years to start participating in them. The skier watches the slope and reacts automatically to the situation. Similarly, the retoucher looks at the picture and automaticall take the tools that allow it to be changed. It is impossible to learn retouching by copying the tutorials of other retouchers. It takes many years to develop your own style. The tutorials discover the tools and therefore are worth to watching 👍
This is very true, well said. Its funny though, before I went skiing for the first time ever last week I was actually watching TH-cam tutorials and they definitely helped a bit. But yes, tutorials are good starting spot and then its time for lots of practise! Thanks for the comment Jerry 😊
I've been using Photoshop for over 15 years and it's crazy to see now how you can just press a button - Subject - and instantly get a mask. It's just so easy now (along with other tools like Content Aware Move/Fill), however I do miss the "old days" when you had to take time to make masks and things. It separated the serious artists from just anybody with a copy of Photoshop.
It can help to save time but I don’t believe things like automated Masks can make an amateur artist create masterful work. There’s a lot more that goes into each photo (lighting, Color palettes, etc.)
Old Days! Reminds me of 40 years ago locking myself into a darkroom sniffing toxic chemicals for hours on end. The image had to be right in camera to begin with. The most post you could do in the dark room was dodging and burning with your fingers under the light of the enlarger.
Hey James, so you bring up a good point. 👍 I prefer to underexpose my images straight out of camera for a number of reasons, one of those reasons is to slowly build the lighting in Layers like I did here to create more depth. Other reasons include: to preserve highlight details, to create deeper, richer colors in post and also to create a more low key, dramatic look.
Thats all the point of shooting with high micro-contrast lenses, due to the "latest and greatest" sharp lenses the magic is gone. Basically you can't reproduce the effects of a good lense, only try to reach 20-30% substitute like this video.
I clicked the LIKE believing that it will in fact be 'Simple' :D Omg, I'm sooo new with Photoshop, i only had few lessons, but chanells like this will help for sure!
I'm glad to hear it was helpful, these techniques become much easier with practise! BTW if you're very new to portrait editing/retouching in Photoshop I'm sure you will get a lot out of my course: www.justinlaurens.com/access
Great work though as the tutorial went on it increasingly specific to this particular photo and there were too many steps to justify placing the word, "simple" in the title.
Seeing as I easily spend hours editing a photo… this tutorial is pretty darn simple and short. XD also, he talks a lot about what he’s thinking behind, which is where you learn. :)
I am completely new to Photoshop. I want so much to be able to do these things, but these tutorials seem to be suited for people who already have working knowledge of the basics at least. It’s too fast for me, and I’ll get tripped up with something as simple as how to make all those layers. I tried to buy a book to learn Photoshop, but the layout of the Photoshop menu and instructions didn’t seem to match up with my program. I tried to follow other more basic tutorial videos, but they have you memorizing all these shortcuts and they click around too fast, and I can’t follow. I have no idea where to go to learn Photoshop from the beginning as a complete novice.
Hey Marci, thanks for sharing and for watching. What I would recommend is my full portrait editing & retouching course - I promise you it will get you from Beginner to Advanced in just a few days (so long as you practise the techniques taught often!) My course even comes with the RAW Photos - so you have lots to practise on. Let me know if you're interested: www.justinlaurens.com/portraitmastery
bruh I watched several videos on how to color grade individual areas and skin tone 2 days straight and was completely mind fucked , THIS VIDEO left me giggling at how i finally figured it out. THANK YOU SO MUCH
Thank you so much :) download my free cheatsheet below the video to join my newsletter for an upcoming photography & photo editing course that showcases how to achieve this effect more simply using Lightroom :)
It's a big pleasure, thanks for watching! I have a follow up video to this concept coming out next! (Talking about micro separations now, and not the broader macro subject separations).


Master Portrait Photography and create stunning photos in only 21-Days: go.justinlaurens.com/ ☺
Your explanation is completely incomprehensible !!!
I believe in you
This tutorial is better than those that simply show you what to do, because the reasoning behind every edit is being explained, so people can apply the skill quicker to their work. Great tutorial.
Wow, thanks! That means a lot, thanks for watching. 🙌
I agree! Reminds me of that book series where the photographer broke down each section of a photo, and why he chose it.
Agreed
This can be done in LR. Simple subject select in the masking tool. Like Justin, first select the subject, invert, darken the background and decrease clarity/sharpness. Then select the subject in a second mask, and tweak as desired.....usually upping exposure a tad, add some vibrance, contrast, and whatever else to your taste. BOOM! Done in a couple minutes, tops.
Definitely a faster way but I find with Photoshop its easier to get more granular & refined with the selections and adjustments.
Could you please point me to a tutorial for this or an example ?
@shayanghosh6518 I teach precisely how to edit these photos (3 from this exact series) using only Lightroom in my latest Portrait Transformation course: go.justinlaurens.com/portraitstransform
The one thing that makes any of these tutorials truly pop is the one thing Photoshop does not have, a very attractive subject.
It took me a while before I was able to work with someone as attractive as Franceska!
Subject seperation is well explained in here. I do it alot more subtly though. Because I went to extreme many times and subject looked like it was cropped and pasted from another photo. Most of the times I dont even use all 4 methods together. But I try to do so.
Thank you and yes absolutely. For demonstration purposes I have applied the effects to an extreme, but I subtle approach is always recommended. 👍
so i have been BEGGING so many of these instagram photographers who do retouching like this to teach me...teach me and they always offer a pay wall before anything. screw em all. thank you Justin for this. this has opened up my skills in Photoshop a lot more. it was the piece i was missing. thank you so much for sharing this knowledge. also you have gained a subscriber FOR LIFE!
My pleasure homie, definitely a LOT more offered behind my pay wall 😂 but happy to provide these free content sneak peeks. Thanks for watching my friend
@@justinlaurens i appreciate this a lot big homie
The pop up visuals to accompany what you are saying, were just perfect! You speak clearly and at a good pace, everything is so clear cut, I couldn't imagine a better tutorial formula. Thank you for this, you've been a great help!!
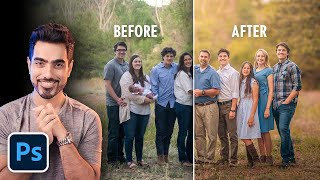
Pretty high quality tutorial in less than 10 minutes and a pretty impressive result (she obviously looked stunning even before the edit).
Thanks my friend 🙌
It's amazing how I can understand everything and translate it to lightroom as well. I am a newbie in photography by the way. Great video!
So glad to hear that my friend! Definitely have a bunch of videos for Beginners on my Channel that should be helpful to you. BTW is there anything in particular you'd like to learn from me in future videos? Let me know!
@@justinlaurens I would love it if you make some videos on lightroom as well. :)
@@justinlaurens I have a question. What matters more? The camera body or the lens?
@@DrFlexit The Lens!
@@DrFlexit lens
Just wow! So much info in one comprehensive video!!!
Glad it was helpful! 🙏
Flash/strobe could help get most of this done in camera. You trade set up time for editing time though.
Really cool to see you take those principals of dual exposure and recreate it with layer masks in Lightroom. It’s almost as if the model was exposed with an off camera flash and the background was ambient in the final product.
Was thinking the same thing. Great technique for influencers who only need 1 or 2 photos from the shoot. Not so great for working pros who need to submit the entire shoot to the client.
One of the underrated TH-cam Channel. Man you deserve more
There's one other trick you can use to make the model pop. You actually did half of it by warming her up a bit. The other half would be cooling down the background by adding blue/cyan. The eye sees warm colors as closer than cool colors. Years ago I had a photo taken in a mall of a carousel painted in yellows, oranges and reds and in the background was an exit to outside. The light coming in from that was blue by comparison. The slide looked like it was shot in 3D.
Really good tip yes, I’ve heard it before. Thanks for sharing Robert 🙏
Man. What an astolinishing tutorial. I want your skills. Dang. I used to know how to do all this but it's been good 7 years. :(. Time to get back.
You're a legend, thanks for the kind words! haha if there was ever a sign to get back into it - this would be it! 🙌
You can give groups masks too, so instead having three different layers with same mask, put the layers in group and give that group the mask! Gives the perk to use (different) mask on the layers in case you want to tweak them somehow.
The best tutorial on TH-cam, thank you
Wow, thank you so much. Glad it was helpful man.
@@justinlaurens subscribed 💯
Gotta love when you keep repeating the shortcuts! It's really important to get shortcuts to people workflows
Ah thanks man, I agree such an important aspect of an efficient workflow! Thanks for watching man
It just pop up again on my feed, I did use it back them,...and today I still using this Technic ,....but with the new Lr!...what it make it so so simple, but it was because of your video I discover the Technic itself . Muchas Gracias!
Thanks for sharing! Yes my new course teaches all these techniques in LR now! With many more techniques like this :) go.justinlaurens.com/beta
Justin, please consider repeating this edit with only Lightroom. I am curious whether the
new subject masking in Lightroom would allow an even simpler edit to the subject/background with similar impressive results.
Really good suggestion, thank you. I will work it into the content plan!
@@justinlaurens please my brother try to repeat it to LIGHTROOM . thanks God bless you. Watching you from SOUTH AFRICA.
Excellent tutorial. Followed it along with an image of my own regardless of how inappropriate it turned out to be in the end. The point was to become familiar with the techniques involved in the whole process outlined in your video. Thank you.
You're very welcome! Very glad to hear 🙏 I am almost finished my brand new Portrait Photography & editing course that contains my new method of creating this effect more simply using only Lightroom (let me know if you'd like to join the Beta test!) :)
this is golden !!!!! I love this AMAZINng and she is literally so gorgeuos!
Woo!! Thanks Jess :) Appreciate the kind words!
Hands down THE best Photoshop tutorial I have watched this year, you packed a lot of tips into just a few minutes, thank you!
Wow Sarah, you're very kind for saying that, it really means a lot! Thank you for watching!
Justin, you make me believe in the generosity of tutorials again ^^ thank you for doing this
Aw it’s my big pleasure my friend. Thanks for watching
Excellent! Simple, clear and to the point.
Glad it was helpful, Carl. Much appreciated my man. Stay tuned for more (and speaking of what video would you like me to make in the future?)
im just beginning to learn about colour correction etc, so although a good bit went over my head i'm starting to understand some of what your speaking about. You have a really good teaching style, thanks.
Aw dude thank you for sharing that, and watching. Keep going I promise you it gets more and more rewarding as you keep learning and improving 👊
Wow. Great tutorial! Really comprehensive with no fluff and easy to follow. Thanks Justin!
Glad you enjoyed it! Thanks for watching and leaving such a nice comment. :)
@@justinlaurens tsex
Great tute, easy to follow with top notch results.
Justin - a brilliant follow-along tut. Thanks for keeping it sectioned out. Nice work and great presenting.
This is deep! Would take along time for starting to learn this without any knowledge of. Whoa ....
Great to the point techniques. Beautiful subject, well imaged thanks for sharing.
Thanks so much Bobby! 🙏 Would you like to see more PS tutorials or shooting tips (composition, posing, lighting etc.) videos in future?
I won't lie.. This seems like a TON of work!!!
I use Affinity Photo and Capture One so I would have NO CLUE to do these things in those tools.
really great explanation of the different concepts of color and how to draw the viewers attention by using those concepts. i would have loved to see more of a non destructive approach in photoshop by not copy the layers but using the smart object more often. because after you've copied all the layers on a new layer, you can no longer adjust anything you've done before because its all fixed on this new layer.
Thanks for the kind words! But do I not convert to smart object each time? If not that’s a mistake I usually do, and would recommend anyone reading this comment to listen to this good advise! Cheers 👍
Awesome tutorial by explaining each step in detail.
Glad it was helpful! Thanks for watching Umair!! 🙏
You are welcome :)
This is very helpful! I love the “3D/pop” look. I am new to Photoshop and Lightroom but decided to start with learning Lightroom first as it seemed slightly less confusing. Can these exact same steps be used in Lightroom?
Thank you - good call! Lightroom is a good place to start out. And yes the same 'Subject Separation' concepts apply no matter what type of editing software you use. All you need to do in Lightroom is apply a Brush Mask to apply separate edits to both the model & background. I believe you can also use the same Subject Selection tool in Lightroom as well. 😊
@@justinlaurens Yes, subect selection works there as well
One of the best video. Please keep creating. Love you❤️❤️❤️❤️
Thank you! Will do - means a lot! 🙌
Great video! First-time watching one of your Photoshop videos. Definitely helpful. Will subscribe for more:)
Awesome, thank you! Really appreciate you watching, stay tuned for more. :)
This is by far the best explaining tutorial ever! you got a new subscriber!
Awesome, thank you so much! That means a lot 🙏
Another great example on how to use photoshop to hide our limitations as photographers. You could block the light reaching the background and improve the lighting in the model to enhance contrast and pop, including a slightly orange tone to the light, then adjusting the white balance for it so the background is slightly blueish, and essentially doing everything better, in camera, with light.
best comment here. First learn to light and shoot
Lighting conditions aren’t always ideal and it helps to know the editing techniques to solve problems you encounter
OMG, nice and well explained information, thanks a lot man, you are the best!!!
Glad it helped! You are very welcome 🙌
Retouching is like a sport. you can't learn to ski by looking at a competition. It takes years to start participating in them. The skier watches the slope and reacts automatically to the situation. Similarly, the retoucher looks at the picture and automaticall take the tools that allow it to be changed. It is impossible to learn retouching by copying the tutorials of other retouchers. It takes many years to develop your own style. The tutorials discover the tools and therefore are worth to watching 👍
This is very true, well said. Its funny though, before I went skiing for the first time ever last week I was actually watching TH-cam tutorials and they definitely helped a bit. But yes, tutorials are good starting spot and then its time for lots of practise! Thanks for the comment Jerry 😊
as an editor for 6 years I have not learned this tip by selecting only the subject to pop out. Thanks Justin, also for the beautiful photos
That wasn’t very simple bro
😂
yeah i agree, i'm new on this app and i want try some edit and stood upon this video
It is if you know PS
Wasn’t simple, skipped several skin cleaning steps 😂
It’s just tooooo fast … I know one can rewind but did it about 100 times and it’s nerve racking to follow … won’t buy a course from this dude
Nicely explained on the technique, also illustrates why PS is such a PIA with shortcut keys.
Thank you
Great video, man! Detailed and very well explained. 👌🏻
Appreciate it! Thanks Jordan
This was great, Justin.
Thanks so much Jon, really appreciate it man. Thanks for watching
I've been using Photoshop for over 15 years and it's crazy to see now how you can just press a button - Subject - and instantly get a mask. It's just so easy now (along with other tools like Content Aware Move/Fill), however I do miss the "old days" when you had to take time to make masks and things. It separated the serious artists from just anybody with a copy of Photoshop.
It can help to save time but I don’t believe things like automated Masks can make an amateur artist create masterful work. There’s a lot more that goes into each photo (lighting, Color palettes, etc.)
embrace tech progress
Old Days! Reminds me of 40 years ago locking myself into a darkroom sniffing toxic chemicals for hours on end. The image had to be right in camera to begin with. The most post you could do in the dark room was dodging and burning with your fingers under the light of the enlarger.
Wow that's amazing 😍🤩
Thank you! Cheers! 😊
great tutorial.... lot of work though...i wonder if it was lite properly in the first place how much time would be saved.
Hey James, so you bring up a good point. 👍 I prefer to underexpose my images straight out of camera for a number of reasons, one of those reasons is to slowly build the lighting in Layers like I did here to create more depth. Other reasons include: to preserve highlight details, to create deeper, richer colors in post and also to create a more low key, dramatic look.
Thats all the point of shooting with high micro-contrast lenses, due to the "latest and greatest" sharp lenses the magic is gone. Basically you can't reproduce the effects of a good lense, only try to reach 20-30% substitute like this video.
I clicked the LIKE believing that it will in fact be 'Simple'
:D Omg, I'm sooo new with Photoshop, i only had few lessons, but chanells like this will help for sure!
I'm glad to hear it was helpful, these techniques become much easier with practise! BTW if you're very new to portrait editing/retouching in Photoshop I'm sure you will get a lot out of my course: www.justinlaurens.com/access
@@justinlaurens thanks I’ll take a look
Great work though as the tutorial went on it increasingly specific to this particular photo and there were too many steps to justify placing the word, "simple" in the title.
Seeing as I easily spend hours editing a photo… this tutorial is pretty darn simple and short. XD also, he talks a lot about what he’s thinking behind, which is where you learn. :)
Yes, its not simple.
@@JohnEba-e5gagreed! I love PS, but this can be done in 2 steps in LR 😇
Loved the video + the EDM music. It's "PALA - Peppermint Mocha"
That's it Alwin! My mannn
I am completely new to Photoshop. I want so much to be able to do these things, but these tutorials seem to be suited for people who already have working knowledge of the basics at least. It’s too fast for me, and I’ll get tripped up with something as simple as how to make all those layers. I tried to buy a book to learn Photoshop, but the layout of the Photoshop menu and instructions didn’t seem to match up with my program. I tried to follow other more basic tutorial videos, but they have you memorizing all these shortcuts and they click around too fast, and I can’t follow. I have no idea where to go to learn Photoshop from the beginning as a complete novice.
Hey Marci, thanks for sharing and for watching. What I would recommend is my full portrait editing & retouching course - I promise you it will get you from Beginner to Advanced in just a few days (so long as you practise the techniques taught often!) My course even comes with the RAW Photos - so you have lots to practise on. Let me know if you're interested: www.justinlaurens.com/portraitmastery
@@justinlaurens I will also be interested
Just getting back into photoshop after being away since photoshop CS. Wow I have alot to learn.
Awesome video
Great to hear! Thanks for the kind words :)
Can you provide this model image ? For practising
Sure, here you go: drive.google.com/drive/folders/1XPeMs_eyxSDTouHZpU1d4xYEQk2F-egX?usp=sharing
I put it in the PSD (Photoshop file) ready to edit 👍 You see it?
@@justinlaurens thanks I like this type of follow along tutorial with picture provided very nice keep doing 😀
You are a Pro magician ☺️. Good work 👍 dude...
@@V4VIPINSS Thank you bro 🙏
So funny, I've been doing this technique to my photos for years! But now I'm doing it the correct way. Thank you!
Haha you’re so very welcome Suzy. I’m glad to hear it helped 🙏
Enjoy watching this 👏🏾👏🏾👏🏾great tips.
Thanks for watching my friend 🙌
You are a good teacher. Easy to understand & follow. Thanks
I appreciate that! Stay tuned for many more vids 🙌
Excellent tutorial!!
Thanks so much Madeline! 🙏
Precise and simple technique !! TFS
You are so welcome my friend!
Excellent tutorial! Thank you very much! 🥰🥰
You are very welcome! Thanks for watching, glad you enjoyed. ☺️
Amazing. Super helpful!
Glad it was Sajib! Many more videos to come
I love it! I have seen this video a lot of times and Im still learning something new every single time!
I'm brand new, it was really easy to follow and soak it all in. Thank you.😊
You are so welcome! Really glad to hear 🙏 stick around for more videos like it!
I love your perspective. Thanks!
bruh I watched several videos on how to color grade individual areas and skin tone 2 days straight and was completely mind fucked , THIS VIDEO left me giggling at how i finally figured it out. THANK YOU SO MUCH
This youtuber is a winner in the category of having the biggest proportion of screen dedicated to his mic. It's literally bigger than his head.
And that’s saying something, my head is yuuge
You are a pro man!
Thanks so much my man! Appreciate it 👊
very useful, thanks a lot Justin!
the tumbnail just wow. she is the pretty one
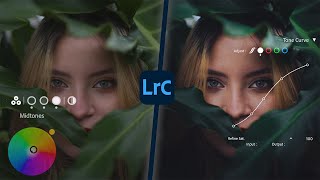
great job! I learnt lots of handy tips and tricks from this video, such as showing mask by clicking alt and \
Glad it was helpful! Appreciate you letting me know my friend 🙏
Great job Justin! I like how you get right to it...as someone said below no fluff!
Ah thanks so much, really means a lot!
I don't like the result but some of your technics are really great!
Wow, really great video. Short and easy to follow with good underlying structure. Thank you!
Thank you so much :) download my free cheatsheet below the video to join my newsletter for an upcoming photography & photo editing course that showcases how to achieve this effect more simply using Lightroom :)
I love how you break it down. Thank you. Excellent video.
Glad it was helpful! Thanks for watching Pedro 🙏
This is so great! It took me a couple of attempts with different photos, but I have now gotten the hang of it. Thanks so much!
You are so welcome!
Love that pop 🔥
Ottimo lavoro, descrizione chiara ed esauriente, risultato eccellente!
great tutorial. thank you Justin!!
Congrats!!! GREAT VIDEO! Helped me out a lot!🙏
Awesome! Thank you! Glad it was helpful :)
Thanks! I've learned some useful techniques!
Great to hear! Thanks for checking out my Channel!
you are my new photoshop teacher thank you sir i'm new for photoshop user
You are most welcome, and really glad to hear it - its an honor! Definitely check out the rest of my videos or my course if you are a beginner.
@@justinlaurensObcourse
Quite excellent! Great eye. *Subscribed*
Thank you that means a lot. More to come :) 🙏
Hey you,yes you,I wish all the best to you and your family :)!
Great tutorial. Model image would be very helpful.
See the pinned comment! Thanks.
Thank You So much sir for this tutorial
You are most welcome
Wow~ Great before-'n-after - thanks for these insights, I shall make use of them going forward!
You are welcome my friend!
Dude that was amazing
Really appreciate that William 🙏
woahhh, amazing, thanks!
haha you're welcome! 😊
Right on. Thanks for sharing.
Thanks for watching!
Super helpful Justin, used it today on an event I shot...huge difference in images, thank you.
Aw that’s amazing to hear. Feel free to share with me on my Instagram
Thank you for this fantastic tutorial! :)
It's a big pleasure, thanks for watching! I have a follow up video to this concept coming out next! (Talking about micro separations now, and not the broader macro subject separations).
Heyy Justin U finally uploaded itt. Love your videos✌🏻.
Thanks my friend, let me know what you think! (BTW what videos would you like to see from me in the future?)
@@justinlaurens I would love to see new model photos. I am seeing most of your videos have common photos.
Very well done. You provide very good instruction. Thank you very much Justin.
Thanks so much Dan, really appreciate it. Trying my best! 😊 Thanks for watching.
WOW, well done and well taught. Subscribed
Welcome aboard! Thanks so much for the kind words! Lots more to come
Amazing. Thanks❤
Greetings from Brazil
thank you so much, what a good video 🙏🏼
Hey Mia, you're welcome thanks for watching :)
do you have tutorial on how to shoot this? i have problem exposing for subject! love this subscribed!
Thank you for such a great toturial!
You are so welcome! Thanks for watching 🙏
Great tutorial! 3D"pop" effect is Photoshop action?Thanks Justin!
Thanks Bujar, I will create a video where I show you how to make it a Photoshop action, and then provide the action for free.
@@justinlaurens Thank you very much.