I haven't used that trick in quite a while, but it's a pretty cool way to get a smooth bridge, especially if you have repeatable parts to make it worth the time to do. A little tape on top and some glue stick for good measure since the surface is only at room temp.
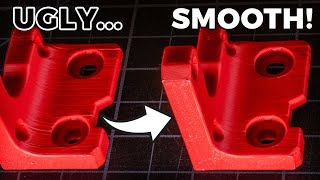
I would agree that simple models will generally show better results The test samples shown in the video clearly show the differences in the techniques used.
@@bikerboy3k no need to make a rude comment, he is simply stating that it shows the difference each setting makes...... thats not defensive at all its simply stating the entire goal of the video.
My man, I thought I was crazy, or it was just my setup. I tried printing 6 parts I had customized, all came out crap, thought it was my settings and .8m nozzle. Just for a test did them on their own, and all came out beautiful. Thank you for the sanity check.
The print sequence option on Cura....VERY helpful. I tried it and am hooked. Have to plan out placement of parts to prevent the gantry from hitting it but otherwise, very helpful. Thanks very much for posting this. Made a huge difference!
I've thought about other ways to improve this, printing with PLA and ABS seem to be very forgiving with stringing compared to PETG. I've just downloaded the newest version of CURA, super curious to see what is inside that could be helpful.
Congrats on the layer consistency. A mixture of a very squarely assembled frame, tight belts, correct V-wheel pressure and many other things are required to achieve this.
Drying your filament will also help A LOT. Even with PLA! If you don't dry your PETG or PLA, it will usually ooze out of the nozzle, even when there's no pressure applied by the extruder. This leads to those blobs shown at 5:00. Keeping it dry (max. 10% humidity), there won't be any oozing.
@@uhu4677 I'm staking the gel I get from shoes and wherever I find some. I don't have any air-tight box so I'm just using zip bags and placing it on a dry place
My pleasure, we'd all like to load up the build plate, in order to do that everything needs to be perfect to get great results. for the rest of us, these tips help a bit.
@@oneheadlight8000 drive.google.com/file/d/1TO6z8dptLZOI2y_eBmG_m4exzY3lLtRi/view?usp=sharing Try this, it is set for PETG with minimal fan, you can adapt as needed.
@@NeedItMakeIt thank you! I print pretty much exclusively PETG.. around 120 spools of it last year. We just bought 3 ender 3 v2’s and are dialing them in. Your prints look noice!
@@oneheadlight8000 Nice stuff, three wow. Having a few of the same printer makes a lot of sense for replacement parts and repair, interchangeability and the list goes on. Very smart. Do you have to dry your material before you begin printing with it, how do you handle the moisture absorption, or is it a non-issue for your parts?
You mentioned that you coved combing in another video. Just a tip, always put a link to any video you reference in your description. It makes it soo much easier to find.
I’ve had a lot of luck with scotch brand blue tape. You can print PETG on it with a 0 degree bed so it saves energy. Sticks really well and can be used several times before replacing it.
@@alejandroperez5368 I’m saying on blue tape you can print with 0 degree bed with PETG all the way through. No need to turn on the bed if you have the right model.. some require 65 degrees with glue stick, hair spray or blue tape if the model doesn’t have a lot of surface contact. I have never used a brim with PETG in over 300,000 hours of printing
Here's another tip I only started doing recently: If you use a newer build of Cura with a Creality printer (maybe others as well), your nozzle does a purge line on the corner of the bed. It's probably 10cm long. Adjust the start gcode so it's only 5cm - all it's doing is priming the nozzle. Now, since that's getting your nozzle primed, you don't need to print a skirt anymore around the perimeter of the print, so go ahead and set the build plate adhesion to "None" (assuming your prints typically stick to the bed reliably after printing skirts). This knocks a small amount of time and material use off of your prints, which adds up over time. This is especially important if you want to operate a 3D printing business, because lean is the name of the game for that.
For sure, the main reason that I leave a brim or skirt on is to make sure the previous filament is purged out properly from the nozzle. It isn't too professional to have a mix on that first layer only to find out when the print is finished. Valid points though, thanks!
Skirts are necessary for first layer Z-offset calibration at the start of each print. Something you will most likely have to deal with on cheap 3D printers and considerably large prints.
I do this as well as adjusting the retraction speed and distance for the type of filament I am using. This allows me to print multiple prints without messy cleanup. The blobbing effect is what happens when the filament pools up in the nozzle the pressure causes it to push out as it leaves the part to go the next part. There is also the stringing effect people get. The combing setting and z hop will help eliminate this. I get very little if almost like slight spider web like whisp of string at the most now, nothing a swipe from my small butane torch doesn't eliminate in a poof, gone. Even a good heat gun would do the job. No blobs and all calibrations set. With all of that you can really dial in a printer to go above the bar of what they do out of the box. With a little tweaking that is. 😁👍 Good video!
I noticed just turning down the nozzle temp helped a lot for me. As long as you have dry filament and your esteps are good you should be good. I use to print super hot right at 220 for PLA. 210-215 helped give me super smooth prints.
@@mrpbjnance Oh sorry, I like to integrate butter into my videos. There may be a way to use it, if we separate the milk solids from the fats and apply just the solids they may work fairly well as a binder. Best just to use glue stick though. On the other hand the clarified butter can be very tasty and doesn't burn in the pan.... I also make cast iron pan test videos, and I love butter.
For very small parts it is often better to print multiple of them. There is a minimum time per layer or the print doesn't cool enough and pausing between (set your minimum layer time to around 10s) introduces blobs.
Very true, slower usually yields better results. Many of my prints are for customers and I don't always have time to wait so I've brainwashed myself to thinking everyone needs to print fast. I suppose that could make for a good comparison even for my own knowledge. How slow is too slow? I would assume at some point it will not produce a better quality.
@@NeedItMakeIt if the print have steep overhangs the slow speeds sometimes work against you. The heat of the nozzle dont let time to cooldown the overhang and make things worse. Sometimes i add a second part if what im printing is too small. Sorry for may bad english, is not my first language
I used to use Print One at a Time, but in a previous version of Cura, they changed how it determined the order to do the models (random selection of the models). After having just played with it, it appears they restored the previous ordering (last model loaded prints first). With the last in/first out ordering, you can arrange the models front to back and you don't have to worry about collisions. You can print any size model by tweaking your carriage settings. When doing multiple parts, I prefer One at a Time (POAT?) for the exact reasons you covered. Also, if you have a failure, you don't immediately lose an entire bed worth of prints.
The butter failed in my testing. The print would dislodge from the plate, and fly across the room. It wasn't until I came across your video that I should have used salted butter. If I only would have known sooner.
@@BlondieHappyGuy Yeah, it's a joke. In case you're wondering, any type of grease is *going to ruin your first layer.* The print will simply not stick.
@Brax W Before you make the obligatory, overused reddit joke, maybe you should take into account that I was replying to someone else's comment. It appears that comment doesn't exist anymore, but my reply still stands. In case someone doesn't get the joke, yes grease will prevent the print from sticking. Now that we got that cleared up, this matter is in my opinion resolved.
@@hank1845 You're welcome I guess. If you need bed adhesion, use a heated bed at 60 degrees for first layer and drop down to 50 degrees for the rest to help avoid warping. Hair spray is a good adhesion agent.
I get my best petg results using 255c on the nozzle and 25% fan and a flow rate 95% also slow down the retract and advance speeds 25mm/s this seems to help with blobbing somewhat. also make sure its printing perimeters FIRST then infill and not its default of infill first then perimeters.
@@bc4ke a couple of reasons first when the plastic hardens it doesn't exactly push out of the way so when you print infill first and then the perimeter the infield pushes the perimeter out where it intersects this is why you sometimes see the infield stick out on models people print Second the inflow intersects the perimeters and you want them to for strength it helps to build proper info when it touches the perimeter outside edge of the model but if you're printing a button fill first there's no Edge to attach to yet I can't think of a single good reason to print infill first
8:25 ... you can improve that blobbing. It is doing that because it writes a checkpoint to the SD Card it reads from in case of a power failure, so it can resume printing. If it can't write fast enough the buffer will run out and cause a split second delay and the extruder will keep extruding and leave a blob. Either A.) use a SD Card with faster transfer speed or B.) disable resume printing after power failure so it doesn't try to write the checkpoint file.
For prints with lots of surface details, like D&D minis, set the Outer Wall Inset to 0.05 and the layer height to 0.12. The small details will come out much better.
That one with the last settings looks good. Myself I havent printed anything anymore. Still stuck with the bl touch. Last testing today.. After that I can only say the sensor itself came broke from start. The videos look better every upload. It shows the effort that has gone in em!
That's disappointing, I don't know whether I'll ever need the BL touch, I rarely level the bed with this printer. I did upgrade the springs because the stock ones were very weak and could promote the knobs from loosening though. Good luck! Thank you for the compliment, and yes it is a fair amount of work. My hope is that I get better at it so it doesn't take as long. I have a list for the next 10 of so videos, so I'll be busy for a while.
Rik, if you need a hand, I got mine working after some trouble. Your name makes me think that you're Dutch, so you could give me a call if it doesn't work out.
@@DHGV klopt inderdaad, ik heb hem nu werkend. 123-3d .nl heeft mij geholpen via de mail. Er is schijnbaar een 4.2.2. Moederboard firmware waar duidelijk bij staat 4.2.2. Bl touch zonder adapter. Vanaf dat deze erop staat doet hij het goed (de bl touch) Maar vanaf dat ik de printer verplaatst heb en zo vaak op zijn kant maakt hij nu een vreemd geluid op de y as. En kwam er gister achter tijdens de excintric nuts onder het bed aandraaien dat als ik het bed van voor naar achter duw. En hier goed oplet voel ik een kleine verhoging in het bed achterin. Maar kan niets vinden bij de wieltjes of de rails. Twijfel om hem nu deels uit elkaar te halen en weer opnieuw te assembleren.
@@TriMeX1987 Mooi dat dat werkt. Wat je beschrijft op de Y-as herken ik niet, maar klinkt alsof een van de wieltjes niet helemaal gelijkmatig is afgesleten. Het kan ook zijn dat het te maken heeft met je Y-riem. Staat die te strak gespannen, of te los, zit hij goed op de geleiders? Is hij beschadigt? Dat kan er zeker voor zorgen dat je iets voelt in die beweging.
@@DHGV de ender 3 is praktidch nieuw. Heb nog geen volledige rol filament geprint. Ik had op de z as wel wieltjes beschadigd. Voelde ik ook en direct nieuwe wieltjes erop gezet. Het lijkst als je de plaat helemaal naar achter duwd dat hij ergens overheen omhoog rijd..en net ervoor een dipje.. in dit dipje kon ik het bed ook licht bewegen. Daarna excentric nut weer beetje vaster gezet kijken of dat hielp. Maar voor alsnog niet. Hij maakt ook een raar geluid bij auto home op een lage snelheid hoor je het niet. Maar hier wel.
I use Land o Lakes 😏 lol but really, I actually use a decent hair spray on my creality glass bed printing Petg. Works better for me then any adhesive marketed to the 3D printing world that I’ve tried, just a light layer and your golden for a while, then if you notice any issues, clean plate with alcohol then respray, I might have to do that once a month with moderate usage.
@@marv8481 Here in Spain we use the hairspray "Nelly". It is very good and it takes very little for the PLA or ABS to be sinked into the glass of the bed. No need to heat the bed at all. A bottle of lacquer Nelly costs about € 3 or about $ 4 and I can print several kg of filament with it since they are big. The same brand produces a lacquer for 3D printers, which is exactly the same formula, but without the smell of lacker, and costs 5 times more. So I advise you to use Nelly hair lacquer instead of another lacker or system, im pretty sure it can even be bought on Amazon. To remove the printed part in PLA or ABS from the glass, you can put the glass in the freezer 10 minutes also.
Just starting out in 3D Printing. ( as of this comment 😁) Mostly to Try and get my 11 Year Old Son doing something else with his Tablet than playing games 🙄 He has Good skills for drawing, so I see, 3D Printing as the next level to developing his hobby to another level. Great to see so much information like this available here on TH-cam. Of course Subscribed. Looking forward to learning how to speak another language 😉👍
Thanks so much for this video, ive had multiple issues with just one roll of red filament, turned on combing and one at a time and suddenly my prints are flawless, brilliant :)
At 0:20 you drop a printed disc into a printing part. Was that done to provide support for layers to print on top in the printing part? Did you apply anything to the printed disc to prevent "welding"?
Not too bad for a printer of that generation. I'm seeing even better results these days with the faster printers, especially with PETG. The fast moves help to prevent blobbing quite well.
@@zac2877 The travel speed was one of the biggest issues, with the newer printers, acceleration and travel are much faster, fast enough that I don't notice blobbing unless the parts are set quite far apart from each other. It's a nice little bonus that I wasn't expecting. It's mostly a problem with PETG, but does happen with PLA as well, just not as much.
I've have tried this feature, but I've not found that it works well for my parts. It looks for sharp corners to place the seams so they are less visible, my parts don't have corners unfortunately, but it could be useful for some people.
@@NeedItMakeIt Yes, it only works best with corners. Even then it can be easily noticeable. I wish there was an option for wipe hiding. Basically, the outer perimeter would start slightly in the infill and move outwards or inwards depending on the perimeter being printed. This would eliminate blobs at the start of the perimeter. It's basically nozzle wiping but in reverse.
Thanks for the "Print Sequence" tip! I was on my way to make a python script just to create a single .gcode from individual parts .gcode files. Nice to learn that!
I have a cheat for printing taller prints also, but it is a bit risky, I'll test it out a bit more before making a video. It involves lowering the hotend and choosing a volcano type hotend also which further drops the hotend down. But there is one more tip that can help but I think it is risky business.
Nice video. I'm new to 3s printing world and I have a ender 3 v2 but my bad is different that yours. Why do you change the bed? I also have problems of adhesion to bad I used hairspray but all the videos I see people don't use anything on default bed. Why do I need to? I have a leveled the bed and the level test is printing very nice don't know what to do anymore
@@marine1718 , I had to go to 210 and 70 on the textured side of the glass Or things simply would not stick. Bed temperatures especially seems important. On the smooth side I could go to 200 and 60, But I had to use hairspray or glue, glue sucks, it messes up the face. Ya know what worked well for me (on the smooth side only). MILK, brush on some evenly and let dry. BTW clean bed well first. I use DAWN dishwashing liquid, rinse really well and let dry, then use whatever.
Are you printing ABS, PETG or PLA? ABS is hard to get to stick, Nano adhesive works super well, I have a video on that, if you are using PETG or PLA regular dollar store glue stick works very well.... too well most of the time, I need to put my prints into the freezer to release them.
New sub. Why do the program spots to start a new layer? Wouldn't it be better for it to keep going to the next layer in the same motion, especially since your going around in a circle? Like vase mode.
Glad to have you! I'd have to think very hard about this, but I believe it is not possible. At least not currently possible. In vase mode there is only 1 wall layer, a continuous motion upward is possible except for the bottom and top layers. When printing these normal parts the entire part must be filled in, the nozzle would travel up, then down, and so on until the entire layer(s) is complete. What you may be looking for is called non-planar 3D printing (true 3d printing). I'm sure in a few years we will have the ability to do this at home with some limitations.
Matthew, use the slicer's visualize feature and step through one layer at the time (i.e., super slowly) to see how the print progresses. This is a fantastic feature.
At 3:05 why did your printer print a line on the side of the bed? I have an artillery sidewinder x1 and I’m coming along after finally getting the files to show up on cura and am working on the benchy and mjolnir but a new problem is that it starts printing on the side but then keeps going so the filament wraps around the nozzle and pulls any that was on the bed around with it. how do I prevent that or how do I just get it to cut off like yours did?
This can be setup in the startup Gcode script in your slicer, I've modified mine a bit to shorten it, the clips at the front and back were being hit on occasion and I wanted to avoid that. Here is the code, and you should be able to add it to your slicer without too much trouble. ; Ender 3 Custom Start G-code G92 E0 ; Reset Extruder G28 ; Home all axes G1 Z2.0 F3000 ; Move Z Axis up little to prevent scratching of Heat Bed G1 X0.1 Y20 Z0.3 F5000.0 ; Move to start position G1 X0.1 Y200.0 Z0.3 F1500.0 E15 ; Draw the first line G1 X0.4 Y200.0 Z0.3 F5000.0 ; Move to side a little G1 X0.4 Y20 Z0.3 F1500.0 E30 ; Draw the second line G92 E0 ; Reset Extruder G1 Z2.0 F3000 ; Move Z Axis up little to prevent scratching of Heat Bed G1 X5 Y20 Z0.3 F5000.0 ; Move over to prevent blob squish I've had the problem you are talking about with my Anet A8, the code shown above helps a lot to prevent this from happening. Good luck and let me know if you need help.
@@NeedItMakeIt I don't know what linear advance is, I suppose it can't be found in Cura? As for my settings, I've been slowly dialing them in as I've started printing and so far I've seen increasing initial layer flow to 110-120% helps along with decreasing acceleration of the first layer to 100mm/s and jerk to 2. The initial layer speed is 15mm/s but speeds up greatly after that. Here, I'll just upload my profiles if you want to take a deeper look, I've customized many settings but I don't claim that they are perfect, I'll update them as I keep printing. drive.google.com/folderview?id=1lqlHvzxJnhggHqpEbnP2ZZp-eggMwnLS
I substituted my usual hairspray for "I can't believe its not butter" and couldn't get the filament to stick. is there a certain type of butter I need to get? Thank you sir! New subscriber...
I've not used random seams since I tried it the first time. It simply introduces very visible surface defects. Took me a while to figure out what was causing these surface defects, but once I did and switched to one seam, all of the defects were gone. Second issue is *random filament stuck to the nozzle.* This will absolutely ruin your print surface once it detaches and gets incorporated into the print. Always get these off.
@@mbikerFR I simply turned off random seam and chose the seam placement to be sharpest corner and random location. Random location is different from random seam. I also tried arc welder which converts multiple points into uniform arcs. This limits the amount of "stops" the nozzle makes when it moves from point to point. Depending on the motherboard, it may cause a very slight pause at each point and some material oozes out, forming a blob.
@@PunakiviAddikti hi can you help me wher to find this? (225C Nozzle, 75C Bed, 78mm Infill, 37mm Outer Wall, 57mm Inner Wall, 45mm Initial Layer) i don't know where to find this it is because im literally newbie on this 3d printing. please help me.
@@daniellejunio1810 There are plenty of 3D printers that can do 225C on the nozzle and 75C on the bed. Infill, outer wall, inner wall and initial layer are controlled by the slicer software.
For holes, there is also one more factor, they'll have a seam, that seam can sometimes bulge the holes a bit on one side, making them a bit oblong. A little cut into the model at one side of the hole will force the seam to that side and also push the seam away from the critical side of the hole. I'm glad you found the video helpful!
Have you tried linear advance? I have been using this technique and I believe it improves the quality of the prints. I can also print as much as 50% faster. I have printed at 100mm/sec with no reduction in the quality of the prints. Retraction can also be reduced. I think I could print even faster, but I think the stepper motors may start skipping steps - I may test this in the future, but overall, I am pleased with it and plan to use it for most if not all of my prints.
I have not, I will check it out for sure. So how do you compensate for the increased flow, higher nozzle temps? Do you find that you have more ghosting or do you have slower outer walls to compensate? Thanks!
@@NeedItMakeIt Linear advance pretty much eliminates all the problems, that's the point of it. When running at 100mm/sec, I did increase the filament temp about 5C. It does take some setting up. There is a program on Github that can help determine what K value to use. K is a dimensionless value that determines the behavior of the linear advance setting. There is an add-on for Cura that allows you to set the K value right in your Cura profile so you do not have to go back to the Marlin firmware to set it.
4 ปีที่แล้ว
@@rcort4864 I thought the Ender 3 V2 is not capable of linear advance due to the legacy mode of motherboard and stepper motors? Do you have any link for me with stuff to read how to make this happen?
@ It may not be - IDK. Linear Advance is a part of Marlin firmware, so you must be using Marlin to activate it. Here's a video to get started: th-cam.com/video/c5jjwBqARpo/w-d-xo.html
I printed with PETG-CF yesterday and I loaded the buildplate, unfortunately even with a fast printer I still had blobbing between travel moves, for the best results, print separately or use this feature if you are able to.
That works too, the fuzz will cause your print speed to slow quite a bit and also it can also cause far too much for your slicer to process depending the Fuzz-e-ness a more coarse fuzz works just fine though and looks good to me as well. For PETG it helps to avoid that sheen too.
if you are using Cura, you can click on Shell dropdown and select Z-seam alignment, set to User Specified and choose your position from there. Email me at needitmakeit@gmail.com if you need some screenshots.
A video on how to get that soft seam on circular objects would be awesome. I’m troubleshooting on mine but still it dips in too much. would really appreciate some help. (using MS DD and all metal hotend)
enable retraction in your slicer settings (retraction in cura, maybe called something else in your software of choice). It pulls the filament back from the nozzle and generally does a really nice job of eliminating blobs and other defects where the nozzle stops for a second before changing direction. I have mine set to 7mm retraction length and my surface finish is usually near perfect. Unless I do what I did an hour ago and let my printer run out of filament. Whoops.
This is Spaghetti detective with Octoprint Raspberry Pi, pretty handy if you have prints which have potential to go wrong. Most of my prints are simple and I use glue stick to make sure they don't come away from the Build Plate. Spaghetti detective also allows you to watch your prints from anywhere on your phone that's a really nice feature.
I've been printing for a few years now and I still feel new somedays, there is a lot more to know than one might thing looking from the outside. Thank you for the comment and support!
Hi NeedItMakeIt, and i was just wondering if you could help me get better printer results, I have an ender 3 pro and I've had trouble for a long time trying to make my prints look nice, but they have always had some kind of defect in them. I've tried everything like I' got a new extruder, I calibrated the E steps for the extruder, and i even got a new hot end too, it would be really helpful if you were able to help me out with. i could also show you pictures of the prints to, Thank you
Sure, send me some pics, a video of a print with the issues is also helpful, sometimes these can be tough to identify without knowing all of the variables and your settings.
Hey bud awesome video. I’m new in this world just ordered the V2. What program do I need to download to be able to make a solid print. I just want to know what I need to do to get started it’s coming in the mail tomorrow. I’m just going to be using the free downloads to start I just want to make sure I use the right one. Thanks for your help.
I am popping in to say thank you for all your content. It is very helpful. Keep up the great work as it is inspiration for others like me. I’m late to the game as usual. I am about 4 days into 3D printing and love it so far. I’ve had my failures, but several success as well. I’ve got octopi going and my first time lapse after getting my camera mount printed. This first time lapse is an 11 hour build on the Ender 3 V2. I say all that to again let you know you have me interested in content creation and helping others as I learn. Hopefully I can provide others with a little help and inspiration as you have me. Thank you!
one big reason for single prints rather than multiple items giving you better quality is cuz the stepper inaccuracy is bascially reduced. if you look at some specs for these steppers they have a +- few microns per turn, but it shows up on prints esp when it has to travel between each parts.
That's a really good point. To add to your point, when traveling turn Z-hop on so you can avoid hitting other parts which can throw things off. Worn belts and gears can impact over time. this printer makes it easy to keep good tension on the belts, my last printer not so good.
Thanks for the tips! New to the space, and I got carried away packing as many things onto my plate as I could. Heh. I wanted to throw an idea out there: I think the 'print one at a time' feature would work for taller pieces if you line the pieces up instead of distributing them. If done in the correct direction this eliminates risk of collision with crossbar and allow taller objects to be printed using this setting. (I have an Ender 3- other gantries setups might differ.)
Can you print at home plastic parts that are super precise. Let say for example a Plain Bearing. Or the piston of a cylinder. Things that need to fit very tight but still moving freely.
There are a few issues with 3d printing pieces like this, they'll have pretty tight outer tolerance, but where the seam is placed will cause a slight irregularity. There are some features to help with this, but the seam areas tend to be a little larger and would impact that extremely precise fit. It would be possible to turn the piece on a metal lathe if you could hold it without deforming it as well, soft-jaws of some kind for plastics. I suppose we're talking about a tolerance of no more than 0.2mm +/- most of the time it is better than this, but I'd say worst-case. It's funny that you mention the bearing, I'm designing a large bearing which fits around a steel shaft, I was thinking that I could print the balls within the bearing, but I think maybe I'd be better to insert them afterward from a hold in the side, or how they assemble steel bearings and then add the 'keeper' afterward. It's pretty cool that we can all be inventors now with this tech, and it continued to get better each day. I am getting more excited about being able to make a 3d model from 2d images, I think we're really close with the Machine Learning systems to get good enough results that don't require modifications to the mesh. It will also be a problem who make a living creating models, so I'm a little conflicted about that. We shall see what happens on that front.
@@NeedItMakeIt In my case, it is not necessary to print it all together. I am just starting, i mean i am investigating about what i need. For a current project, i need to make a flat air one way valve. A regular air valve that i can buy everywhere just does not fit. So, i needed a very round pipe. I bought various models of PVC pipes from various providers. Each one of them is elliptical. So, what i did was this - i asked a guy who has a lathe to machine a round metal piece. I put the PVC pipe around the metal piece and i heat the metal. The pipe melts around and solidifies as a good circle. I am still perfectioning this. I am telling this to you as an idea that you could use. You could heat a machined piece of metal and push it toward some surfaces, and it will leave a perfect shape. Like medieval seal matrices. Real life projects pose other challenges like making the holes parallel one to the other etc. The most precise a machine, the better it will work. For my next project that i did not start it yet, i need precision only in some places. So, i could design it to be modular. For example, for the places, where i have the bearings, i could ask a company to print it to me with extreme precision. And then i will print at home the pieces that don't need precision. I will then make it all fit together. As an example, i could order to a printing company to create the joints of a robot, and i will print at home the bones. Just as an example. You could melt the internal plastic walls of a hole using a smaller metal round bar and then melt the plastic outer walls of a piece that needs to perfectly fit by using a metal pipe with machined internal walls. But you have to improvise a way to hold the metal piece in such a way that they are parallel to the axis of rotation. And you must find a way to pull the metal pieces out of the hole later. In some cases it will be complicated to do. You can improvise some kind of a bearing puller. They do the same for engines. The block of an engine does not require precision. The pistons have rings that are precise and the block has cylinders that are precise too and these were machined apart. The cylinder and rings are later fit into a less precise, cheaper to produce engine block. I can see on some engine blocks the marks of the casting molds. They were not even grind outside where it is not needed. I try to design my project in such a way, that it will not require to print the moving parts together. I consider it impossible to print pieces together and them to be tight and moving.
Good stuff! I mostly print for sale, it is important to have the nicest looking prints possible and this seems to be the best way I've found under the constraints. I'm still tuning the printer a little and I'm looking at whether belt tension, better pulleys and belts will also help. The stock belts look pretty good to my eye.
@@NeedItMakeIt Subbed too because i see the dedication and time used to make this video short (for us, viewers) and clear, but still very detailed. Only 2 things i've seen that were kinda wrong : the butter part, i'm new to 3D printing and it really confused me, but it got clearer by reading the comments about it and your answers(maybe put a caption or a small addition to the description about "don't do that, i just love butter"), and the binary @ 8:04, you wrote 00110101 and i believe you meant 0110 *0* 101 ("5" instead of "e")
I got my glass plate from ebay. Works great but know few guys that bought glass at hardware store and cut it to size themselves that haven't had any issues. 🤷♂️
@@fishingsouthernindiana6480 I've been using the 3mm borosilicate glass for a while and it has been working very well until 2 days ago while testing a high flow 0.5mm layer height with a 1mm nozzle, the part had such a good bond and contracted with such force that it cracked the glass. I've also used picture frame glass from walmart at 2mm and it works well also, though it is more flexible.
@@NeedItMakeIt would love to check out and do some comparisons of your profile with my profiles as well as the stock ender 3 profiles that come with cura. thanks in advance. if you need an email. superbasic919@gmail.com
Send a photo to needitmakeit@gmail.com and I'll take a look. Belt tension, speed, could be seam locations and retraction distances for you as well. Set your retraction to 5 and your seams to one corner, back right or left for example. Random seams only work well on direct-drive setups. Hope that helps.
Go to the heater "Walls" go down and select "User Specified" and choose your corner or x/y location that you'd like. I'm currently looking at PrusaSlicer, they have a feature to Paint on the seams, one problem... I can't get the print to start yet, I need to fiddle a bit more with it.
I'm asking for help. I just ordered my first 3-D printer ever. I settled on the Ender 3 v2 . Excuse my ignorance but what do I need to get started. And feel free to talk to me like I'm five. Do I need to get any programs for my computer. What are they and how much are they. Am I able to just start with what I have any things later? I'm primarily using it to make miniatures in Tehran for table top game? What is the best material to use for best results? Please I need advice I'm not a technical person I have a five year old laptop.
Sure here are a few tips to get you going: Install Cura, it is easy enough and free as well, it should work on your laptop, but it might be a little slow as many newer softwares would be. If your printer didn't come with glass for the build plate, I'd suggest buying one 235 x 235 x 4mm borosilicate or similar, it helps a lot with leveling, the glass is very flat, the aluminum below it is not, and changes shape as it heats up causing issues with bonding (there are upgrades to solve this later on). Buy some dollar store glue sticks... big ones. It helps for the best adhesion on that critical first layer. Because it bonds so well, when complete pop the plate into the freezer for 10-20 minutes to release the parts. Seems like a tedious process, but it works 100% of the time. I'd suggest using PLA to start, ABS is hard to work with and PETG has its own set of problems. PLA is the simplest, just make sure to keep it dry, recommend some dessicant in a plastic bin to begin with. You don't need an enclosure to print with PETG or PLA I'd suggest to watch an assembly video rather than just using instructions, there are little tips which produce better results, for example, I use a ruler to align the posts so they are exactly parallel. The plastic stock extruder is not great, you'll want to change that out at some point because it might break on you, I'll have a video out soon on a fairly inexpensive alternative, or just buy a metal one, they are cheap. Watch some of my other videos, they'll help you to know more about printing with this printer. I am still getting great results very happy with it. There are struggles of course like anything. It looks so easy from the outside, however when things go sideways on you it takes some problem solving and perseverance to get it solved. I have about 10,000 more tips, I think YT might have a limit on comment length.... One more thing, the bed spring upgrades are cheap, buy the orange/yellow ones, they are stiffer and do a much better job. There are also silicone ones available, I've never tested them, seems to me they'd add too much weight. Good luck!
NeedItMakeIt thanks I have been watching other videos for a while but my printer is getting delivered most likely tomorrow some time. So it's hard to take everything in when you have no printer in front of you. And everything kind of overwhelming now. Not being a tech person. Thanks for the advice and help.
Thanks for sharing. Could you test PETG printing with tree support? Because I can get good result without support, but with support it’s a mess with lots of stringing. I print mechanic parts.
No but I do with CF PETG and I'm not too much of a fan at the moment, it wears the nozzle and gears super quick. I've ordered a set of hardened dual gears to handle it along with a hardened steel nozzle, so I'll be giving it another go soon. It looks great and it is more stiff so there are some pros. What are the benefits of the metal infused filament?
Your printer has 0.04 z axis resolution so you should print with 0.08, 0.12, 0.16 layer height instead of 0.1, 0.15 and so on, otherwise it will cause artifacts. Also you should try linear advance feature of marlin to reduce seam visibility, because now its huge, and your stock feeder + tmc2208 may struggle with that, i will suggest titan feeder and tmc2209. Random seems is just harmful setting, never use it
@@jessehellakoo The "magic number" is 4. Because with each step from the stepper motor it moves 0.04mm. Doing half steps can reduce quality on budget machines so much that the difference is easily visible. One could mitigate said issue with quality stepper motors but most people don't want to upgrade their printer out of the box. Same applies to the speed settings. You don't want to set it to 50mm/s. Either 48mm/s OR 52mm/s. Every number that can be divided by 4 without creating decimals works just fine. I'm lacking the mathematical term as I'm not a native speaker and math was always my nemesis, lol.
@@DrEckig thanks buddy. I normally print on 0.12 mill layer hight on my cr10s4 it takes litterly weaks for big parts but i upgraded it to linear rails and the hemera revo the resulsts are crazy
It's probably extreme for demonstration at 01:00, but in the first example of two parts, those prints are waaay too far from each other and i doubt anyone would arrange the prints like that, just the travel time spent between the parts is probably quite a few percent and it would be an invitation for stringing, a distance of 1mm between two parts is enough, not half the buildplate.
Is that the vertical line? I think that's the seam. There isn't much that can be done with the seam, it a smaller nozzle, thinner layer lines and adjustment of the retraction using a retraction tower can help.
I'm on a bowden setup, I'd suggest using a wee bit of glue stick, I always use it because I'd rather pop it in the freezer than have wonder whether there will be any bonding issues with the build plate. Can you describe your problem?
Like the tip about forcing travels to occur at unseen sides. Thanks. And is that bed-mounted camera holder downloadable somewhere? What cam? The time lapses are great.
For sure, it's something I use when I'm in a bind and I need to print a few larger parts but don't have the time to do them separately. The camera mount is in a video I made, the link should be there as well to the thingiverse file. th-cam.com/video/A5Ac-sB5jIY/w-d-xo.html. I like this mount, it gives a really good angle for finding problems. Just make sure you have lots of light. The specs of my hardware should be in the video and description as well. Not very expensive and there are lots of benefits to viewing your prints from anywhere using Spaghetti detective with Octoprint.
@@kezman82a I have a new camera video coming out soon, keep an eye out for it, this one is pretty unique and a much better option for people wanting to keep an eye on their prints... in detail
I'm having difficulty having the outer wall adhering to the inner walls and infill. I feel like I've attempted everything, all to no avail! Most prevalent with large flat sides of the model
This is under extrusion, you'll want to first lookup a video about calibration of your e-steps. Basically measure 110mm away from your extruder and mark. Preheat your nozzle to normal temp and extrude 100mm manually on your printer. You should measure 10mm left to your mark. Adjust the amount of e-steps to bring it to the correct dimension. Mine was under extruding when I assembled the printer and this fixed the problem.
@@NeedItMakeIt seems like it was under extruding by 38% that seems wildly high, still running some tests but thanks for this suggestion. I had forgotten to do this again after replacing the Bowden tube and extruder gear some months ago!
I believe this was the zoom H1N mic, i still use it when i script, some is off script and it is easier to use the phone mic or BT lapel mic in those cases. I also edit out the bad sounding stuff and do a little noise reduction in DaVinci resolve


In the intro, he slipped that pre printed support in so fast and smooth I almost didn't even notice... well done sir.
I haven't used that trick in quite a while, but it's a pretty cool way to get a smooth bridge, especially if you have repeatable parts to make it worth the time to do. A little tape on top and some glue stick for good measure since the surface is only at room temp.
Crazy work, my ass would push my shit out of x axis and have it printing in the air 😂
Simple models always print very clear.
I would agree that simple models will generally show better results
The test samples shown in the video clearly show the differences in the techniques used.
@@bikerboy3k no need to make a rude comment, he is simply stating that it shows the difference each setting makes...... thats not defensive at all its simply stating the entire goal of the video.
@@bikerboy3k You are right, as stated in my response. Time to move on, have a good hoiday!
That is true, but this video is educational and if high quality. I have learn something.
@@kundeleczek1 learned* 🙂
My man, I thought I was crazy, or it was just my setup. I tried printing 6 parts I had customized, all came out crap, thought it was my settings and .8m nozzle. Just for a test did them on their own, and all came out beautiful. Thank you for the sanity check.
been there done that
The print sequence option on Cura....VERY helpful. I tried it and am hooked. Have to plan out placement of parts to prevent the gantry from hitting it but otherwise, very helpful. Thanks very much for posting this. Made a huge difference!
I've thought about other ways to improve this, printing with PLA and ABS seem to be very forgiving with stringing compared to PETG. I've just downloaded the newest version of CURA, super curious to see what is inside that could be helpful.
Congrats on the layer consistency. A mixture of a very squarely assembled frame, tight belts, correct V-wheel pressure and many other things are required to achieve this.
👍
Drying your filament will also help A LOT. Even with PLA!
If you don't dry your PETG or PLA, it will usually ooze out of the nozzle, even when there's no pressure applied by the extruder. This leads to those blobs shown at 5:00.
Keeping it dry (max. 10% humidity), there won't be any oozing.
Thank you for the information. Which brand of the dryer do you recommend?
@@uhu4677 I'm staking the gel I get from shoes and wherever I find some. I don't have any air-tight box so I'm just using zip bags and placing it on a dry place
this has been driving me crazy, thank you.
Great tip! I'm new to this world and I should have paid more attention to this to start with. Just got my dry box set up and lots of dessicant.
Wouldn't throwing them in a box with silica beads do the same thing?
_"Print one part at a time"_ simple tips but how am I not realizing it. Thank you for mentioning this tips
My pleasure, we'd all like to load up the build plate, in order to do that everything needs to be perfect to get great results. for the rest of us, these tips help a bit.
@@NeedItMakeIt Do you have a profile available for Cura?
@@oneheadlight8000 drive.google.com/file/d/1TO6z8dptLZOI2y_eBmG_m4exzY3lLtRi/view?usp=sharing Try this, it is set for PETG with minimal fan, you can adapt as needed.
@@NeedItMakeIt thank you! I print pretty much exclusively PETG.. around 120 spools of it last year. We just bought 3 ender 3 v2’s and are dialing them in. Your prints look noice!
@@oneheadlight8000 Nice stuff, three wow. Having a few of the same printer makes a lot of sense for replacement parts and repair, interchangeability and the list goes on. Very smart.
Do you have to dry your material before you begin printing with it, how do you handle the moisture absorption, or is it a non-issue for your parts?
You mentioned that you coved combing in another video. Just a tip, always put a link to any video you reference in your description. It makes it soo much easier to find.
The way how the light shines onto the prints make them better, too.
I’ve had a lot of luck with scotch brand blue tape. You can print PETG on it with a 0 degree bed so it saves energy. Sticks really well and can be used several times before replacing it.
0090000
*B U T T E R*
Petg can warp, a heated bed is not just for first layer adhesion. If it were, you'd only have to turn it off after the first layer.
@@alejandroperez5368 I’m saying on blue tape you can print with 0 degree bed with PETG all the way through. No need to turn on the bed if you have the right model.. some require 65 degrees with glue stick, hair spray or blue tape if the model doesn’t have a lot of surface contact. I have never used a brim with PETG in over 300,000 hours of printing
@@oneheadlight8000 you have 34 years of printing experience? LOL.
Here's another tip I only started doing recently:
If you use a newer build of Cura with a Creality printer (maybe others as well), your nozzle does a purge line on the corner of the bed. It's probably 10cm long. Adjust the start gcode so it's only 5cm - all it's doing is priming the nozzle. Now, since that's getting your nozzle primed, you don't need to print a skirt anymore around the perimeter of the print, so go ahead and set the build plate adhesion to "None" (assuming your prints typically stick to the bed reliably after printing skirts). This knocks a small amount of time and material use off of your prints, which adds up over time. This is especially important if you want to operate a 3D printing business, because lean is the name of the game for that.
For sure, the main reason that I leave a brim or skirt on is to make sure the previous filament is purged out properly from the nozzle. It isn't too professional to have a mix on that first layer only to find out when the print is finished.
Valid points though, thanks!
Skirts are necessary for first layer Z-offset calibration at the start of each print. Something you will most likely have to deal with on cheap 3D printers and considerably large prints.
That's too tiny to even care. And a skirt should always be used, no exceptions.
@@Ibian666 why is a skirt so necessary?
@@haqeeqee Primes the flow.
I do this as well as adjusting the retraction speed and distance for the type of filament I am using. This allows me to print multiple prints without messy cleanup. The blobbing effect is what happens when the filament pools up in the nozzle the pressure causes it to push out as it leaves the part to go the next part. There is also the stringing effect people get. The combing setting and z hop will help eliminate this. I get very little if almost like slight spider web like whisp of string at the most now, nothing a swipe from my small butane torch doesn't eliminate in a poof, gone. Even a good heat gun would do the job. No blobs and all calibrations set. With all of that you can really dial in a printer to go above the bar of what they do out of the box. With a little tweaking that is. 😁👍 Good video!
I noticed just turning down the nozzle temp helped a lot for me. As long as you have dry filament and your esteps are good you should be good. I use to print super hot right at 220 for PLA. 210-215 helped give me super smooth prints.
Oh wow, i think mine uses 190 for pla
@@shabadooshabadoo4918yea I use 200 and 60 for bed
I almost lost it at the butter
I had to rewind and check that it was butter 😁
Salted. On sale also!
@@NeedItMakeIt wtf
I am a newbie and went out researching if that was something we need to do!
@@mrpbjnance Oh sorry, I like to integrate butter into my videos. There may be a way to use it, if we separate the milk solids from the fats and apply just the solids they may work fairly well as a binder. Best just to use glue stick though. On the other hand the clarified butter can be very tasty and doesn't burn in the pan....
I also make cast iron pan test videos, and I love butter.
If you want less visible random z-seams, you can also enable coasting, which turns of the filament feed while near the z-seam.
For very small parts it is often better to print multiple of them. There is a minimum time per layer or the print doesn't cool enough and pausing between (set your minimum layer time to around 10s) introduces blobs.
If only I had an hi-def IR camera, we'd really be able to dive into this more.
Or fix your cooling fans to actually work.....
Printing slower and not too hot always help me for improve the quality of my prints
Very true, slower usually yields better results. Many of my prints are for customers and I don't always have time to wait so I've brainwashed myself to thinking everyone needs to print fast. I suppose that could make for a good comparison even for my own knowledge.
How slow is too slow? I would assume at some point it will not produce a better quality.
@@NeedItMakeIt if the print have steep overhangs the slow speeds sometimes work against you. The heat of the nozzle dont let time to cooldown the overhang and make things worse. Sometimes i add a second part if what im printing is too small. Sorry for may bad english, is not my first language
I need to try those since I just got My Ender 3 V2 last week & I’m new to 3D printing in general.
Print wall order and retraction/prime settings are another good place to look to for improving quality.
Can you explain further please if you have time!? Thanks!! I need some help lol
I used to use Print One at a Time, but in a previous version of Cura, they changed how it determined the order to do the models (random selection of the models). After having just played with it, it appears they restored the previous ordering (last model loaded prints first).
With the last in/first out ordering, you can arrange the models front to back and you don't have to worry about collisions. You can print any size model by tweaking your carriage settings.
When doing multiple parts, I prefer One at a Time (POAT?) for the exact reasons you covered. Also, if you have a failure, you don't immediately lose an entire bed worth of prints.
Is there any way to import 2 or 3 stl and know their order? Or importing 1 at a time is needed? Cheers
Try printing outer walls first in the Cura settings. It depends on the geometry of the part but it can help (not for overhangs).
I will try that, thanks for the tip. Not for overhangs because it loses the added bond to plastic adjacent to it?
@@NeedItMakeIt Correct.
The butter failed in my testing. The print would dislodge from the plate, and fly across the room. It wasn't until I came across your video that I should have used salted butter. If I only would have known sooner.
Yes, and only use the best quality butter. I like to churn mine a few hours before I need it so I know it's fresh :)
@@BlondieHappyGuy Yeah, it's a joke. In case you're wondering, any type of grease is *going to ruin your first layer.* The print will simply not stick.
@Brax W Before you make the obligatory, overused reddit joke, maybe you should take into account that I was replying to someone else's comment. It appears that comment doesn't exist anymore, but my reply still stands. In case someone doesn't get the joke, yes grease will prevent the print from sticking. Now that we got that cleared up, this matter is in my opinion resolved.
@@PunakiviAddikti thanks for telling me, too many people are saying to use grease, it's confusing to a complete beginner
@@hank1845 You're welcome I guess. If you need bed adhesion, use a heated bed at 60 degrees for first layer and drop down to 50 degrees for the rest to help avoid warping. Hair spray is a good adhesion agent.
I get my best petg results using 255c on the nozzle and 25% fan and a flow rate 95% also slow down the retract and advance speeds 25mm/s this seems to help with blobbing somewhat. also make sure its printing perimeters FIRST then infill and not its default of infill first then perimeters.
Why perimeters before infill?
@@bc4ke a couple of reasons first when the plastic hardens it doesn't exactly push out of the way so when you print infill first and then the perimeter the infield pushes the perimeter out where it intersects this is why you sometimes see the infield stick out on models people print
Second the inflow intersects the perimeters and you want them to for strength it helps to build proper info when it touches the perimeter outside edge of the model but if you're printing a button fill first there's no Edge to attach to yet I can't think of a single good reason to print infill first
8:25 ... you can improve that blobbing. It is doing that because it writes a checkpoint to the SD Card it reads from in case of a power failure, so it can resume printing. If it can't write fast enough the buffer will run out and cause a split second delay and the extruder will keep extruding and leave a blob. Either A.) use a SD Card with faster transfer speed or B.) disable resume printing after power failure so it doesn't try to write the checkpoint file.
I had to give a like just because of the work you put in for the buttered build plate B-roll
Thank you! I would like to add more humor in my vids, but it seems people take them seriously...
For prints with lots of surface details, like D&D minis, set the Outer Wall Inset to 0.05 and the layer height to 0.12. The small details will come out much better.
That one with the last settings looks good. Myself I havent printed anything anymore. Still stuck with the bl touch. Last testing today.. After that I can only say the sensor itself came broke from start.
The videos look better every upload.
It shows the effort that has gone in em!
That's disappointing, I don't know whether I'll ever need the BL touch, I rarely level the bed with this printer. I did upgrade the springs because the stock ones were very weak and could promote the knobs from loosening though.
Good luck!
Thank you for the compliment, and yes it is a fair amount of work. My hope is that I get better at it so it doesn't take as long. I have a list for the next 10 of so videos, so I'll be busy for a while.
Rik, if you need a hand, I got mine working after some trouble. Your name makes me think that you're Dutch, so you could give me a call if it doesn't work out.
@@DHGV klopt inderdaad, ik heb hem nu werkend. 123-3d .nl heeft mij geholpen via de mail. Er is schijnbaar een 4.2.2. Moederboard firmware waar duidelijk bij staat 4.2.2. Bl touch zonder adapter. Vanaf dat deze erop staat doet hij het goed (de bl touch)
Maar vanaf dat ik de printer verplaatst heb en zo vaak op zijn kant maakt hij nu een vreemd geluid op de y as. En kwam er gister achter tijdens de excintric nuts onder het bed aandraaien dat als ik het bed van voor naar achter duw. En hier goed oplet voel ik een kleine verhoging in het bed achterin. Maar kan niets vinden bij de wieltjes of de rails. Twijfel om hem nu deels uit elkaar te halen en weer opnieuw te assembleren.
@@TriMeX1987 Mooi dat dat werkt. Wat je beschrijft op de Y-as herken ik niet, maar klinkt alsof een van de wieltjes niet helemaal gelijkmatig is afgesleten. Het kan ook zijn dat het te maken heeft met je Y-riem. Staat die te strak gespannen, of te los, zit hij goed op de geleiders? Is hij beschadigt? Dat kan er zeker voor zorgen dat je iets voelt in die beweging.
@@DHGV de ender 3 is praktidch nieuw. Heb nog geen volledige rol filament geprint.
Ik had op de z as wel wieltjes beschadigd. Voelde ik ook en direct nieuwe wieltjes erop gezet.
Het lijkst als je de plaat helemaal naar achter duwd dat hij ergens overheen omhoog rijd..en net ervoor een dipje.. in dit dipje kon ik het bed ook licht bewegen. Daarna excentric nut weer beetje vaster gezet kijken of dat hielp. Maar voor alsnog niet.
Hij maakt ook een raar geluid bij auto home op een lage snelheid hoor je het niet. Maar hier wel.
I like to add wipe distance of between nzl diam size to about 2mm. I drop the outer wall speed down to 20mms and ramp it up for inner walls and infill
most important step to getting good results is buttering up your print plate 😳
What adhesive do you use
@@sachinsaravanan3664 3DLAC
"Nelly" works really good.
I use Land o Lakes 😏 lol but really, I actually use a decent hair spray on my creality glass bed printing Petg. Works better for me then any adhesive marketed to the 3D printing world that I’ve tried, just a light layer and your golden for a while, then if you notice any issues, clean plate with alcohol then respray, I might have to do that once a month with moderate usage.
@@marv8481 Here in Spain we use the hairspray "Nelly".
It is very good and it takes very little for the PLA or ABS to be sinked into the glass of the bed.
No need to heat the bed at all.
A bottle of lacquer Nelly costs about € 3 or about $ 4 and I can print several kg of filament with it since they are big.
The same brand produces a lacquer for 3D printers, which is exactly the same formula, but without the smell of lacker, and costs 5 times more.
So I advise you to use Nelly hair lacquer instead of another lacker or system, im pretty sure it can even be bought on Amazon.
To remove the printed part in PLA or ABS from the glass, you can put the glass in the freezer 10 minutes also.
Your prints are basically perfect!
thankyou for this! ive been struggling and the comments are super useful aswel :D
Is there anything in particular you're having the most trouble with?
combing is gonna be a big help! Thanks
Thanks for sharing the wealth! Much appreciated, will pass forward
the butter is a joke tho...?
Yeah lol, caught me off guard
No! It's the secret ingredient😂
2:50 No Name butter … hello fellow Canadian! 🇨🇦 😎
Just starting out in 3D Printing. ( as of this comment 😁)
Mostly to Try and get my 11 Year Old Son doing something else with his Tablet than playing games 🙄
He has Good skills for drawing, so I see, 3D Printing as the next level to developing his hobby to another level.
Great to see so much information like this available here on TH-cam.
Of course Subscribed.
Looking forward to learning how to speak another language 😉👍
Thanks so much for this video, ive had multiple issues with just one roll of red filament, turned on combing and one at a time and suddenly my prints are flawless, brilliant :)
No problem, lots more videos like this to come and some other really cool and unique ideas also. I was hoping that some of these tips could help!
How do you turn on combing? I'm using a ender 3v2 and creality slicer
Hi David, Sorry I use Cura, but assume there is a setting in the Creality slicer somewhere @@davidhogue100
You can do z-hop to jump between travels so it won’t drag nozzle across the surface
Yes, I always have z hop turned on, though I haven't played with the height setting and with wear on the nut, it will lose accuracy over time.
At 0:20 you drop a printed disc into a printing part. Was that done to provide support for layers to print on top in the printing part? Did you apply anything to the printed disc to prevent "welding"?
Bro, those print qualities are cleaner than my room!
Not too bad for a printer of that generation. I'm seeing even better results these days with the faster printers, especially with PETG. The fast moves help to prevent blobbing quite well.
@@NeedItMakeIt oh that's cool, so the fastness, the speed itself actually helps prevent a few problems
@@zac2877 The travel speed was one of the biggest issues, with the newer printers, acceleration and travel are much faster, fast enough that I don't notice blobbing unless the parts are set quite far apart from each other. It's a nice little bonus that I wasn't expecting. It's mostly a problem with PETG, but does happen with PLA as well, just not as much.
Cura 4.8 has a z seam hiding option. Using smart hiding will eliminate the seam on the outer skin.
I've have tried this feature, but I've not found that it works well for my parts. It looks for sharp corners to place the seams so they are less visible, my parts don't have corners unfortunately, but it could be useful for some people.
@@NeedItMakeIt Yes, it only works best with corners. Even then it can be easily noticeable. I wish there was an option for wipe hiding. Basically, the outer perimeter would start slightly in the infill and move outwards or inwards depending on the perimeter being printed. This would eliminate blobs at the start of the perimeter. It's basically nozzle wiping but in reverse.
Thanks for the "Print Sequence" tip! I was on my way to make a python script just to create a single .gcode from individual parts .gcode files. Nice to learn that!
I have a cheat for printing taller prints also, but it is a bit risky, I'll test it out a bit more before making a video. It involves lowering the hotend and choosing a volcano type hotend also which further drops the hotend down. But there is one more tip that can help but I think it is risky business.
Nice video. I'm new to 3s printing world and I have a ender 3 v2 but my bad is different that yours. Why do you change the bed? I also have problems of adhesion to bad I used hairspray but all the videos I see people don't use anything on default bed. Why do I need to? I have a leveled the bed and the level test is printing very nice don't know what to do anymore
temperatures, perhaps
@@philmor1776 im using default 200 ad 60 o bed i tried to change no luck there
@@marine1718 , I had to go to 210 and 70 on the textured side of the glass Or things simply would not stick. Bed temperatures especially seems important. On the smooth side I could go to 200 and 60, But I had to use hairspray or glue, glue sucks, it messes up the face. Ya know what worked well for me (on the smooth side only). MILK, brush on some evenly and let dry. BTW clean bed well first. I use DAWN dishwashing liquid, rinse really well and let dry, then use whatever.
Are you printing ABS, PETG or PLA? ABS is hard to get to stick, Nano adhesive works super well, I have a video on that, if you are using PETG or PLA regular dollar store glue stick works very well.... too well most of the time, I need to put my prints into the freezer to release them.
@@NeedItMakeIt I'm using pla. With original glass u are not suppose to use glut right?
New sub. Why do the program spots to start a new layer? Wouldn't it be better for it to keep going to the next layer in the same motion, especially since your going around in a circle? Like vase mode.
Glad to have you!
I'd have to think very hard about this, but I believe it is not possible. At least not currently possible. In vase mode there is only 1 wall layer, a continuous motion upward is possible except for the bottom and top layers. When printing these normal parts the entire part must be filled in, the nozzle would travel up, then down, and so on until the entire layer(s) is complete. What you may be looking for is called non-planar 3D printing (true 3d printing). I'm sure in a few years we will have the ability to do this at home with some limitations.
Matthew, use the slicer's visualize feature and step through one layer at the time (i.e., super slowly) to see how the print progresses. This is a fantastic feature.
wait - buttered bed and glued bed? did you both ?
At 3:05 why did your printer print a line on the side of the bed? I have an artillery sidewinder x1 and I’m coming along after finally getting the files to show up on cura and am working on the benchy and mjolnir but a new problem is that it starts printing on the side but then keeps going so the filament wraps around the nozzle and pulls any that was on the bed around with it. how do I prevent that or how do I just get it to cut off like yours did?
This can be setup in the startup Gcode script in your slicer, I've modified mine a bit to shorten it, the clips at the front and back were being hit on occasion and I wanted to avoid that. Here is the code, and you should be able to add it to your slicer without too much trouble.
; Ender 3 Custom Start G-code
G92 E0 ; Reset Extruder
G28 ; Home all axes
G1 Z2.0 F3000 ; Move Z Axis up little to prevent scratching of Heat Bed
G1 X0.1 Y20 Z0.3 F5000.0 ; Move to start position
G1 X0.1 Y200.0 Z0.3 F1500.0 E15 ; Draw the first line
G1 X0.4 Y200.0 Z0.3 F5000.0 ; Move to side a little
G1 X0.4 Y20 Z0.3 F1500.0 E30 ; Draw the second line
G92 E0 ; Reset Extruder
G1 Z2.0 F3000 ; Move Z Axis up little to prevent scratching of Heat Bed
G1 X5 Y20 Z0.3 F5000.0 ; Move over to prevent blob squish
I've had the problem you are talking about with my Anet A8, the code shown above helps a lot to prevent this from happening.
Good luck and let me know if you need help.
Mid print you add a supporting part. 00:19 How do you get this not to stick please.
Fuzzy option in cura hides the layers and you can make prints look very professional
I really appreciate your work on your videos ❤
best lower jerk and acceleration settings too
Could you provide the settings you use for this. I'd like to investigate this further. Also do you use linear advance?
@@NeedItMakeIt I don't know what linear advance is, I suppose it can't be found in Cura? As for my settings, I've been slowly dialing them in as I've started printing and so far I've seen increasing initial layer flow to 110-120% helps along with decreasing acceleration of the first layer to 100mm/s and jerk to 2. The initial layer speed is 15mm/s but speeds up greatly after that.
Here, I'll just upload my profiles if you want to take a deeper look, I've customized many settings but I don't claim that they are perfect, I'll update them as I keep printing. drive.google.com/folderview?id=1lqlHvzxJnhggHqpEbnP2ZZp-eggMwnLS
I substituted my usual hairspray for "I can't believe its not butter" and couldn't get the filament to stick. is there a certain type of butter I need to get?
Thank you sir! New subscriber...
Look for the butter with the highest butter content, 100% butter is best. If you can find 110%...even butter :)
Gotta get the one that used to be racist.
I've not used random seams since I tried it the first time. It simply introduces very visible surface defects. Took me a while to figure out what was causing these surface defects, but once I did and switched to one seam, all of the defects were gone. Second issue is *random filament stuck to the nozzle.* This will absolutely ruin your print surface once it detaches and gets incorporated into the print. Always get these off.
Hi, can u explain what Setting you chose ?
@@mbikerFR I simply turned off random seam and chose the seam placement to be sharpest corner and random location. Random location is different from random seam. I also tried arc welder which converts multiple points into uniform arcs. This limits the amount of "stops" the nozzle makes when it moves from point to point. Depending on the motherboard, it may cause a very slight pause at each point and some material oozes out, forming a blob.
@@PunakiviAddikti hi can you help me wher to find this? (225C Nozzle, 75C Bed, 78mm Infill, 37mm Outer Wall, 57mm Inner Wall, 45mm Initial Layer) i don't know where to find this it is because im literally newbie on this 3d printing. please help me.
@@daniellejunio1810 There are plenty of 3D printers that can do 225C on the nozzle and 75C on the bed. Infill, outer wall, inner wall and initial layer are controlled by the slicer software.
Great tips. I’d like to know more about precision. My “5mm” shaft holes came up 4.5mm in reality.
For holes, there is also one more factor, they'll have a seam, that seam can sometimes bulge the holes a bit on one side, making them a bit oblong. A little cut into the model at one side of the hole will force the seam to that side and also push the seam away from the critical side of the hole. I'm glad you found the video helpful!
Have you tried linear advance? I have been using this technique and I believe it improves the quality of the prints. I can also print as much as 50% faster. I have printed at 100mm/sec with no reduction in the quality of the prints. Retraction can also be reduced. I think I could print even faster, but I think the stepper motors may start skipping steps - I may test this in the future, but overall, I am pleased with it and plan to use it for most if not all of my prints.
I have not, I will check it out for sure. So how do you compensate for the increased flow, higher nozzle temps? Do you find that you have more ghosting or do you have slower outer walls to compensate? Thanks!
@@NeedItMakeIt Linear advance pretty much eliminates all the problems, that's the point of it. When running at 100mm/sec, I did increase the filament temp about 5C. It does take some setting up. There is a program on Github that can help determine what K value to use. K is a dimensionless value that determines the behavior of the linear advance setting. There is an add-on for Cura that allows you to set the K value right in your Cura profile so you do not have to go back to the Marlin firmware to set it.
@@rcort4864 I thought the Ender 3 V2 is not capable of linear advance due to the legacy mode of motherboard and stepper motors? Do you have any link for me with stuff to read how to make this happen?
@ It may not be - IDK. Linear Advance is a part of Marlin firmware, so you must be using Marlin to activate it. Here's a video to get started: th-cam.com/video/c5jjwBqARpo/w-d-xo.html
I heard ark welder add on in cura upgrades prints
2:43 why turn combing off, If printing one at a time? Tha k you for this!!
*I used a 4 burner cigar lighter to clean up my PETG.*
Thanks a lot for sharing the knowledge.
My pleasure.
I use an Elegoo Neptune 2S, but I hope this helps. 🤞🏻
I printed with PETG-CF yesterday and I loaded the buildplate, unfortunately even with a fast printer I still had blobbing between travel moves, for the best results, print separately or use this feature if you are able to.
I am using "Fuzz" to have an imperfect finition wich is quite good actually.
That works too, the fuzz will cause your print speed to slow quite a bit and also it can also cause far too much for your slicer to process depending the Fuzz-e-ness a more coarse fuzz works just fine though and looks good to me as well. For PETG it helps to avoid that sheen too.
You mention that seams should be placed at the corners if you have any, how do you select where they go?
if you are using Cura, you can click on Shell dropdown and select Z-seam alignment, set to User Specified and choose your position from there. Email me at needitmakeit@gmail.com if you need some screenshots.
A video on how to get that soft seam on circular objects would be awesome. I’m troubleshooting on mine but still it dips in too much. would really appreciate some help. (using MS DD and all metal hotend)
enable retraction in your slicer settings (retraction in cura, maybe called something else in your software of choice). It pulls the filament back from the nozzle and generally does a really nice job of eliminating blobs and other defects where the nozzle stops for a second before changing direction. I have mine set to 7mm retraction length and my surface finish is usually near perfect. Unless I do what I did an hour ago and let my printer run out of filament. Whoops.
@@FurryKeidran98 nah, he's talking about circular objects. There's no way to hide it there
Cool video, may I ask which plugin I see starting 4:01?
This is Spaghetti detective with Octoprint Raspberry Pi, pretty handy if you have prints which have potential to go wrong. Most of my prints are simple and I use glue stick to make sure they don't come away from the Build Plate. Spaghetti detective also allows you to watch your prints from anywhere on your phone that's a really nice feature.
@@NeedItMakeIt Thanks mate!
Great info! I've been printing for a few months and am definitely a noob. I'll be using some of these things
I've been printing for a few years now and I still feel new somedays, there is a lot more to know than one might thing looking from the outside. Thank you for the comment and support!
Just a heads up the borosilicate glass plate link is unavailable
Thanks, I just tried it and it does work on my end, I wonder if Amazon.ca links work in other countries?
Hi NeedItMakeIt, and i was just wondering if you could help me get better printer results, I have an ender 3 pro and I've had trouble for a long time trying to make my prints look nice, but they have always had some kind of defect in them. I've tried everything like I' got a new extruder, I calibrated the E steps for the extruder, and i even got a new hot end too, it would be really helpful if you were able to help me out with. i could also show you pictures of the prints to, Thank you
Sure, send me some pics, a video of a print with the issues is also helpful, sometimes these can be tough to identify without knowing all of the variables and your settings.
try prusa. I find the way it deals with seams so much better, and now you can even paint the location you want it to be
I may just do that. It sounds like it has some extremely useful features. Thank you for the tip!
th-cam.com/video/3thCNTS0i4o/w-d-xo.html
Does the ATF know you're printing suppressor baffles ??
WTF is ATF?
Ask your DoG, he DESPISES and fears the ATF
Hey bud awesome video. I’m new in this world just ordered the V2. What program do I need to download to be able to make a solid print. I just want to know what I need to do to get started it’s coming in the mail tomorrow. I’m just going to be using the free downloads to start I just want to make sure I use the right one. Thanks for your help.
Would you be interested in doing a training session with me which would then become a video for anyone new?
Yea absolutely dude that would be awesome.
@@jamesp8039 Okay, we'll set something up, can email me at needitmakeit@gmail.com and we can coordinate further from there.
Drying filament No.1 !
What do you use to dry your filament?
I am popping in to say thank you for all your content. It is very helpful. Keep up the great work as it is inspiration for others like me.
I’m late to the game as usual. I am about 4 days into 3D printing and love it so far. I’ve had my failures, but several success as well. I’ve got octopi going and my first time lapse after getting my camera mount printed. This first time lapse is an 11 hour build on the Ender 3 V2.
I say all that to again let you know you have me interested in content creation and helping others as I learn. Hopefully I can provide others with a little help and inspiration as you have me. Thank you!
I also recommend the channel called Maker's Muse. Angus has a good deal of content to help you get started.
Maybe Switch to margarine as a more cost effective Butter option.
Margarine is a type of plastic correct?
one big reason for single prints rather than multiple items giving you better quality is cuz the stepper inaccuracy is bascially reduced. if you look at some specs for these steppers they have a +- few microns per turn, but it shows up on prints esp when it has to travel between each parts.
That's a really good point. To add to your point, when traveling turn Z-hop on so you can avoid hitting other parts which can throw things off. Worn belts and gears can impact over time. this printer makes it easy to keep good tension on the belts, my last printer not so good.
Thanks for the tips! New to the space, and I got carried away packing as many things onto my plate as I could. Heh. I wanted to throw an idea out there: I think the 'print one at a time' feature would work for taller pieces if you line the pieces up instead of distributing them. If done in the correct direction this eliminates risk of collision with crossbar and allow taller objects to be printed using this setting. (I have an Ender 3- other gantries setups might differ.)
One single object can pose the same challenges as multiple objects.
Like for example the tips of a crown.
Can you print at home plastic parts that are super precise.
Let say for example a Plain Bearing. Or the piston of a cylinder.
Things that need to fit very tight but still moving freely.
There are a few issues with 3d printing pieces like this, they'll have pretty tight outer tolerance, but where the seam is placed will cause a slight irregularity. There are some features to help with this, but the seam areas tend to be a little larger and would impact that extremely precise fit. It would be possible to turn the piece on a metal lathe if you could hold it without deforming it as well, soft-jaws of some kind for plastics. I suppose we're talking about a tolerance of no more than 0.2mm +/- most of the time it is better than this, but I'd say worst-case.
It's funny that you mention the bearing, I'm designing a large bearing which fits around a steel shaft, I was thinking that I could print the balls within the bearing, but I think maybe I'd be better to insert them afterward from a hold in the side, or how they assemble steel bearings and then add the 'keeper' afterward. It's pretty cool that we can all be inventors now with this tech, and it continued to get better each day.
I am getting more excited about being able to make a 3d model from 2d images, I think we're really close with the Machine Learning systems to get good enough results that don't require modifications to the mesh. It will also be a problem who make a living creating models, so I'm a little conflicted about that. We shall see what happens on that front.
@@NeedItMakeIt In my case, it is not necessary to print it all together.
I am just starting, i mean i am investigating about what i need.
For a current project, i need to make a flat air one way valve. A regular air valve that i can buy everywhere just does not fit.
So, i needed a very round pipe. I bought various models of PVC pipes from various providers. Each one of them is elliptical. So, what i did was this - i asked a guy who has a lathe to machine a round metal piece. I put the PVC pipe around the metal piece and i heat the metal. The pipe melts around and solidifies as a good circle. I am still perfectioning this. I am telling this to you as an idea that you could use. You could heat a machined piece of metal and push it toward some surfaces, and it will leave a perfect shape. Like medieval seal matrices.
Real life projects pose other challenges like making the holes parallel one to the other etc. The most precise a machine, the better it will work.
For my next project that i did not start it yet, i need precision only in some places. So, i could design it to be modular. For example, for the places, where i have the bearings, i could ask a company to print it to me with extreme precision. And then i will print at home the pieces that don't need precision. I will then make it all fit together. As an example, i could order to a printing company to create the joints of a robot, and i will print at home the bones. Just as an example.
You could melt the internal plastic walls of a hole using a smaller metal round bar and then melt the plastic outer walls of a piece that needs to perfectly fit by using a metal pipe with machined internal walls. But you have to improvise a way to hold the metal piece in such a way that they are parallel to the axis of rotation. And you must find a way to pull the metal pieces out of the hole later. In some cases it will be complicated to do. You can improvise some kind of a bearing puller.
They do the same for engines. The block of an engine does not require precision. The pistons have rings that are precise and the block has cylinders that are precise too and these were machined apart. The cylinder and rings are later fit into a less precise, cheaper to produce engine block. I can see on some engine blocks the marks of the casting molds. They were not even grind outside where it is not needed.
I try to design my project in such a way, that it will not require to print the moving parts together. I consider it impossible to print pieces together and them to be tight and moving.
I print one at a time, 90% of the time, great tips
Good stuff! I mostly print for sale, it is important to have the nicest looking prints possible and this seems to be the best way I've found under the constraints. I'm still tuning the printer a little and I'm looking at whether belt tension, better pulleys and belts will also help. The stock belts look pretty good to my eye.
Thank You for the detailed information and visual comparison test prints. Greatly appreciated ! Subscribed !
You're very welcome, more to come with better audio as well.
@@NeedItMakeIt Subbed too because i see the dedication and time used to make this video short (for us, viewers) and clear, but still very detailed.
Only 2 things i've seen that were kinda wrong :
the butter part, i'm new to 3D printing and it really confused me, but it got clearer by reading the comments about it and your answers(maybe put a caption or a small addition to the description about "don't do that, i just love butter"),
and the binary @ 8:04, you wrote 00110101 and i believe you meant 0110 *0* 101 ("5" instead of "e")
Adjust your speed for the size and style of print. Lower speeds for small or intricate models.
can you make tutorial for octaprint?
Tricks that worked great for me was to buy a Creality Ultimaker glass plate and make a flow percentage calculation using a ruler.
Do you have a link to the glass you can share? Thank you!
I got my glass plate from ebay. Works great but know few guys that bought glass at hardware store and cut it to size themselves that haven't had any issues. 🤷♂️
@@fishingsouthernindiana6480 I've been using the 3mm borosilicate glass for a while and it has been working very well until 2 days ago while testing a high flow 0.5mm layer height with a 1mm nozzle, the part had such a good bond and contracted with such force that it cracked the glass. I've also used picture frame glass from walmart at 2mm and it works well also, though it is more flexible.
How about the speed settings for these tests ?
I have them in the comments section, I can also provide a link to my current profile if you like.
@@NeedItMakeIt I'd be interested in the profile (: lost my old profiles with a cura update
@@NeedItMakeIt would love to check out and do some comparisons of your profile with my profiles as well as the stock ender 3 profiles that come with cura. thanks in advance. if you need an email. superbasic919@gmail.com
drive.google.com/file/d/1TO6z8dptLZOI2y_eBmG_m4exzY3lLtRi/view?usp=sharing
drive.google.com/file/d/1TO6z8dptLZOI2y_eBmG_m4exzY3lLtRi/view?usp=sharing
Would it be possible to add a bit of print to the area where the seams need to be so that you can sand them off and it will be smooth
How are you outer walls so clean?.. im struggling with z axis or something else a lot..
Send a photo to needitmakeit@gmail.com and I'll take a look. Belt tension, speed, could be seam locations and retraction distances for you as well. Set your retraction to 5 and your seams to one corner, back right or left for example. Random seams only work well on direct-drive setups. Hope that helps.
@@NeedItMakeIt Thank you for the tips! I'll play with seam positions as well. I've sent you an email, check it if you have the time!
How do you pick seam location?
Go to the heater "Walls" go down and select "User Specified" and choose your corner or x/y location that you'd like. I'm currently looking at PrusaSlicer, they have a feature to Paint on the seams, one problem... I can't get the print to start yet, I need to fiddle a bit more with it.
I'm asking for help. I just ordered my first 3-D printer ever. I settled on the Ender 3 v2 . Excuse my ignorance but what do I need to get started. And feel free to talk to me like I'm five. Do I need to get any programs for my computer. What are they and how much are they. Am I able to just start with what I have any things later? I'm primarily using it to make miniatures in Tehran for table top game? What is the best material to use for best results? Please I need advice I'm not a technical person I have a five year old laptop.
Sure here are a few tips to get you going:
Install Cura, it is easy enough and free as well, it should work on your laptop, but it might be a little slow as many newer softwares would be.
If your printer didn't come with glass for the build plate, I'd suggest buying one 235 x 235 x 4mm borosilicate or similar, it helps a lot with leveling, the glass is very flat, the aluminum below it is not, and changes shape as it heats up causing issues with bonding (there are upgrades to solve this later on).
Buy some dollar store glue sticks... big ones. It helps for the best adhesion on that critical first layer. Because it bonds so well, when complete pop the plate into the freezer for 10-20 minutes to release the parts. Seems like a tedious process, but it works 100% of the time.
I'd suggest using PLA to start, ABS is hard to work with and PETG has its own set of problems. PLA is the simplest, just make sure to keep it dry, recommend some dessicant in a plastic bin to begin with.
You don't need an enclosure to print with PETG or PLA
I'd suggest to watch an assembly video rather than just using instructions, there are little tips which produce better results, for example, I use a ruler to align the posts so they are exactly parallel.
The plastic stock extruder is not great, you'll want to change that out at some point because it might break on you, I'll have a video out soon on a fairly inexpensive alternative, or just buy a metal one, they are cheap.
Watch some of my other videos, they'll help you to know more about printing with this printer. I am still getting great results very happy with it. There are struggles of course like anything. It looks so easy from the outside, however when things go sideways on you it takes some problem solving and perseverance to get it solved.
I have about 10,000 more tips, I think YT might have a limit on comment length....
One more thing, the bed spring upgrades are cheap, buy the orange/yellow ones, they are stiffer and do a much better job. There are also silicone ones available, I've never tested them, seems to me they'd add too much weight.
Good luck!
NeedItMakeIt thanks I have been watching other videos for a while but my printer is getting delivered most likely tomorrow some time. So it's hard to take everything in when you have no printer in front of you. And everything kind of overwhelming now. Not being a tech person. Thanks for the advice and help.
Thanks for sharing. Could you test PETG printing with tree support? Because I can get good result without support, but with support it’s a mess with lots of stringing. I print mechanic parts.
Hi, I can throw a test together, are you able to link a photo, or send a photo to needitmakeit@gmail.com
Great video again bro 👊
Great tip.... Any experience with metal infused pla?
No but I do with CF PETG and I'm not too much of a fan at the moment, it wears the nozzle and gears super quick. I've ordered a set of hardened dual gears to handle it along with a hardened steel nozzle, so I'll be giving it another go soon. It looks great and it is more stiff so there are some pros.
What are the benefits of the metal infused filament?
Hi, wanted to ask you how do you make that first line is printed on right side of the build plate? Thank you before hands
Is the butter a serious thing or was it a joke?
Your printer has 0.04 z axis resolution so you should print with 0.08, 0.12, 0.16 layer height instead of 0.1, 0.15 and so on, otherwise it will cause artifacts. Also you should try linear advance feature of marlin to reduce seam visibility, because now its huge, and your stock feeder + tmc2208 may struggle with that, i will suggest titan feeder and tmc2209. Random seems is just harmful setting, never use it
Is .02 a good multiple?
Or is .16 better?
@@jessehellakoo The "magic number" is 4. Because with each step from the stepper motor it moves 0.04mm. Doing half steps can reduce quality on budget machines so much that the difference is easily visible. One could mitigate said issue with quality stepper motors but most people don't want to upgrade their printer out of the box.
Same applies to the speed settings. You don't want to set it to 50mm/s. Either 48mm/s OR 52mm/s. Every number that can be divided by 4 without creating decimals works just fine.
I'm lacking the mathematical term as I'm not a native speaker and math was always my nemesis, lol.
@@DrEckig sry but thats not a problem at alll show me a test where you can see diferences. With modern boards microstepping you never have this issue
@@thomaskletzl6493 there you go bud: th-cam.com/video/WIkT8asT90A/w-d-xo.html
@@DrEckig thanks buddy. I normally print on 0.12 mill layer hight on my cr10s4 it takes litterly weaks for big parts but i upgraded it to linear rails and the hemera revo the resulsts are crazy
It's probably extreme for demonstration at 01:00, but in the first example of two parts, those prints are waaay too far from each other and i doubt anyone would arrange the prints like that, just the travel time spent between the parts is probably quite a few percent and it would be an invitation for stringing, a distance of 1mm between two parts is enough, not half the buildplate.
what causes that line in the carbon fiber at 6:16 ive had the same problem
Is that the vertical line? I think that's the seam. There isn't much that can be done with the seam, it a smaller nozzle, thinner layer lines and adjustment of the retraction using a retraction tower can help.
Sorry if I miss this into in your description or comments, are you using Direct Drive or Bowden setup? I’m struggling with PETG first layer on DD.
I'm on a bowden setup, I'd suggest using a wee bit of glue stick, I always use it because I'd rather pop it in the freezer than have wonder whether there will be any bonding issues with the build plate. Can you describe your problem?
Like the tip about forcing travels to occur at unseen sides. Thanks. And is that bed-mounted camera holder downloadable somewhere? What cam? The time lapses are great.
For sure, it's something I use when I'm in a bind and I need to print a few larger parts but don't have the time to do them separately.
The camera mount is in a video I made, the link should be there as well to the thingiverse file. th-cam.com/video/A5Ac-sB5jIY/w-d-xo.html. I like this mount, it gives a really good angle for finding problems. Just make sure you have lots of light.
The specs of my hardware should be in the video and description as well. Not very expensive and there are lots of benefits to viewing your prints from anywhere using Spaghetti detective with Octoprint.
@@NeedItMakeIt I think he should say thank you for this detailed answer :)
@@kezman82a I have a new camera video coming out soon, keep an eye out for it, this one is pretty unique and a much better option for people wanting to keep an eye on their prints... in detail
Great video, thanks for posting. Question, how are you getting it to email you once the print is finished?
He uses octoprint software on a raspberry pi 👍
Have you tried just using outer wall wipe distance instead of going through the trouble of printing one at a time and dealing with those limitations?
what length of yellow spring do you use?
I'm having difficulty having the outer wall adhering to the inner walls and infill. I feel like I've attempted everything, all to no avail! Most prevalent with large flat sides of the model
This is under extrusion, you'll want to first lookup a video about calibration of your e-steps. Basically measure 110mm away from your extruder and mark. Preheat your nozzle to normal temp and extrude 100mm manually on your printer. You should measure 10mm left to your mark. Adjust the amount of e-steps to bring it to the correct dimension. Mine was under extruding when I assembled the printer and this fixed the problem.
@@NeedItMakeIt seems like it was under extruding by 38% that seems wildly high, still running some tests but thanks for this suggestion. I had forgotten to do this again after replacing the Bowden tube and extruder gear some months ago!
Man, what microphone are you using? It sounds amazing compared to most!
I believe this was the zoom H1N mic, i still use it when i script, some is off script and it is easier to use the phone mic or BT lapel mic in those cases. I also edit out the bad sounding stuff and do a little noise reduction in DaVinci resolve