The G channel you mentioned will actually hold 1 bit more of the information after the texture compression (Block Compression). R - 5bit G - 6bit B - 5bit
@@maxwellbrengle7168 the human eye has double the receptors for the green color than it does for the others, that might be why (as adding an extra bit doubles the possible values)
Bro the video is great but I have seen a video for you from over a year and you said something that really changed my logic in game programming, you ware saying don’t make code make a system. And this really took me to the next level
This is an awesome tutorial on game asset workflow. Great stuff. One small comment on the PNG texture export - it's probably best to do a 16 bit export (you'll get the highest precision that way) and then let Unreal Engine handle how that data might be compressed.
I'm trying to export the third Person mannequin from unreal but it seems to be coming out...extremely small... Any ideas as to why this may be happening?
It's possible the scale conversion is messed up, if I were to guess, scaling the mannequin by 100x should bring it to the normal scale- it could also be how your scene is setup measurement wise.
Merci beaucoup pour cette vidéo, je commence à me former en création 3d pour Unreal en autodidacte, donc ce genre de cour m'aide énormément, sympa de l'avoir passé en accès free
How do you avoid problems by overlapping UV's to same UV space . I mean different parts that use same color map part can have different lighting conditions (look differently) due to different AO map ?
Great workflow man! I wonder how I could handle a situation where an object exists only in the high poly mesh and not the low poly, e.g. fabric stitches? I created the stitches using geometry nodes and would ideally bake these into the low poly normals
Should be doable! You would just have to make sure that if you're baking using grouped meshes that you have the stitches apart of those groups or (if I remember correctly, I haven't baked in a while so this might not work) having a _01, _02, etc. after _low/_high should work. Alternatively, you would just bake it as a mesh and put it apart of the object that it's on top of
maan thanks for this video!! i was looking for a tutorial like this for a while.. and it would be really nice to have the entire course here on yt for free.. can't thank you enough
have you worked much with ue5 nanite i have been doing experiments and find i can get similar performance just texturing my highpoly props and not going through the hassel of lowpoly to highpoly workflow , is the downside just when i bake my game down it will be a larger size as it will contain more high poly models, good channel too btw
I have tried to use nanite but there is problem I faced because of my vram my. Nanite need more than 4gb to work properly in the engine but I don’t know about the package
First 30 seconds and I saw substance painter, I mean, I would love to have it, but I need to pay for something that I will barely use since Im learning :(


The best workflow so far in the internet !!!
The G channel you mentioned will actually hold 1 bit more of the information after the texture compression (Block Compression).
R - 5bit
G - 6bit
B - 5bit
I was wondering, is that because green has a higher luminance value than other colors? So it has a wider range of data it can hold?
@@maxwellbrengle7168that might be the reason why G was the chosen between R and G, not sure.
@@maxwellbrengle7168 the human eye has double the receptors for the green color than it does for the others, that might be why (as adding an extra bit doubles the possible values)
@@delamovies Ah, that's interesting!
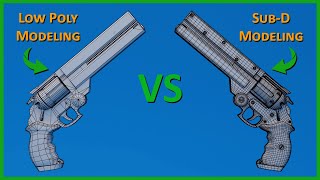
Great tip to start from low poly.
So you don't need to think what to delete, and basiclly doing double work in some places! Nice
Bro the video is great but I have seen a video for you from over a year and you said something that really changed my logic in game programming, you ware saying don’t make code make a system. And this really took me to the next level
What does that mean?
@@faryanblender8946you shouldn’t make a code that works only on one scenario make a system that would work on multiple of ways
amazing way to think about it
This is an awesome tutorial on game asset workflow. Great stuff. One small comment on the PNG texture export - it's probably best to do a 16 bit export (you'll get the highest precision that way) and then let Unreal Engine handle how that data might be compressed.
Thank you so much for making this free!! That's so awesome
Hope it helps!
I'm trying to export the third Person mannequin from unreal but it seems to be coming out...extremely small... Any ideas as to why this may be happening?
It's possible the scale conversion is messed up, if I were to guess, scaling the mannequin by 100x should bring it to the normal scale- it could also be how your scene is setup measurement wise.
Thanks for the help. Figured out that I had my meshes in blender too large. You got my sub! @@FirstCrimson
When in doubt, measure the actual mannequin in blender, it should be 1.75m tall.
Shotpacker isn't for sale anymore )= but that stack similar geometry seemed like a steal of a feature
ZenUV and UVPackmaster also have stacking features. Both of these addons (paid) are essential kit for Blender
Merci beaucoup pour cette vidéo, je commence à me former en création 3d pour Unreal en autodidacte, donc ce genre de cour m'aide énormément, sympa de l'avoir passé en accès free
How do you avoid problems by overlapping UV's to same UV space . I mean different parts that use same color map part can have different lighting conditions (look differently) due to different AO map ?
Great workflow man! I wonder how I could handle a situation where an object exists only in the high poly mesh and not the low poly, e.g. fabric stitches? I created the stitches using geometry nodes and would ideally bake these into the low poly normals
Should be doable! You would just have to make sure that if you're baking using grouped meshes that you have the stitches apart of those groups or (if I remember correctly, I haven't baked in a while so this might not work) having a _01, _02, etc. after _low/_high should work.
Alternatively, you would just bake it as a mesh and put it apart of the object that it's on top of
Hi very nice tutorial is it possible to get access to this model for texturing practice thanksalot.
what will happen in baking result if we dont make sharp edge in low poly and make shade smooth
great video .. where is the mannequin folder located exactly or is it a downloadable file ?
You should be able to easily export it from Unreal itself, since that's Unreal property I can't really give out a download for it sadly
@@FirstCrimson in my case im a blender 4.0 user thanks anyways and that reply was fast omg ❤️
maan thanks for this video!! i was looking for a tutorial like this for a while.. and it would be really nice to have the entire course here on yt for free.. can't thank you enough
Where is link ?
Do I have to join the entire objects first before importing to substance?
No, if you’re baking by name, joining all the objects would break that altogether, plus it’s unnecessary to join the entire thing
Is Substance Painter not the same as the Adobe Substance Painter?
no its the same
have you worked much with ue5 nanite i have been doing experiments and find i can get similar performance just texturing my highpoly props and not going through the hassel of lowpoly to highpoly workflow , is the downside just when i bake my game down it will be a larger size as it will contain more high poly models, good channel too btw
I have tried to use nanite but there is problem I faced because of my vram my. Nanite need more than 4gb to work properly in the engine but I don’t know about the package
The log keeps telling me "highpoly scene was required but could not be loaded"... what the hell
You mention links to articles throughout the video, where can I find these?
They were originally included within the original course material, I'll look into having them publicly uploaded to a Google Drive or something
Thanks! Subscribed.
Where can I get the course ?
This is the course
Thank you :)
First 30 seconds and I saw substance painter, I mean, I would love to have it, but I need to pay for something that I will barely use since Im learning :(
Damn, it's too fast for me to follow, got to stop and google every 5 seconds. xD
❤..